Security Management System
Introduction
The Security Management module helps to establish a place to protect the students, and university staff from all possible dangers, such as chemical, physical, or physiological, under all circumstances.
It is necessary to recognize that the responsibility for safety and security does not solely rest on the shoulders of safety and security supervisors, but is rather a joint responsibility of all university staff.
All university staff is to be informed of and trained in all aspects of prevention from incidents as it relates to their positions and work environment at the university.
To provide a healthy and secure work environment within the university.
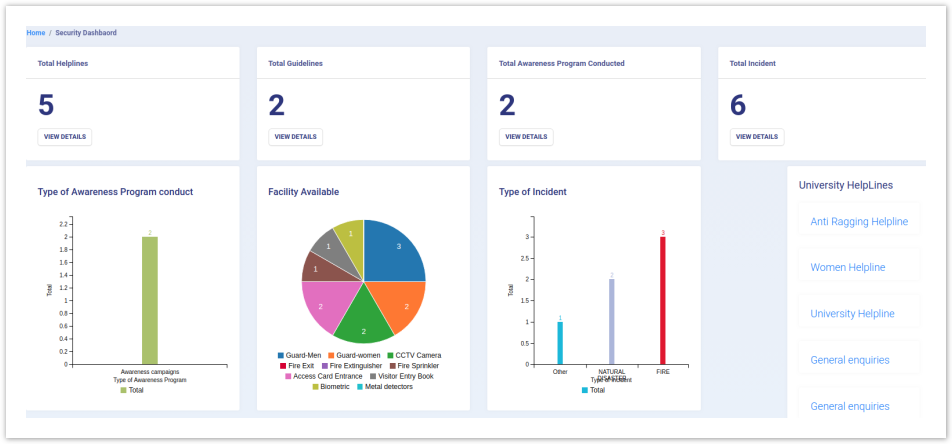
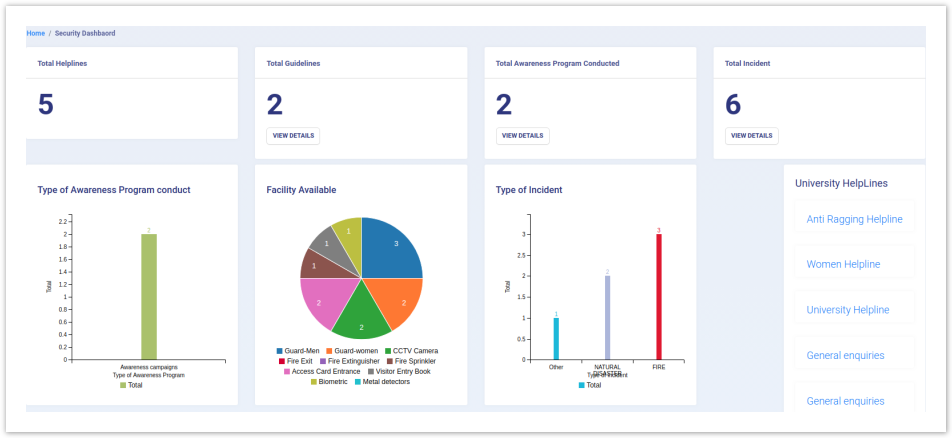
Dashboard
Admin Dashboard
Employee Dashboard
Settings
This section contains the configuration detail related to security. Only the admin of security can view and access it.
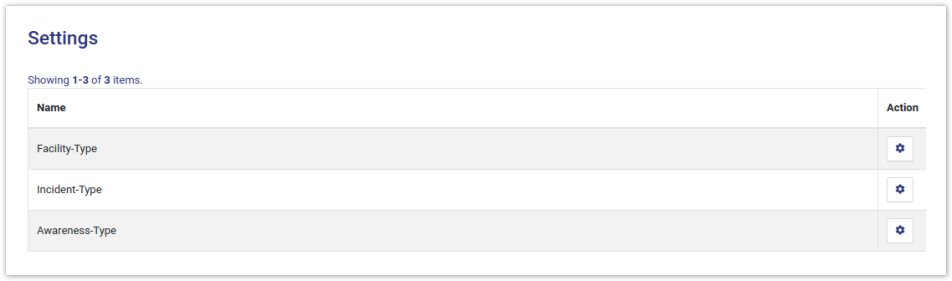
Facility Type
In this field, we can define and configure the type of facility which will be available in each OU(University) for security purposes.
View: Admin can view the details by clicking on “view” icon available in front of every entry.
Add facility: Admin can add a new type of facility by clicking on the "Add Facility Type" button present on the top right side of the portal and fill in the required details:
Facility Name
Description (About the Facility)
Status(Active/Inactive)
Update: Admin can edit/update the details by clicking on the “edit” icon available.
Submit: Admin can submit the added/updated details by clicking on the “edit” icon available.
Note: Once the Submit button is clicked changes cannot be done.
Incident Type
In this field, we can define and configure the type of incident that can be reported by the employee/student/visitor of the university.
View: Admin can view the details by clicking on “view” icon available in front of every entry.
Add new Incident type: Admin can add a new type of incident by clicking on the "Add Incident Type" button present on the top right side of the portal and fill in the required details:
a) Incident Name
b) Description (About the Incident)
c) Status(Active/Inactive)
Update: Admin can edit/update the details by clicking on the “update” icon available.
Submit: Admin can submit the added/updated details by clicking on the “submit” icon available.
Note: Once the Submit button is clicked changes cannot be done.
Awareness Type
In this field, we can define and configure the type of awareness program that can be conducted in the universities.
View: Admin can view the details by clicking on “view” icon available in front of every entry.
Add awareness type: Admin can add a new type of awareness program by clicking on the"Add Awareness Type" button present on the top right side of the portal and fill in the required details:-
a) Awareness Name
b) Description (About the Awareness Program)
c) Status(Active/Inactive)
Update: Admin can edit/update the details by clicking on the “edit” icon available.
Submit: Admin can submit the added/updated details by clicking on the “submit” icon available.
Note: Once the Submit button is clicked changes cannot be done.
University Helplines
In this section, Admin can add and manage the university helpline numbers which will be visible to all the employee/student dashboard for emergency purposes or any help.
Add Helpline
Admin can add a new helpline Number by clicking on the " Add Helpline" button present on the top right side of the portal and fill in the required details:
Name
Contact Authority
Helpline Number
Contact Number
Email
Address
Description
Status(Active/Inactive)
View
Admin can view the details by clicking on the icon available in front of every entry.
Edit
Admin can update/edit the details by clicking on “edit” icon.
Submit
Admin can finally submit the helpline details after adding/editing by clicking on the Submit button.
Note: Once the Submit button is clicked changes cannot be done.
Safety and Security Guidelines
In this section, we note down the procedure guidelines on how to maintain security/safety at one's end, how to react under any emergency, what all precautions could be taken, and other necessary information.
Add Guidelines
Admin can add guidelines by clicking on the "Add Guidelines" button present on the top right side of the portal and fill in the required details:-
Title of guidelines
Guidelines For(choose from the dropdown)
Description
Helpline(choose from the dropdown)
Status(Active/Inactive)
View
Admin can view the details by clicking on “view” icon available in front of every entry.
Edit
Admin can update/edit the details by clicking on “edit” icon.
Admin/employee/students can finally take the print of the guidelines by clicking on the “print” icon.
Security and Safety Facility In Organisational Unit

Add Facility in Organisation
Admin can configure security and safety facility organizational wise by clicking on the " Add Facility in Organisation" button present on the top right side of the portal and fill in the required details:
OU Unit(Select from the drop-down)
Facility
Incharge Name
Incharge Contact Number
Incharge Email
Remarks
Status(Inactive/Active)
View
Admin can view the details by clicking on “view” icon available in front of every entry.
Edit
Admin can update/edit the details by clicking on “edit” icon.
Awareness Program
In this section, admin can specify the guidelines of safety and security to university staff/students/visitors. It can be Anything like mock drills, campaigns, workshops, etc.
For Example guidelines for safety/security from fire is to know:
How to respond to fire drills,
Knowing the procedures of how to raise a fire alarm,
Knowing how to use the fire fighting equipment available in the work environment,
Knowing all emergency exit and entry points and the locations of emergency alarms, etc.
Add Awareness Program
Admin can add awareness program by clicking on the " Add Awareness Program" button present on the top right side of the portal and fill in the required details:-
Title
OU Unit(Select from the drop-down)
Awareness program Type(Select from the drop-down)
Start Date(Select From Calendar)
End Date(Select From Calendar)
In-charged Name
Organized By(Organiser Name)
Description
Number of Student Participated
Number of Staff Participated
Number of Teacher Participated
Feedback/Outcomes
Status(Inactive/Active)
View
Admin can view the details by clicking on “edit” icon available in front of every entry and can add pictures for the notification/information by clicking the "Add Pictures" button present in the bottom right side of the portal.
Edit
Admin can update/edit the details by clicking on “edit” icon.
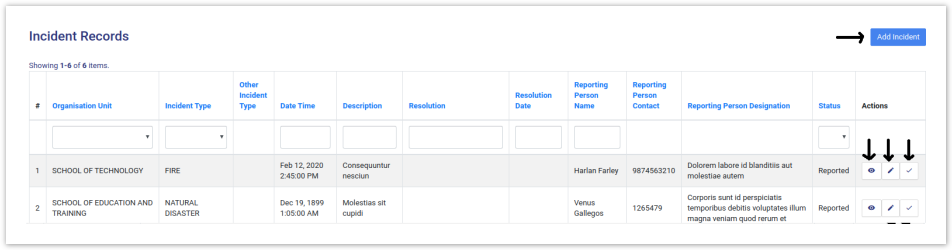
Incident Report
In this section, all the incidents reported by any staff/student are visible to the admin(as Security Admin login) but to the employee(as employee login) only those incidents are visible which is reported by himself/herself. Here:-
Incident reports are reported/filed by the victim(employee).
The immediate notification goes to the supervisor in charge.
The status of whether the incident is resolved or pending is visible to the reporting person.
Admin:
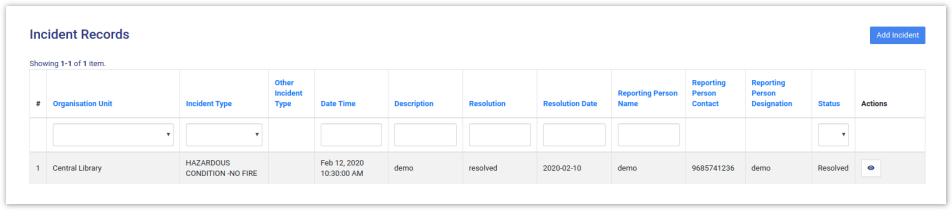
Employee:
Add Incident
An employee can add Incident occurred with him/her by clicking on the "Add Incident" button present on the top right side of the portal and fill in the required details:-
OU Unit(Select from the drop-down)
Incident Type(Select from the drop-down)
Date & Time(When the incident occurred)
Description(About the incident)
Reporting Person Name(Victim Name)
Reporting Person Contact(Victim Contact)
Reporting Person Designation(Victim Designation)
View
Employees can view the details by clicking on “view” icon available in front of every entry.
Edit
Employees can update/edit the details by clicking on “edit” icon.
Add Resolution
Once the incident is reported by the victim, it goes to the in-charge of the OU where the incident happened. After that actions are taken on that incident by clicking on “tick” icon and fill in the required details:
Resolution(What action was taken)
Resolution date(When the action was taken)
Status(reported-by Default/Pending/Resolved)
This status will be reflected in the victim dashboard.
Annexure
Roles
| Role Name | Description |
|---|---|
| security_admin | Can configure the setting like adding university helpline and safety guidelines |
| security_admin_view | Same role as Security_Admin but with viewing rights only |
| employee | Can report an incident, view safety guidelines |
| and take print out. |
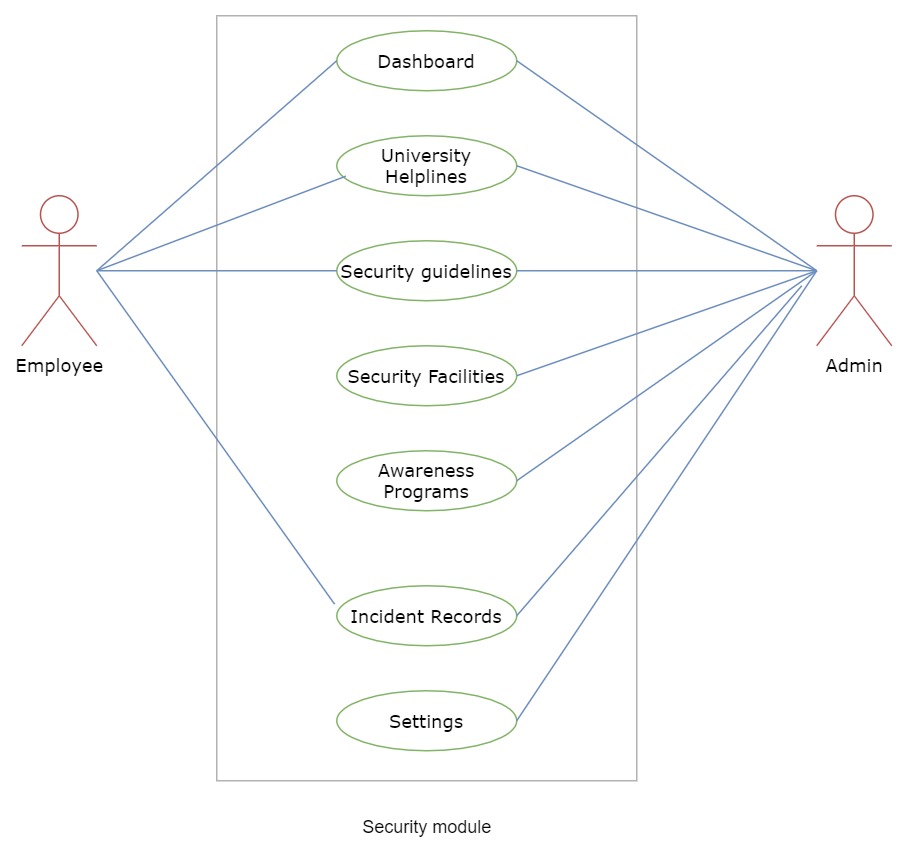
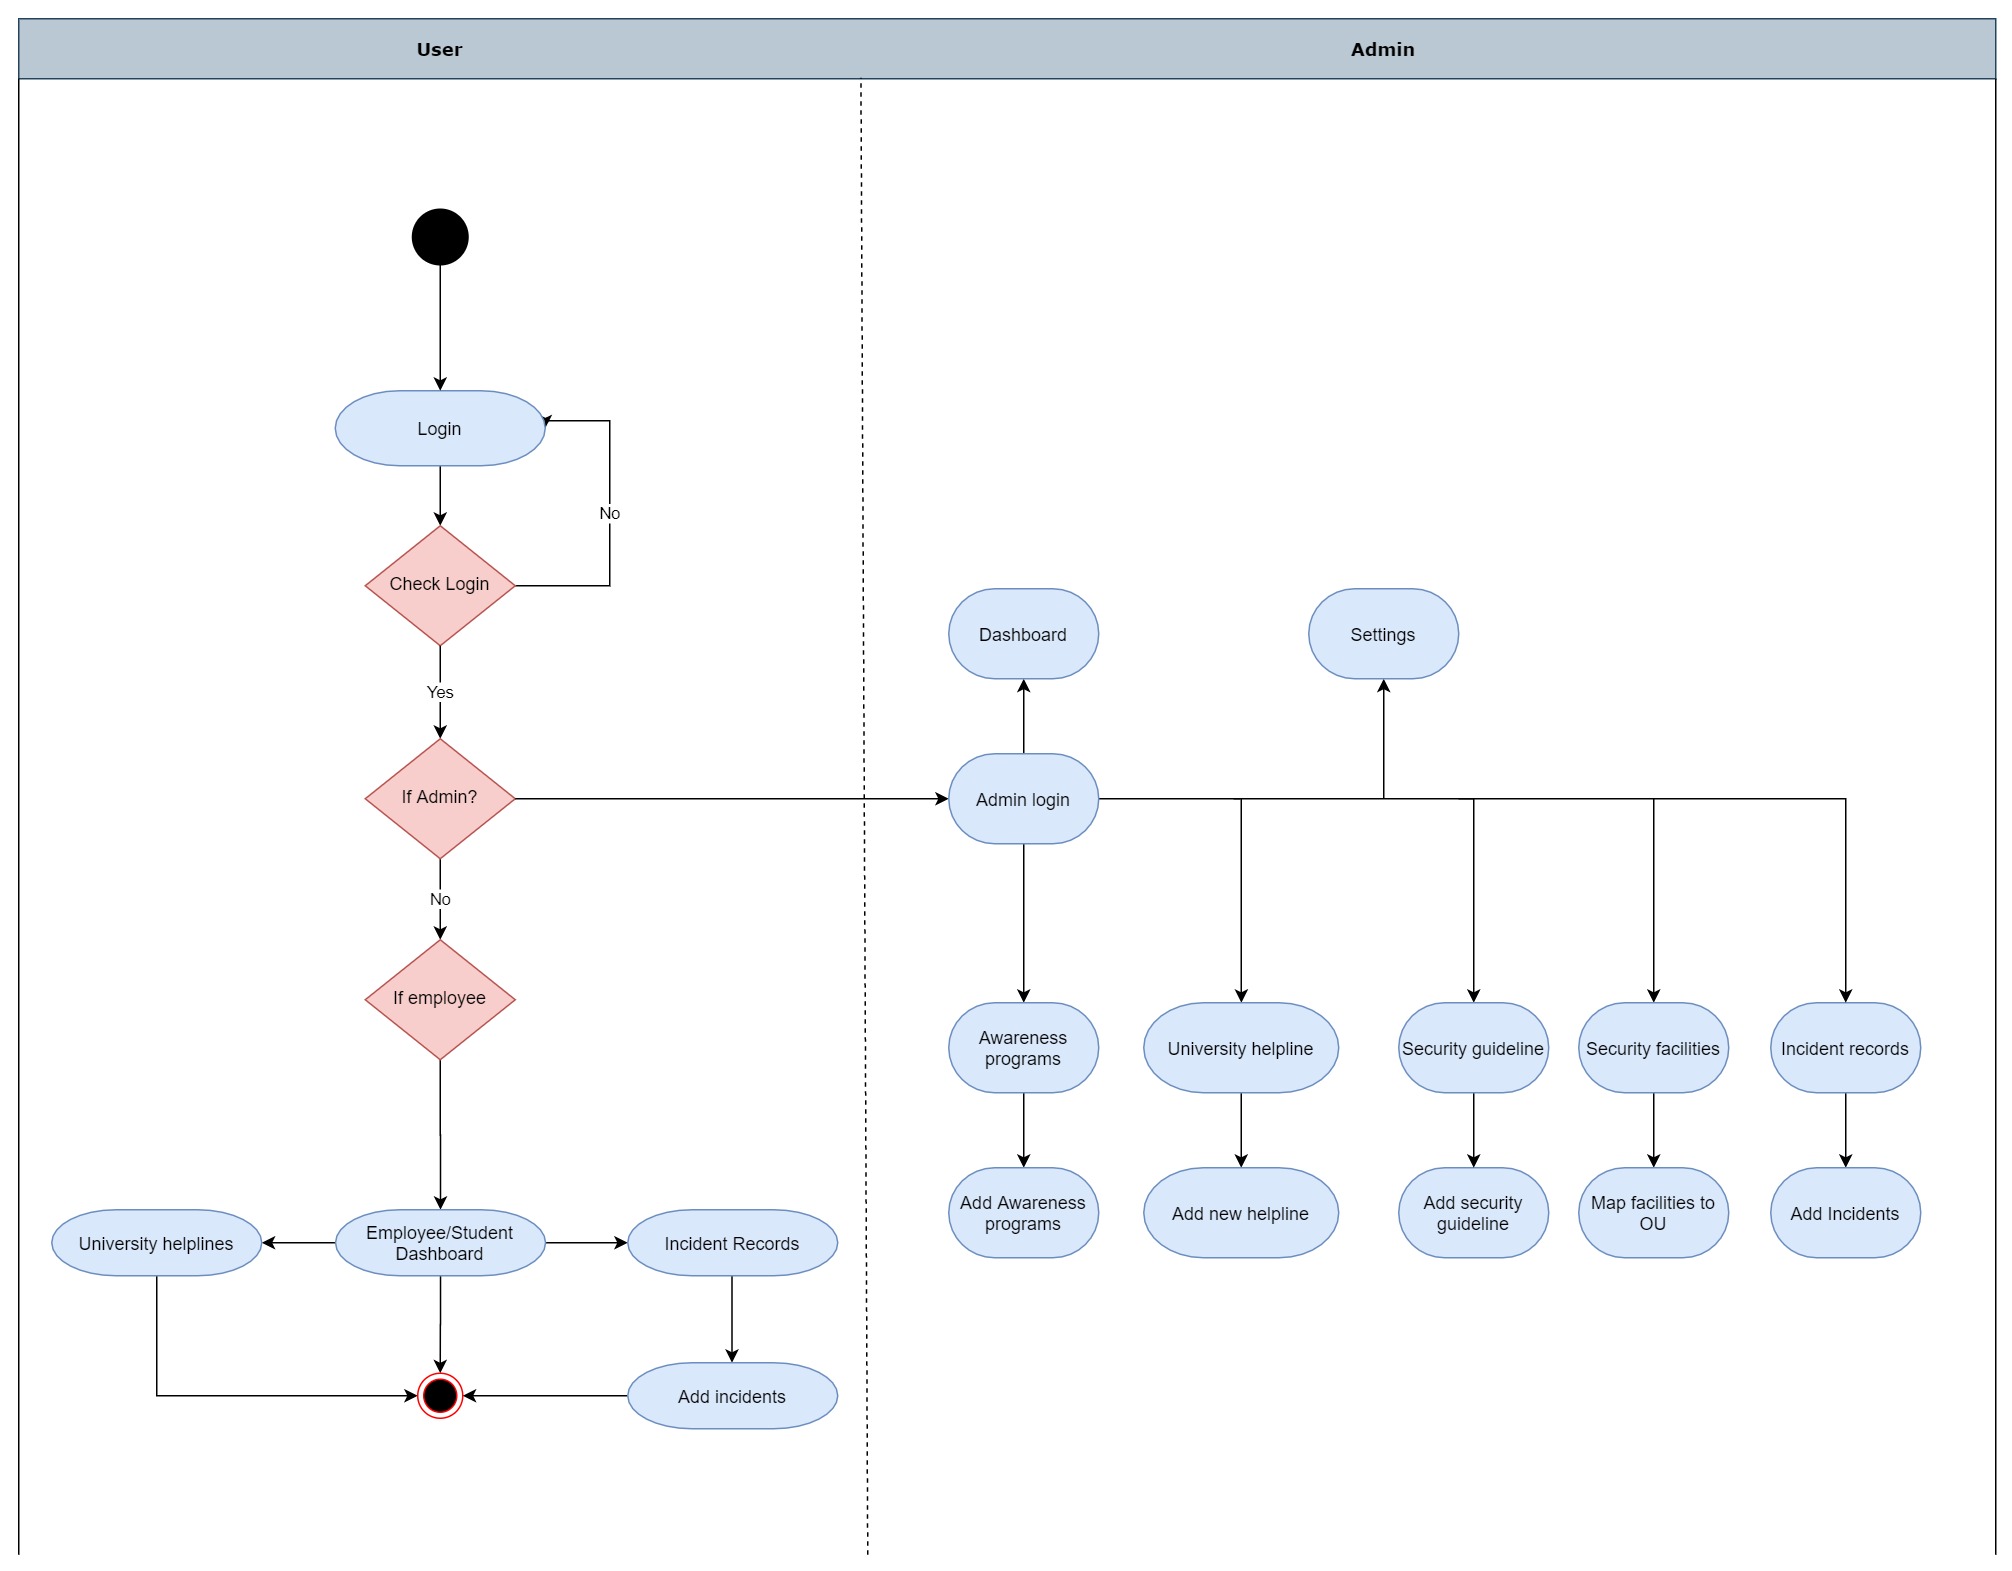
Workflow Diagrams
Activity Diagram
Use Case Diagram