Residence Allocation (E-housing)
Introduction
The Ehousing module is an easy to use scheme centric online House Allocation system, enabling employees of the Institute/University to apply for houses that the Institute/University has.
In order to let employees apply for the house, they have to wait for a housing scheme to go live.
Once the scheme is live and visible, the employees can easily apply by filling up a basic form and selecting their preference, of which they can keep a copy for future reference.
Upon allotment of house to the employee, he/she will also receive an email asking to confirm the allotment on the portal.
Dashboard
As an Admin

As an Employee

The Admin has access to Total Scheme, Residential Building, Employee Accommodation and Total application for Ehousing on this dashboard. Employees can view Total Scheme, House Applied for and House Allotted.
Prepare building for E-Housing
The admin can create the scheme for the residential buildings of the University through the following steps.
Residential Building:
It makes sure the building is a University residential building and is vacant, after which the building will be visible for the Scheme.
1: Go to the Estate Module. Add a new building. Mark the field “Is it the Residential Building” as “YES” and fill all the required details.
To understand how to add building and related details, kindly refer to the Estate Management User manual.
2: Add the floor details accordingly and then the house details.
3: To Add the House details, the admin needs to configure “type of houses” in the “Setting” section.
Add House Type:
Estate Admin can add house type by clicking on the “Add House Type” button present on the top right side of the portal and fill in the required details:-
Name
Description
Pay Level (Select from the Drop-down)
Status (Active/Inactive)
Add House:
Estate Admin can add house details by clicking on the “Add House” button present on the top right side of the portal and fill in the required details:-
House Type (Select from the Drop-Down)
House Number
Floor (Select from the Drop-Down)
Remarks
Description
Status (Occupied/Vacant)
Visible (Yes/No)
Note: If the admin marks the status of the house as occupied, then it will not be visible for the E-Housing scheme.
Create E-Housing Scheme
Add E-Housing Scheme:
E-Housing_admin can add the housing scheme by clicking on the “Add E-Housing Scheme” button present on the top right side of the portal and fill in the required details:-
Scheme Name
Scheme Short Code
Start Date (Select from the Calendar)
End Date (Select from the Calendar)
Type of Houses (Select from the Drop-Down)
List of Houses (Select from the Drop-Down)
Number of House Preferences
View:
E-Housing_admin can view the details by clicking on view icon available in front of every entry. He/she can also see the application received for upgradation, relocation, or fresh allocation from this section.
Update:
E-Housing_admin can update/edit the details by clicking on update icon.
Publish:
E-Housing_admin can finally publish the scheme details after adding/editing by clicking on the Publish button. A prompt will appear to set the status as “published” which will give a prompt again to be sure about it.
Apply for Scheme
Apply for Housing Scheme:
Employees whose payroll has been configured can apply for the scheme published by the admin by clicking on the ‘apply’ button.
Registration:
Employees can fill the registration form by entering the required details:-
Application type (Select from the drop-down)
Schemes (to apply for-select from the drop-down)
Pay Level (Will be fetched automatically)
Pay in Pay Matrix
Preference for house
Drawing Pay Matrix Date (Select from the Calendar)
University Accommodation (Yes/No)
Spouse University Accommodation (Yes/No)
Spouse University Allottee Name
Spouse University House Type
Spouse University Locality
Spouse University Block
Spouse University House No
Spouse Government Accommodation (Yes/No)
Spouse Government Name
Spouse Government Allottee Name
Spouse Government Allotment Address
Spouse Government Allotment Date
Spouse Own Property (Yes/No)
Years of Service
Mobile
Alternative Mobile
Email
Medical Ground
Photo
Signature
Address Proof
Remarks
Declaration
After filling the registration form, click on the submit button prompting to be sure to submit the details.
Note: Once the form is submitted, no changes can be done.
- After clicking on the OK button, the application gets submitted and then the employee can take a print of the form by clicking on the “Print PDF” button.
Print Pdf:
Once the application is submitted, the applicant can take a print out of the form submitted by clicking on the Print PDF button.
Approve the application
View application Received:
Admin can view the application submitted for approval by going to the Registration section and clicking on the ‘View’ icon.
Filter Application:
In a scenario where the admin wants to see a few selected applications, it can be done by filling in the required filter as per the choice.
a) Pay Level
b) Pay in Pay Matrix
c) Schemes
d) Year of Service
Click on the Search button present at the bottom left of the filters displayed.
Admin can reset its filters anytime by clicking on the Reset button.
After filtering, the admin can view the details by clicking on the ‘view’ icon.
Allotment
Admin can allot the house to the employee by clicking on the allotment button.
A Prompt will appear asking for the following details to be entered:-
Employee Name (Automatically Fetched)
Scheme (Automatically Fetched)
House Allotted (Select from the Drop-Down)
Allotted On (Selected from the Calendar)
Allotted Till (Selected from the Calendar)
Allotment Letter (Upload)
Status (Pending/Processed)
As soon as the save button is clicked, a message appears saying that the house is successfully allotted.
Print PDF:
Once the application is submitted, the admin can also take a print out of the form submitted/alloted by clicking on the “Print PDF” button.
House Allotted
When the Admin allocates the house to the user(employee), it has to be confirmed by the applicant if he /she wants to go ahead with the deal or not.
The employee hads to follow the following procedure to confirm the allotment:-
1: The employee has to go to the dashboard.
2: Click on the view button under the House Allotted section.
3: After viewing details, click on Confirm Allotment button prompting you to select the confirmation status.
4: Select the status as “Confirmed”(or Rejected in case not required) and click on the save button again prompting you to be sure.
Housing Employee Records:
When the Admin allotes the house to the user(employee), the status of the allotment(whether confirmation from the user is in process or confirmed) is recorded here.
Annexure
Roles in Residence Allocation
| Role Name | Description |
|---|---|
| E-Housing_Admin | With this permission, users can create Scheme, view the application, etc. Employee user with this permission can login and apply for the scheme. |
Workflow Diagrams
Activity Diagram

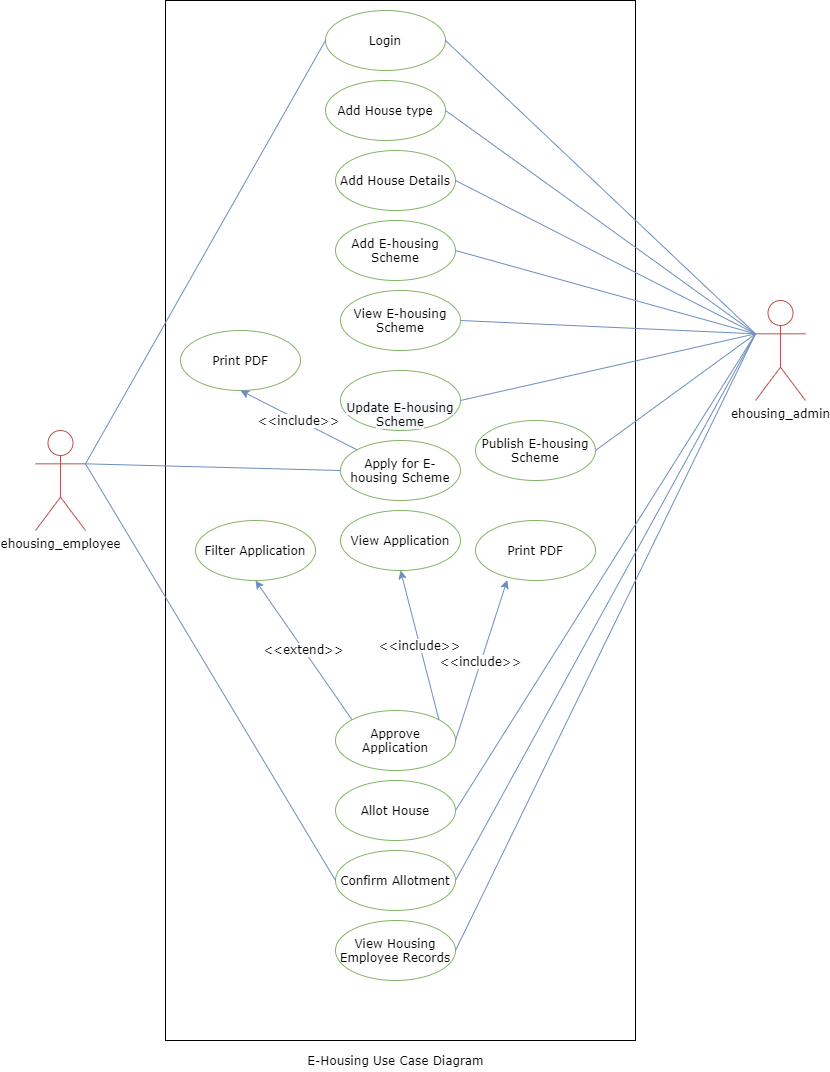
User Case Diagram