Inventory Management System
Introduction
The Inventory Management System module is designed to manage the various consumable and non-consumable inventories issued to multiple university employees.
The module has the following functions:
Dashboard
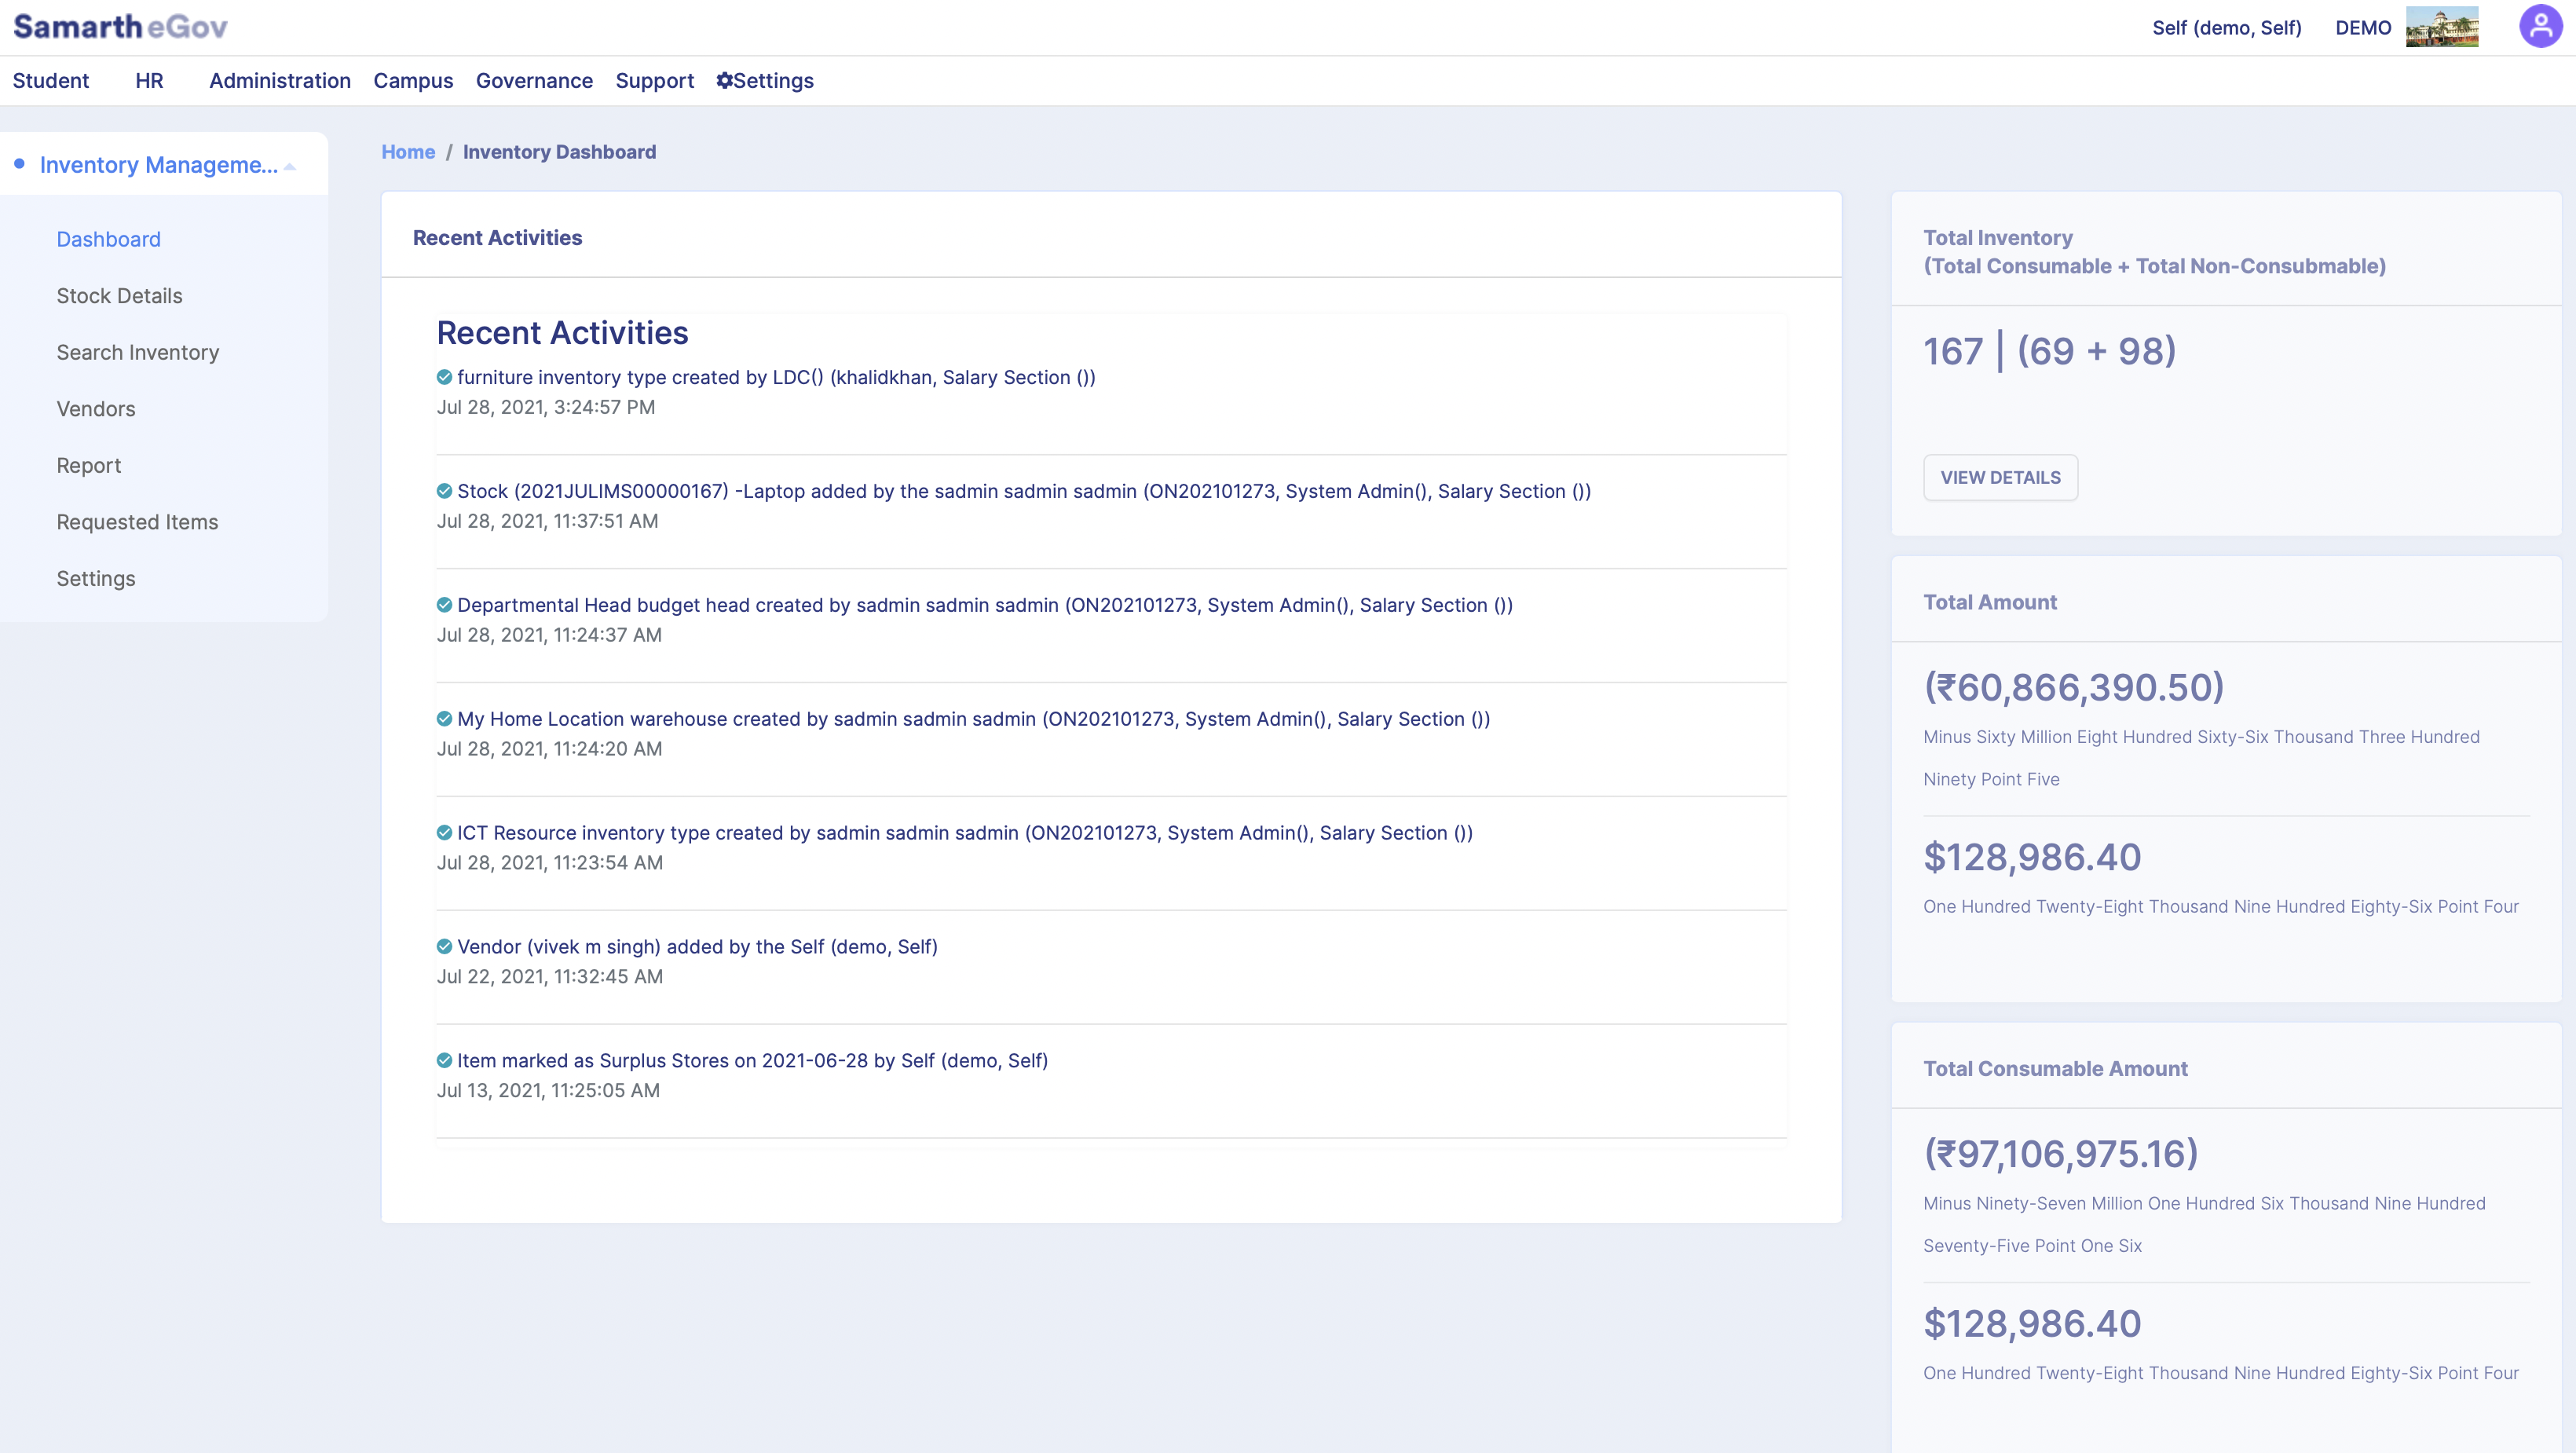
The Dashboard of Inventory Management System shows the details of Inventory that are being added to the system; the following information is shown in the module dashboard:
Recent Activity (Logs of Inventory)
Number of Total Inventory
Total Amount of Inventory
Total Amount for both Consumable and Non-Consumable Inventory.
Graphical representation of Top Ten Vendors, Use Status, Purchase Status, and Disposal Status.
Settings
The Inventory Management System (IMS) module can be customized using the settings of the module. Users just need to click on the Gear button to configure the selected setting. Following are the settings of the Inventory Management System:
Storing/Warehouse Details
Tax Details
Inventory Categories
Budget Heads
Disposal Categories
Note: Before using the module, first, its settings need to be configured as per the workflow of the University.
Storing/Warehouse Details
We can add the details of the location where the inventory is stored, i.e., storing/ warehouse details. Click on the gear button in front of Storing/Warehouse Details.
Click on the Add warehouse/Storing Location Details button.
Fill in the required details, i.e., Name, Address, and status of the warehouse, and click on the Save button.
Tax Details
In this section, you can add various taxes applicable to an inventory. Click on the gear button in front of Tax Details. Then click on the Add Tax Detail button to add a new tax to the system.
Fill in the required details in the form for tax, i.e., Name of the tax, Tax Percentage (the percentage of the inventory tax), and Status (as Active or Inactive).
Note: You can edit the tax details and make a particular tax inactive when it is no longer used.
Inventory Categories
In this section, we can view various categories of consumable and non-consumable inventories. An admin can also view which user has added a particular category.
To add a new Inventory category, we can click on the Add Inventory Category button provided at the top right-hand side. Select the Type of Category, enter the Name of the category, and select Active or Inactive. Then, click on the Save button.
Budget Heads
In this section, we can add various budget heads under which an inventory is being purchased.
Add a new Budget Head; click on the Add Budget Head button provided on the top right-hand side. Enter the Name of the Budget and select the status as Active or Inactive and then, click on the Save button.
Disposal Categories
In this section, we can add various categories of disposable items. By default, the following stores are available:
Surplus Stores: Items that are in working order but are not required for use in a particular section and stock lying in stores for more than five years shall be deemed surplus unless there is any good reason to treat them otherwise.
Obsolete Stores: Items in working order but cannot be put into use effectively-being outdated due to changes in technology/design.
Unserviceable Stores: Items that are not in working order, outlived their everyday life, and are beyond economic repair.
Scrap: Process waste, broken & any other item not covered above but has got resale value.
Empties: Empty containers, crates, bottles, plastic jars, drums, etc.
We can add a new disposal type by clicking on the Add Disposal Type button provided on the top right-hand side.
Enter the Name of the Disposal Category, Disposal description, and select the status as Active or inactive. Then, click on the Save button.
Stock Details
In this section, we can see a list of various stocks of Inventories that are being added to the System. The new Stock Details can also be added using the Add Stock Details button present on the top right of the screen.
We can sort and search stocks added by Reference No., Added by, Inventory Category, Purchased through GEM, GEM bill number, the Name of the Item, and Returnable Item by using the filters provided.
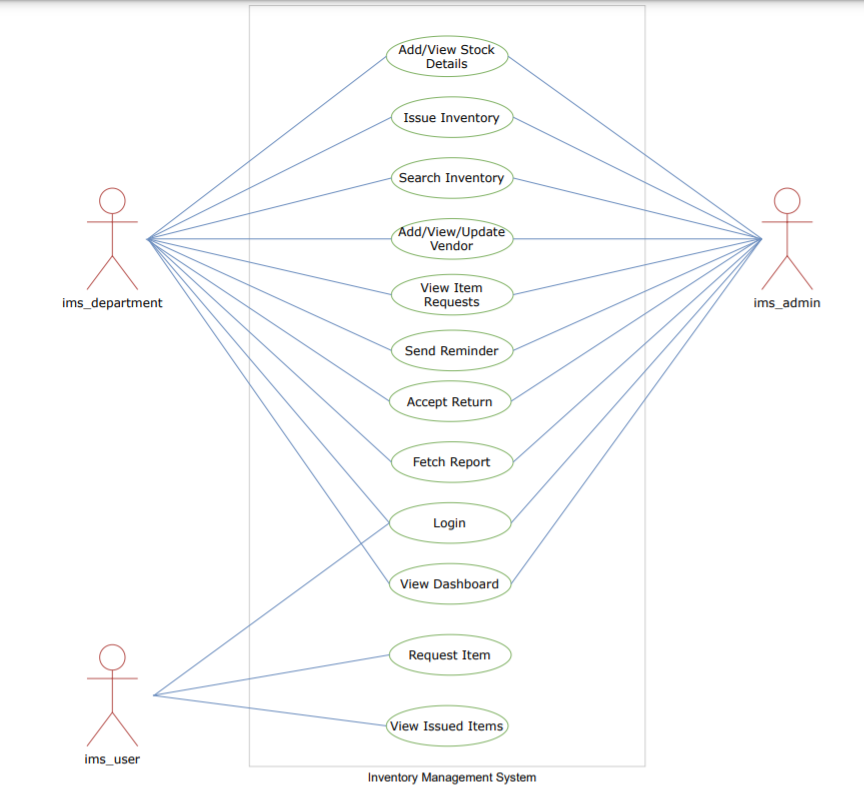
Note: The Inventory Management System works with RBAC (Role-based Access Control), and the user can only view those details which are assigned with their roles: An ims_admin and ims_department can:
Add Stock Details.
View Inventory stocks.
Issue inventory to any user.
An ims_user can only view the inventory issued to him/her. A user with ims_admin_view rights can view all the inventory details but will not edit anything.
Add Stock Details
Click on the Add Stock Details button.
Fill in the Bill Number and select the Date.
Then search for the existing vendor; if the vendor is not added, click on the Add Vendor button. Fill in the Name, Contact Details, GST number, and TIN Number of the vendor. Then click on the Save button. Now, Click on the Add Vendor button in Stock details.
Complete the Stock Details form. Following are the steps to be followed:
1.  Select yes or no if the inventory was purchased through GEM.

2.  Select the Inventory Category, whether consumable or non-consumable.

3.  Select yes or no if Returnable Item. Select the date of purchase and date of disposition.

4.  Select the budget head, Name of the Item, Storing location.

5.  Select the Unit of the Inventory, e.g., liters, pieces, etc. Select Unit price, select the Applicable tax. The tax amount and the Total Amount will be automatically generated.

6.  Select the status as Active or inactive.

7.  Click on Save.
The stock will be added to the stock details list and can be viewed using the View button.
View Inventory stock
You can view the stock by clicking on the View button on the left side.
When we click on the view button, it will open a new page with all the details of the stock we have selected.
We can see the details of the stock on the left-hand side and the details of the person to whom the stock is issued on the right-hand side. We can add or update faulty items in the stock by clicking on the Add/Remove Faulty Item button.
We can enter the total number of faulty quantities and click on save. The total number of faulty quantities cannot be more than the total quantity of the stock.
Click on Update, and then the quantity will be updated. To transfer the Condemnation and Disposal Store stock and give a Disposal date, click on the button Condemnation and Disposal Status given on the top right-hand side.
Select the Condemnation and Disposal Status and the Disposal State.
Click on Update, and then you will get a warning that this action can not be undone. Once the Stock is in the selected Condemnation and Disposal Status, it cannot be issued to anyone.
Issue inventory to a user
To issue an Inventory to an employee, select the stock, click on View and click on the Issue Inventory button.
We can issue an inventory to two types of employees
Employee: Teaching employees.
Administrative: Non- teaching employees.
Other: Guest employees.
If we select an Employee or Administrative employee, we need to choose if the item is returnable or not. Select the number of items issued and the date on which the inventory was issued and click on the Issue button.
If we select “Other” in Issued To Person Type, we must enter the person’s contact details to whom this inventory is being issued.
Search Inventory
In this section, we can search for an inventory by Inventory Issue Details.
To search an inventory by the person to whom the inventory was issued, the following steps are performed. The person will get an SMS to return the item when you click on the ‘send reminder’ button issued from inventory stock.
Step 1 Select the type of employee, i.e., Employee, Administrative or Others.
Step 2 Search for Employees if you select an employee or Administrative. If you select Other, then enter the Issuing Person’s Name, Email of the Issuing Person, or Mobile Number of the Issuing Person.
Step 3 Click on search. It will show the complete inventory list which is issued to the employee.
Vendors
In this section, we can view the list of vendors added.
We can use different filters provided to search for vendors. We can view and edit the respective vendor details by clicking on the view or edit button. To add a vendor, click on the Add Vendor button.
A new window will open; fill in the Name of the vendor contact details, GST number, and TIN Number.
Then click on the Save button.
Generating Reports
In this section, the reports can be generated for a selected duration of time. Once the user selects the required period of reports, click on the View List of Items button, the information of Inventory details will get visible on the screen.
It shows the following details:
Duration of Selected dates
View List of Items button.
Count and Amount of inventory items.
Graphical representation of vendor and inventory status.
Requested Items
In this section, the ims_admin can view the inventory requests which are being placed. The requests can be viewed using the View button, and the inventory slip can also be printed using the Print button for the issued items.
Annexure
Roles
This module has four user roles:
IMS Admin:This Login is for the Administrator of Inventory Management
IMS Department: This login is for the department login to manage the inventory issued to the department.
IMS User: This user can view the borrowed items that the respective person has issued.
IMS View: This user view-only rights of all the inventory details
| Role Name | Description |
|---|---|
| ims_admin | This is the Inventory Management Admin. This role is to be provided to the Admin / Inventory Head, who can view all the inventory details available in the system. |
| ims_department | his role is to be provided to the person from the Organization Unit, who handles all stock of a particular Organization. |
| ims_user | This role will be provided to the user who borrows the Stocks. and the user can view their issuing details. |
| ims_admin_view | This is the inventory admin who has view-only rights of all the inventory details but will not edit anything. |
Workflow Diagrams
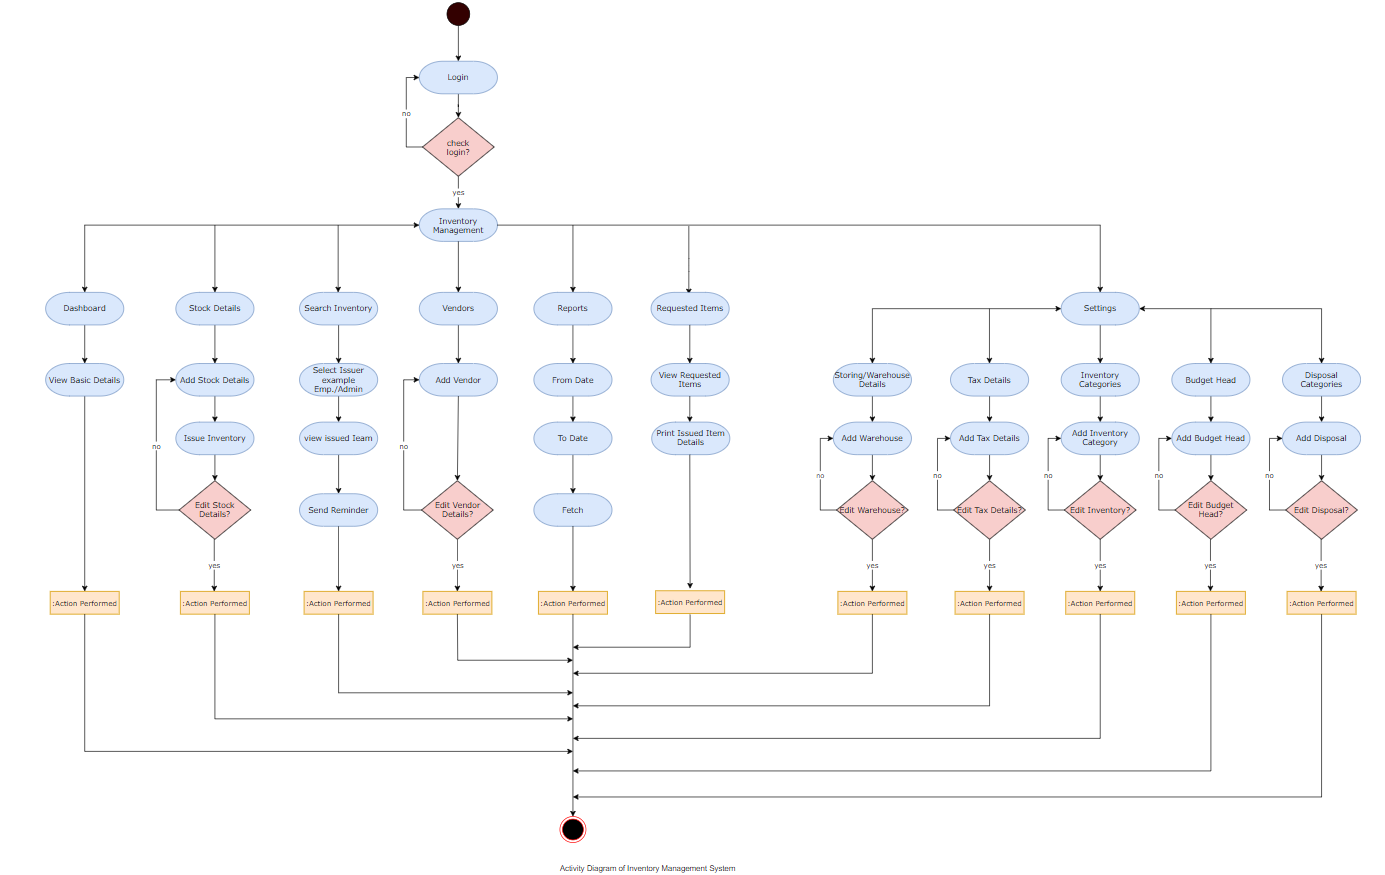
Activity Diagram
Use Case Diagram