Affiliation Management System
About the Module
The Affiliation Management System is a comprehensive digital solution designed to streamline and manage the affiliation process for Higher Education Institutions. This system provides an end-to-end framework that handles every aspect of affiliation — from the initial registration of colleges, through profile verification, application review, automated fee calculation and physical inspection by committees, to the final approval and publication of the outcome.
Key Features of the Affiliation Management System
- End-to-End Affiliation Process Management: Handles everything from initial registration of colleges to final approval of applications for New College Affiliation, Continuation, Extension (Natural Growth), Permanent Affiliation and Annual Fee Collection from affiliated and autonomous colleges.
- Updatable College Profile: A one-time institutional profile (~22 sub-forms covering management, finance, land, buildings, faculty and facilities) that colleges keep current and reuse for every affiliation application.
- Automatic Fee Engine: Instead of one flat fee per affiliation type, the university authors fee rules (per-programme, per-subject, slab-based, strength-based, percentage taxes, late-fee slabs). The engine computes each application’s bill automatically from that application’s own data — configure once, run for years.
- Digital Physical Audit Workflow: A complete committee inspection subsystem — configurable audit form templates, committee assignment (single or bulk), conflict-of-interest declarations, per-section digital scoring by members, consolidated verdicts by the committee admin, guest observers via secure no-login links, a publish gate that controls exactly when the college sees the outcome, and print-ready inspection reports.
- Integrated Payments — Online and Offline: Secure payment-gateway integration for online fees, plus a verified offline path (NEFT/RTGS/DD/Challan/UPI/Cheque) with proof upload and an append-only payment ledger for the admin’s verification trail.
- Action-Led Dashboards: Role-aware dashboards that open with the work that needs attention (applications awaiting review, fees outstanding, audits without committees) — every count links to the exact filtered list it summarises.
- Custom Document Generation: A template builder for official documents (e.g., provisional affiliation certificates) generated per application with automatic data resolution and PDF export.
- Complete Audit Trail and Reports: Every important action is written to history logs, and all large exports run as background download jobs.
Affiliation Application Process Overview
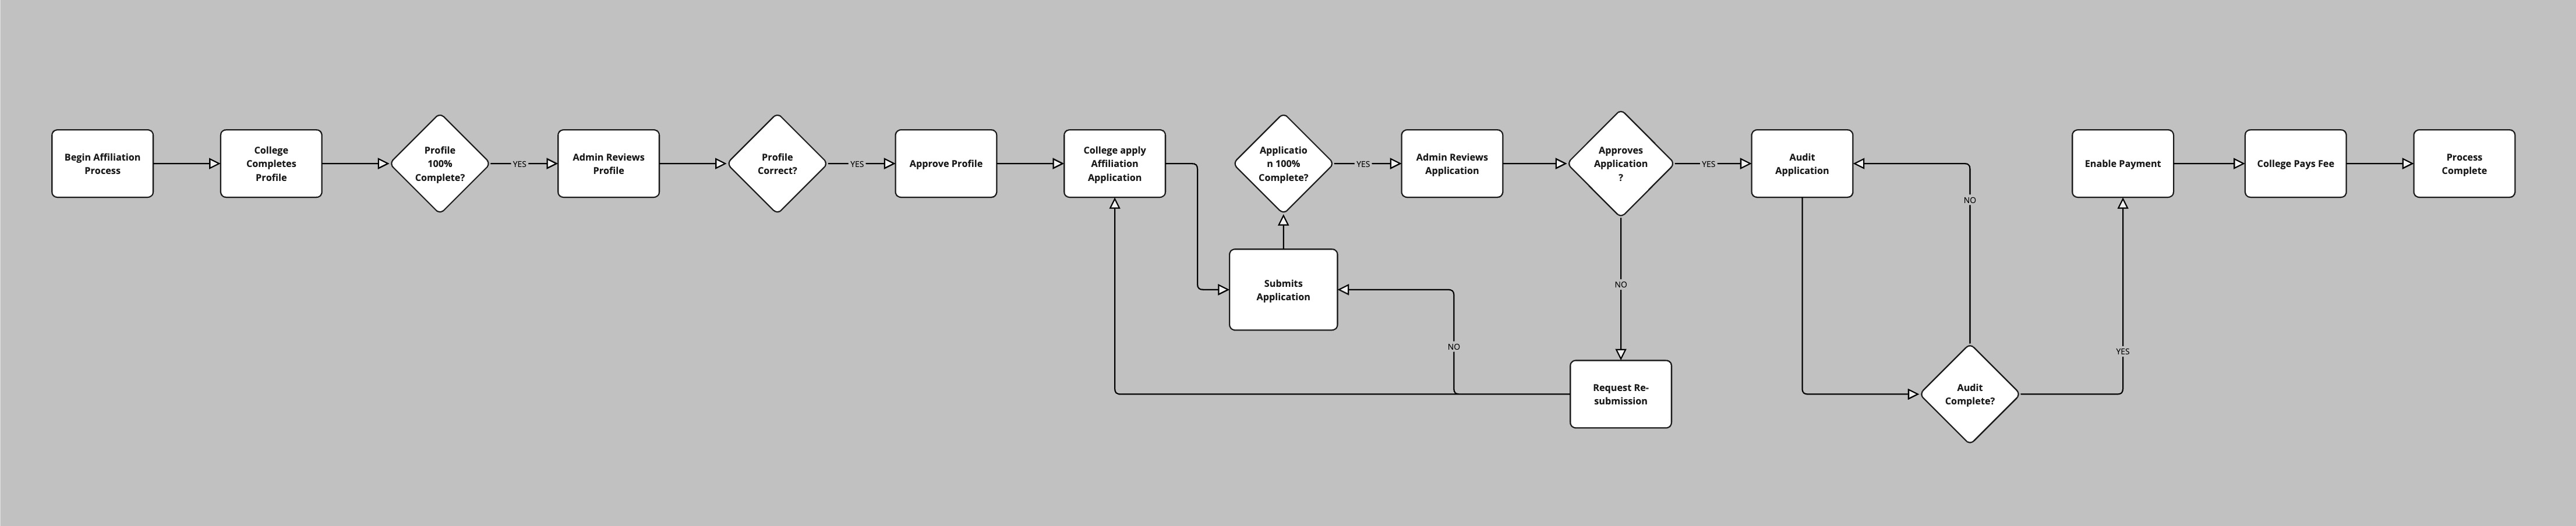
The Affiliation Management System simplifies the complex multi-step process of college affiliation, providing clarity and efficiency at every stage.
- College Registration New colleges register through a public form with OTP e-mail verification; existing affiliated colleges are mapped in bulk by the university from its Organisation Units.
- College Profile Creation Colleges enter detailed information about their institution, management, finances, infrastructure, faculty and facilities, then submit the profile for university approval.
- Affiliation Application Submission Once the profile is approved, colleges apply per session configured by the university, filling application sub-forms (faculty, library, labs, lecture rooms, intake, uploads, declaration) and submitting.
- Administrative Review, Fees & Physical Audit The university reviews the application; the Fee Engine (or manual fee entry, if so configured) produces the bill; the college pays online or offline; an inspection committee may be assigned to physically audit the college and record a digital, section-by-section verdict.
- Outcome & Publication The committee finalises its outcome internally; the university reviews it and publishes the result to the college, which is notified by e-mail. Certificates and reports can then be generated.
Deployment Modes — UNIVERSITY vs HED
The module supports two deployment modes controlled by a single Portal Type setting:
| Behaviour | UNIVERSITY mode | HED mode |
|---|---|---|
| Scope | One university | One shared installation hosting many universities (e.g., a state higher-education portal); every record carries an institution and admins see only their own |
| College Profile menu (college side) | Hidden | Visible — a college can hold a profile per university |
| Apply For Affiliation | Straight to the session list | First asks the college which university it is applying to |
| Configuration toggles | One value per toggle | One value per (toggle, institution) |
| Dues (defaulter) check before applying | Skipped | Enforced — colleges with unpaid previous dues are blocked until settled |
Roles in the Affiliation Process
| S.no. | Role | Description |
|---|---|---|
| 1. | Affiliation Admin (affiliation_admin) | University administrator — full access to settings, masters, configurations, approvals, fees, audits, logs and reports. |
| 2. | OU / Sub-University Admin (affiliation_ou_admin) | Same screens as the Affiliation Admin, automatically scoped to their own institution (HED deployments). |
| 3. | Affiliation User (affiliation_user) | The college (director/head/principal) — completes the college profile, submits applications, pays fees, responds to remarks. |
| 4. | Committee Admin (affiliation_committee_admin) | Inspection committee lead — everything a member does, plus consolidating members' section scores into the official verdict, finalising the audit, re-opening it and reminding pending members. |
| 5. | Committee Member (affiliation_committee_member) | Declares conflict-of-interest status, scores each audit section digitally, saves drafts and submits assessments. |
| 6. | Land Verifier (affiliation_land_verifier) | Sees only the Land Verification Requests assigned to them and files the land report. |
In addition, Guest Observers (external experts) participate in physical audits through a secure e-mail link with OTP — they need no portal account, and their input is advisory only.
Note: Permissions are checked per action using the pattern
affiliation/<controller>/<action>. If a button does not appear for a user, the corresponding permission is missing from the user’s role — add it in the Core / RBAC module.
Benefits for Universities and Colleges
For Universities:
- Operational Efficiency: Automates routine tasks — fee computation, notifications, exports — reducing manual effort and clerical error.
- Centralized Oversight: One dashboard for applications, money and inspections across every affiliated institution, with a complete history log for dispute resolution.
- Customizability: Masters, sessions, fee rules, audit form templates and system toggles tailor the module to each university’s process.
For Colleges:
- Seamless Application Process: Guided profile creation, per-session applications, automatic itemised bills and online payment.
- Real-Time Updates: Colleges track application status, payment history and inspection schedules from their own dashboard.
- Transparent Communication: Every status change is e-mailed; remarks from the university are shown on the application; inspection outcomes arrive with the committee’s official remark once published.
Administrator’s Guide
Prerequisites to Initiate the Affiliation Management System
To use the system, universities are required to configure certain modules in their Samarth suite:
- Configuration of the Base Module adding Organisation Unit types.
- Add Existing Affiliated Colleges in Organisation Units.
- Add Organisation Unit Heads for the respective affiliated colleges.
- Add Programmes in the Programme module, which is part of the Academic package.
- Payment gateway kit of the university’s respective banking institution.
Note: These configurations should be done by various administrators with the admin role of the mentioned modules.
The Affiliation Management Dashboard
The dashboard is action-led: the first thing on screen is the work waiting on the administrator, followed by portfolio figures, the physical-audit pipeline, anomaly detection and analysis charts.
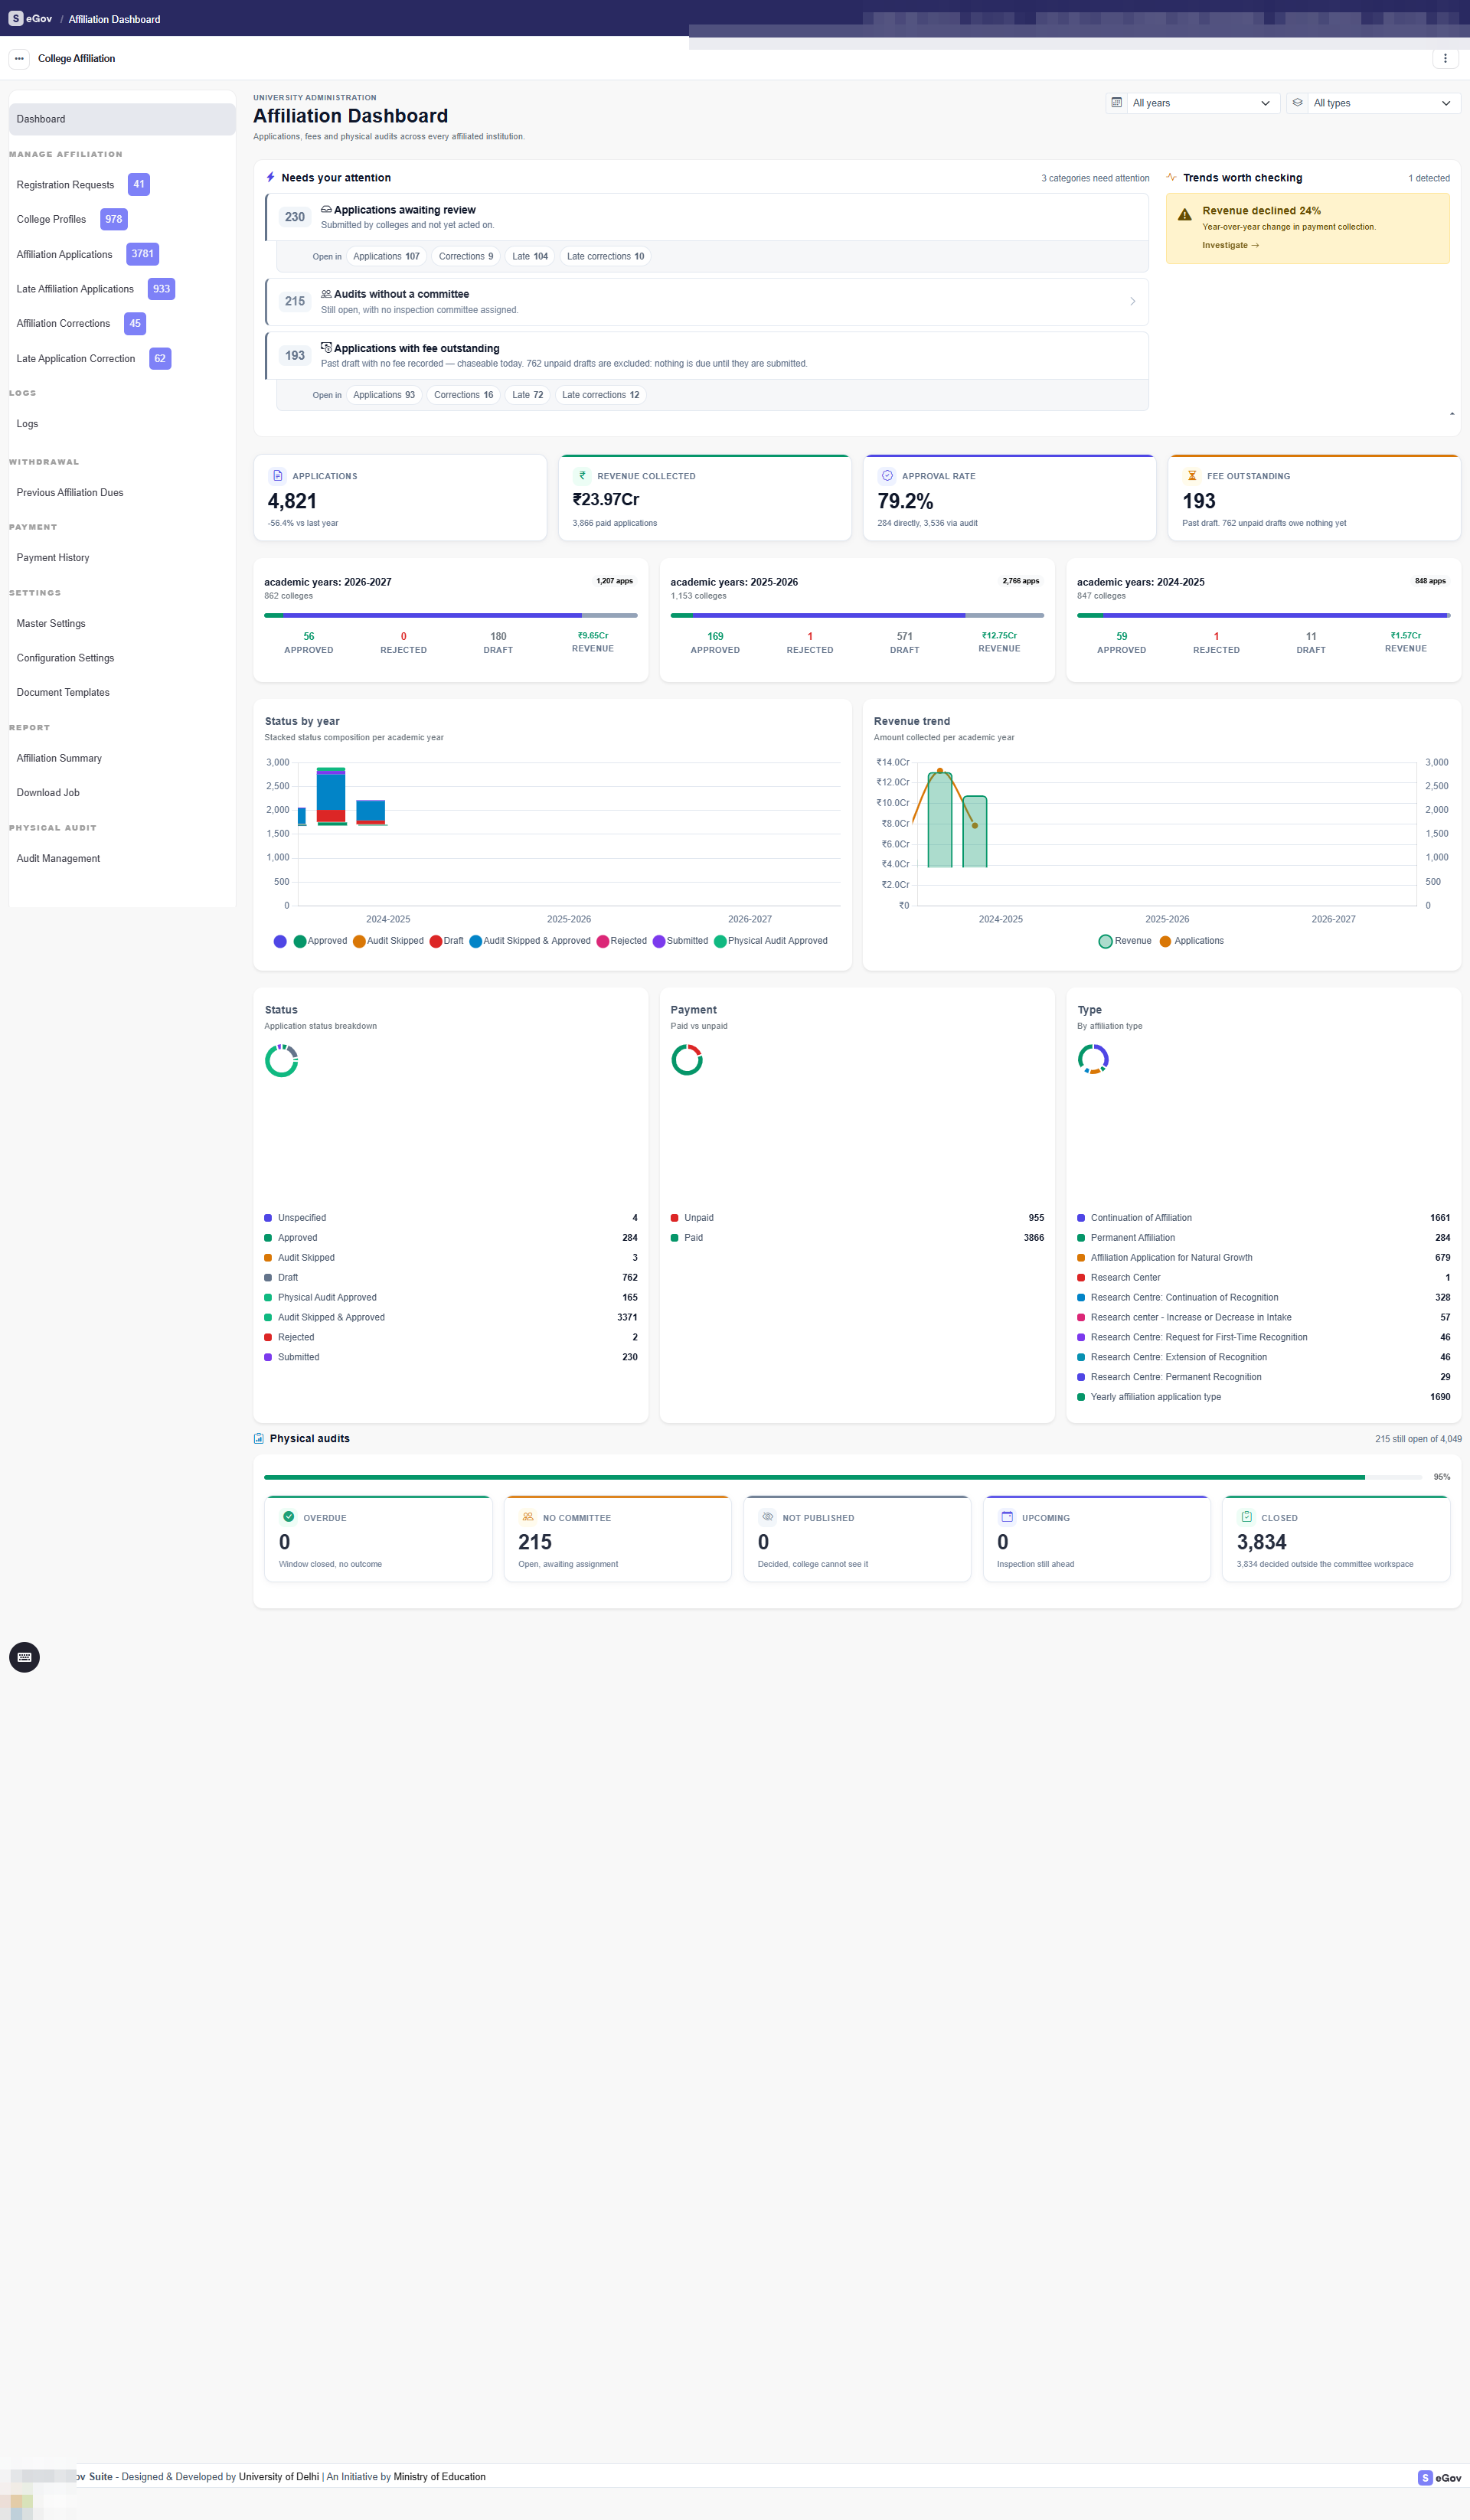
Dashboard regions, top to bottom:
- Needs your attention (Action Queue): Each row is a category of pending work — Inspections overdue, Applications awaiting review, Audits without a committee, Audit outcomes not published, Land verifications in progress, Applications with fee outstanding. The headline figure on a row is the portfolio total, and where the work spans more than one grid (the module keeps Late applications and Corrections in their own lists), the row shows “Open in” chips — one per grid, each carrying exactly the count that grid shows on arrival. Rows with nothing pending disappear; an empty queue renders as an “all caught up” state.
- Figures (KPI tiles): Applications (all types), Revenue collected, Approval rate (counting both direct approvals and audit-based approvals, with the split stated), and Fee outstanding (unpaid and past draft — unpaid drafts owe nothing until submitted and are excluded, with the exclusion stated on the tile).
- Physical audits: The audit pipeline as an operational picture — Overdue (window closed, no outcome), No committee, Not published (decided but invisible to the college), Upcoming, Closed. Every card links to the audit list pre-filtered to the same lifecycle state it counts.
- Trends worth checking: Automatic anomaly detection (rejection-rate spikes, revenue decline, draft accumulation, late-submission growth) with minimum-sample guards so small years cannot raise false alarms.
- Academic years: One card per year — applications, approval/rejection/draft composition meter, colleges and revenue — each opening a year-level drill-down dashboard, which in turn drills into a per-college detail view.
- Analysis: Status-by-year, revenue trend, and status/payment/type distribution charts.
The college user sees the same engine with a different composition — their own queue (drafts to submit, payments due, corrections requested, rejections to review), their own figures, and their own status mix. Role scoping is enforced in the data layer: a college only ever sees its own rows, an OU admin only their institution.
The dashboard payload is cached for 5 minutes; use the refresh control for live figures.
Registration Requests
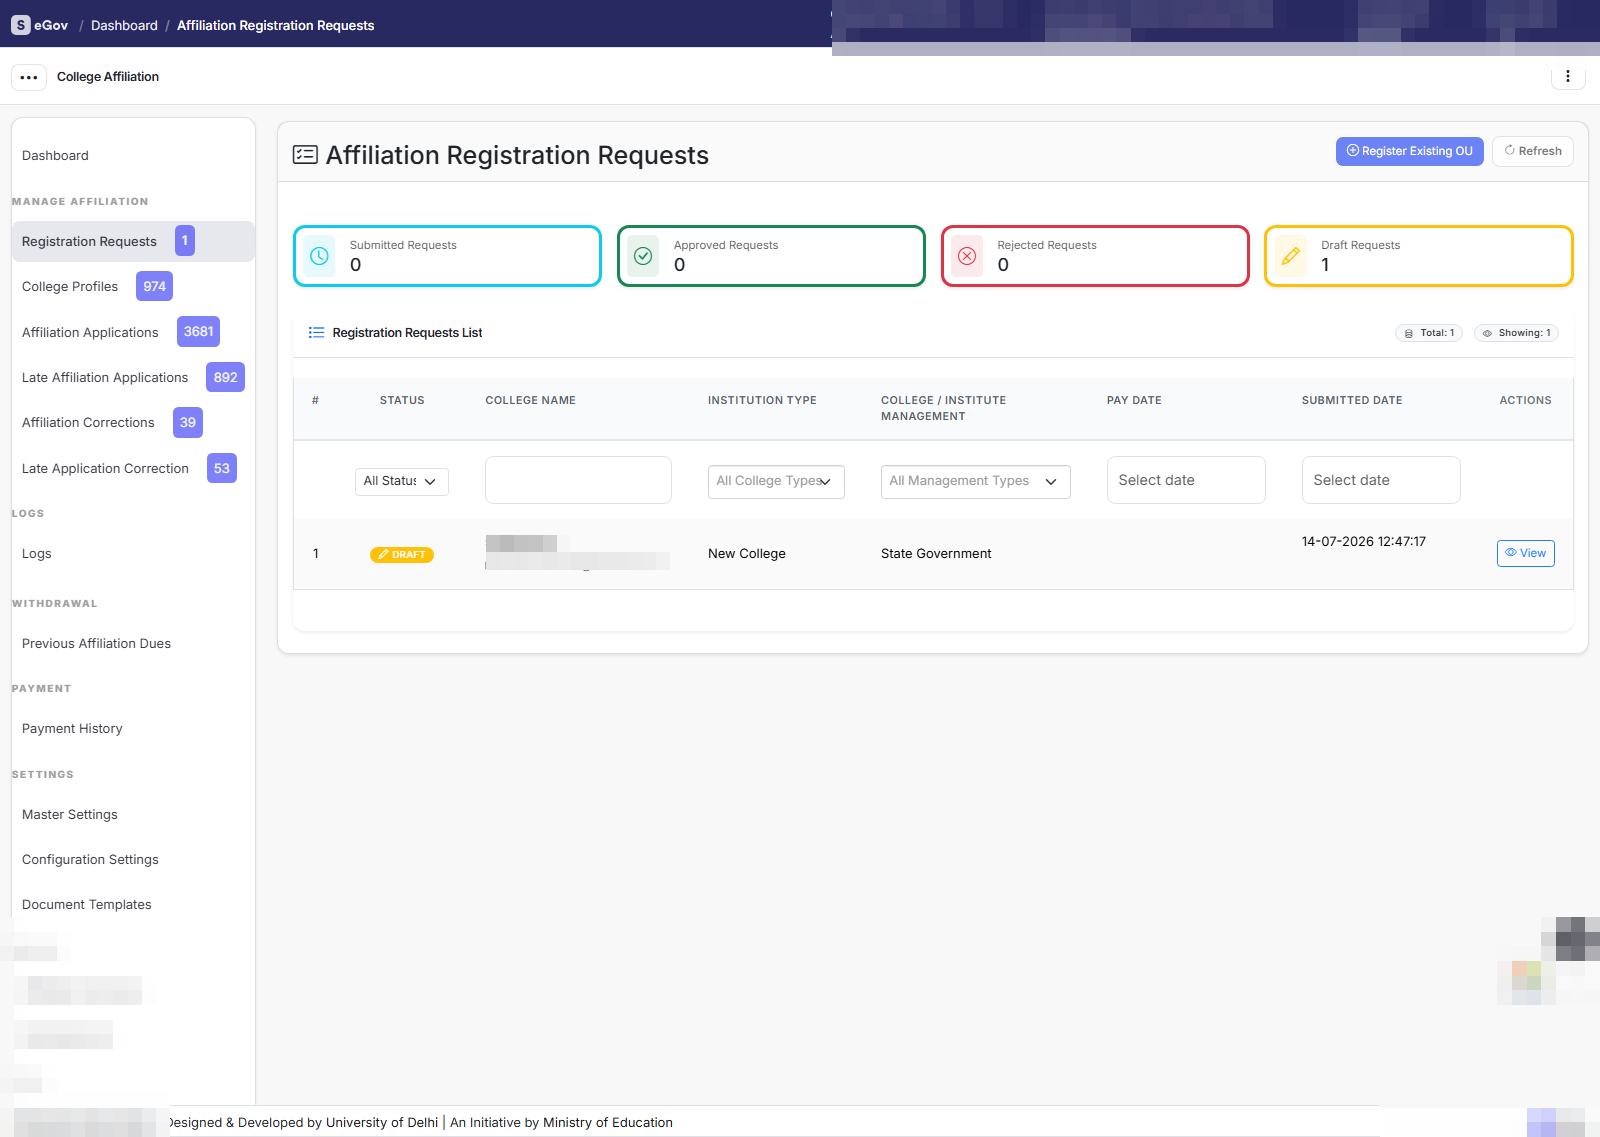
The Registration Requests section lists new colleges that registered through the public form and want affiliation from the university, together with the tools to onboard existing affiliated colleges.
College Registration for Existing Colleges
- Log in as the affiliation admin.
- Go to the governance section of the Samarth eGov suite and open the Affiliation module.
- Click on the Registration Requests section in the left menu.
- Click on the Register Existing Organisation Units button in the right-hand corner of the list table.
- Select the affiliated colleges/standalone institutions from the dropdown list of Organisation Units to map them into the affiliation system.
- Mark each college with its Type: Constituent, Affiliated, Autonomous, Off-Campus/PG Centre, or Registered/Learning/Study Centre.
- Click Add to map the selected institutions. The mapped colleges' heads can then log in and start their profiles — no OTP step is involved for this path.
College Registration for New Colleges
- Open the Registration Requests section — all new college requests appear with their status (Draft, Submitted, Approved, Rejected).
- Click View to inspect the details a college submitted.
- Approve or Reject the request.
- On approval, a user account is created, the
affiliation_userrole is assigned, and the college receives an e-mail with its username and password to log in, complete its profile and apply for affiliation. On rejection, a rejection e-mail is sent.
Settings
Customisation lives in two sections: Master Settings and Configuration Settings.
1. Master Settings
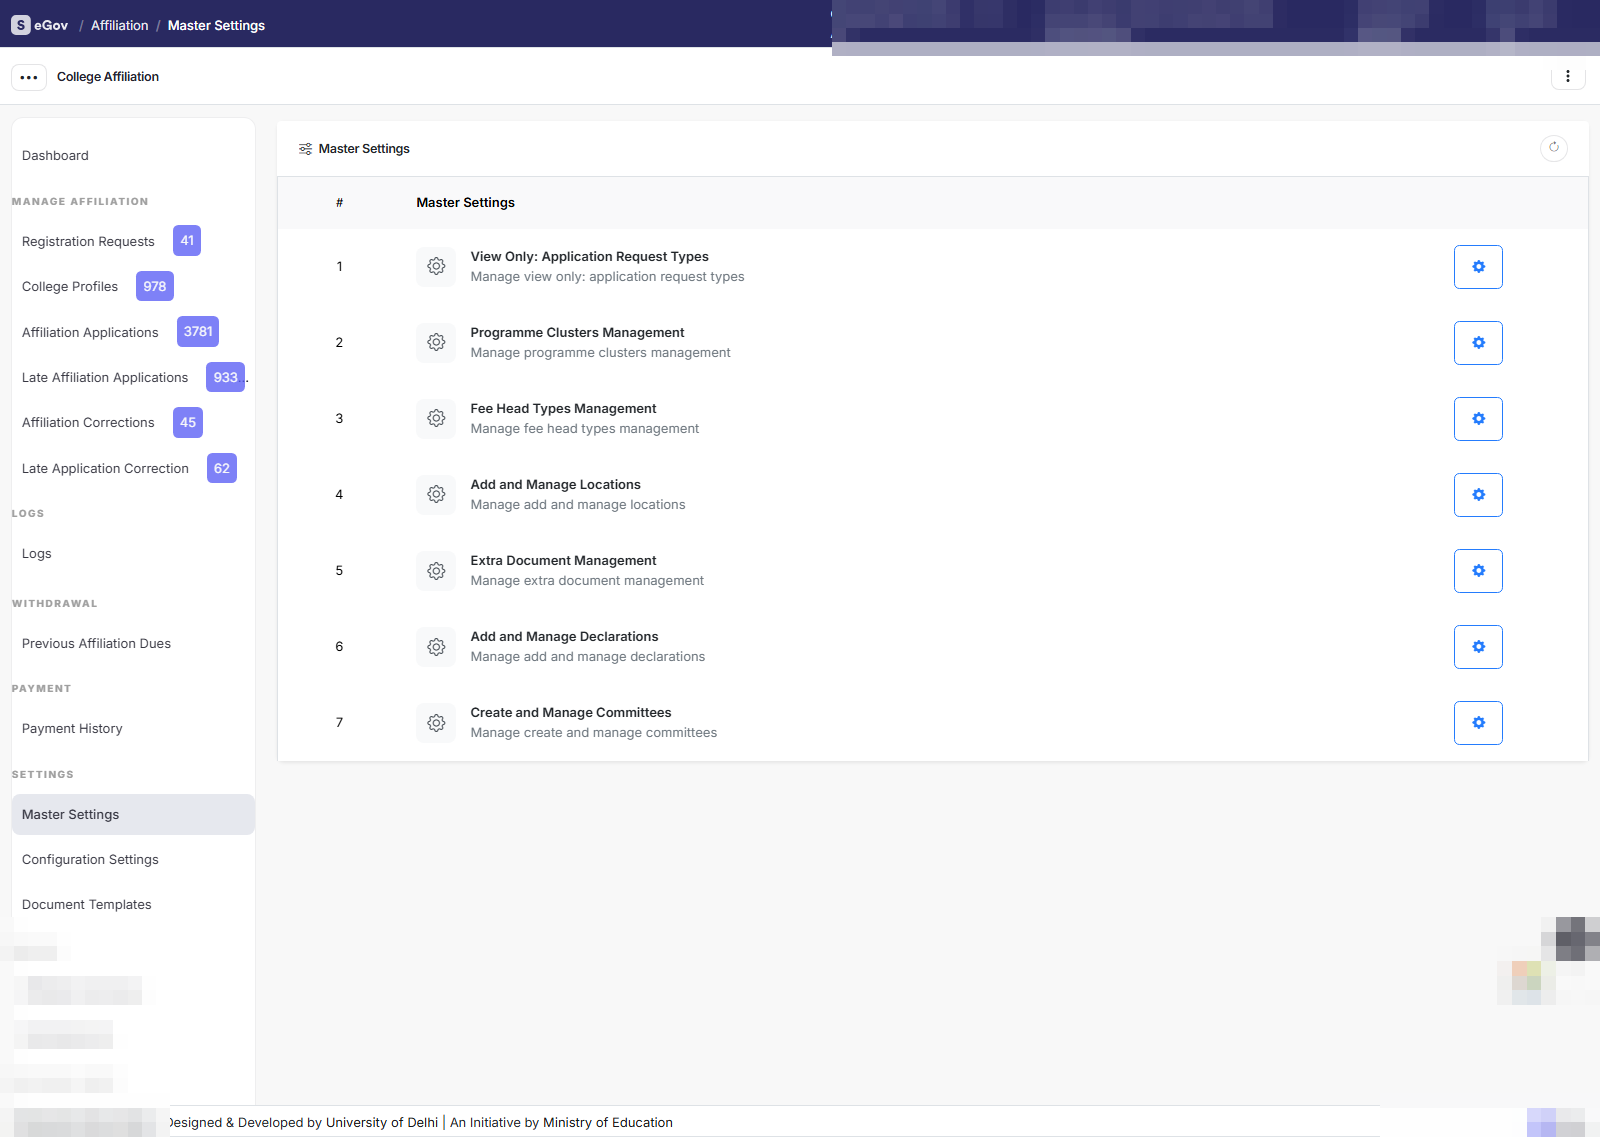
The Master Settings page is the control panel for the reference data the rest of the module uses. The current cards are:
1.1 Application Request Types
Defines the affiliation application types offered by the university — e.g., New College Affiliation, Continuation, Extension (Natural Growth), Permanent Affiliation, Annual Fee Collection. Each type carries a name and an Active/Inactive status and populates the type dropdowns used in sessions and applications.
1.2 Programme Clusters Management
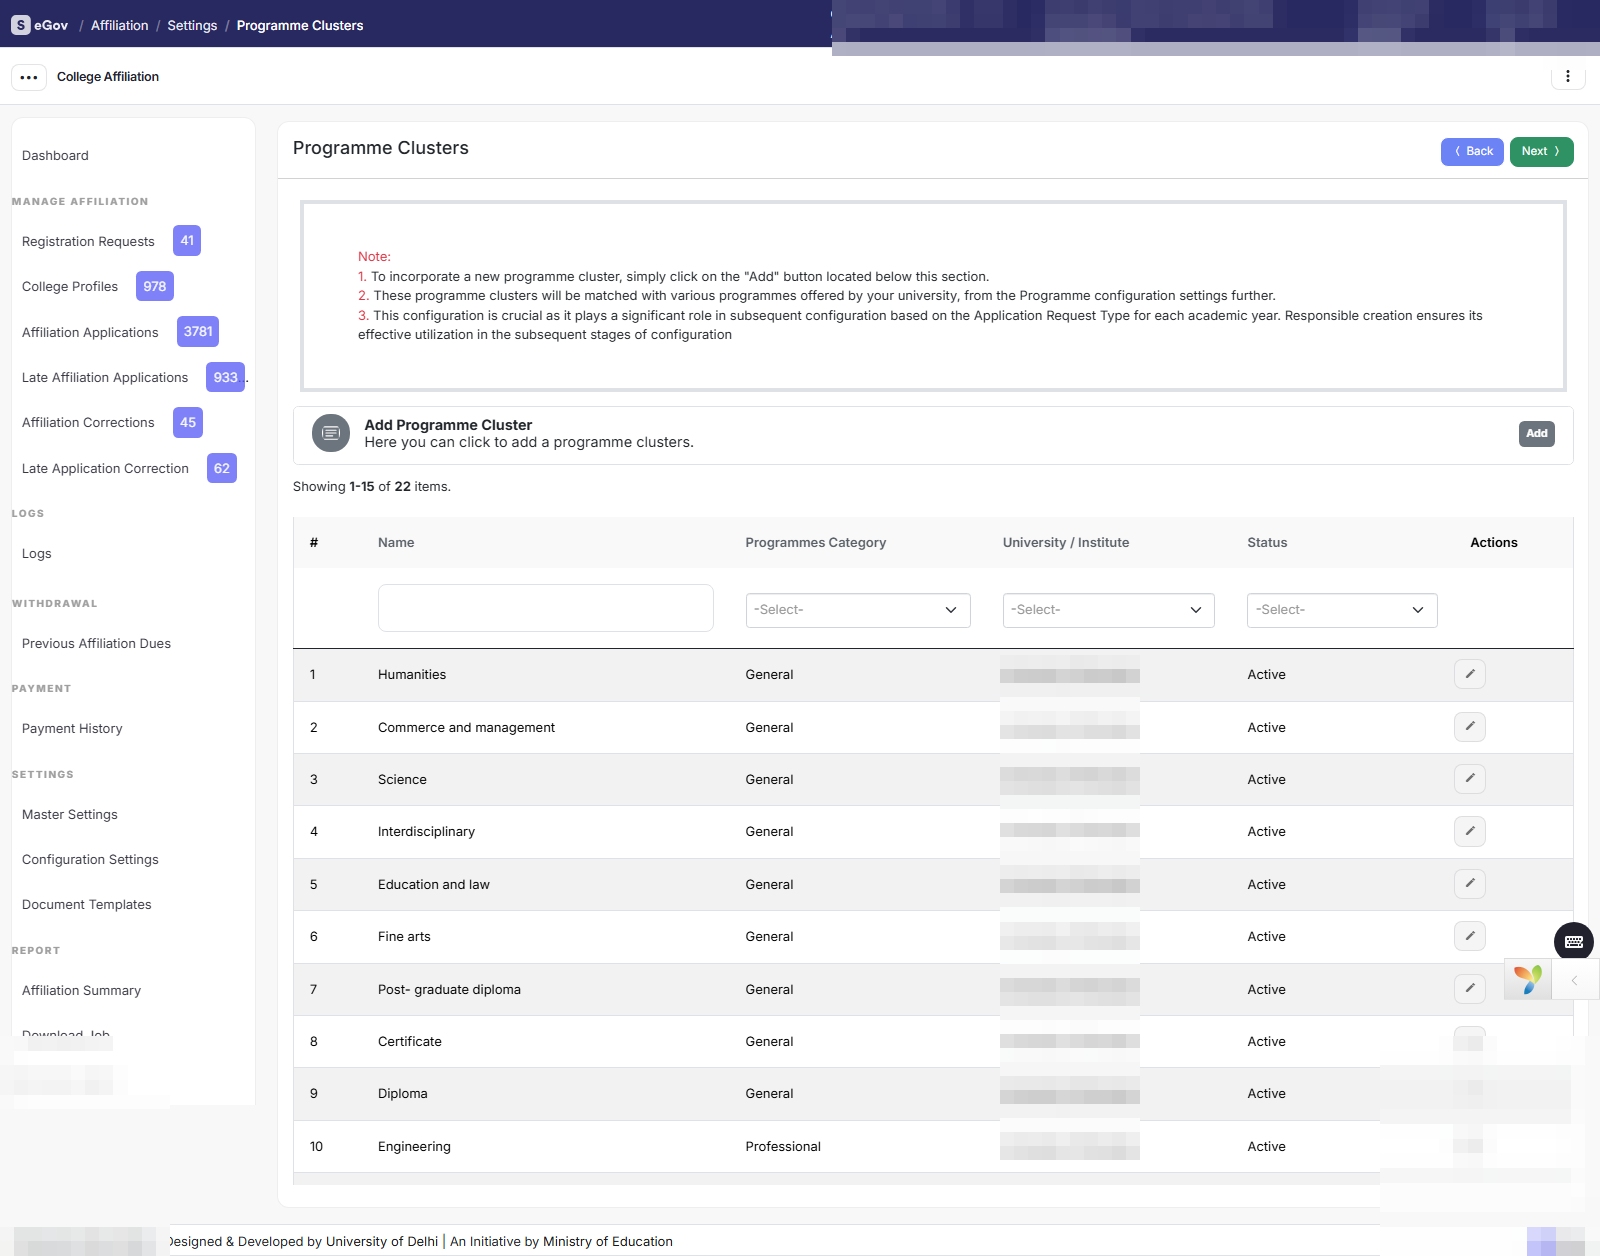
Defines the programme clusters (e.g., Professional, General, Honours, Education & Law, Medical, Fine Arts, Vocational, Certificates). Clusters are later mapped to concrete programmes in Programmes Configuration and drive cluster-scoped fee rules.
- Click the gear icon on the card → Add Programme Cluster.
- Enter the cluster name, select the programme category (General, Honours, Professional, Medical), set Status Active, and Save.
1.3 Add and Manage Locations
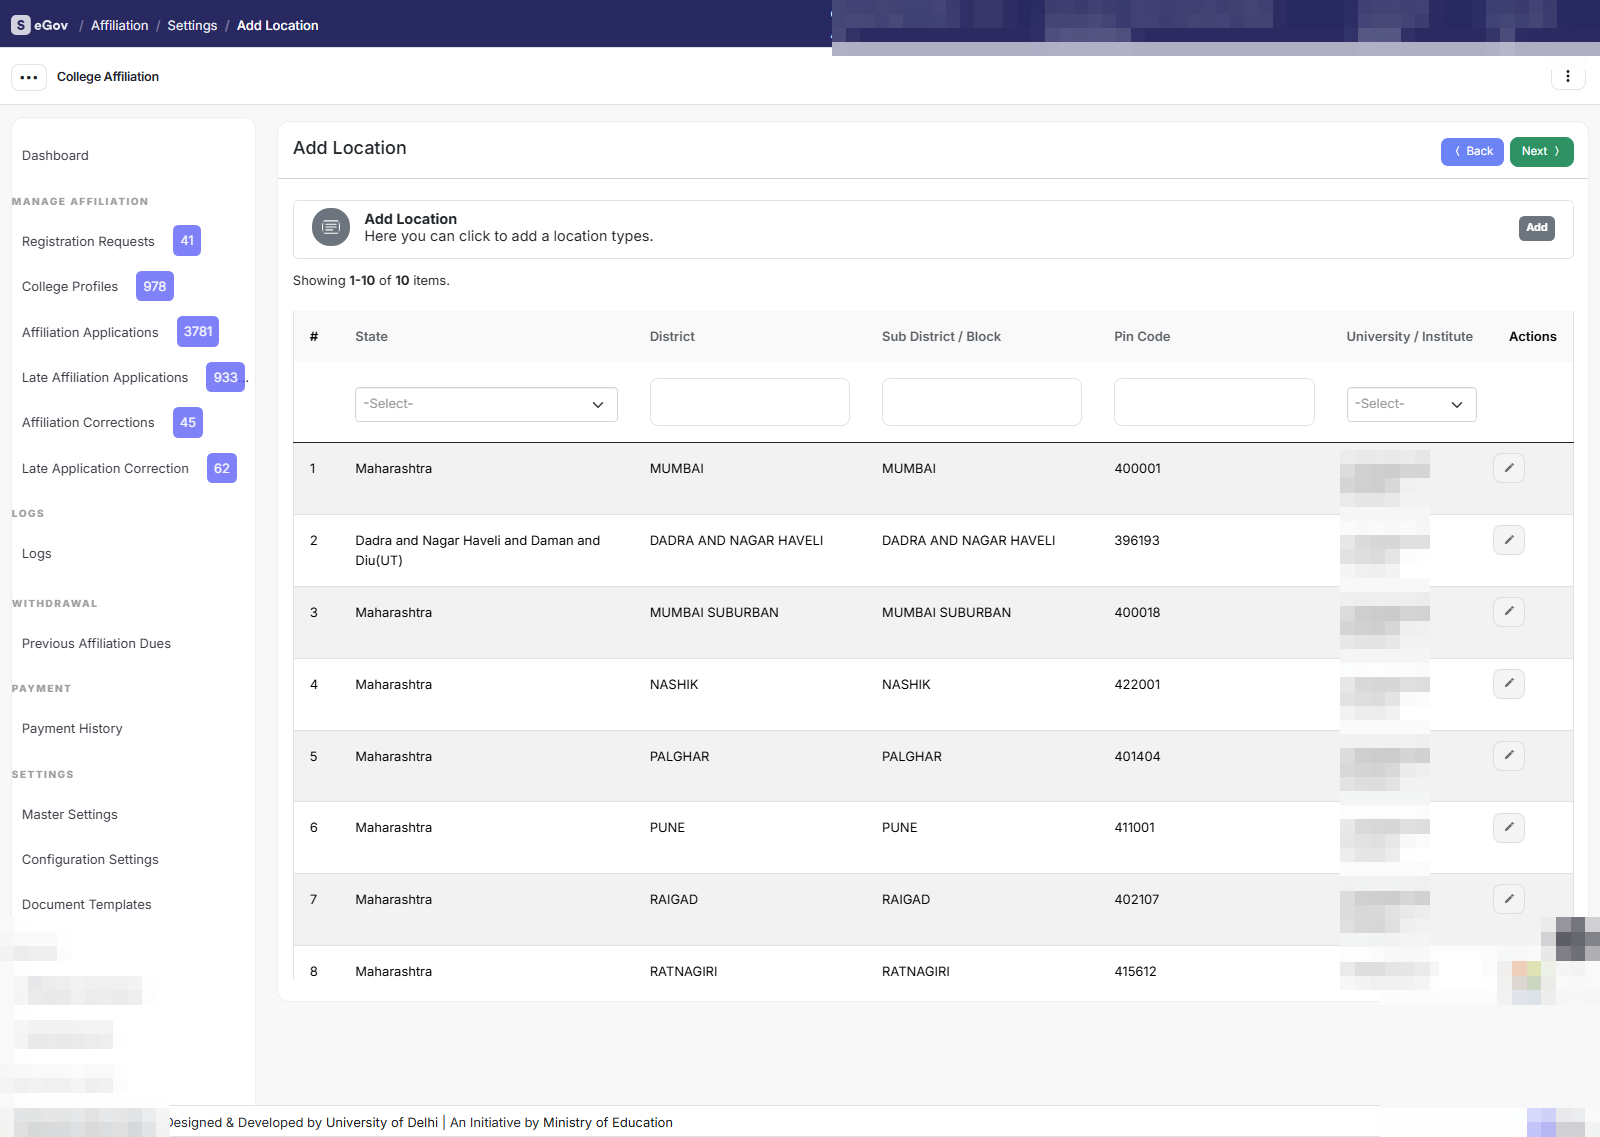
Maintains the State → District → Sub-district → Pincode hierarchy used by registration and profile address forms.
- Click the gear icon → Add Location, select the State (districts load automatically; a missing district can be added with Add not listed District), enter the sub-district and pincode, and Save.
1.4 Extra Document Management
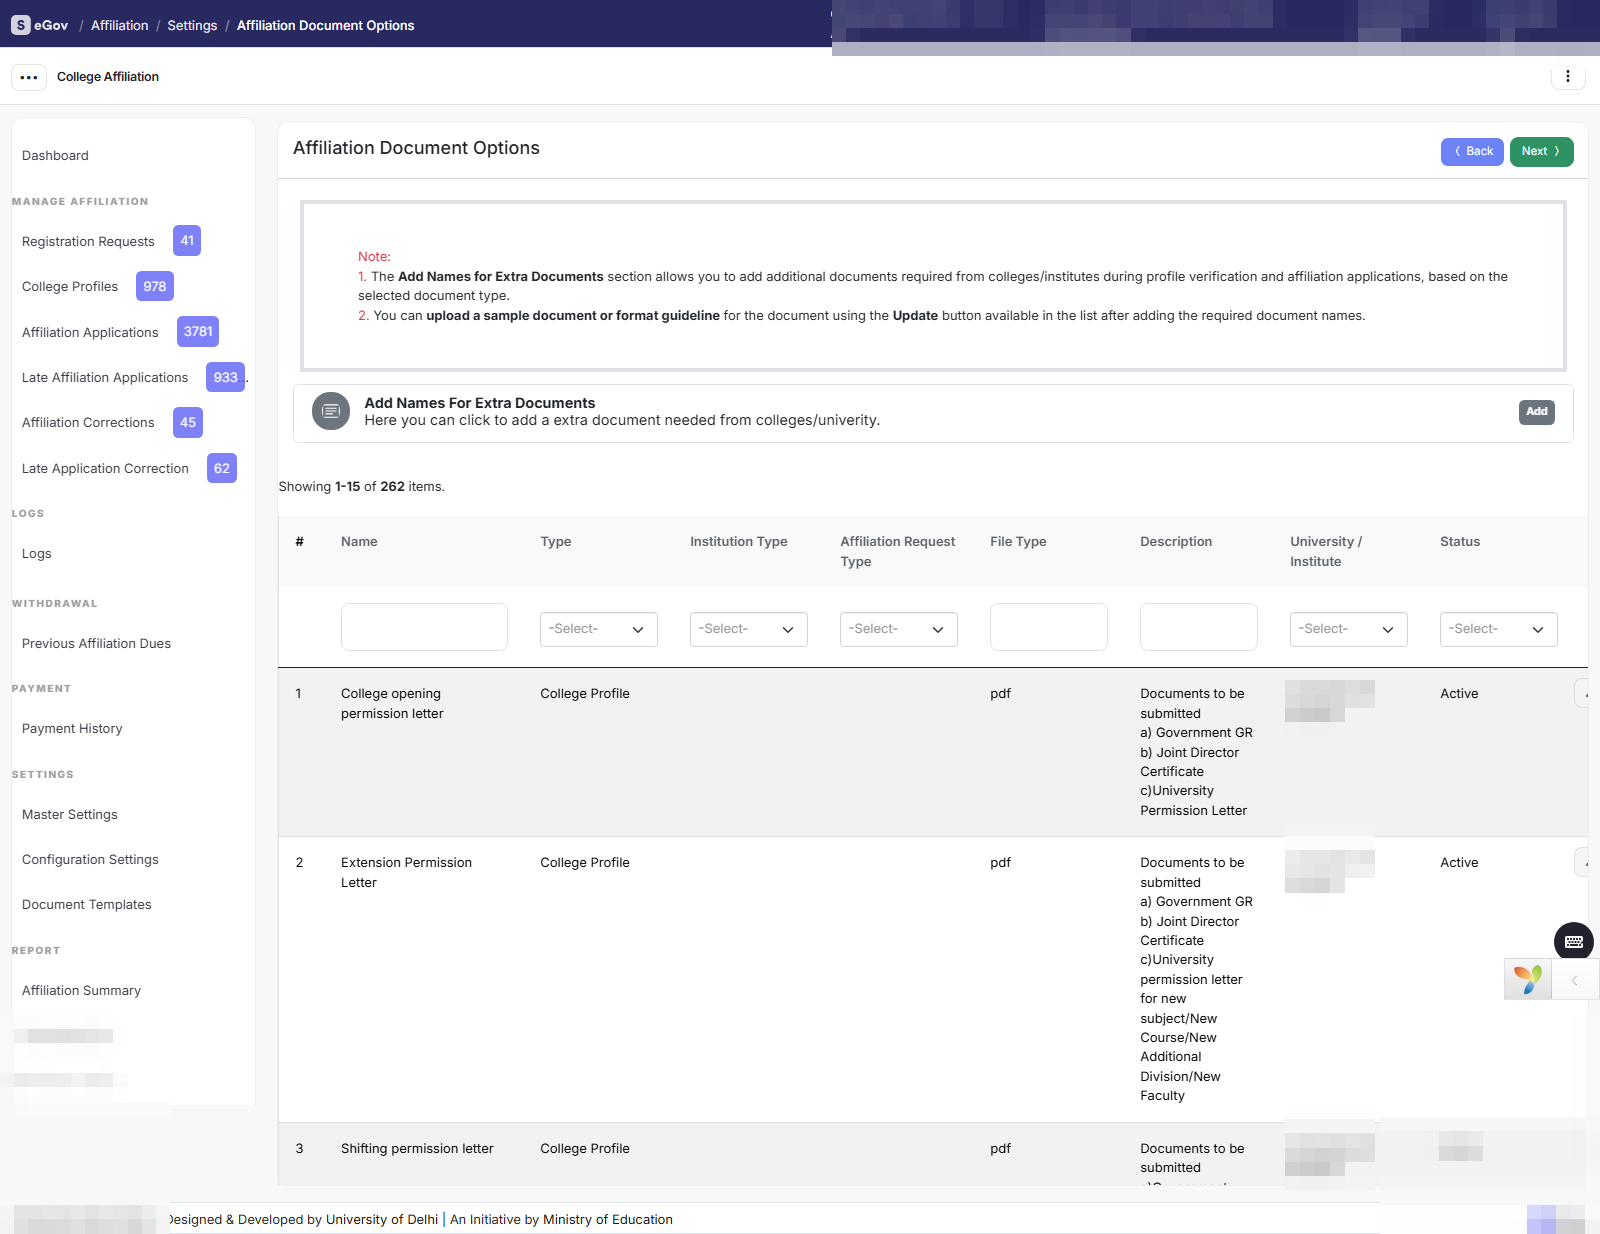
Defines the documents the university requires from colleges. For each document the admin sets the name, where it is collected (College Profile or Affiliation Application), the allowed file type (image / XLSX / PDF), a description, and status. These appear as upload slots on the college side.
1.5 Add and Manage Declarations
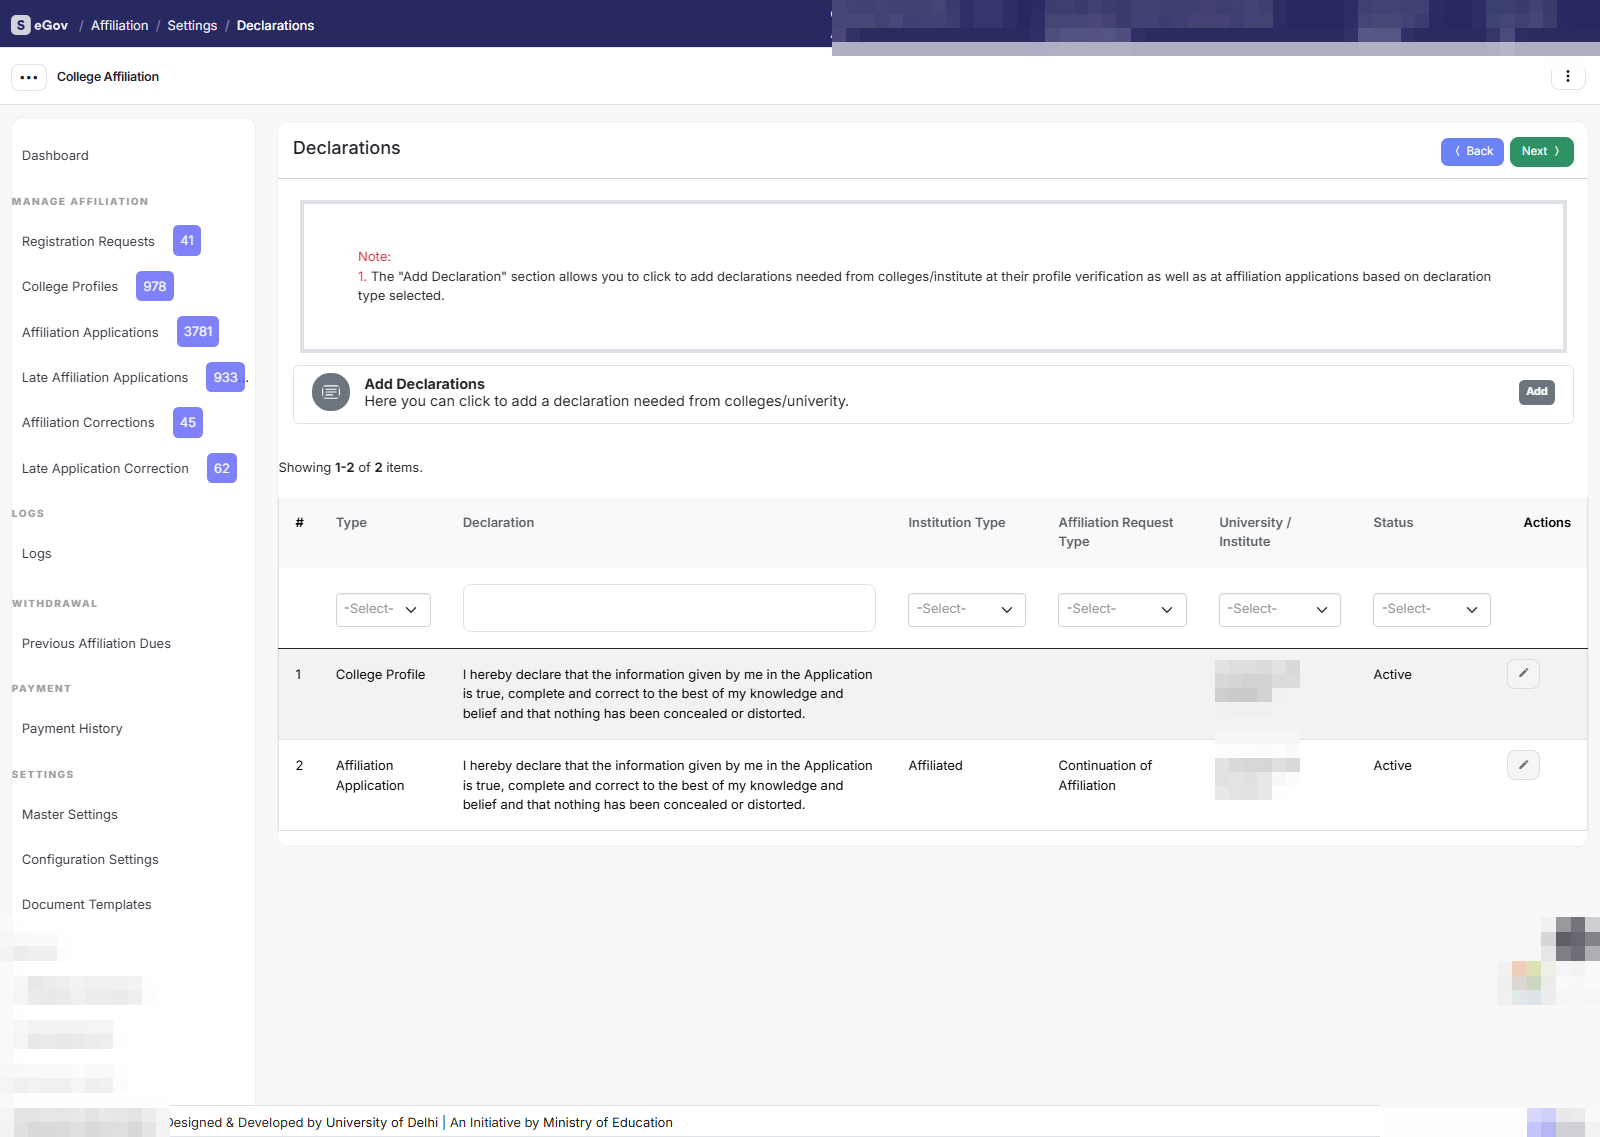
Maintains the declaration text a college must accept before submitting its College Profile and its Affiliation Application. One declaration is kept per context; editing updates it in place so there is never a duplicate.
1.6 Create and Manage Committees
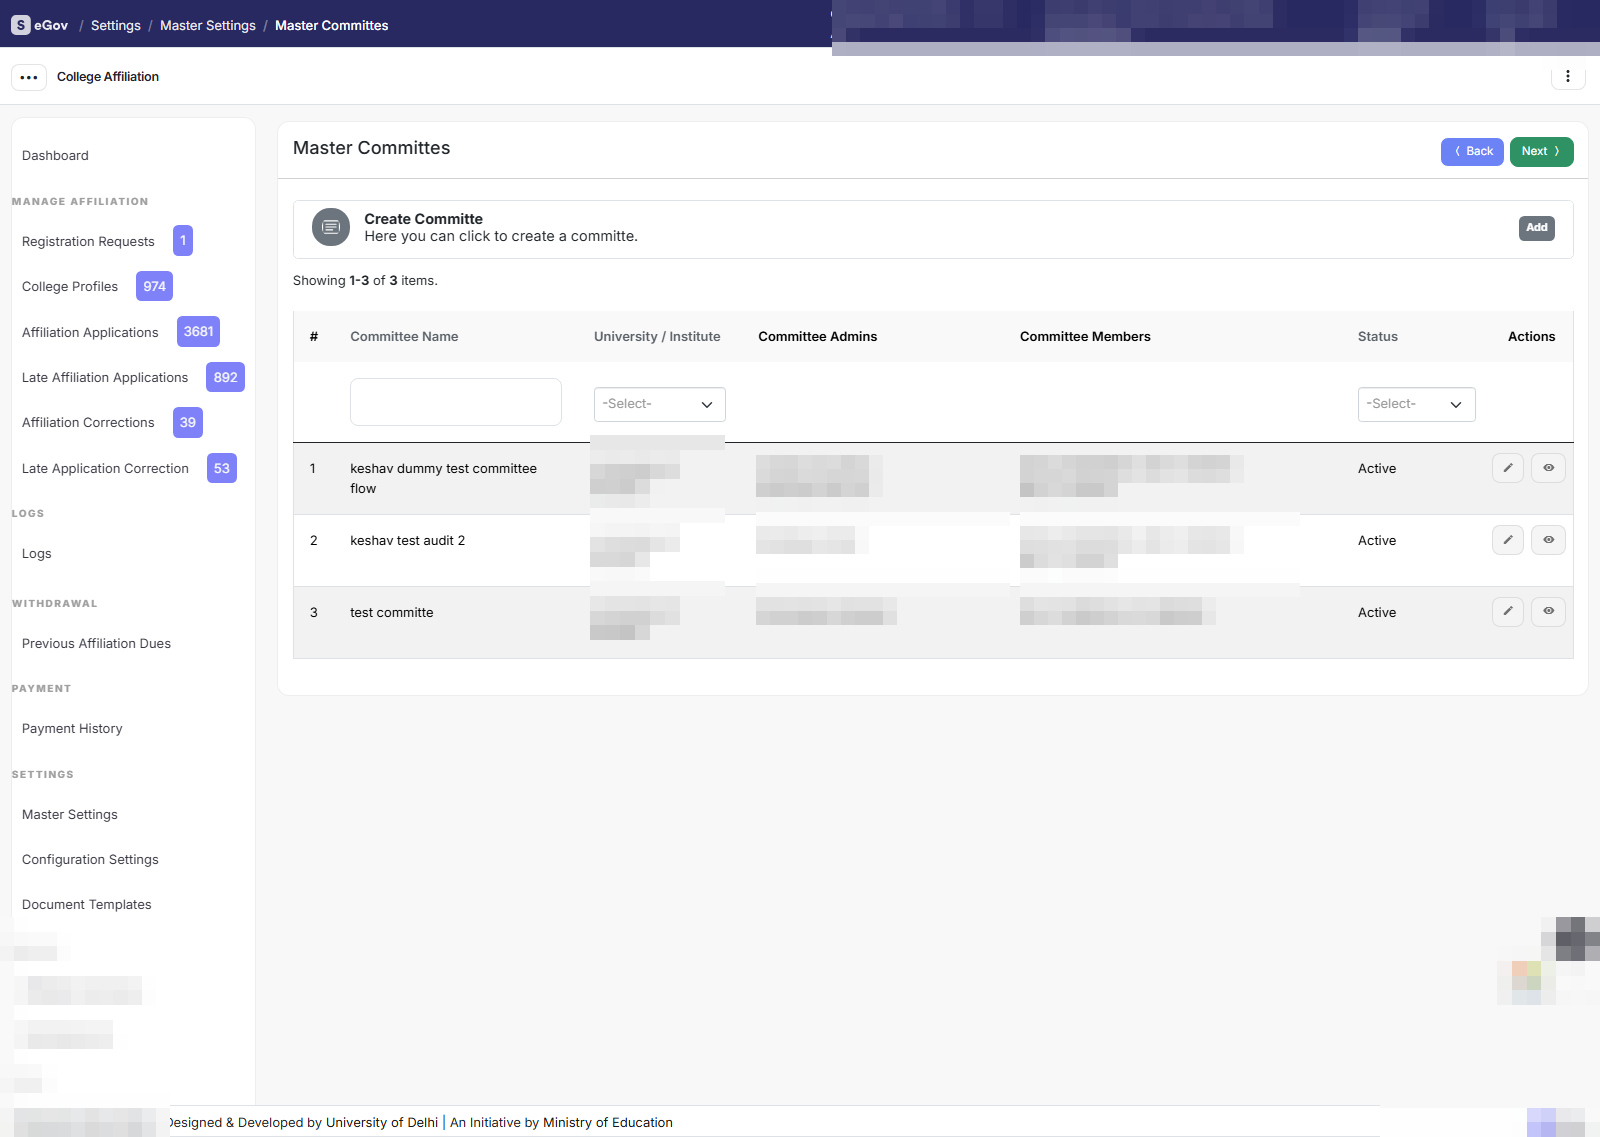
Creates the inspection committees used by the Physical Audit workflow.
- Click the gear icon → Add Committee.
- Name the committee and add members from the university’s users, marking at least one member as the Committee Admin.
- Set Status Active and Save.
Committee membership automatically grants/revokes the affiliation_committee_admin / affiliation_committee_member roles — revocation checks the member’s other active committees first, so removing someone from one committee never breaks their access to another.
2. Configuration Settings
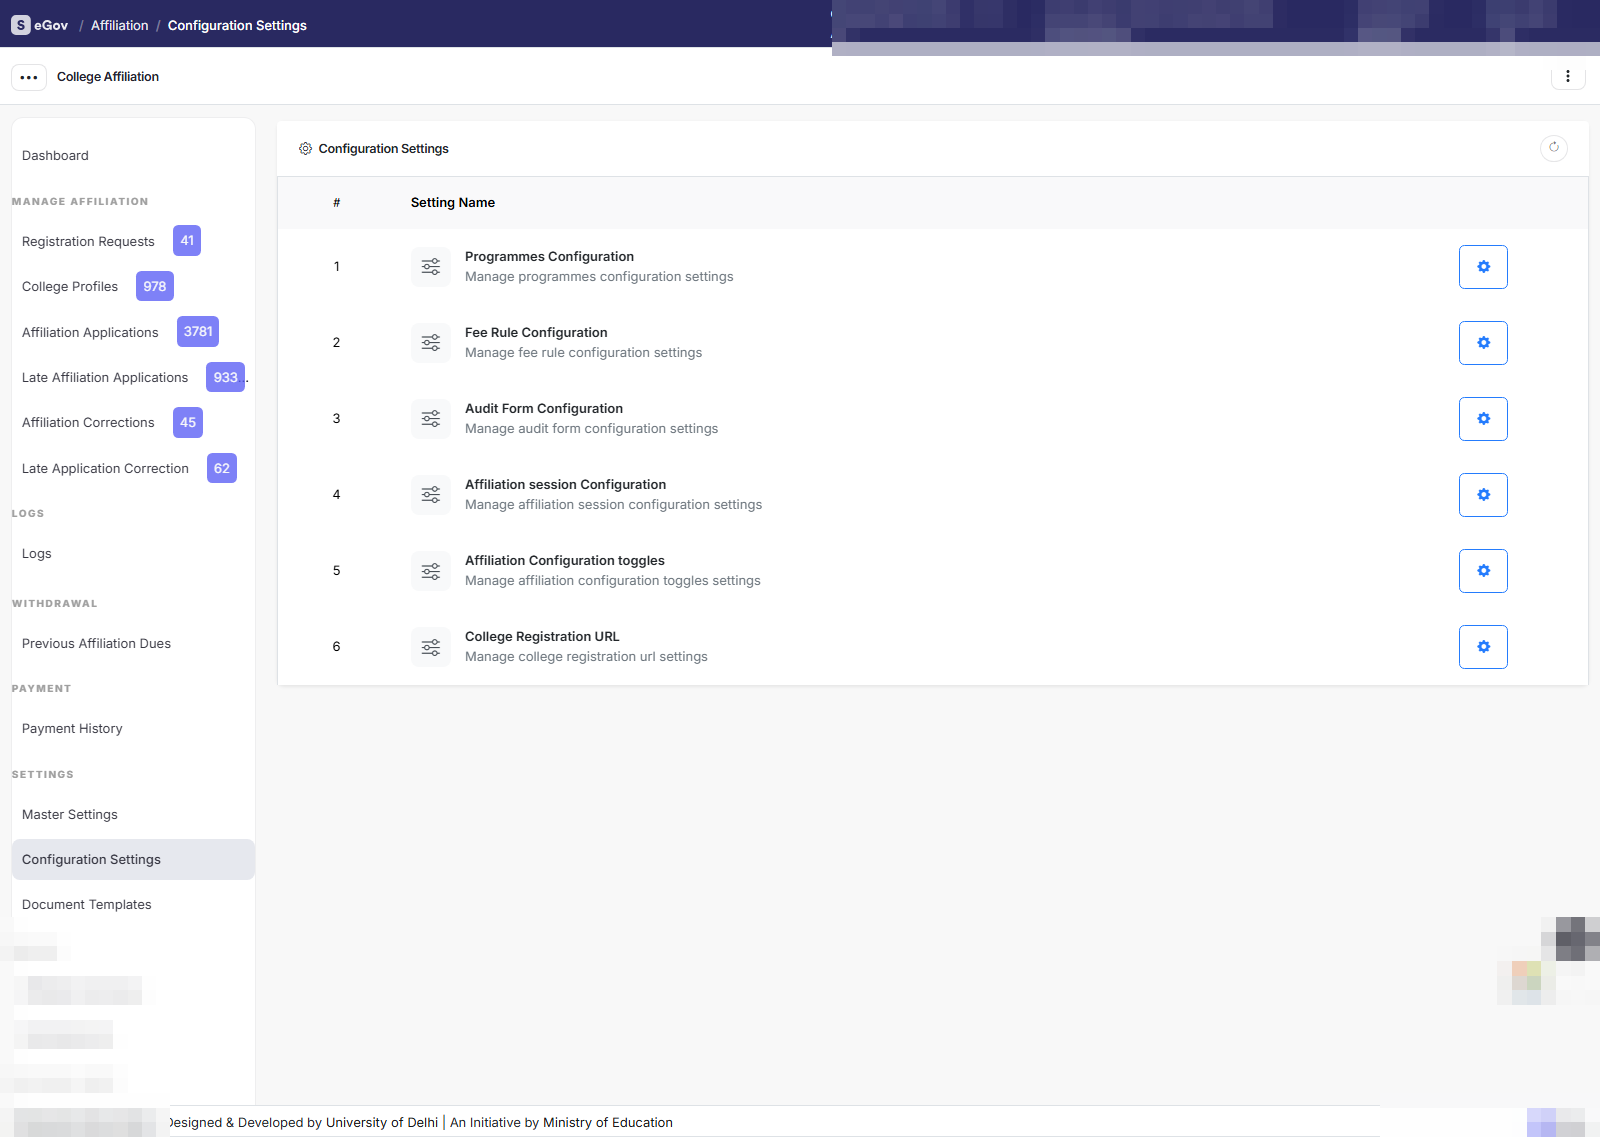
2.1 Programmes Configuration
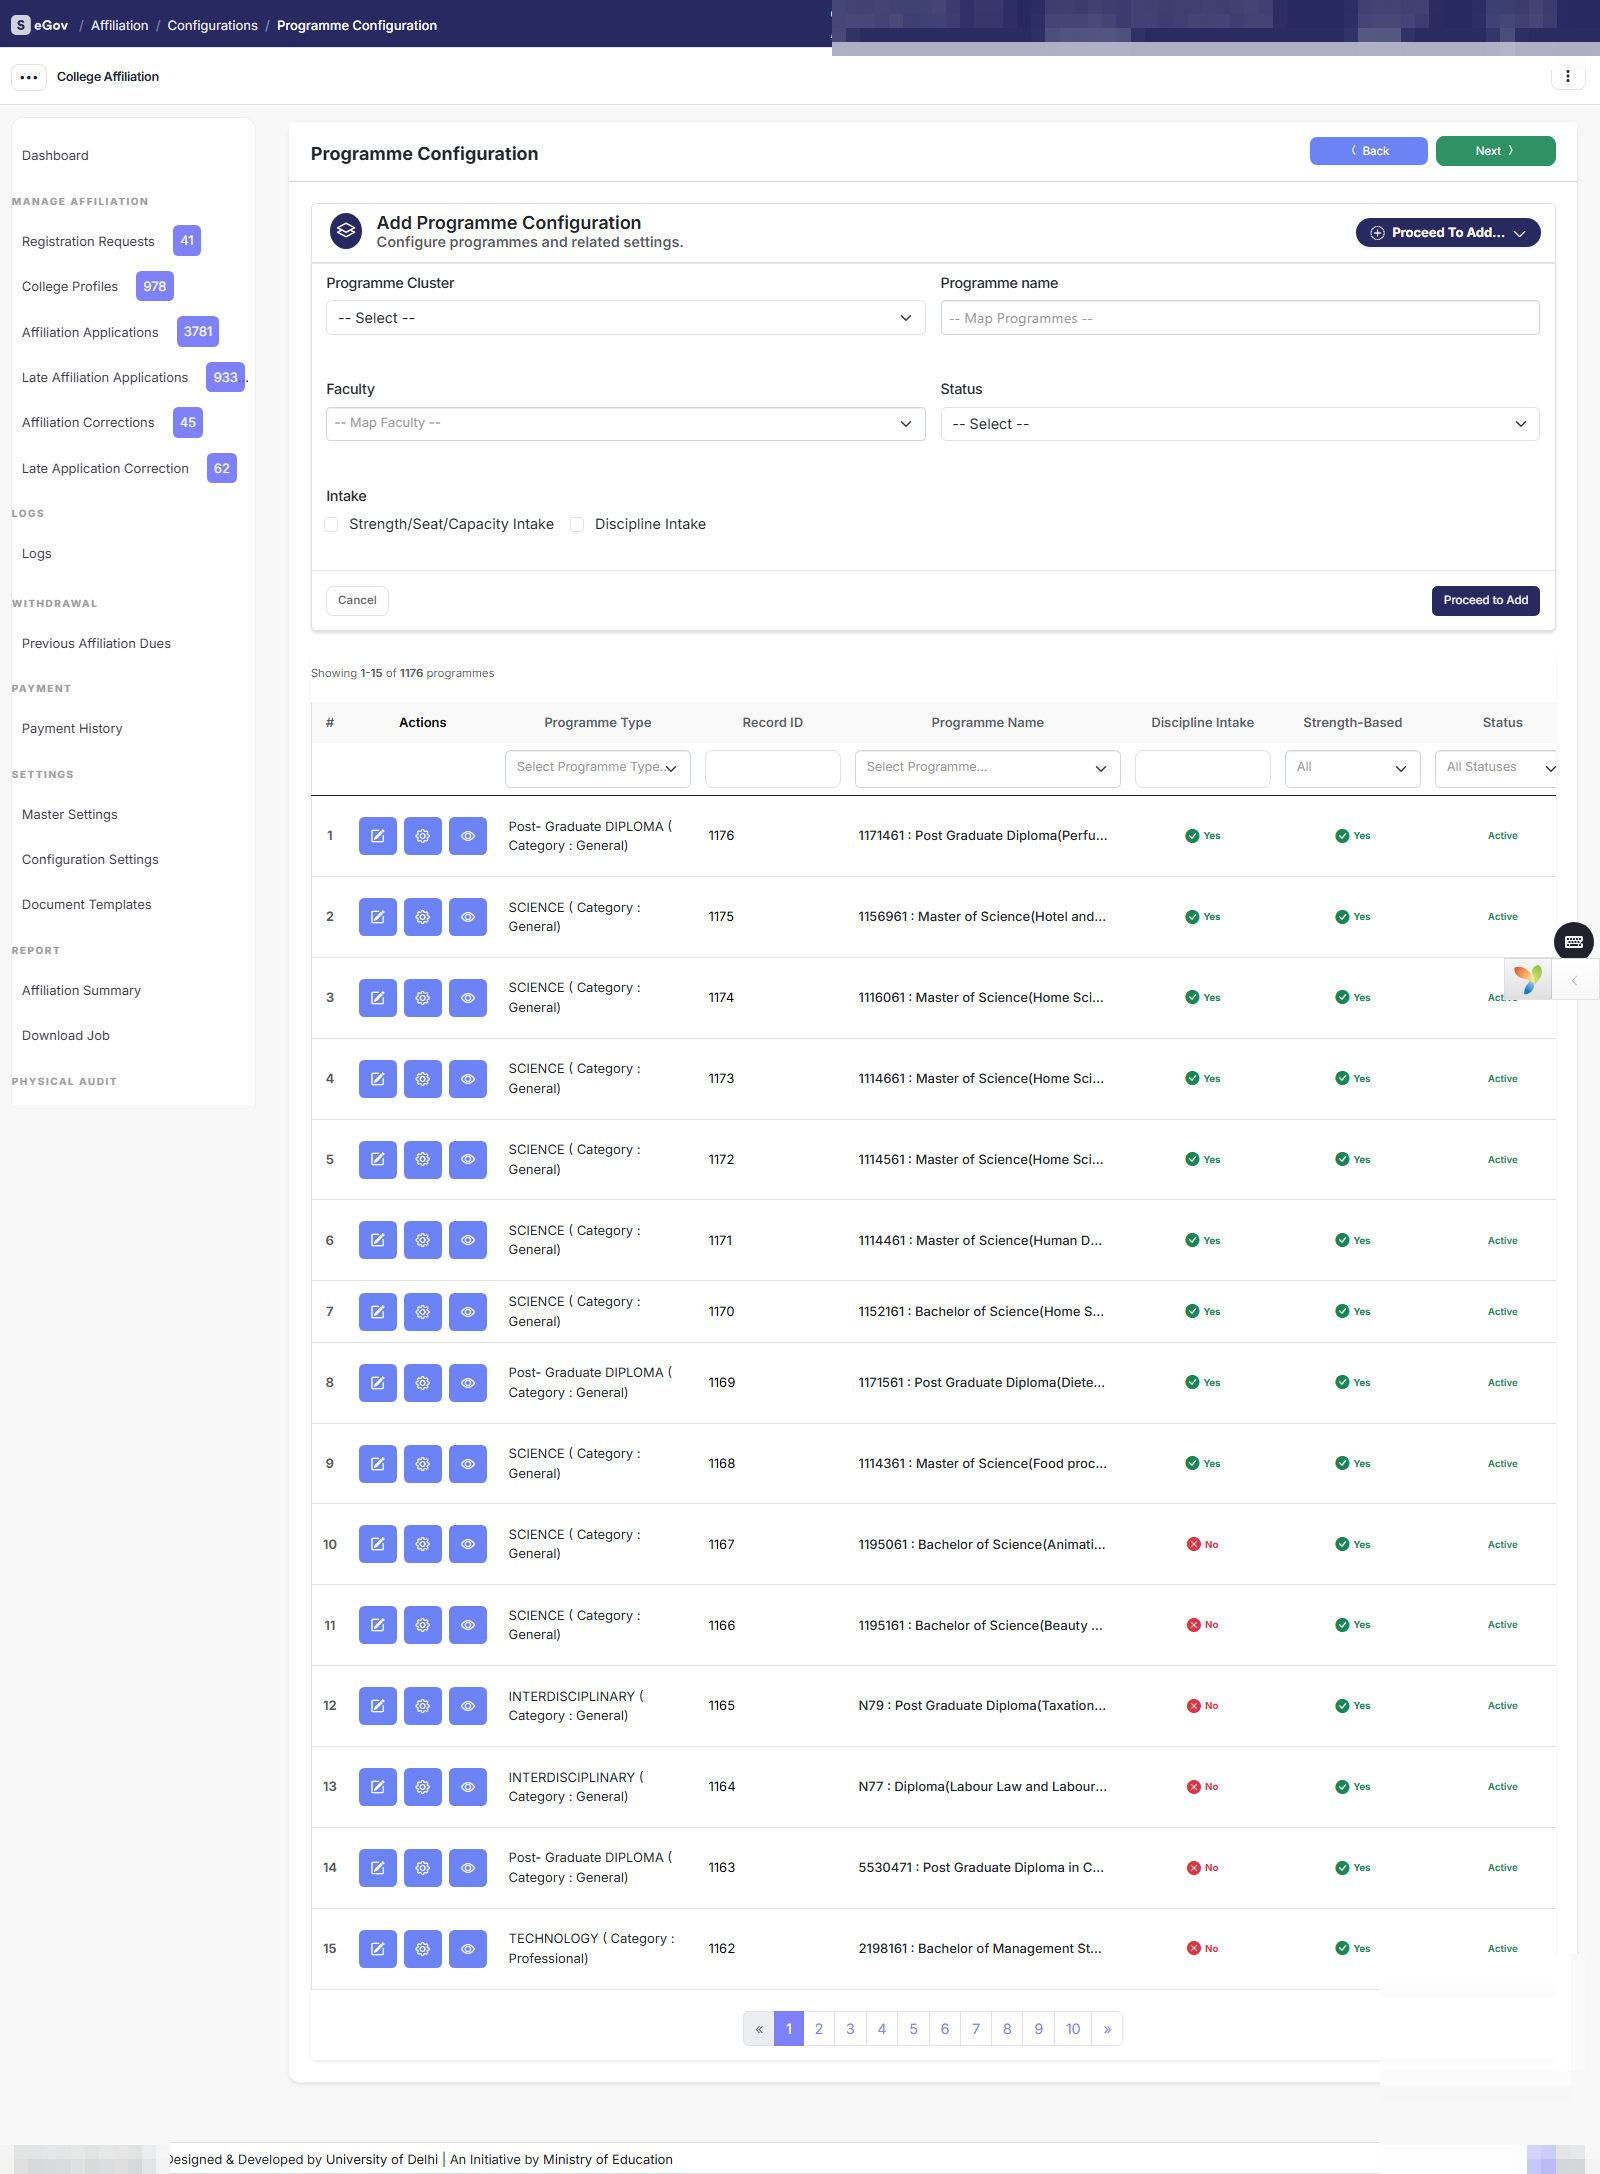
Aligns concrete programmes with the configured clusters and defines their disciplines, subjects and (optionally) student-strength bands.
- Open Settings → Configuration Settings → Programmes Configuration (gear icon).
- Click Add Programme Configuration and select the Programme Cluster.
- Select Yes/No for strength-based affiliation (select Yes only where the cluster genuinely is strength-based).
- Set Status Active and Save.
For strength-based clusters, use the Strength Configuration button against a programme to enter the minimum/maximum strengths and the below-minimum, in-band and above-maximum costs. These bands power STRENGTH-type fee rules.
2.2 Fee Rule Configuration (the Automatic Fee Engine)
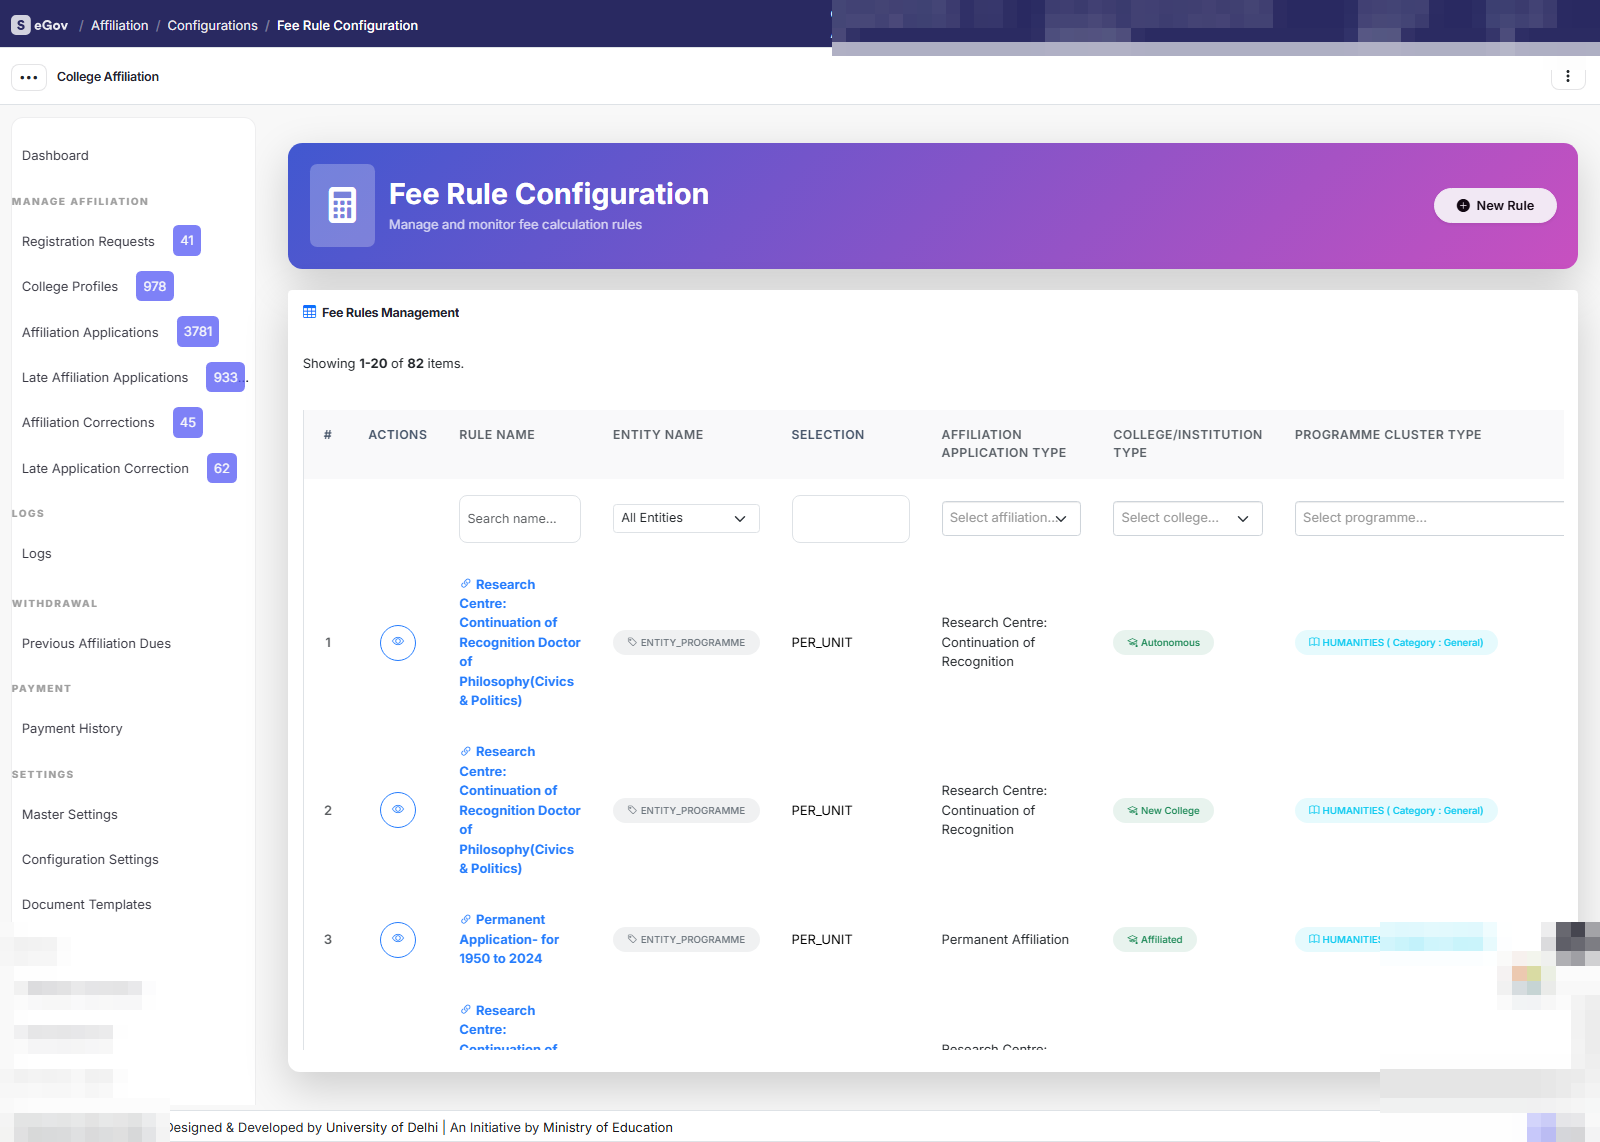
The most significant capability of the current build: the university no longer sets one flat fee per affiliation type. Instead the admin authors fee rules, and the Fee Engine combines those rules with each application’s actual data — programmes chosen, subjects, faculty count, student strength, submission date — to compute an itemised bill automatically, per application.
Why it matters:
- Different colleges, different bills. A two-programme college and a fifteen-programme institute pay according to their own numbers.
- No clerical mistakes. The engine cannot forget a head, a tax percentage or a late fee.
- Configure once, run for years. A rule valid 2025–2030 prices every application in that window with no per-application admin work.
Rule types (each rule is stored with its calculation, tax breakup, late-fee slabs, validity dates and priority):
| Type | When to use | Example |
|---|---|---|
COUNT | Fixed price per unit (programme, subject) | ₹500 per subject |
SLAB | Different price for different unit ranges | 1–3 programmes ₹3,000 each; 4–6 ₹2,500; 7+ ₹2,000 |
STRENGTH | Price depends on the programme’s student-strength band | Below min ₹1,000; in band ₹2,000; above max ₹3,500 |
FIXED | One flat amount | Application processing ₹5,000 |
PERCENTAGE | Percentage of a base — used for taxes | GST = 18% of base fees |
Rules can be scoped to the whole application, a programme cluster, subjects (including major/minor), disciplines or faculty. Tax rules (CGST/SGST/IGST breakups) and late-fee rules (per-day/week/month slabs) appear on dedicated bill lines.
Adding a rule, step by step:
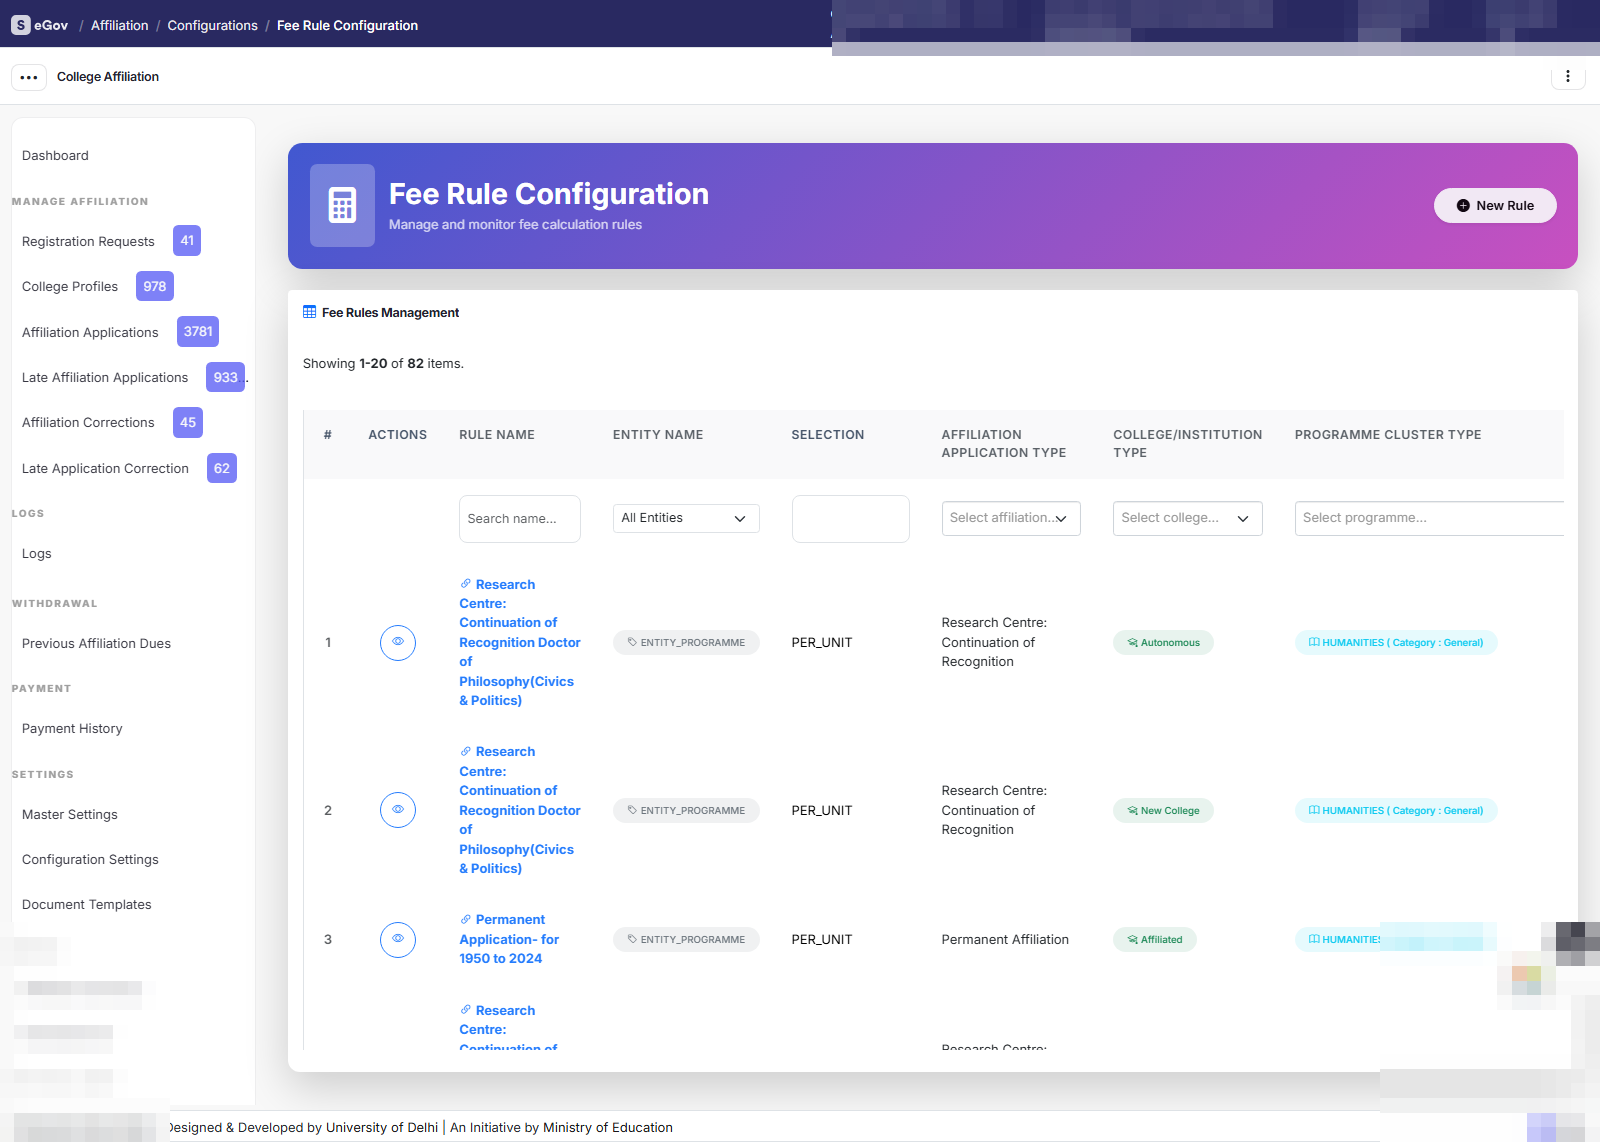
- Open Settings → Configuration Settings → Fee Rule Configuration → Create Rule.
- Pick the Entity and Selection (e.g., Subject + Per Unit) and the Programme Cluster the rule applies to.
- Choose the Calculation type and fill its inputs (unit price, slab rows, flat amount, or percentage;
STRENGTHreads the programme’s strength bands automatically). - Add the Tax breakup and Late-fee slabs if applicable.
- Set Priority (lower runs first when rules overlap), Validity dates and Status Active.
- Click Test Rule to run it against a sample input — malformed rules fail the test with a clear error.
- Save.
What the bill looks like: when a college (or admin) opens an application’s fee breakdown, the engine resolves the applicable rules, dispatches them to specialist calculators (programme / subject / faculty / strength / application-level), and renders a five-line grand summary — Base Fees, Application Fees, Taxes, Late Fees, Grand Total — with every line traceable to the rule that produced it. The set of applied rule IDs is stored on the application, so months later the university can answer exactly which rules computed this college’s bill.
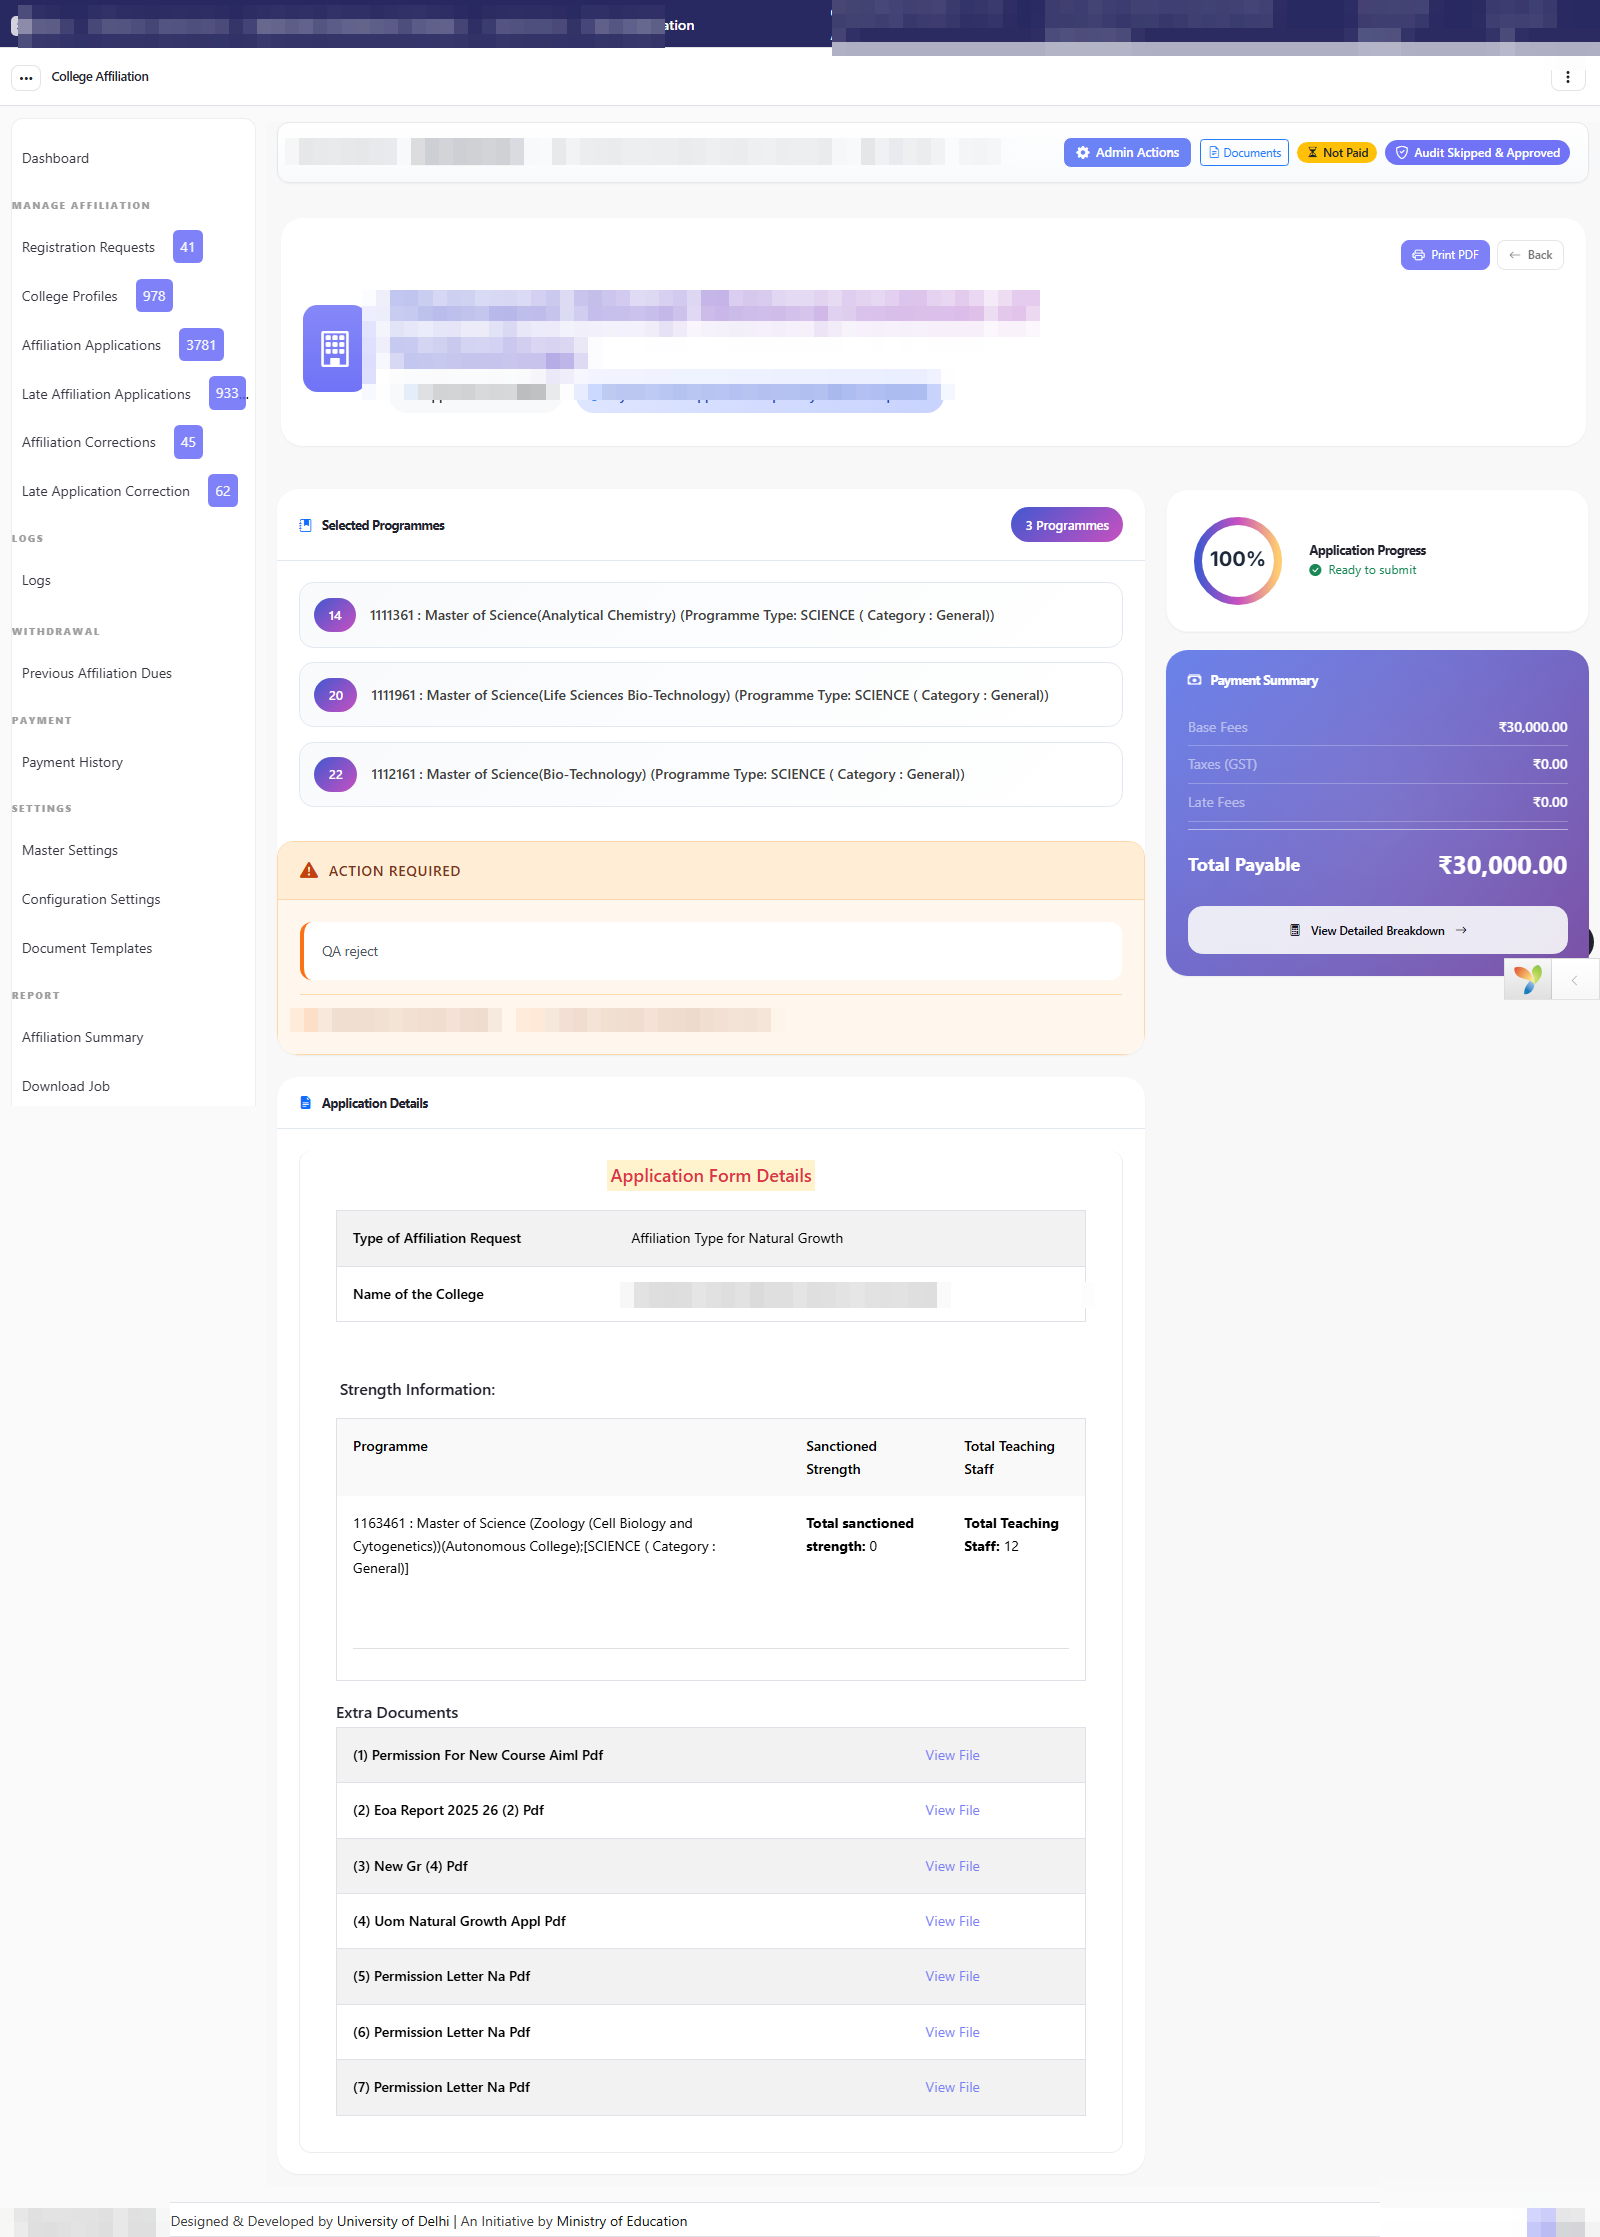
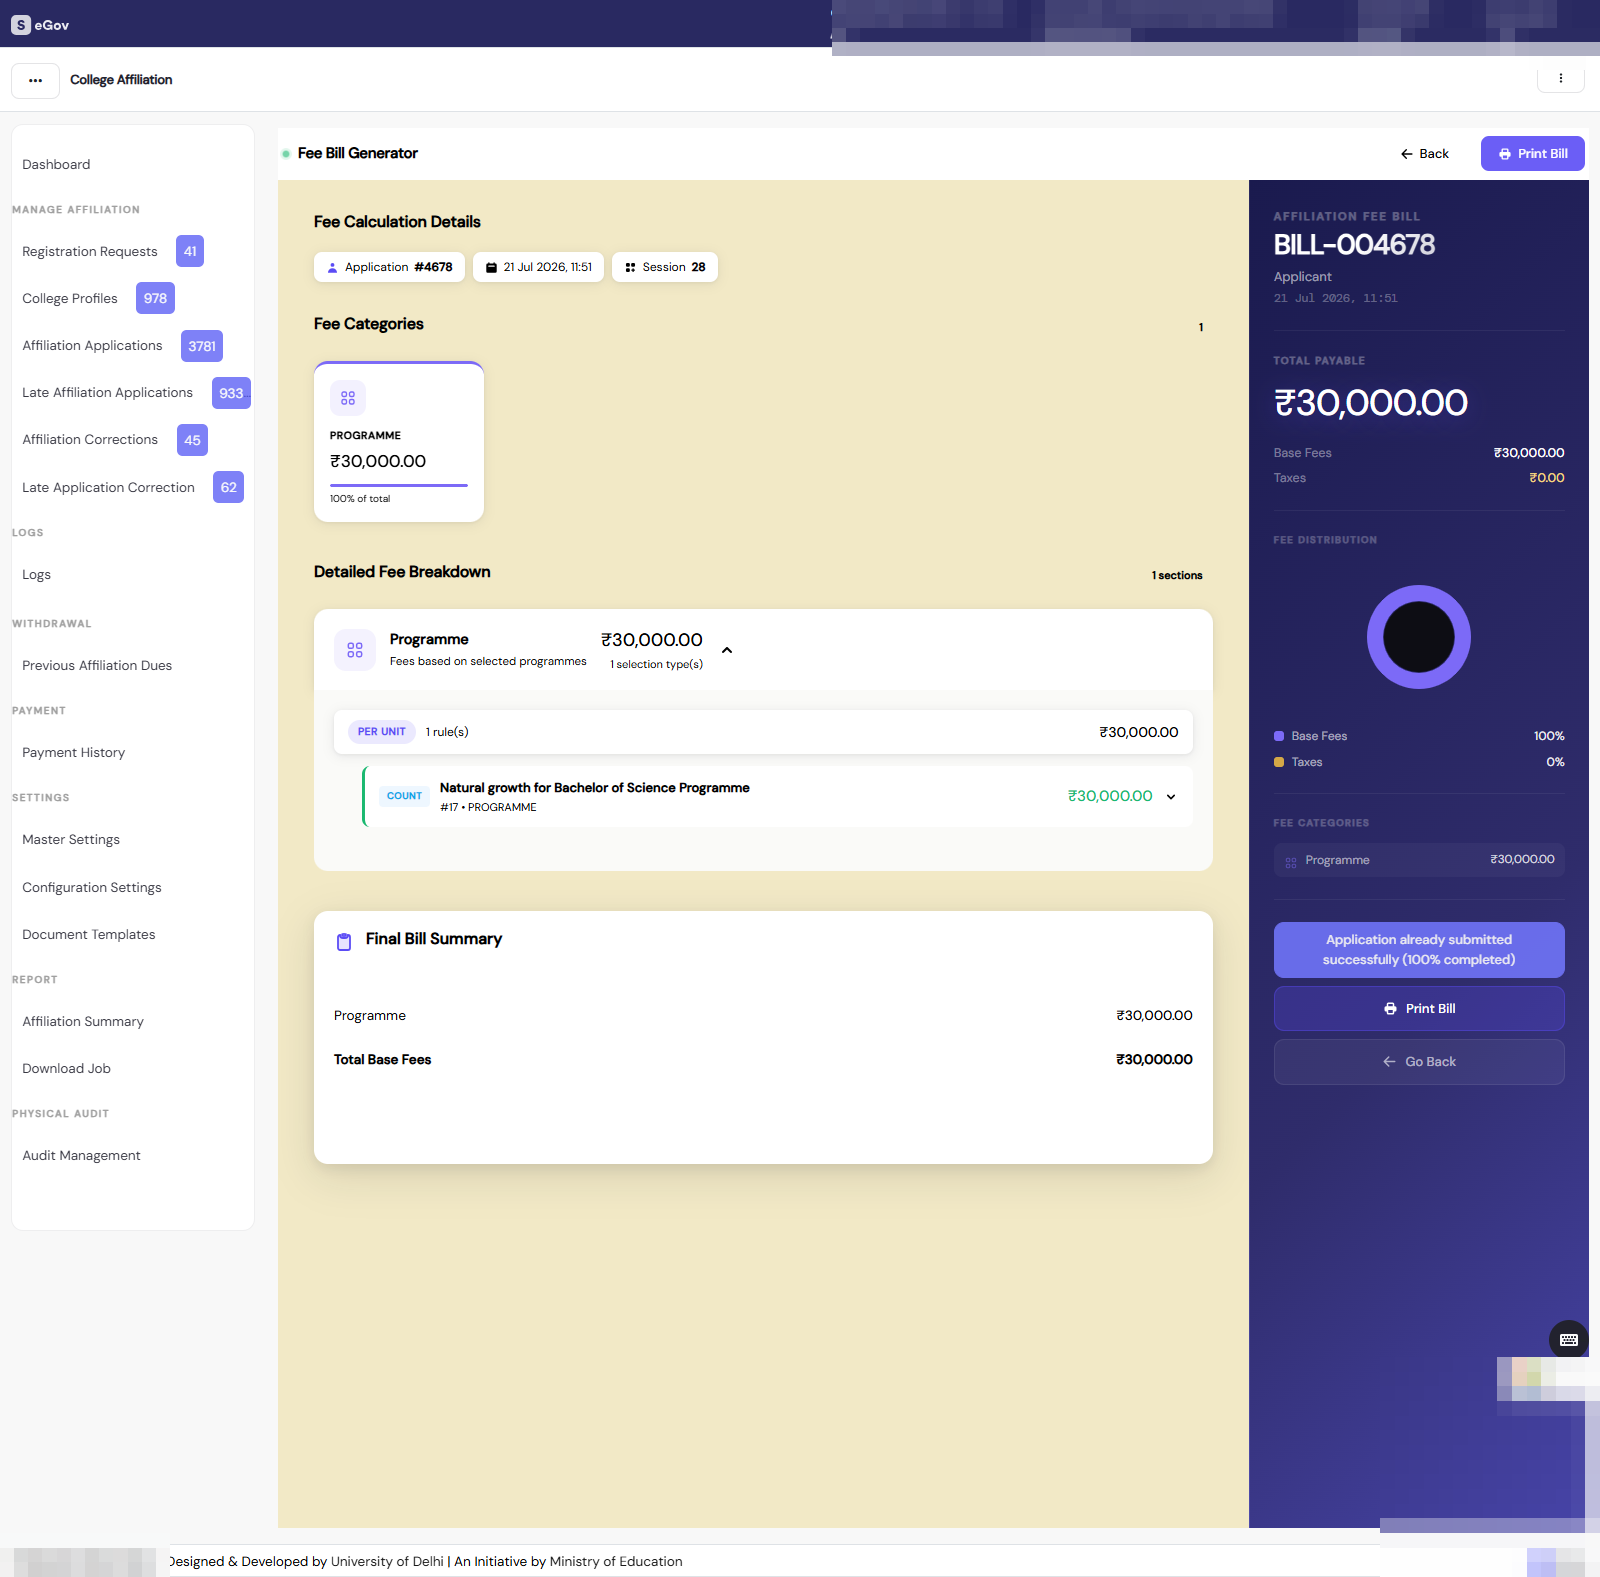
2.3 Affiliation Session Configuration
A session is one open application window. For each session the admin sets:
- Start and End dates (submissions after the End Date are auto-flagged Late and attract the configured late fee).
- The College Type and Affiliation (Application Request) Type the session serves.
- The Fee configuration mode — Automatic (the Fee Engine prices every application; the system refuses to save Automatic mode unless matching fee/programme configuration exists, so a session can never go live with zero rules) or Manual (admin enters fee heads per application).
- Allowed payment gateways (multi-select) and whether offline payment is accepted.
- The Audit Form (template) used if a physical audit is conducted for applications of this session — a committee cannot be assigned without one.
Only one Active session may exist per (college type, affiliation type) combination — attempting a duplicate is blocked with “A session is currently in progress for the selected college type and affiliation type."
2.4 Audit Form Templates (inspection scoring templates)
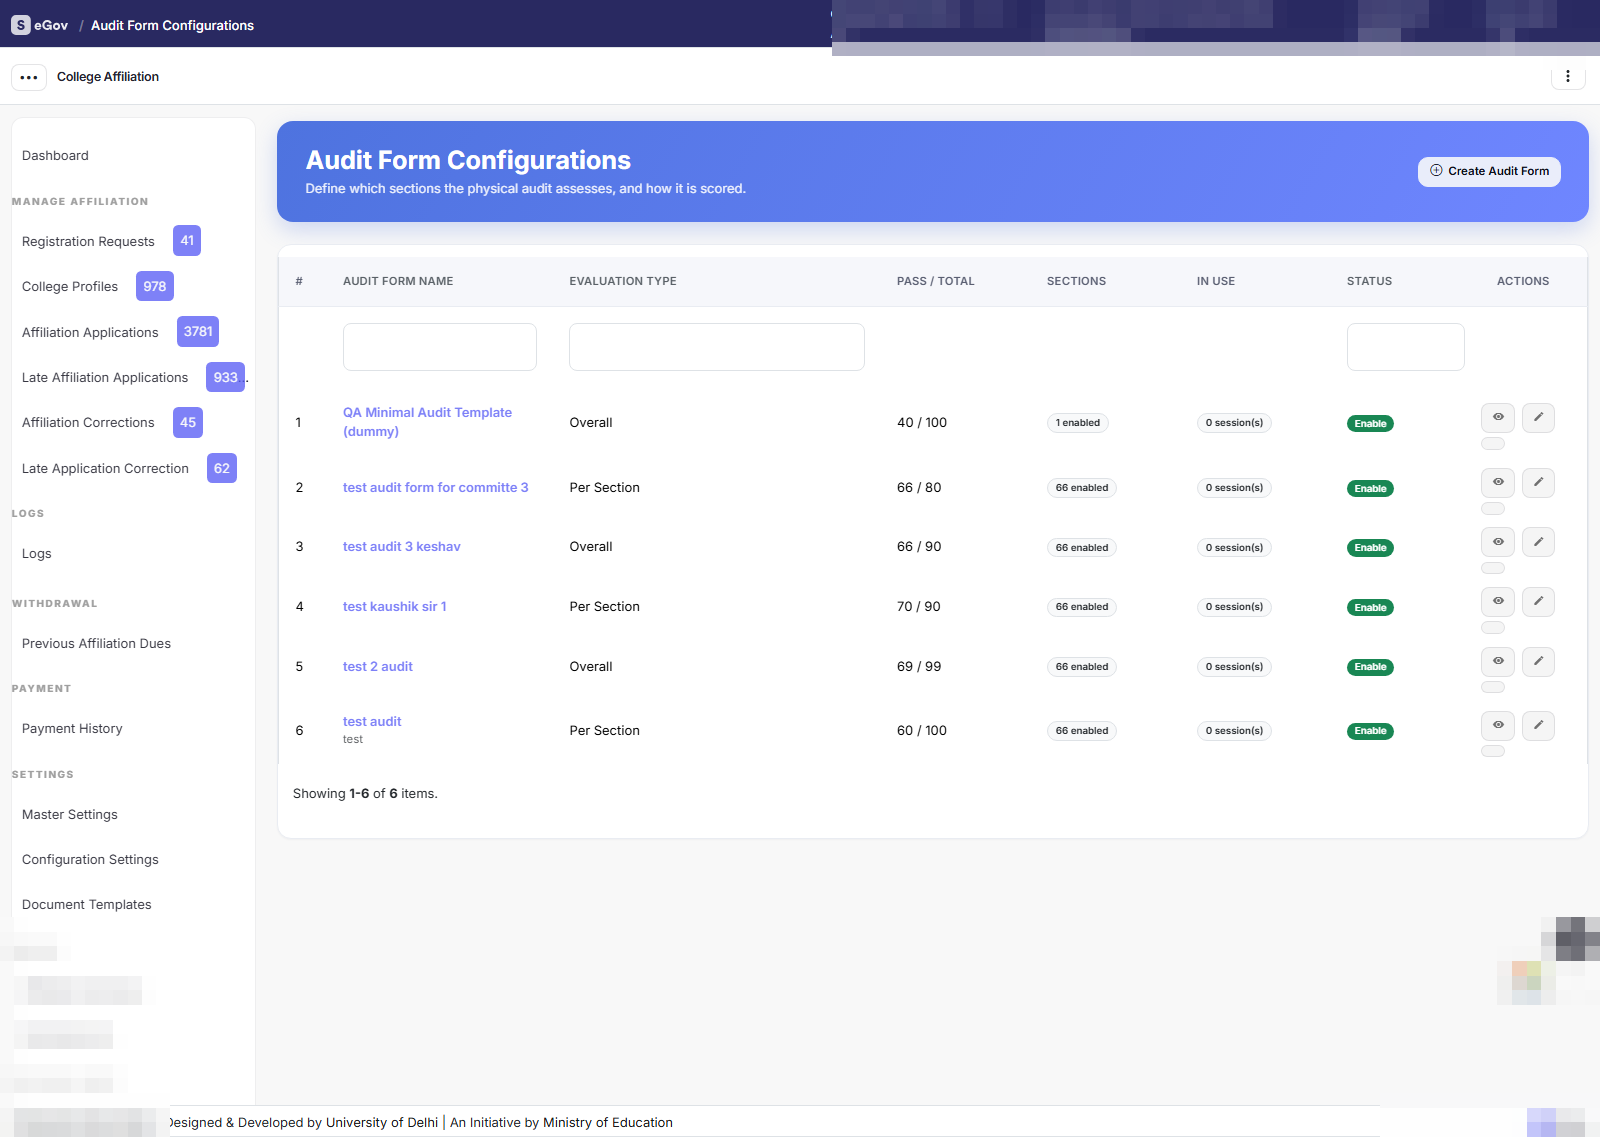
Audit Form templates define how a physical inspection is scored: which sections of the application are evaluated (faculty, library, labs, lecture rooms, etc. — or one overall assessment), the maximum score, whether grades are used, optional grade bands (e.g., A/B/C with score ranges), and whether grades auto-fill from scores.
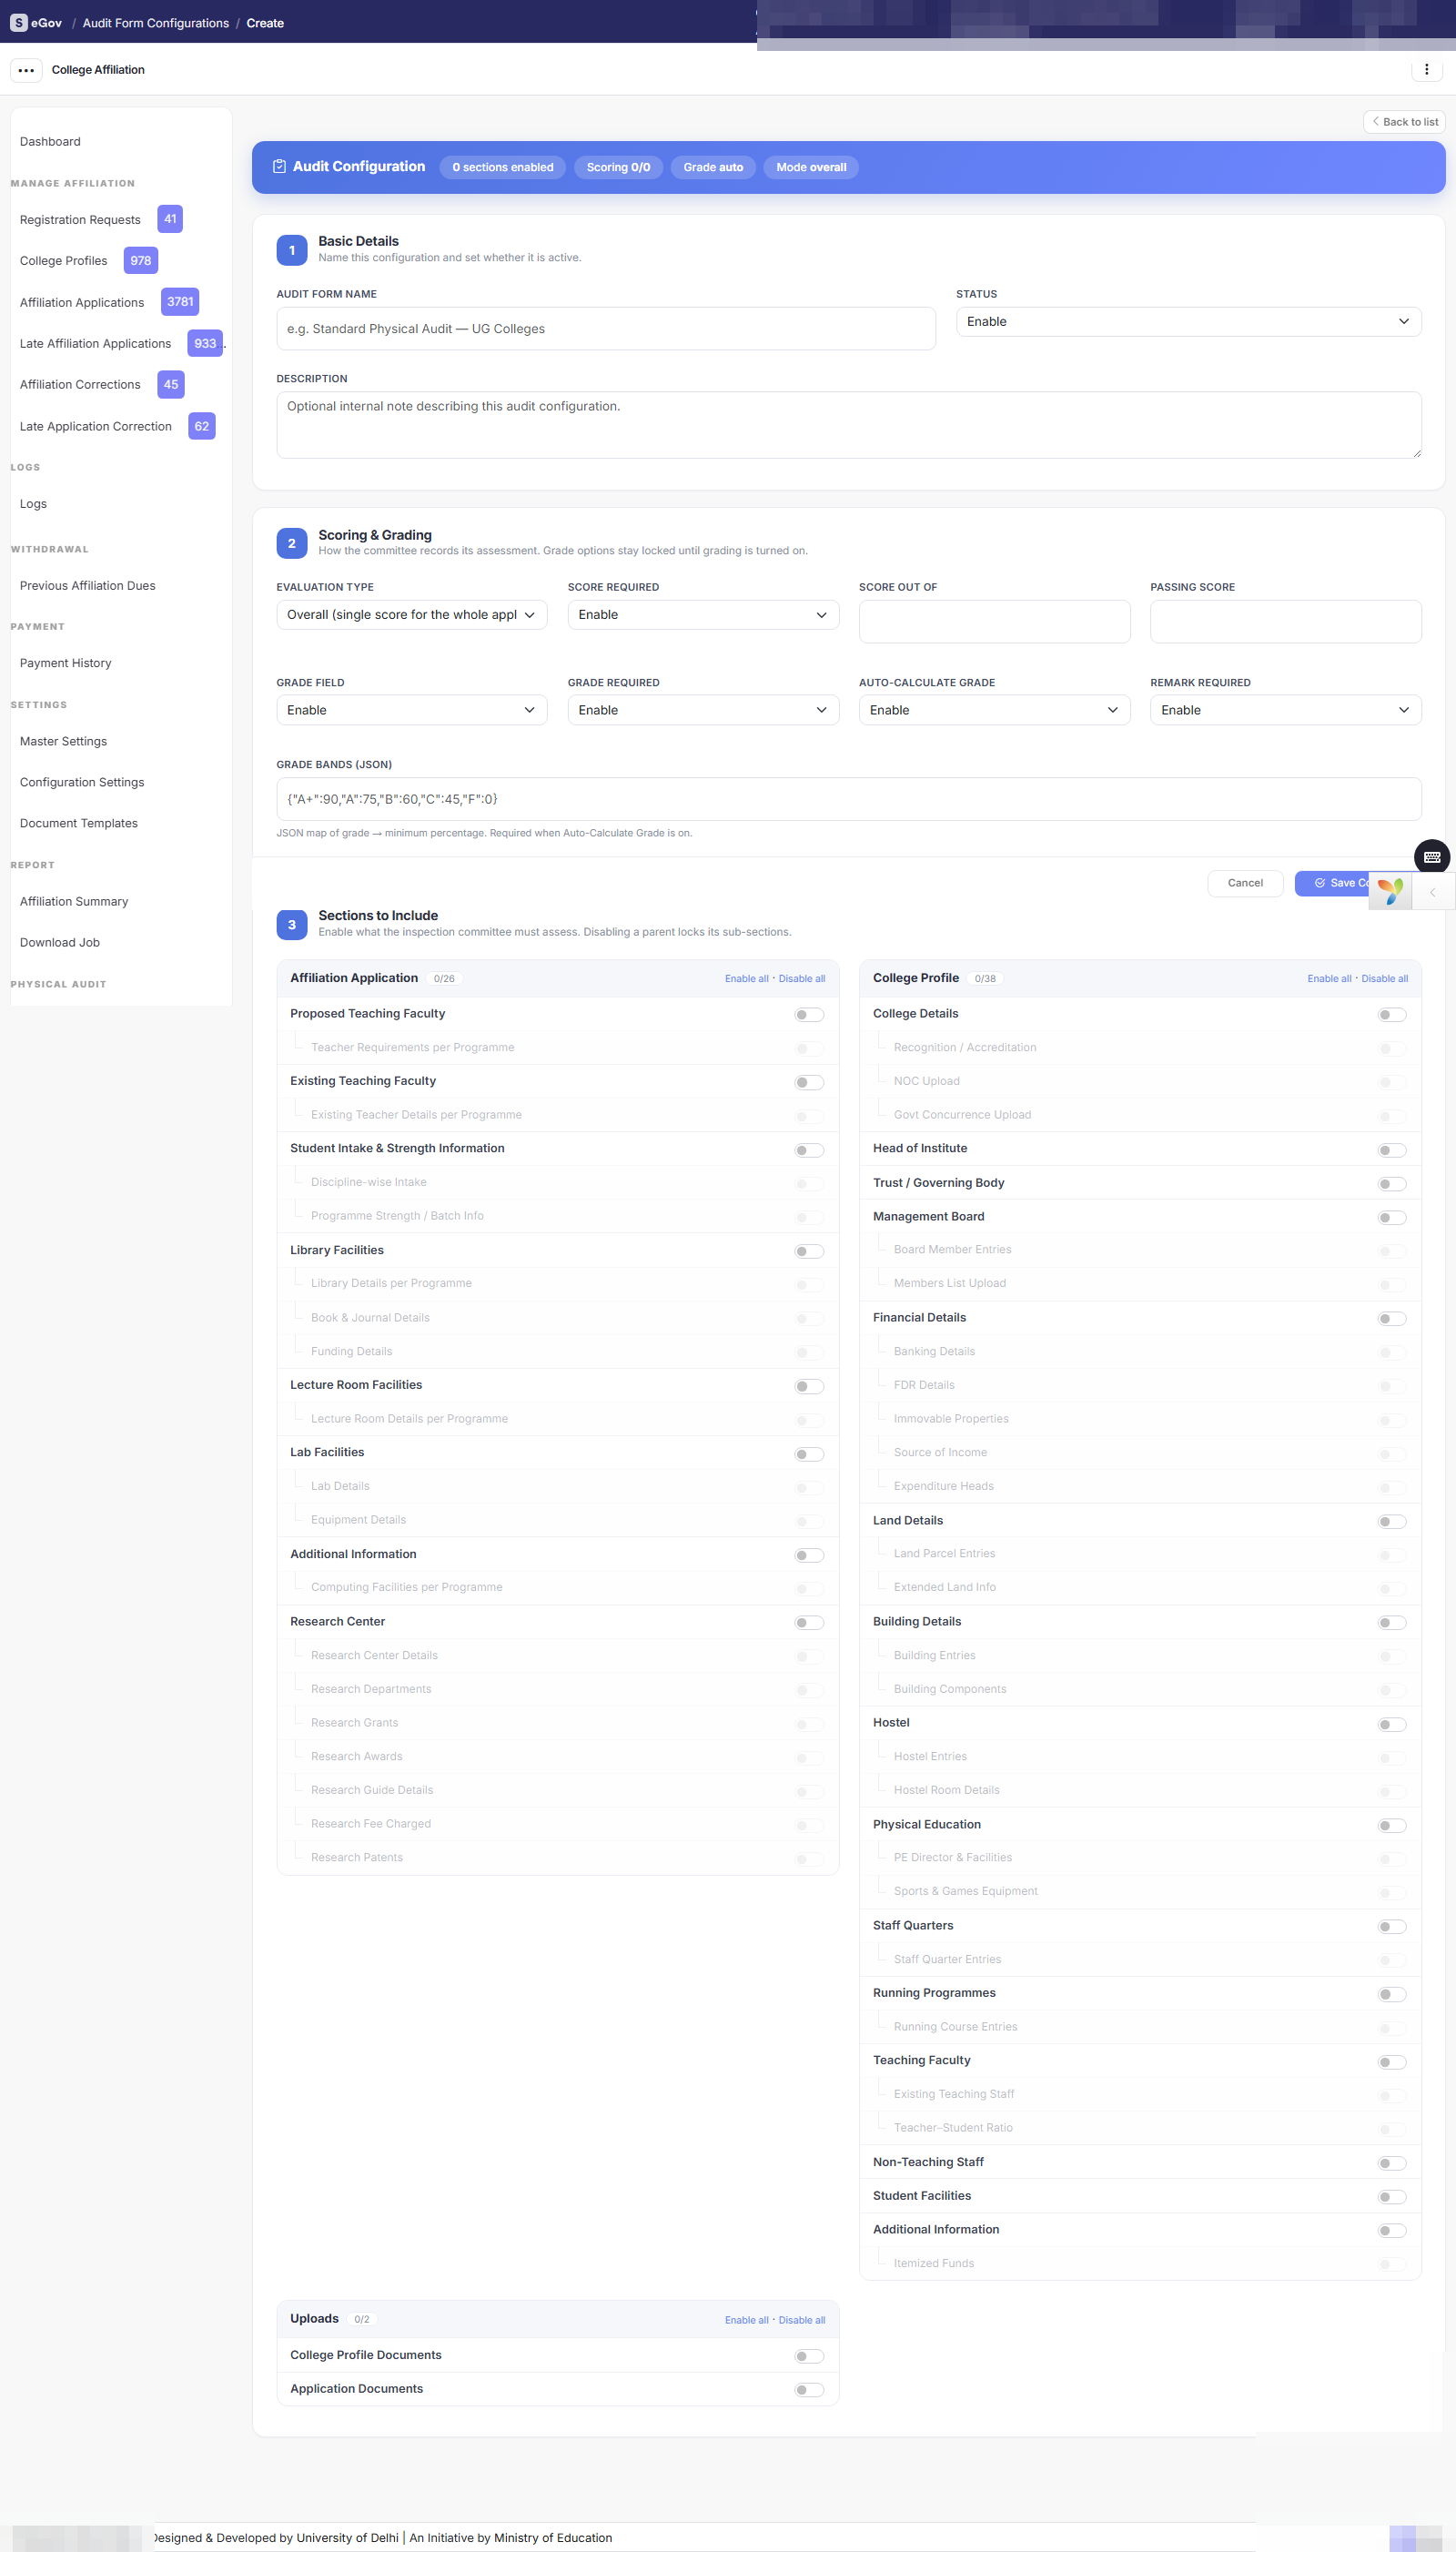
Create templates here, then link one to each session that requires physical audits. The template in force is snapshotted onto each audit at assignment time, so editing a template later never retroactively changes an in-flight inspection.
2.5 College Registration URL
- Open Settings → Configuration Settings → College Registration URL Configuration (gear icon).
- Set the registration Open date and Close date.
- Use the open/close control at the top-right of the page to manage access to the public form.
- Click Copy Application Link to place the public registration URL on the university website or to e-mail it to prospective colleges.
2.6 System Toggles (Affiliation Configuration)
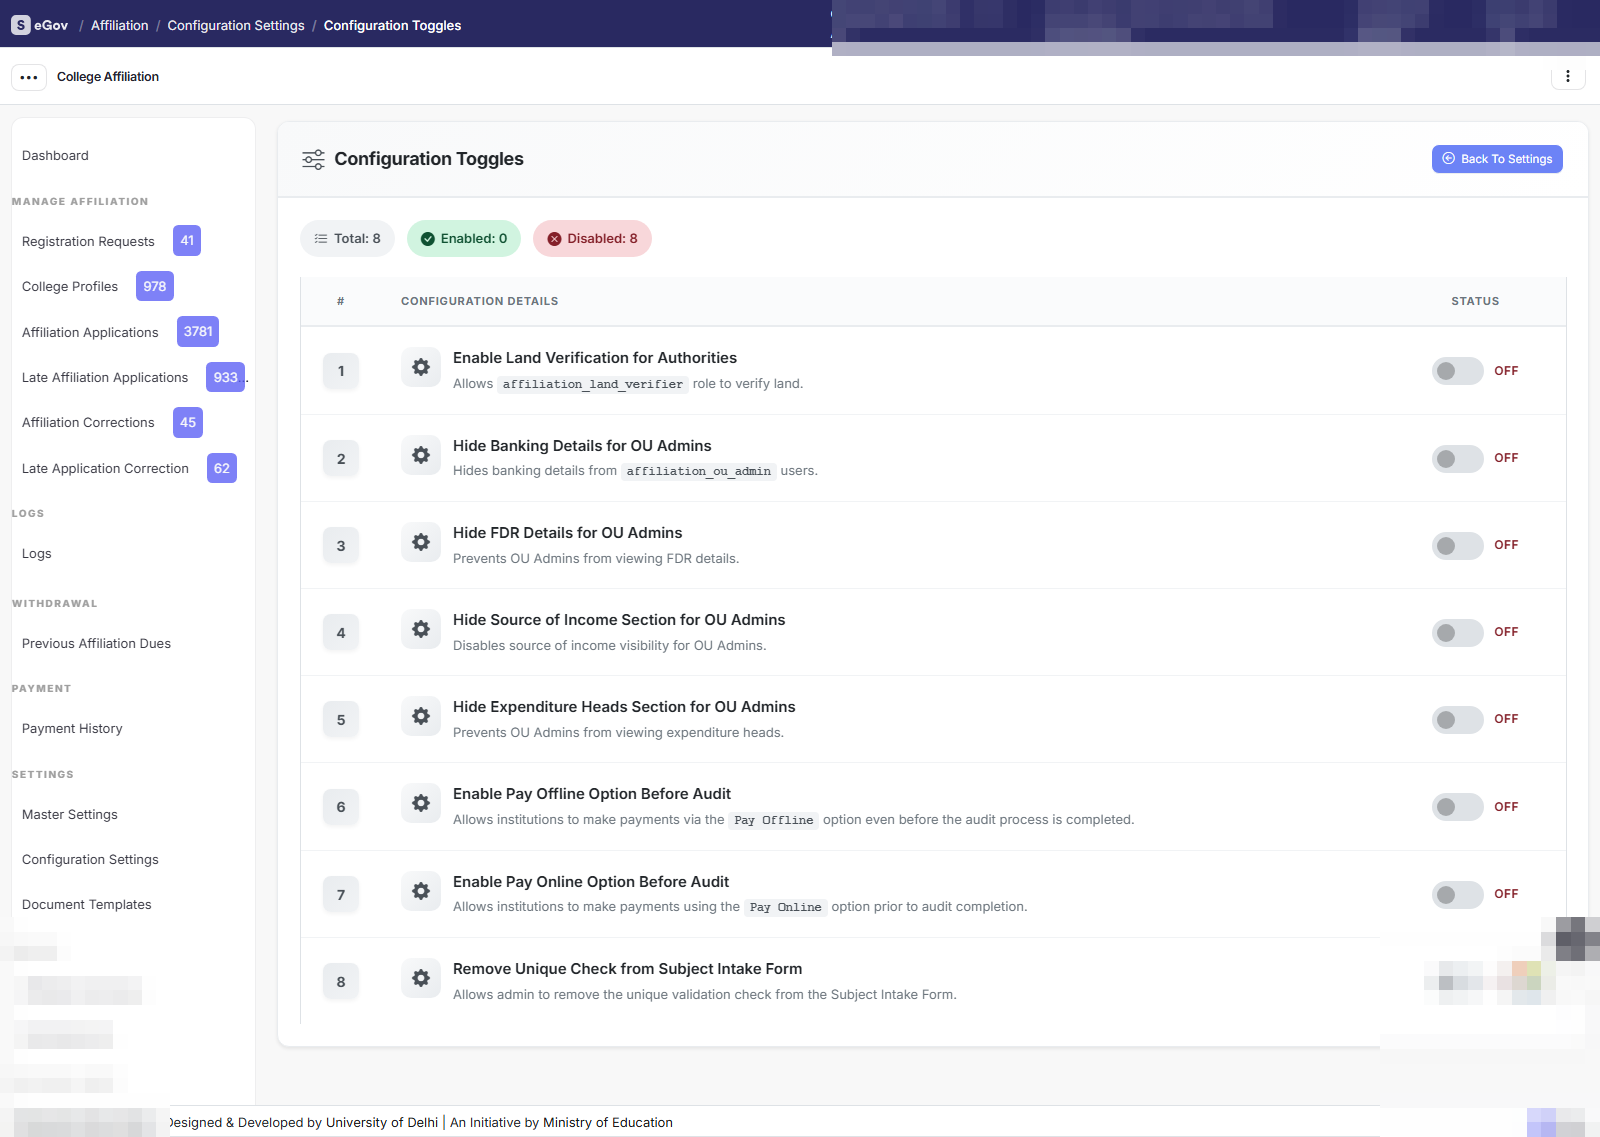
A page of on/off switches that adapt the module to the university’s process: land verification on/off, offline payments on/off, section visibility for OU admins, subject-intake uniqueness, bill version (v1 manual-era vs v2 engine-era), and similar. In HED mode each toggle is set per university.
Affiliation Management Process
Reviewing and Approving a College Profile
Where: Manage Affiliation → College Profiles.
Colleges work through ~22 profile sub-forms (Head of Institution, Trust/Society, Governing Board, Bank, FDR, Income, Expenditure, Land, Building, Hostel, Staff Quarters, Physical Education, Library, Labs, Teaching & Non-teaching staff, Student Facilities, Uploads, Declaration). The profile stays DRAFT until the college submits it.
- Open the profile from the list — each section shows a “Submitted ✓ / Not yet” indicator so you can see at a glance where the college stands.
- Approve — sets the profile to
APPROVED, e-mails the college “Your college profile is verified — apply for affiliation”, and writes a history log. The college can now apply in any open session. - Reject — sends a rejection e-mail with your remark and sets
REJECTED. - Re-submit — returns the profile to the college for specific corrections.
- Edit Name / Code / Head User — administrative corrections; changing the Head User re-points the profile, assigns the
affiliation_userrole to the new user and logs the old/new user IDs (all-or-nothing, rolled back on failure).

Land Verification (optional flow)
If the university has Land Verification enabled, the admin can Initiate Land Verification on a submitted profile, then assign a Land Verifier (the user receives the affiliation_land_verifier role and sees only their assigned requests). The verifier files the land report; the admin then continues the normal approval flow.
Reviewing an Affiliation Application
Where: Manage Affiliation → Affiliation Applications.
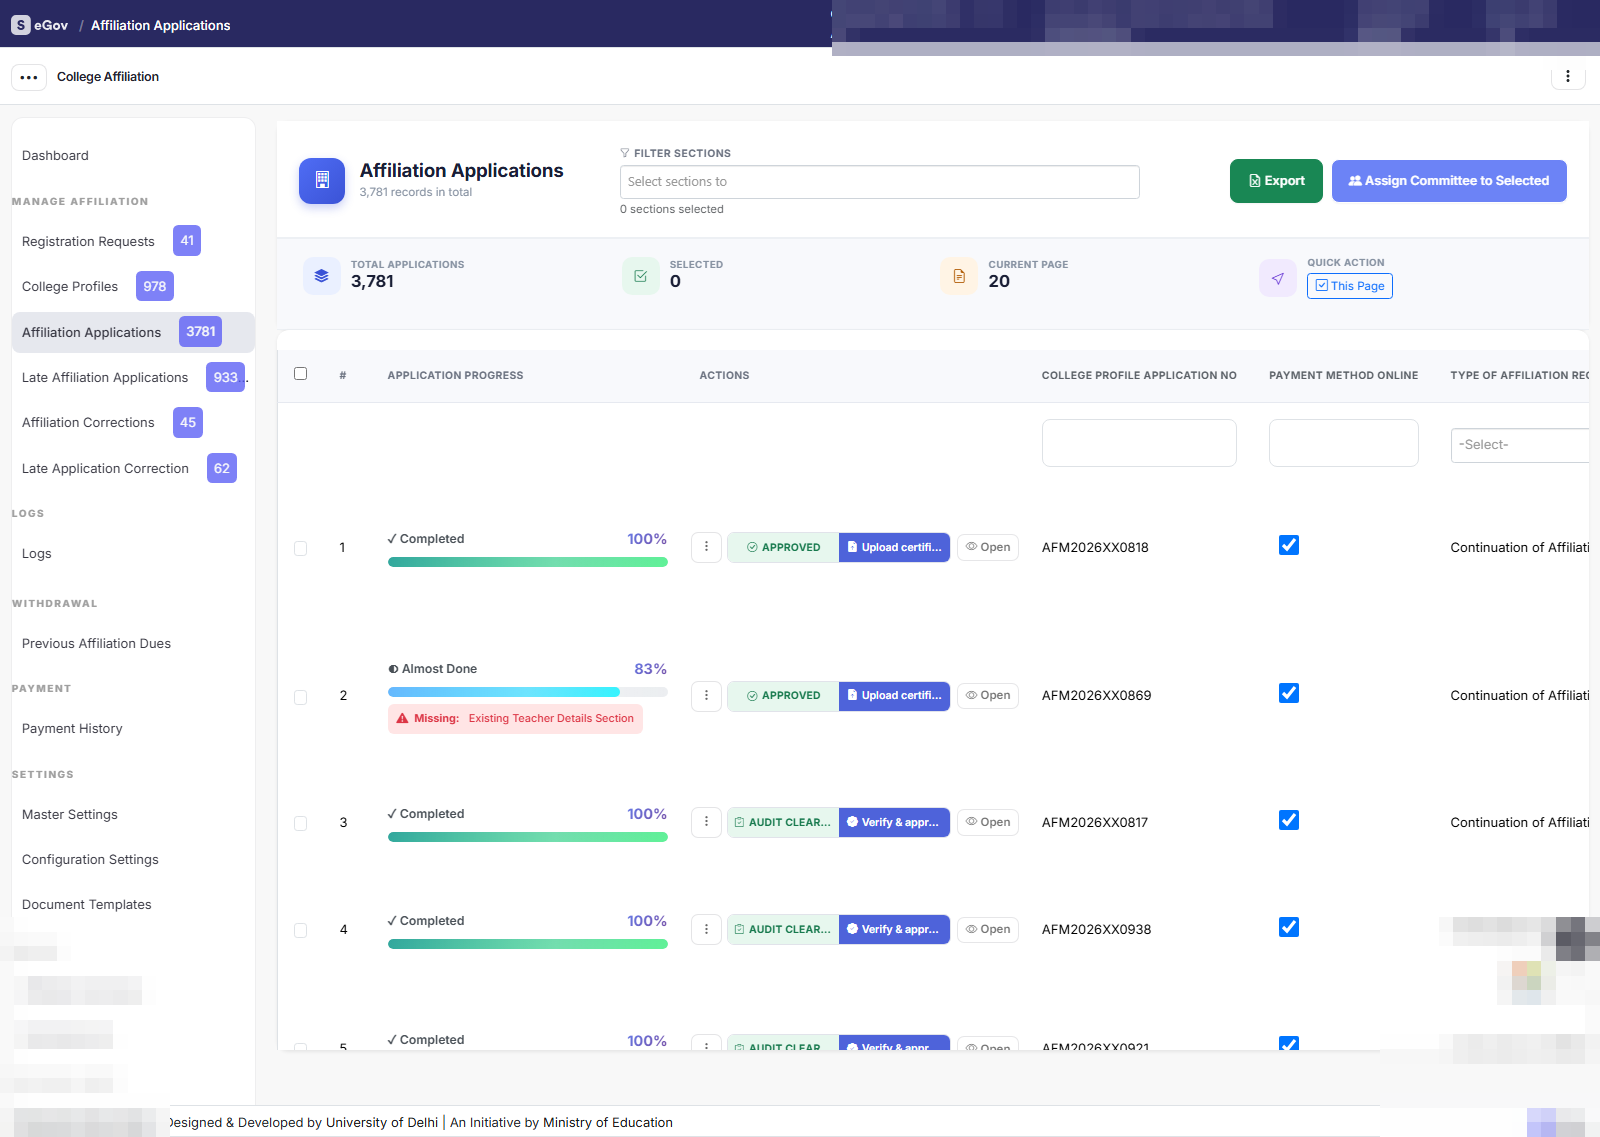
The grid shows every application with its status, payment state and physical-audit stage, with filters for each (including a Physical Audit filter that matches the audit’s own recorded state). The application list is split into four sibling lists so each stays reviewable:
| List | Contents |
|---|---|
| Affiliation Applications | Regular applications |
| Late Affiliation Applications | Submitted after the session End Date (late fee added) |
| Affiliation Corrections | Applications the admin reopened for correction |
| Late Application Correction | Both late and reopened |
Opening an application shows every sub-form the college filled, the fee summary, payment state, audit state, and the admin actions:
- Approve (mails “pay now” where fees are pending) / Reject (mails the remark) / Resubmit (returns it to DRAFT for the college to fix).
- Reopen a decided/paid application for correction — it moves to the Corrections list.
- Fee actions — on Manual-mode sessions, enter/override fee heads; add or remove late fees and inspection fees; the system refuses a zero-total overwrite.
- Assign Committee / Skip Audit / Review Physical Audit / Publish Outcome — the physical-audit controls (next section).
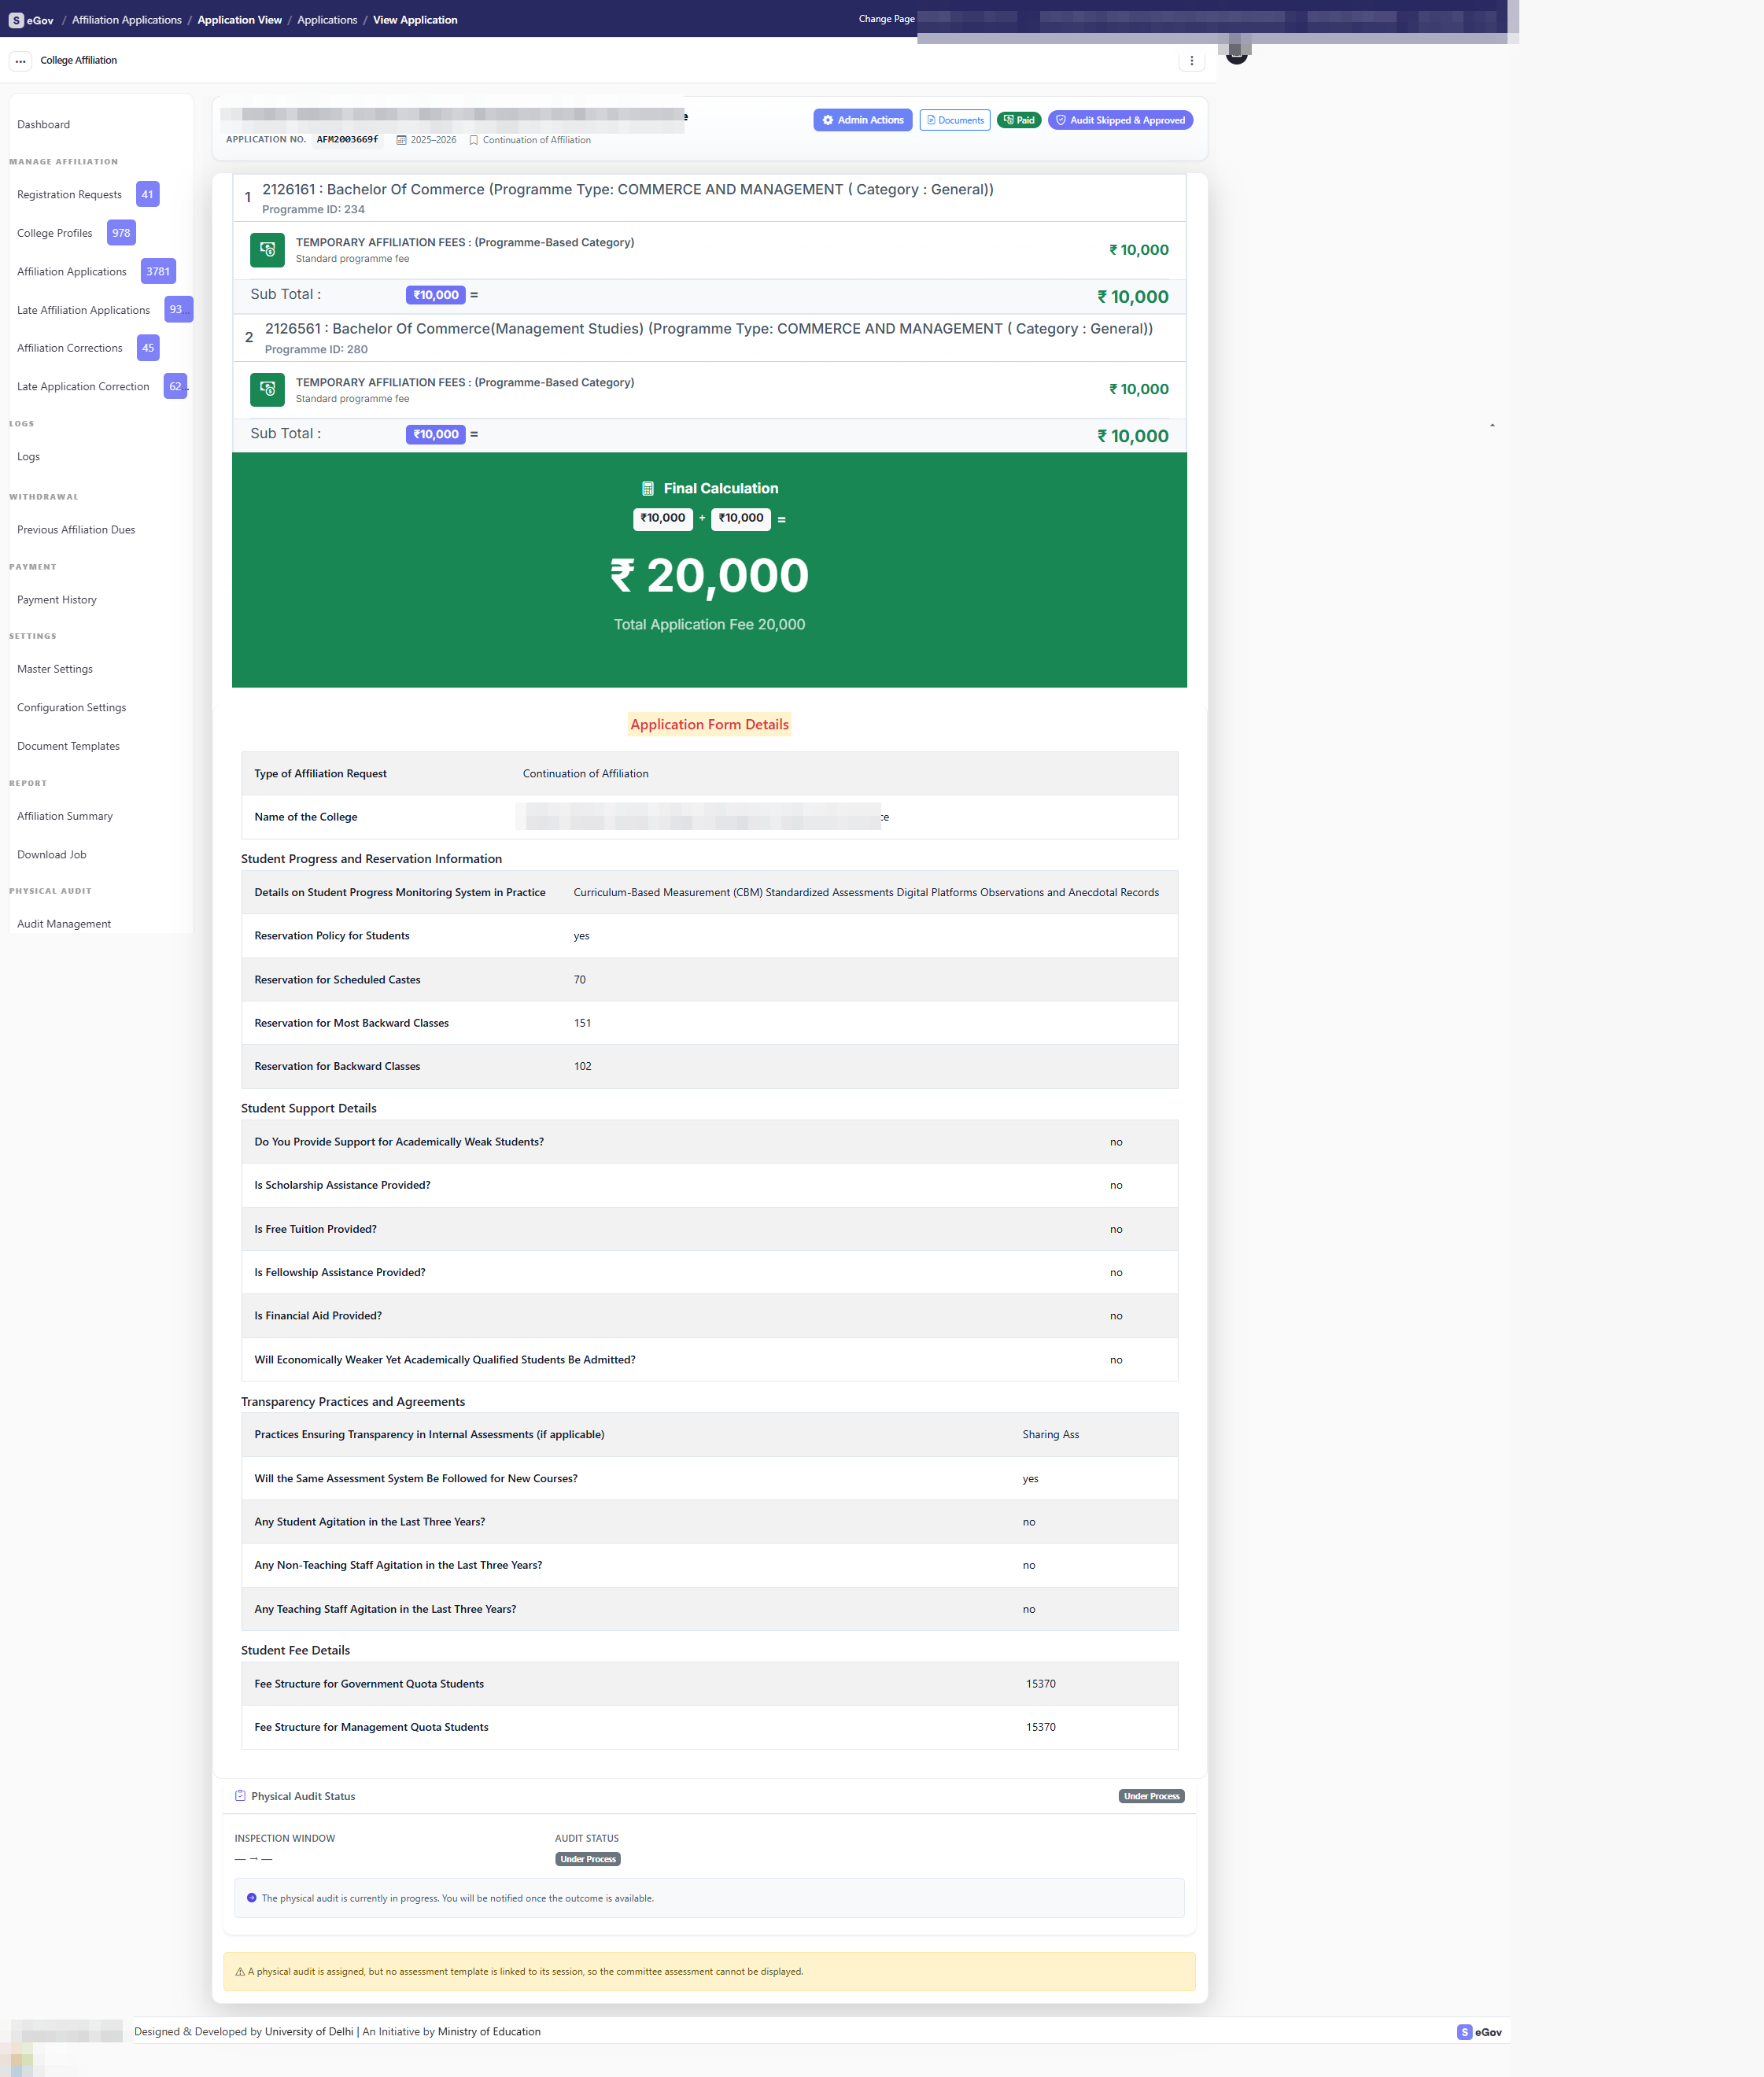
Application status quick reference
| Status | Meaning |
|---|---|
DRAFT | In progress at the college, not yet submitted |
SUBMITTED | Waiting for university review |
APPROVED / REJECTED | University decision recorded |
REOPENED | Admin reopened it for correction |
Late Application Fee Added | Submitted after the End Date |
Late Application Fee Removed | Admin waived the late fee |
Land Verification Initiated | Land check in progress |
Physical Audit Initiated | Inspection committee assigned |
Physical Audit Approved | Inspection passed |
Physical Audit Approved Temporarily Without Inspection | Approved with the inspection deferred |
Creation of Physical Audit Inspection Committee has been Skipped | Audit formally skipped |
Physical Audit — the Complete Committee Workflow
Physical audit happens per application after approval. This is the current, fully digital workflow — every role, every screen, every rule.
Affiliation Admin / OU Admin           Committee Member / Admin        Guest Observer (no login)
  assigns a committee     ──────►        scores each section              (invited only)
  (single or bulk)                       after declaring no                leaves a per-section
                                         conflict of interest               advisory evaluation
                                              │
                                     Committee Admin consolidates
                                     each section's verdict
                                              │
                                     Committee Admin finalizes
                                     (outcome + overall remark)
                                              │
                              ◄────  Affiliation Admin reviews
  publishes the outcome                (read-only, any time)
  to the college
                                              │
                                       College sees the result
Assigning a committee
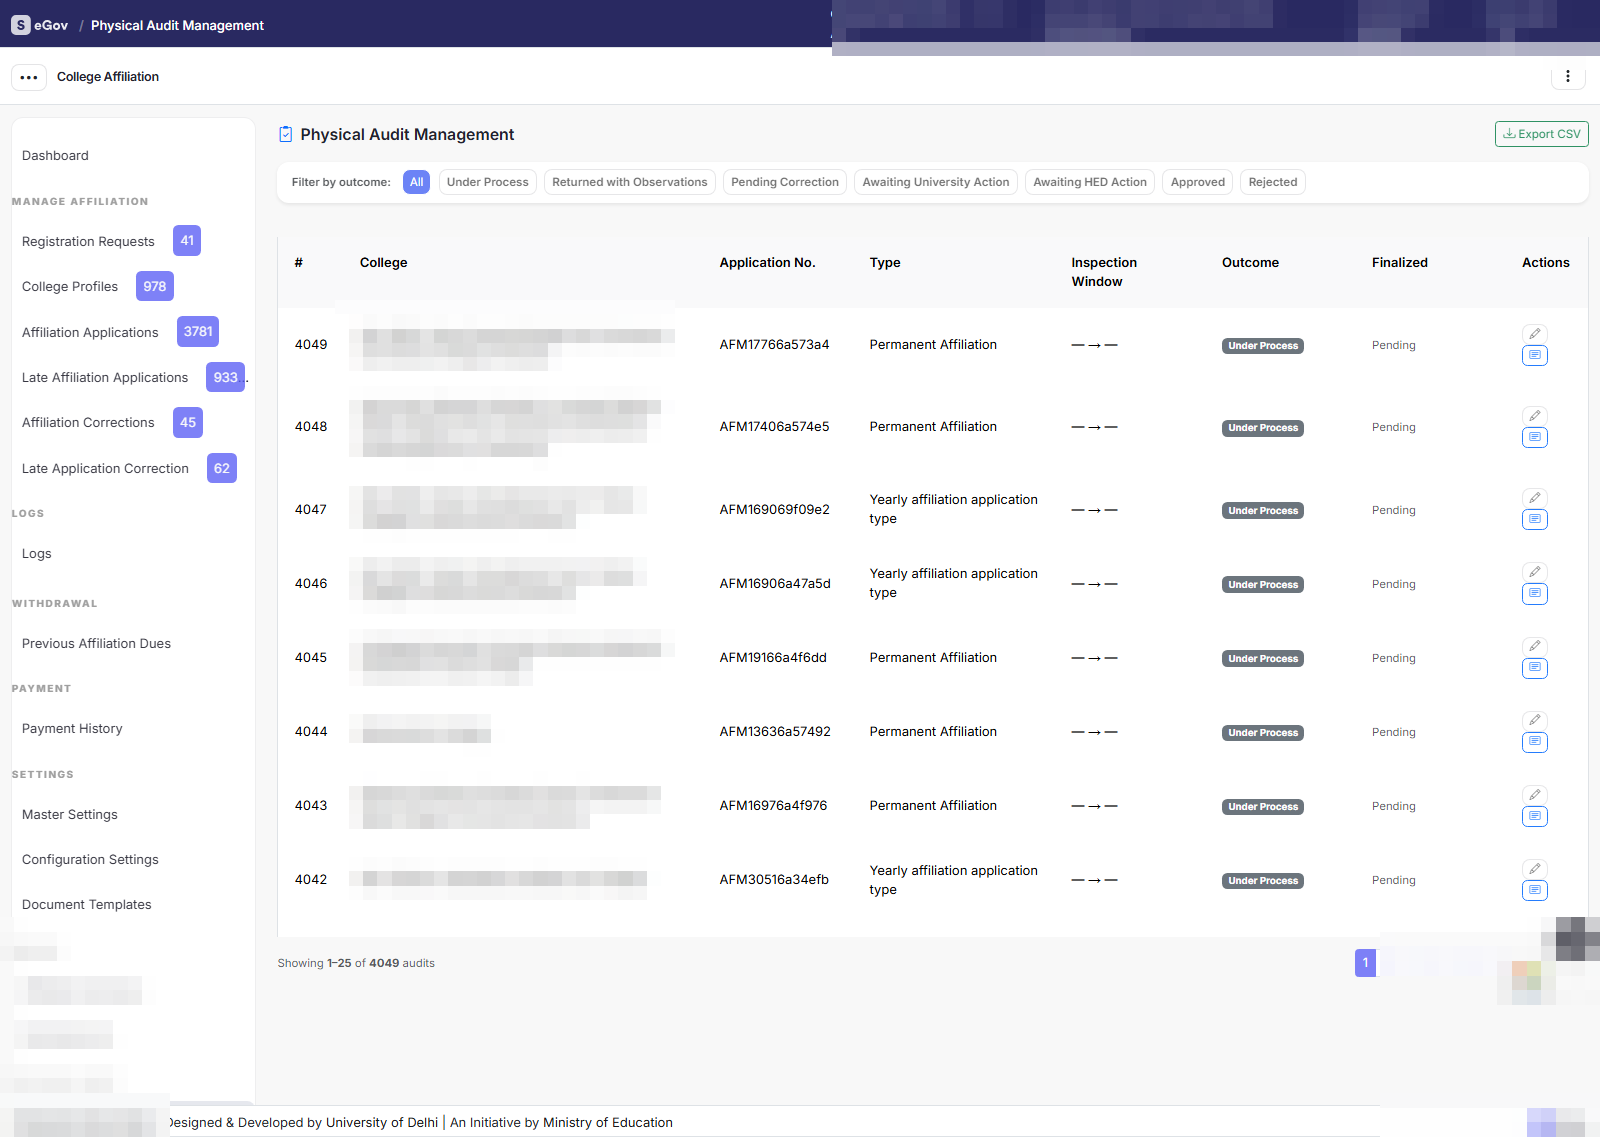
- Single: open the application → Assign Committee. The application’s session must have an Audit Form template linked, or the page stops you. Choose the committee, the inspection window (from/to dates), and optional Guest Observers (name, designation, e-mail, phone). On save, the audit record snapshots the template in force, the application moves to
Physical Audit Initiated, and e-mails go out — committee admins and members get the workspace link, guests get their no-login link, and the college gets a pre-audit checklist. - Bulk: select multiple rows on the applications grid → Bulk Assign Committee — one committee, one window, applied to every selected row. The batch automatically skips (and reports) rows that are finalized, outside your institution, in an ineligible status, or whose session has no template; rows with an in-progress audit require an explicit overwrite confirmation. A summary states exactly what was assigned, reassigned and skipped.
- Skip: Skip Committee Creation creates a stub audit and marks the application as skipped. If the session has an audit template, a reason must be typed — deliberate friction so a real audit is not bypassed accidentally. A skipped audit notifies the college immediately (the publish gate does not apply).
Committee member workflow — COI and scoring
Committee members work in their own Audit Committee workspace (dashboard + “Institutions to Audit”); a user who is only a committee member is automatically sent there on login.
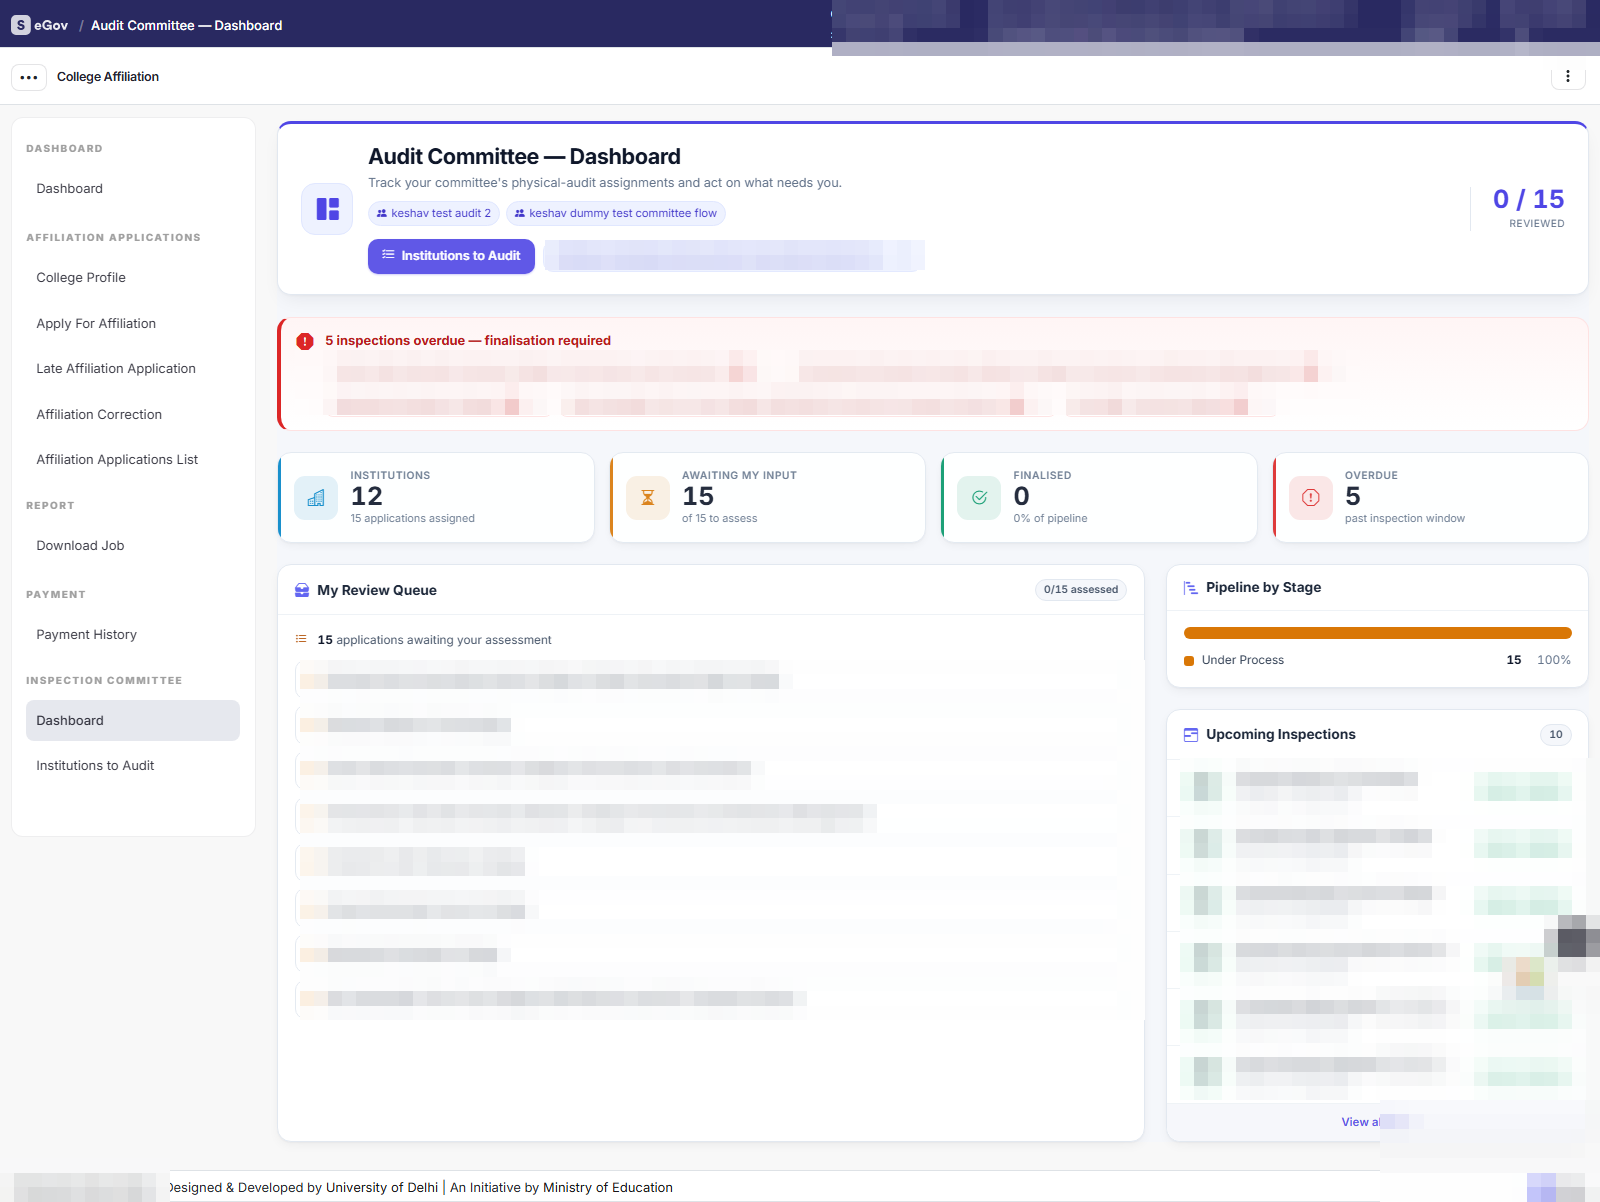
Opening an assigned application lands in the audit cockpit:

- Conflict-of-interest declaration first (mandatory). No score can be saved by any assessor before their own COI declaration; the scoring inputs stay visibly locked until it is submitted (which unlocks the page instantly, without a reload).
- Score each section. Each section shows the college’s actual submitted data for that area (never re-typed), then the inputs: a numeric score bounded by the template’s maximum (with an inline range hint), an optional grade (dropdown when the template defines grade bands, otherwise validated free text), and a remark. A progress bar updates as you type; a section-navigation rail and back-to-top button make long templates navigable.
- Save Draft vs Submit. Drafts stay private to the member and editable; Submit locks the section and makes it visible to the committee admin. Navigating away with unsaved changes triggers a browser warning.
Committee admin workflow — consolidation and finalization
The committee admin sees everything a member sees, plus:

- Team Readiness panel — every member’s progress, with a Remind Pending Members e-mail button.
- Member score table per section — all submitted scores side by side with min/average/max and a consensus badge (Consensus / Minor spread / Divergent).
- Consolidated Verdict per section — the admin’s own score/grade/remark (the figures that officially count), with a “Pre-fill avg” starting point.
- Record Audit Outcome — the overall outcome (
Under Process,Returned with Observations,Pending Correction,Awaiting University Action,Awaiting HED Action,Approved,Rejected) and an overall remark.
Finalization is gated: a remark is mandatory for Rejected / Returned with Observations / Pending Correction (it is the only explanation the college receives), and every section needs a consolidated score before an Approved-class outcome on per-section templates. Finalize Audit locks every input read-only, moves the application to the outcome-matched status, and logs the action. The outcome is not yet visible to the college.
A finalized audit can be re-opened by a committee admin for a genuine correction — previous consolidated scores are kept for reference, and concurrent finalize/re-open actions are race-protected.
Guest Observer workflow (no login)
Invited guests receive a unique link: they enter the e-mail they were invited with, receive an OTP, declare no conflict of interest, and then see the same section-by-section evaluation a member sees. Their input is strictly advisory — stored separately, never averaged into official scores, clearly labelled as such. The OTP prompt looks identical for invited and uninvited e-mails, so the guest list can never be probed.
Reviewing, publishing and reporting (Affiliation Admin)
| Screen | What it shows | When |
|---|---|---|
| View Audit | Compact consolidated summary — metadata, section verdicts, member participation matrix, guest evaluations, outcome and remark | Any stage |
| View Consolidated Audit | The full committee cockpit in strict read-only — every member’s scores, exactly as the committee sees it | Any stage |
| Print Report | Print-optimised inspection report for the file | After finalization |
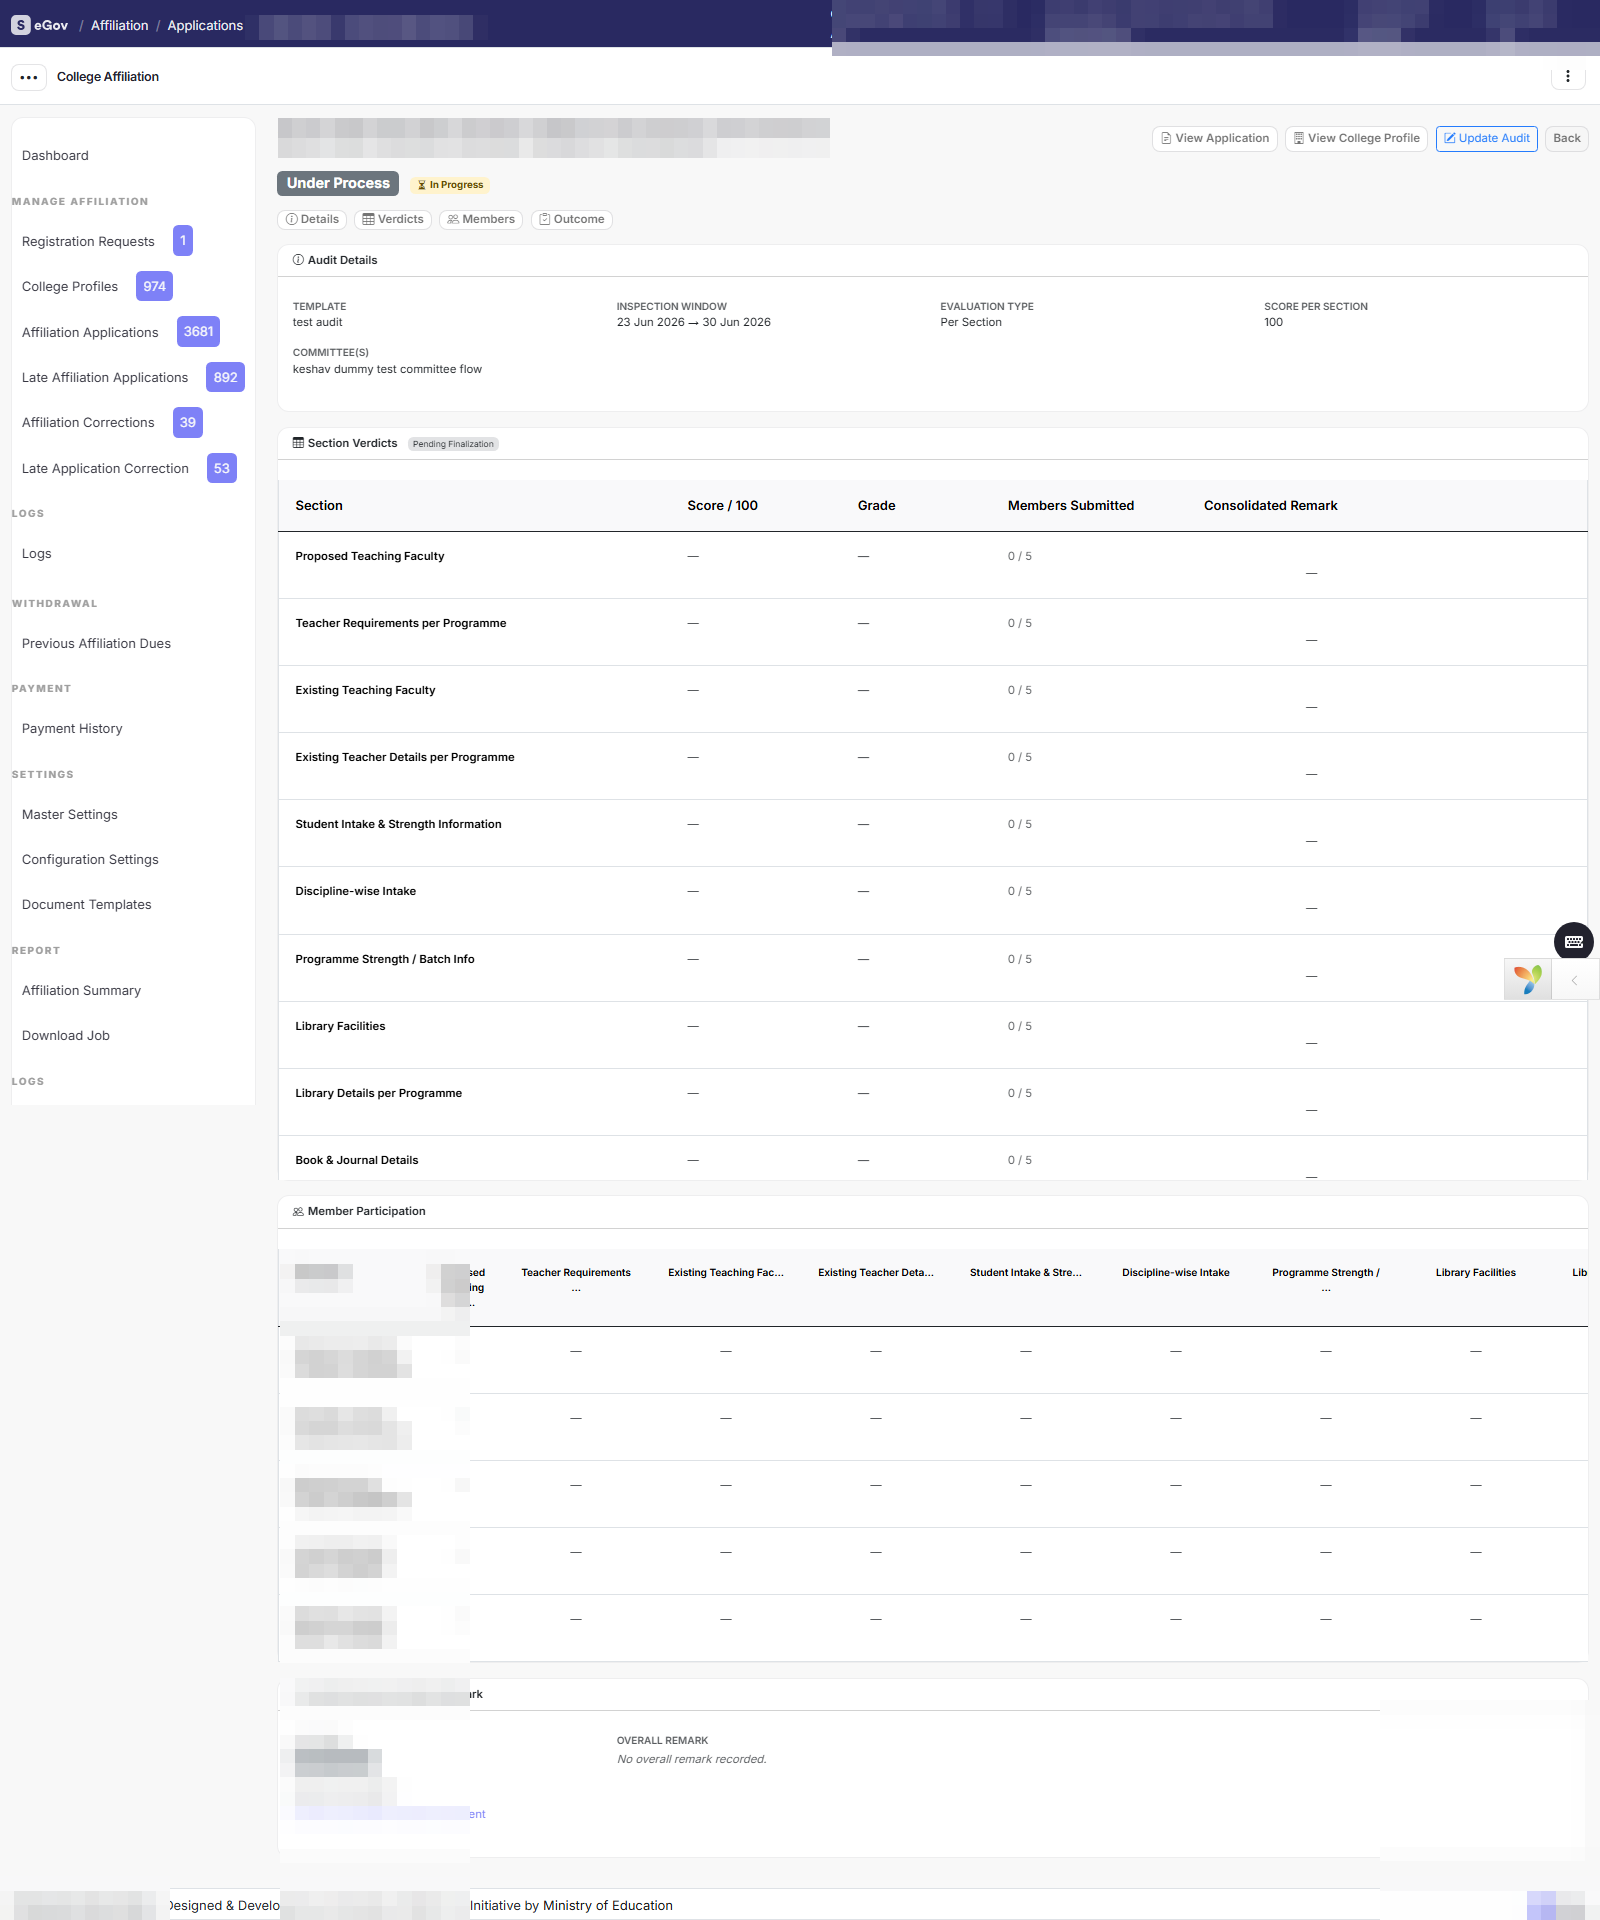
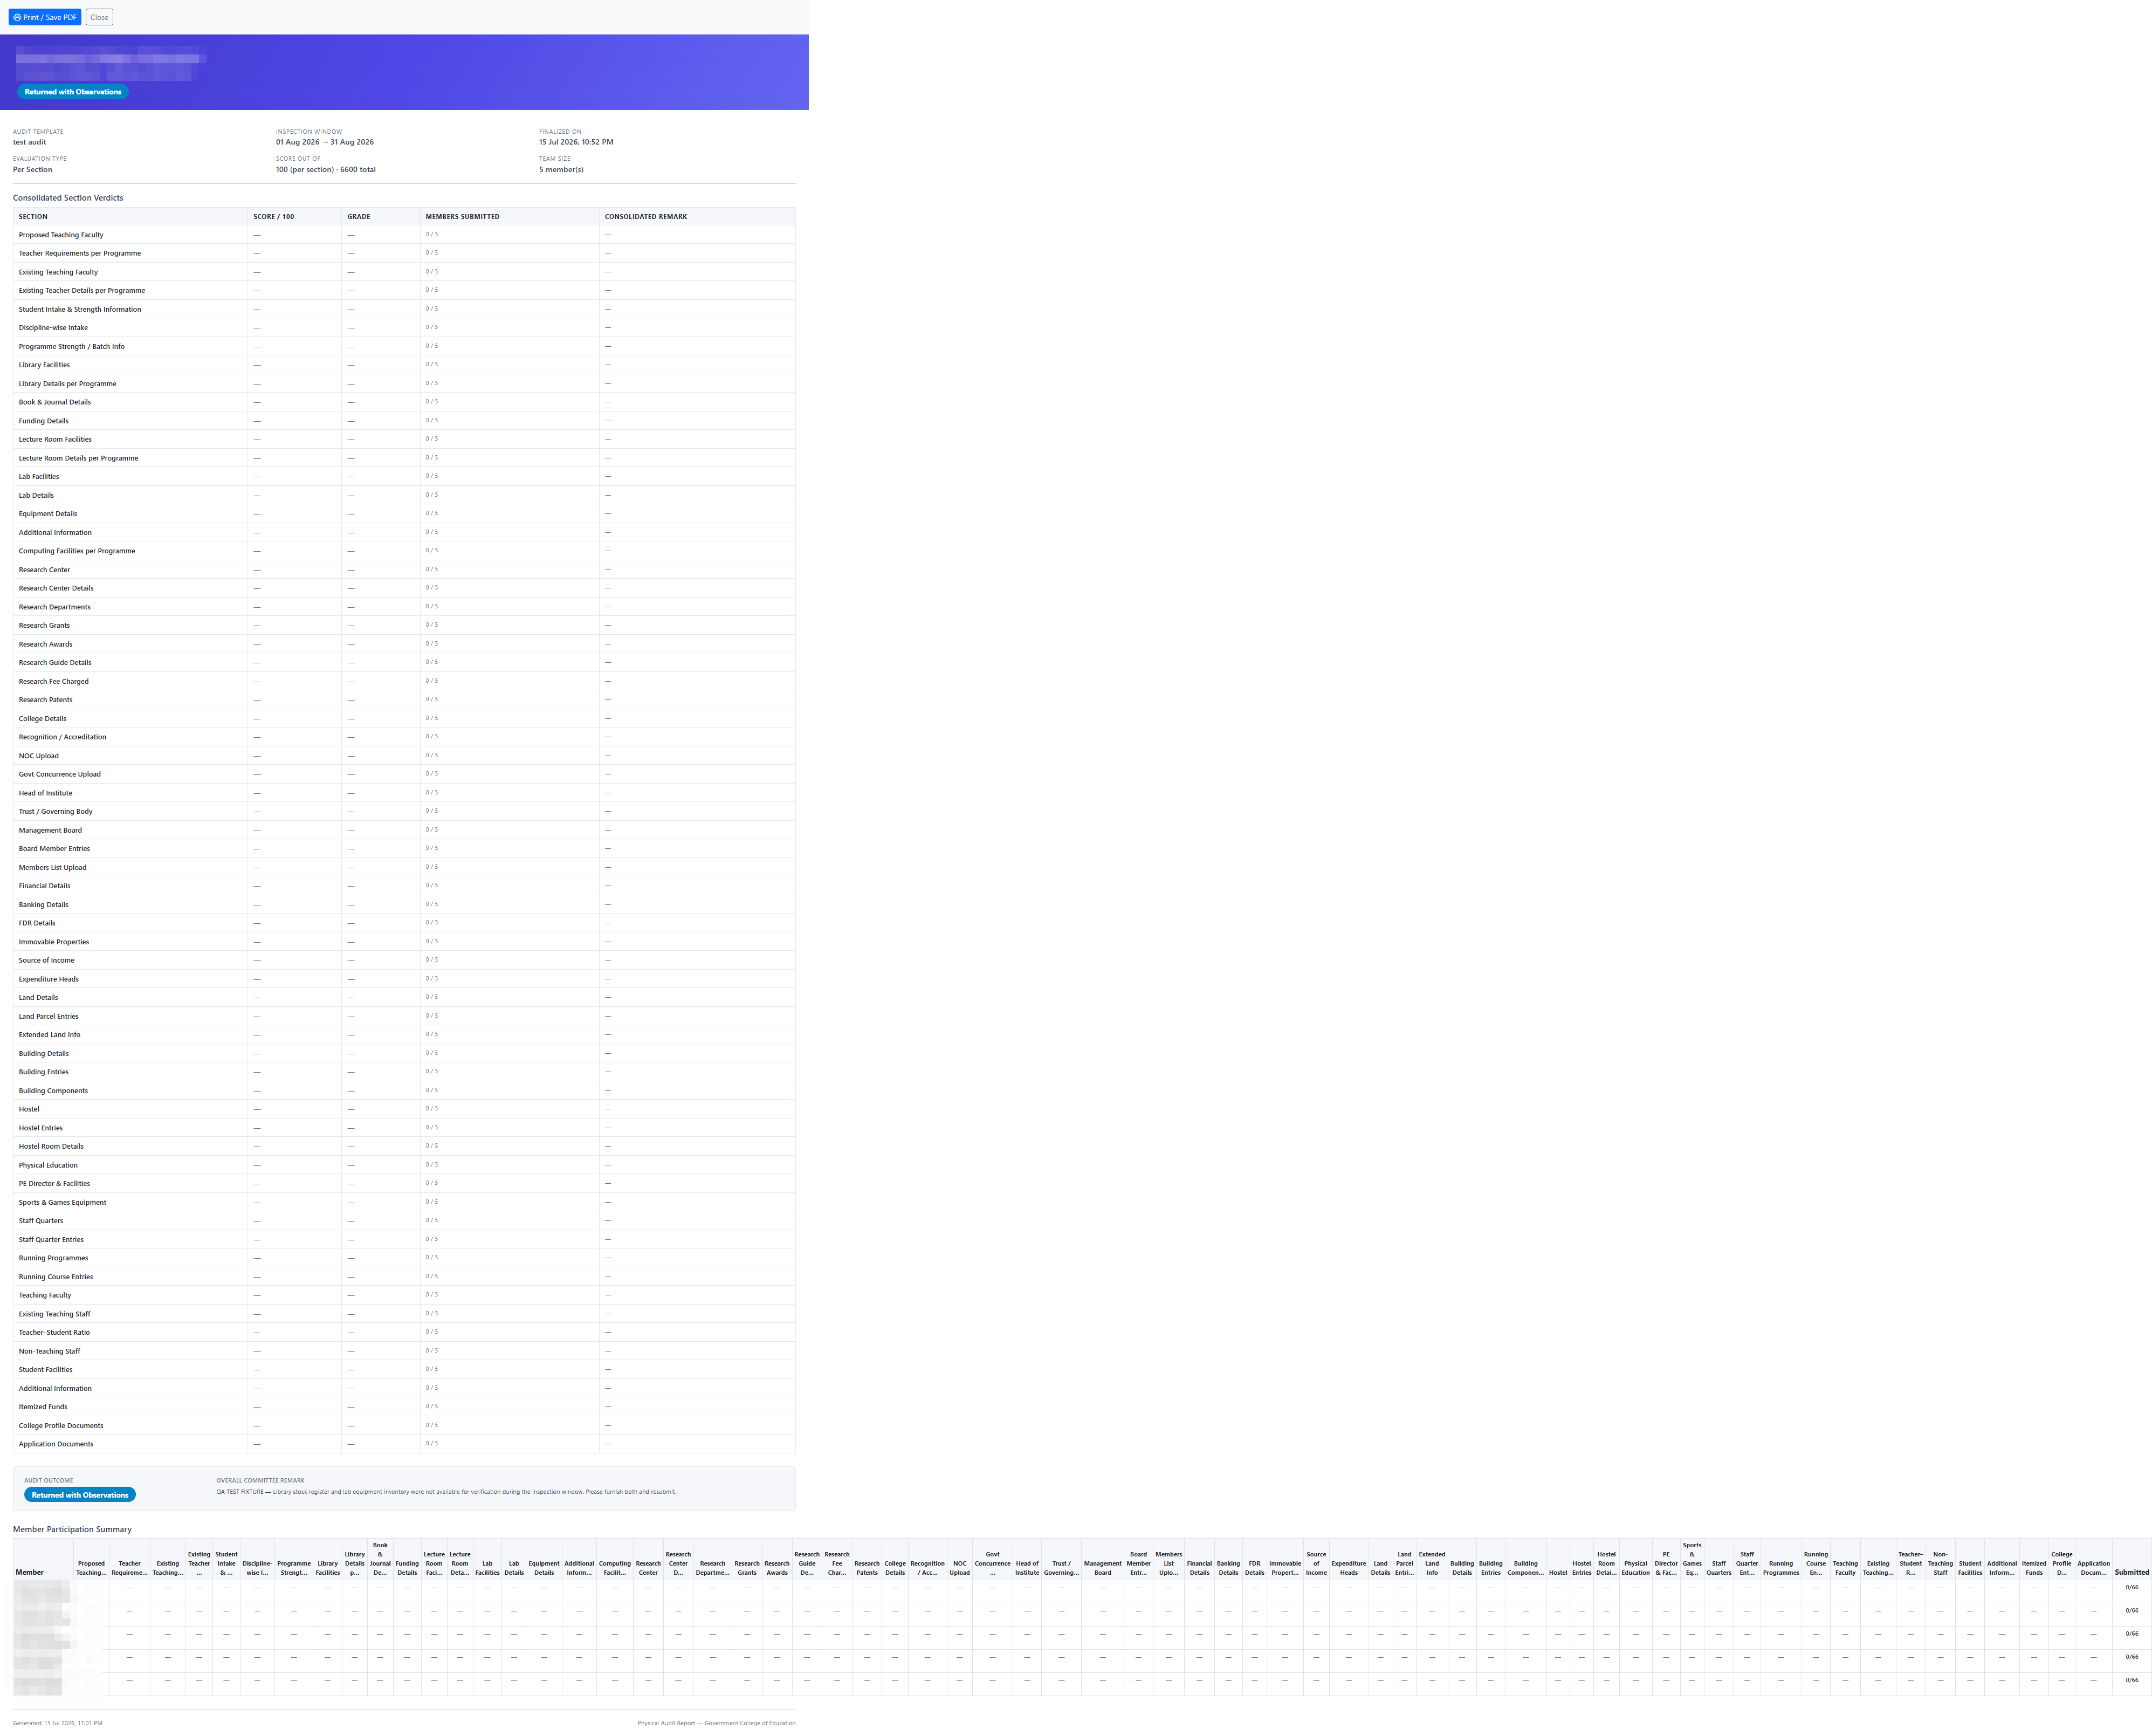
The publish gate: audit outcomes are private by default. After finalization the application view shows Publish Audit Outcome — clicking it records who published and when, e-mails the college the outcome with the committee’s overall remark and outcome-specific guidance, and logs the action. Until then the college sees only the inspection schedule; Unpublish hides a published outcome again. The college never sees individual member names or per-section scores, at any stage.
Payments — Online and Offline
Online
The college clicks Pay on its application, picks one of the session’s allowed gateways, and completes payment; the gateway callback updates the transaction and marks the application PAID. A separate registration-fee service handles the (optional) registration payment with the same gateways.
Offline
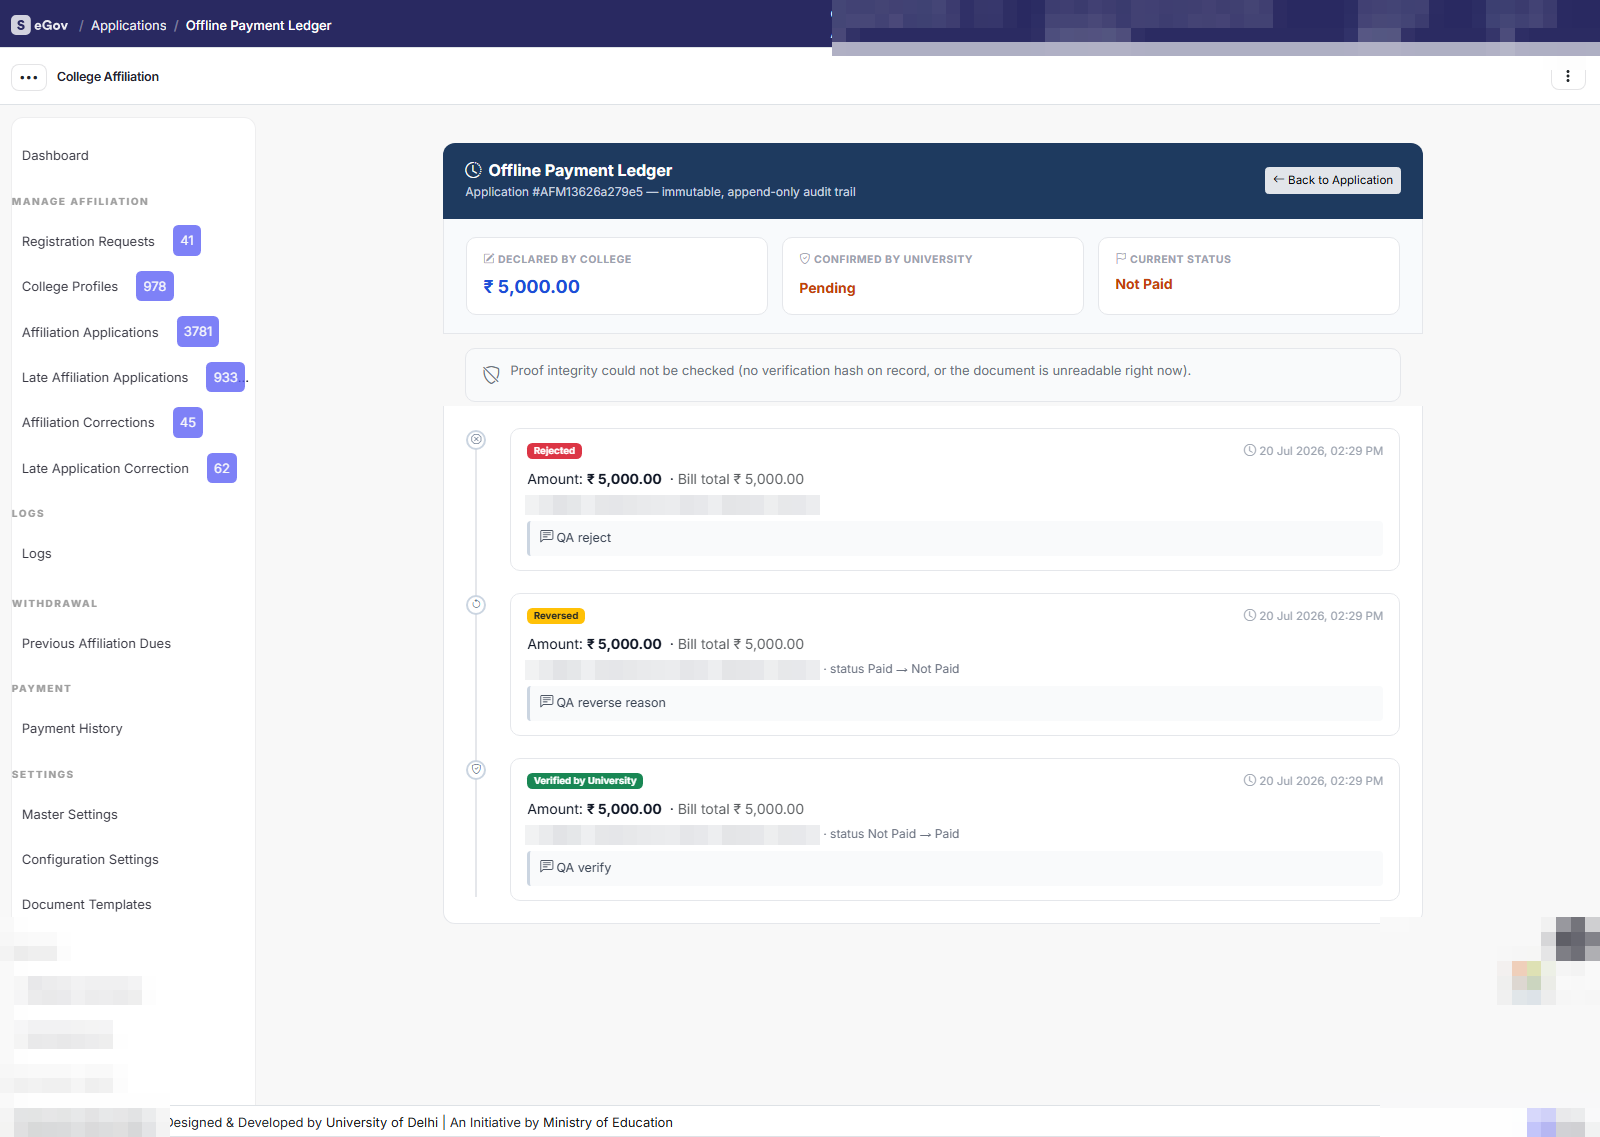
If the university enables offline payment, the college submits a payment-proof (PDF) with the mode (NEFT / RTGS / DD / Bank Challan / UPI / Cheque), reference number, amount, bank and IFSC. The application is not marked paid on upload — an admin verifies the proof and either Approves (marks PAID with the verified amount) or Rejects (the college re-uploads). Every declaration, verification, rejection and reversal is a new row in the append-only payment ledger, and proof files are fingerprinted so a tampered proof can be detected.
Payment History and Receipts
Payment → Payment History lists all transactions (admins see everything in their scope; colleges see their own). PDF receipts can be produced per paid application.
Withdrawal / Previous Affiliation Dues
Where: Withdrawal → Previous Affiliation Dues.
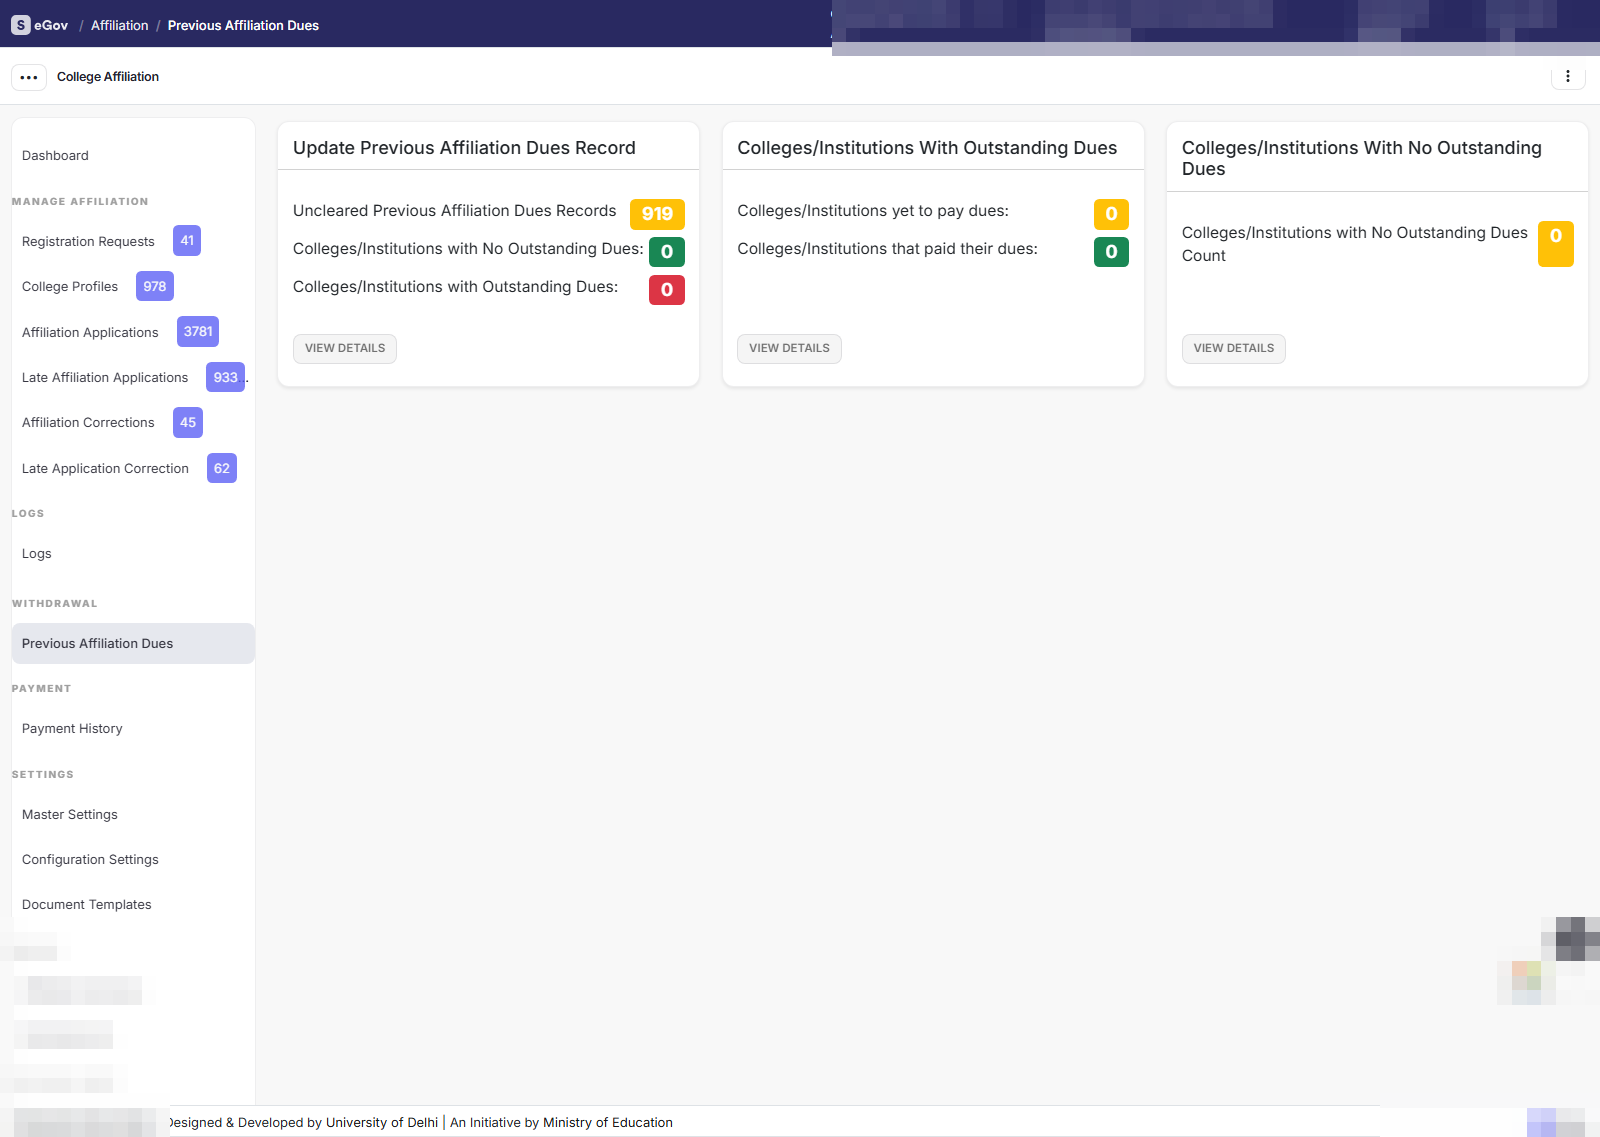
The page opens with four counts — colleges with outstanding dues, with no dues, yet to pay, and paid. To record dues: Existing Units → pick a college → Due Update, then enter old programmes, due amount, validity dates and gateway (optionally uploading a supporting document). In HED mode, a college with unpaid dues is blocked from applying until it pays — it is bounced to the Dues Payment page with a warning, pays through the gateway, and the dues row moves to PAID.
Logs and Audit Trail
Where: Logs → Logs.
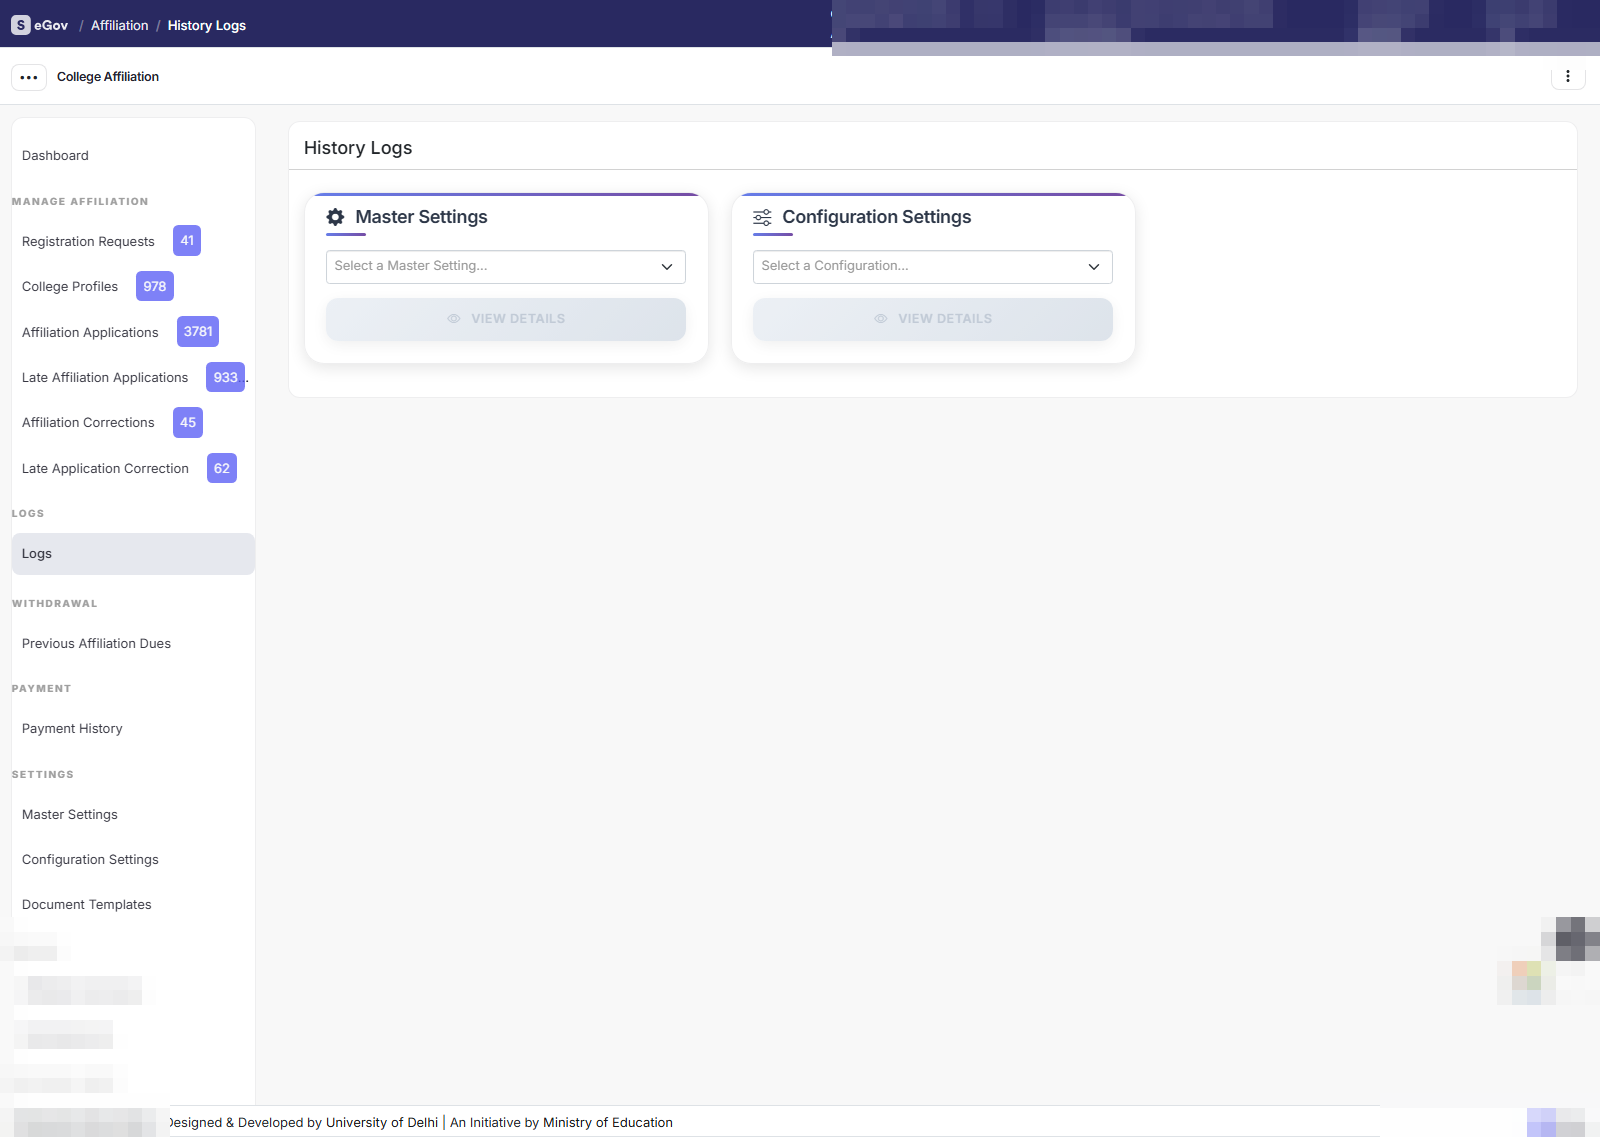
Every important action writes a history log: the log type, section, actor role, operation description, JSON snapshots of new/modified values, client IP and timestamp. The top-level page pivots by log type (Configuration Settings, College Registration, College Profile, Affiliation Application, Land Verification, …) with date-range drill-down. This log is the source of truth when a college disputes a status change.
Reports — Affiliation Summary
Where: Report → Affiliation Summary.
An administrator-only reporting tool (it is not part of the college’s flow) that answers two different questions from one page:
| Card | Use it for | How it works |
|---|---|---|
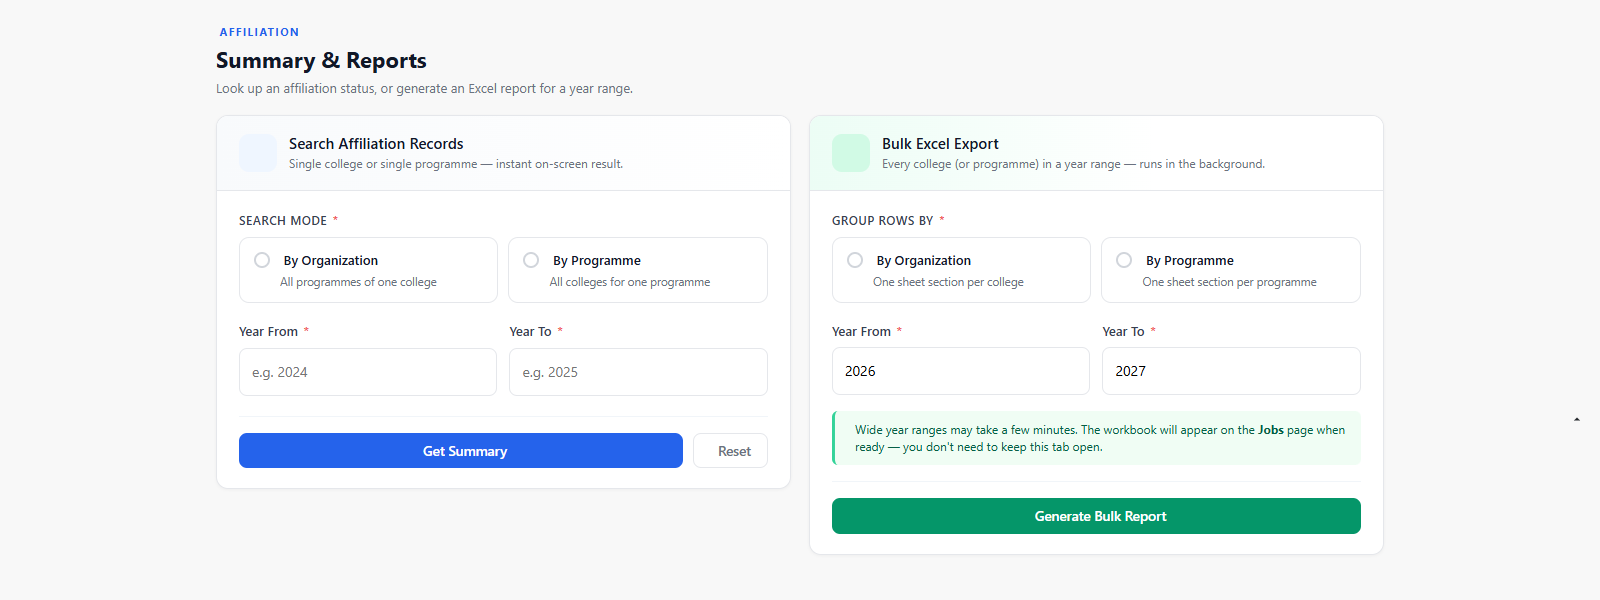
| Search Affiliation Records | A quick, on-screen answer about one college or one programme | Choose the search mode — By Organization (all programmes of one college) or By Programme (all colleges offering one programme) — enter the Year From / Year To range and click Get Summary. The result renders immediately on the page. |
| Bulk Excel Export | A full workbook covering every college or programme in a year range | Choose how to group rows — By Organization (one sheet section per college) or By Programme (one sheet section per programme) — set the year range and click Generate Bulk Report. |
The bulk export deliberately runs in the background: wide year ranges span thousands of applications, so the workbook is queued and appears on the Download Job page when it is ready. You do not need to keep the tab open.
Reports / Download Job
Where: Report → Download Job.
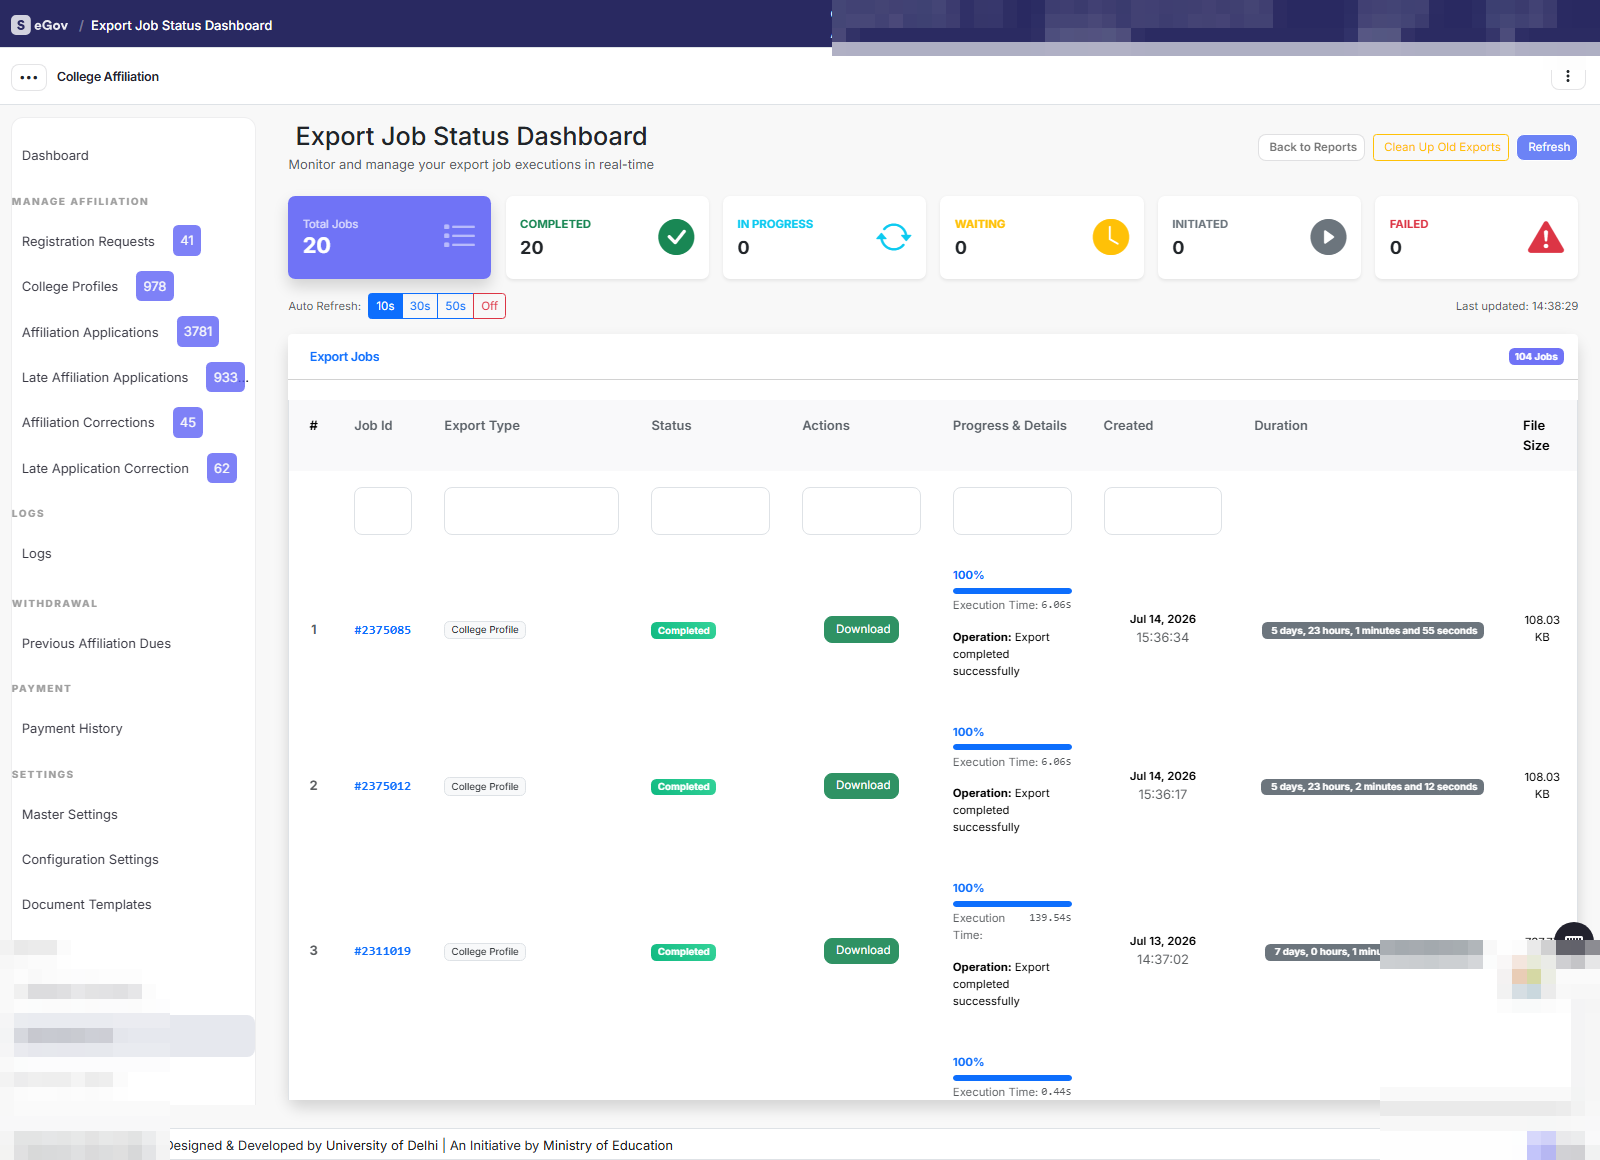
Large CSV/Excel exports never run in the page — the Export button on any list schedules a background job; this page shows queued / processing / completed / failed jobs, offers Download when ready, and provides a safe Clean Up Old Exports action that never touches an in-flight job.
Custom Document Templates (Document Generation)
The module includes a document-generation engine for official outputs such as provisional affiliation certificates.
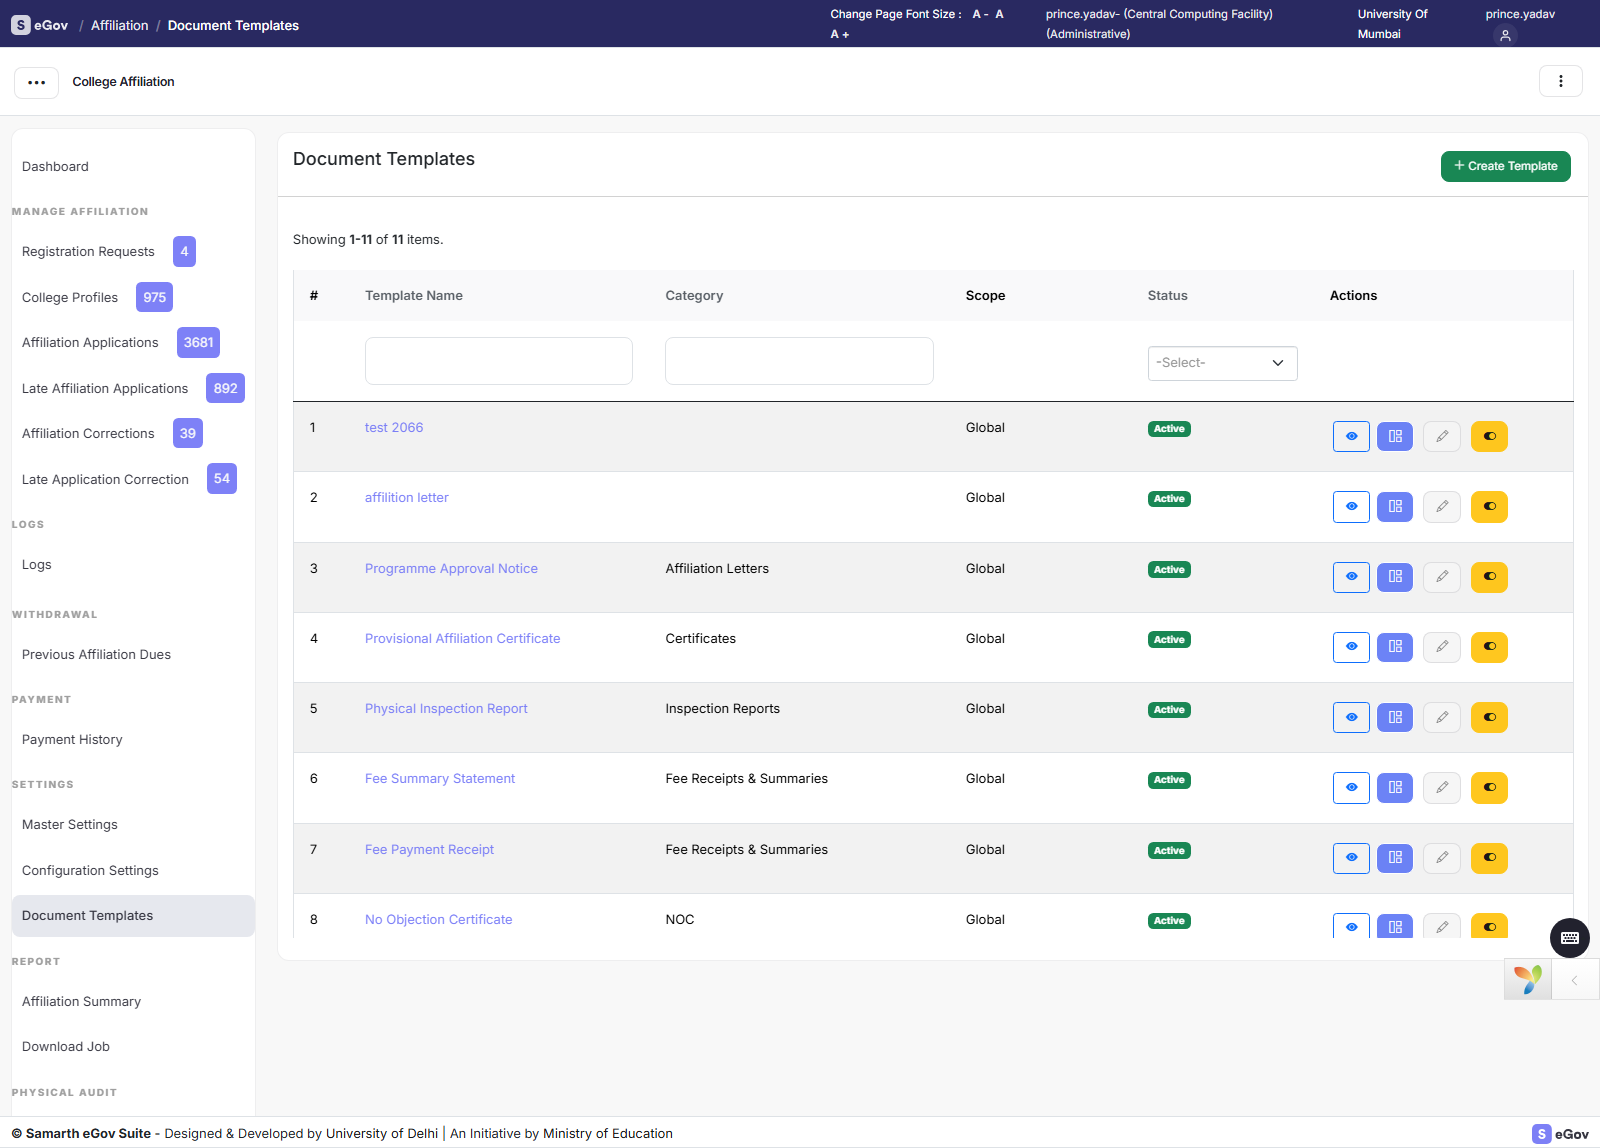
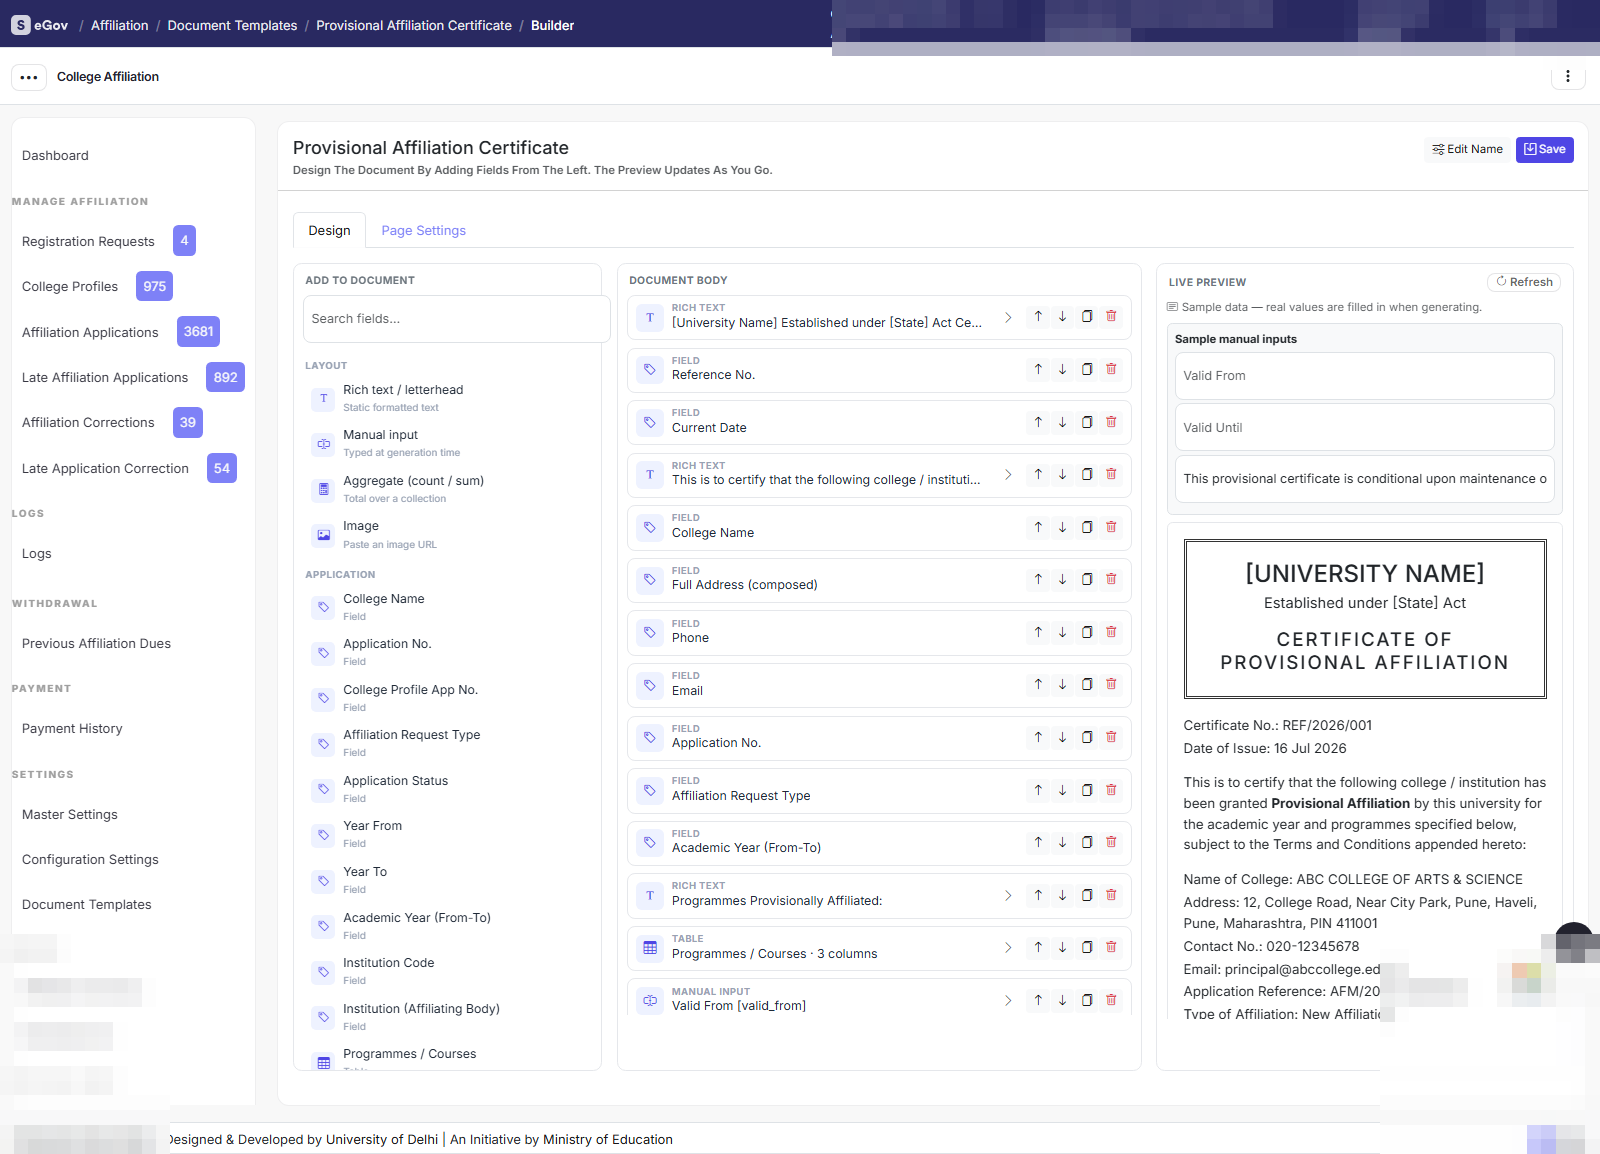
- Template builder — compose a document from blocks (headings, paragraphs, parameter placeholders, tables); placeholders resolve automatically from application data (college name, programmes, fees, dates, outcomes) at generation time.
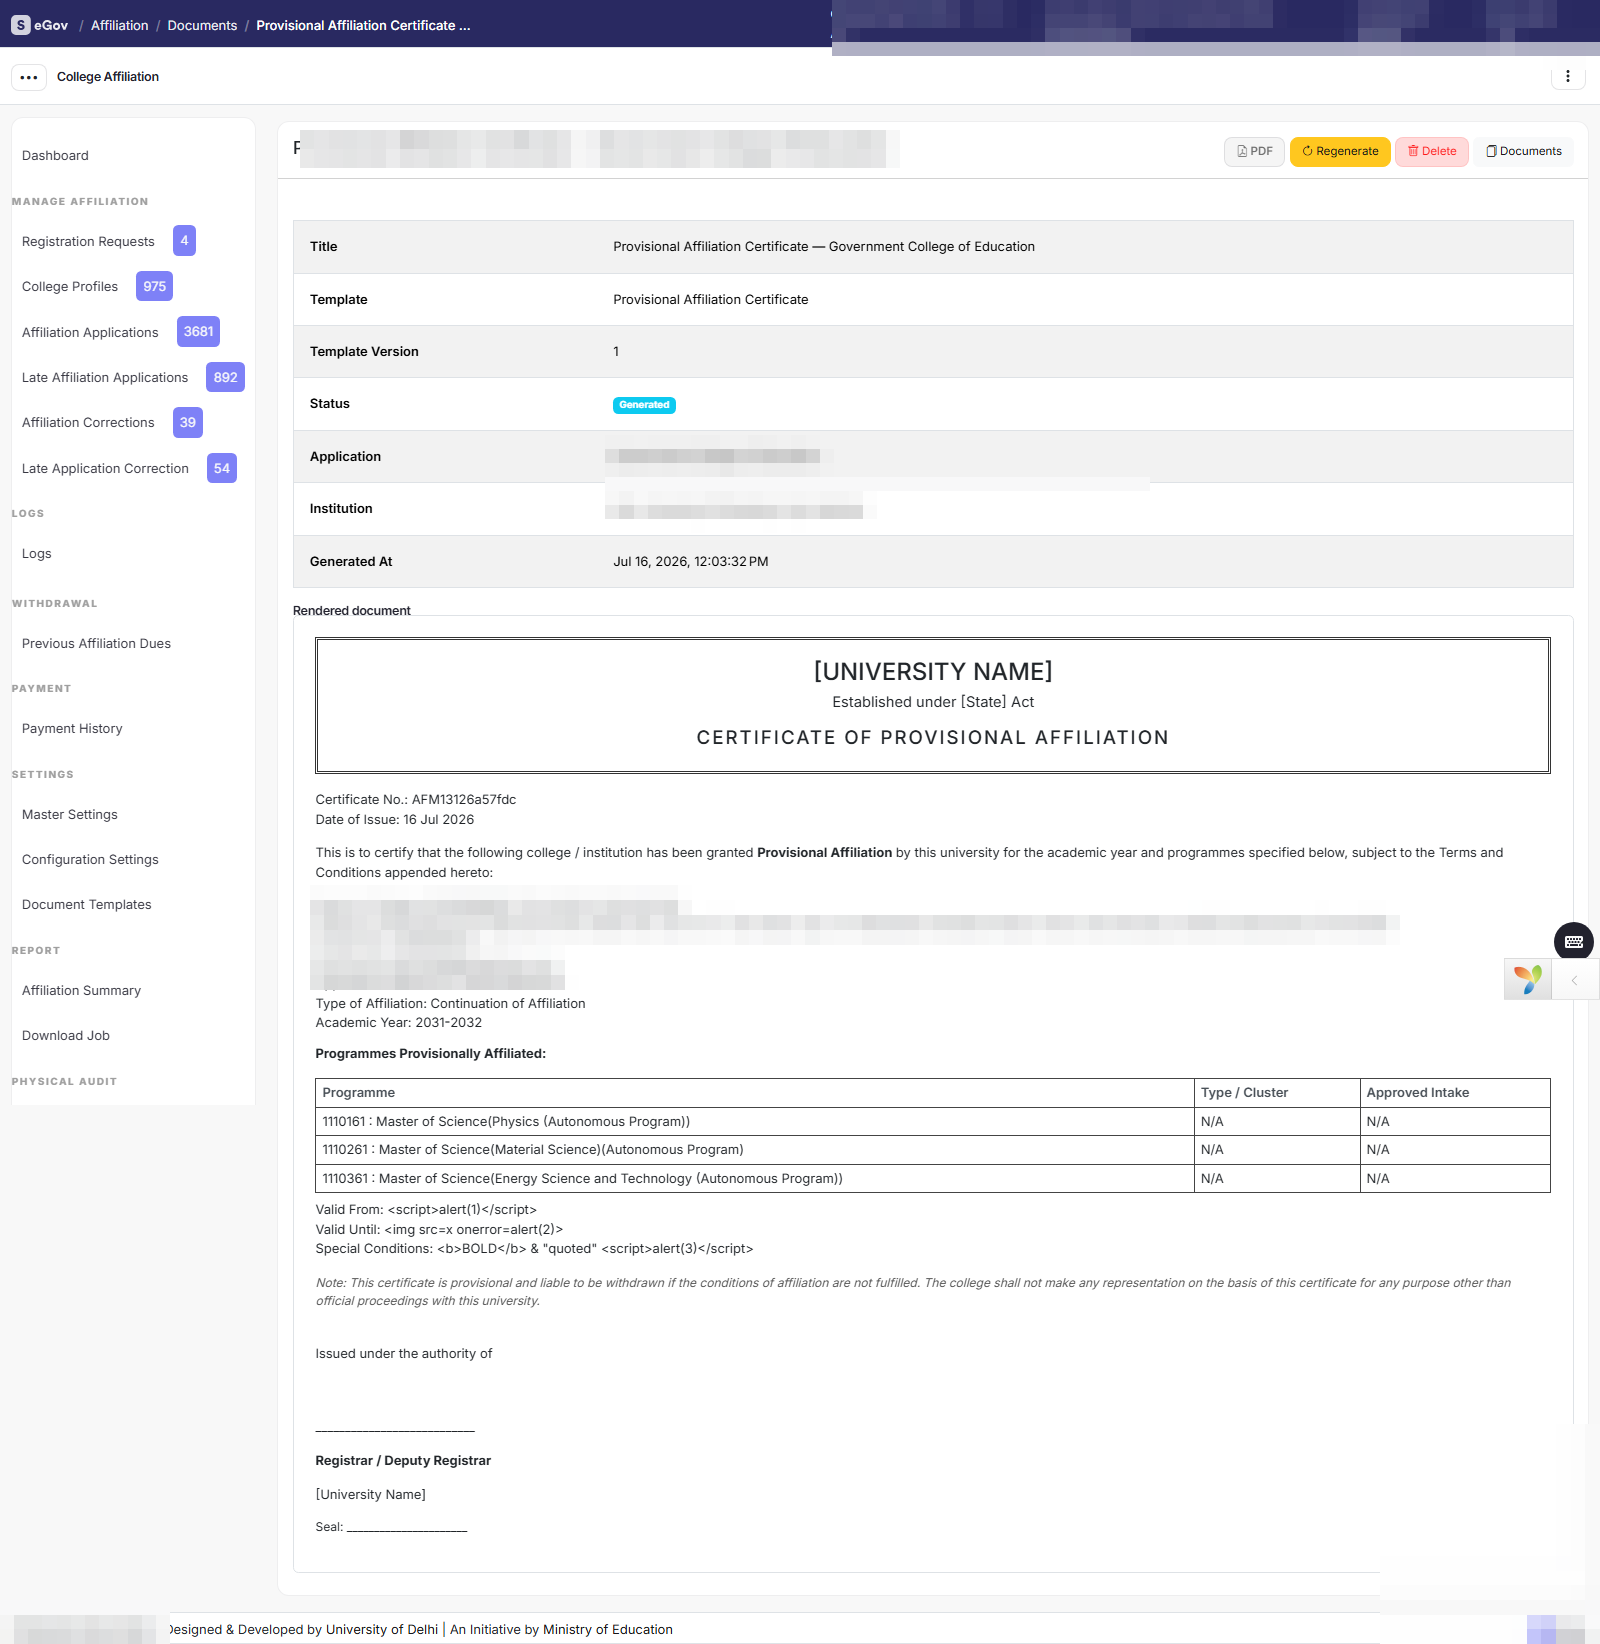
- Generate — pick an application, pick a template, preview, and generate; documents are stored per application, re-generable, and export to PDF with full Unicode support (₹ renders correctly). All values are escaped; missing values render as “N/A”.
Colleges' guide to apply for affiliation
Introduction
The Affiliation module lets a college register with the university, build its institutional profile once, apply for affiliation in every open session, pay fees online or offline, respond to university remarks, and follow its physical inspection through to the published outcome.
Before you begin
You will need a valid e-mail address you check often (OTP, credentials, status updates and inspection schedules all arrive by mail), a mobile number, soft copies (PDF/images) of your institutional documents (address proof, board resolutions, bankers' letters, FDR receipts, audit reports, building plans, faculty CVs, and anything else your university lists), and clarity on the programmes you intend to apply for with expected student strength per programme.
College Registration Process
There are two paths into the system — you only need one:
- Self-registration (public form) — described below.
- Admin-initiated — the university maps your college itself; you simply receive an e-mail with a username and temporary password and log in. There is no OTP step.
Step 1: College Registration Form Submission
- Open the public registration link provided by the university.
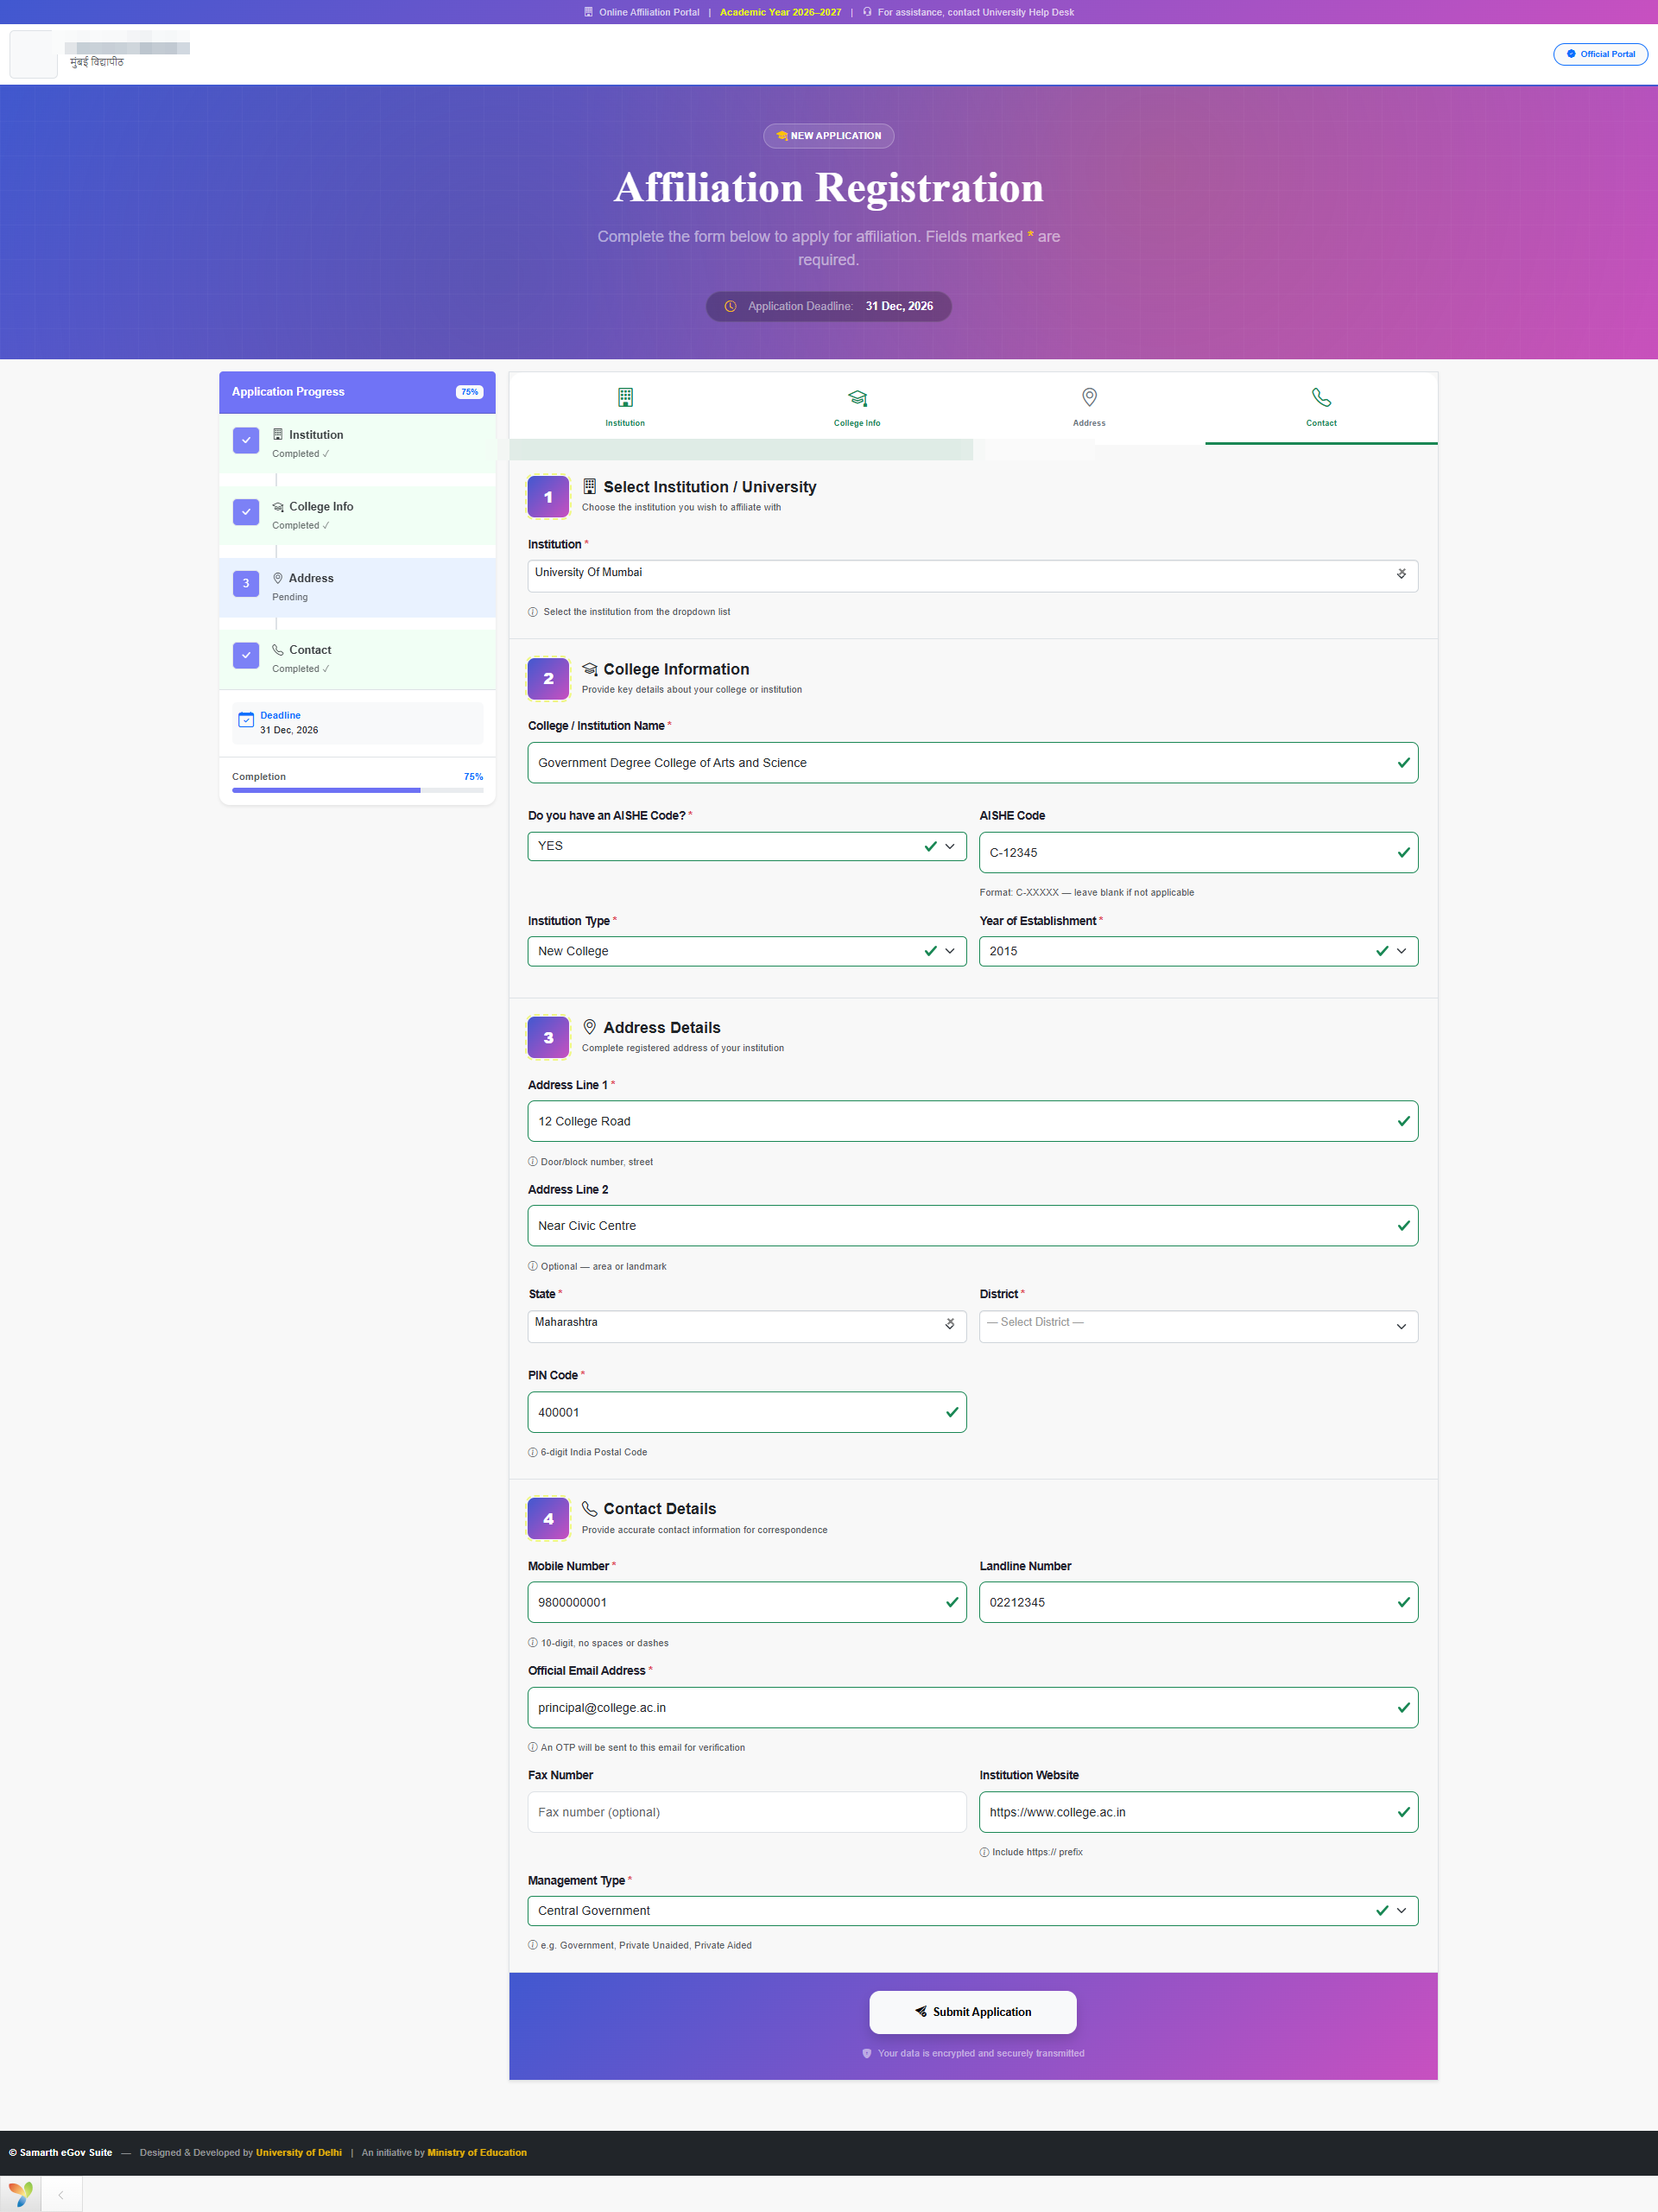
- Fill in the institute/university you are applying to (locked in single-university deployments), college name, AISHE code (if any), year of establishment, full address (State → District → Sub-district, Pincode), contact details and management type.
- Click Submit.
Step 2: OTP Verification
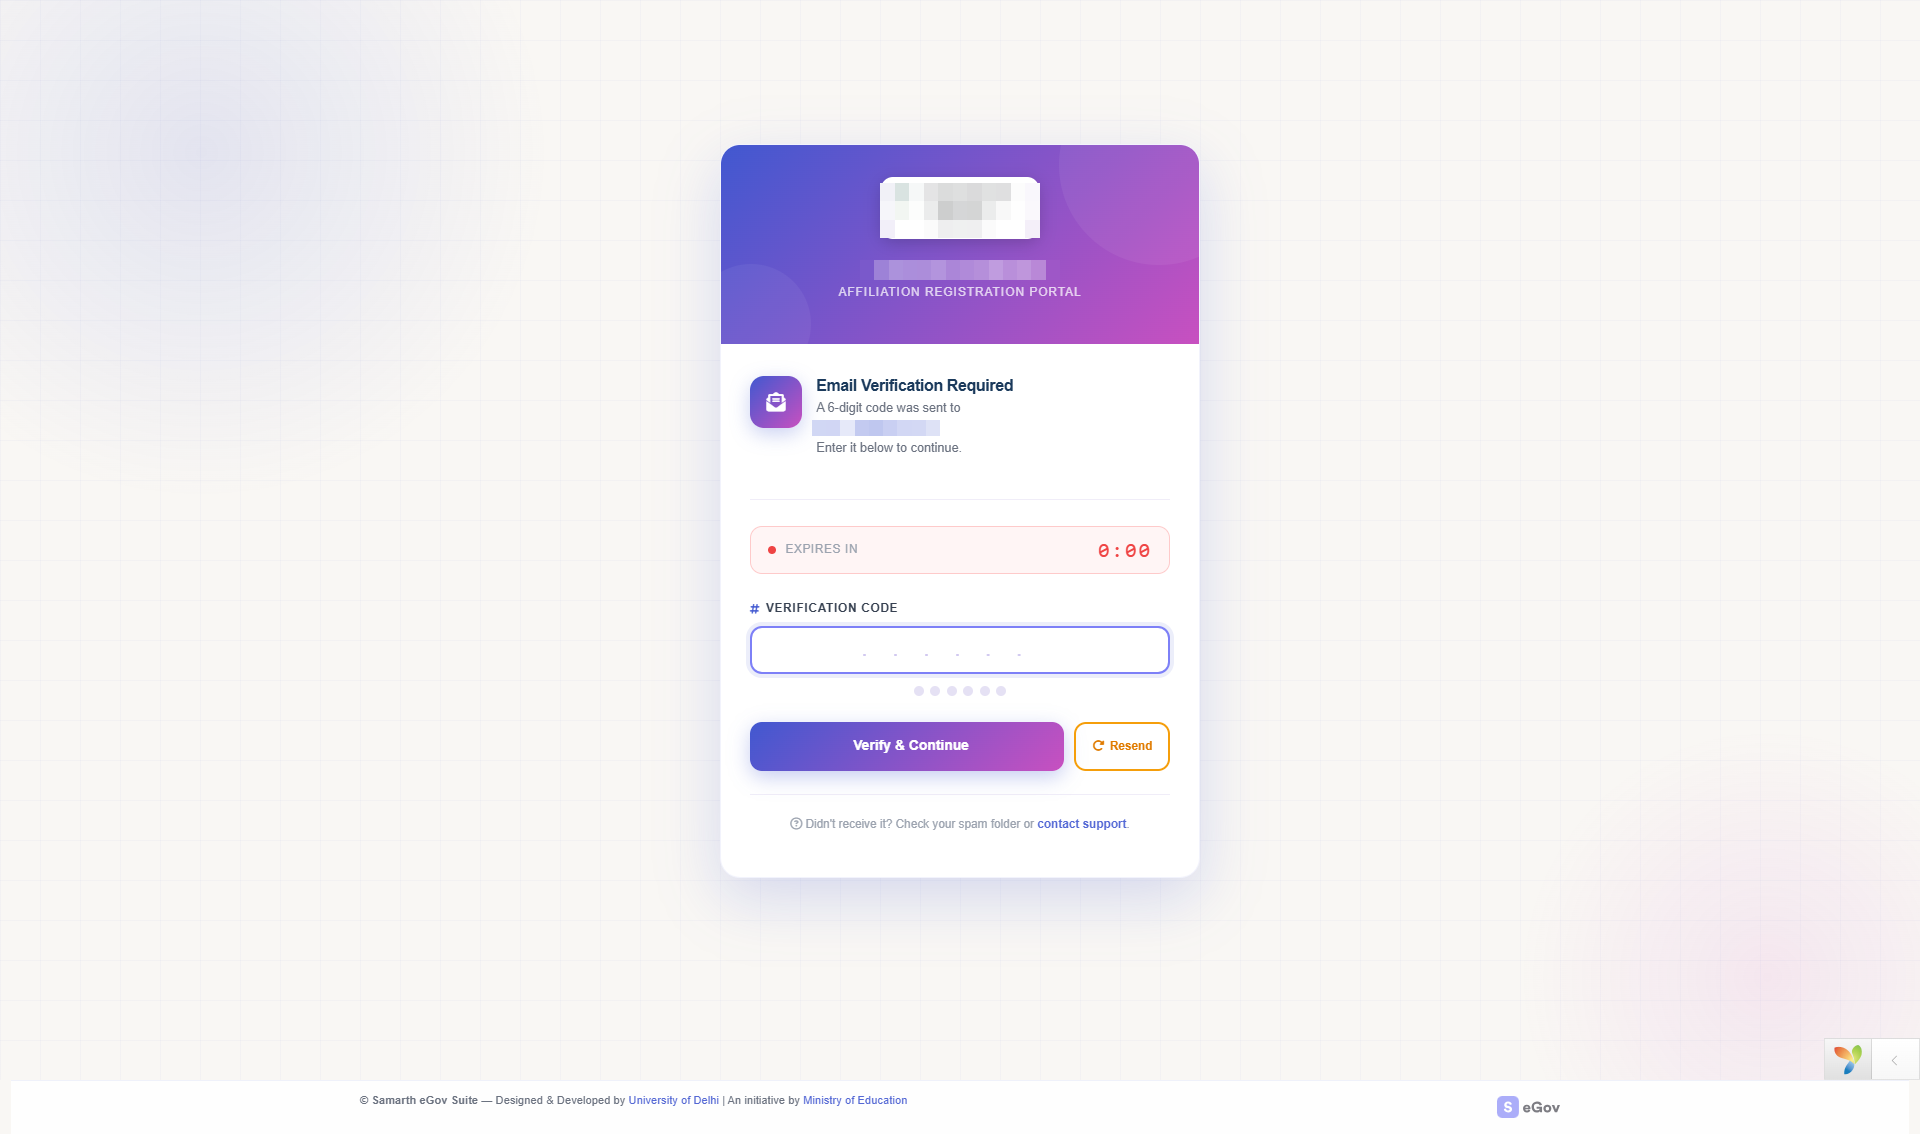
- The system e-mails a One-Time Password to the address you registered with.
- Enter the OTP to verify your request. If it does not arrive, check spam, or use Request New OTP; an expired OTP simply means re-submitting the form for a fresh one.
Step 3: Registration Fee (when applicable)
Some universities charge a registration fee — either pay now (before the OTP step completes) or pay after approval (a Pay link arrives by e-mail once the admin approves). Registration payment status can be checked any time from the public Check Registration Payment page using your e-mail, phone and registration number.
Step 4: Admin Review and Notification
The university reviews your request and approves or rejects it; either way you are notified by e-mail. On approval the mail contains your username and temporary password.
Step 5: Access to the Affiliation Interface
Log in with the received credentials. Your sidebar shows Dashboard, Affiliation Applications (College Profile — HED setups only, Apply For Affiliation, Late Affiliation Application, Affiliation Correction, Applications List), Report → Download Job and Payment → Payment History.
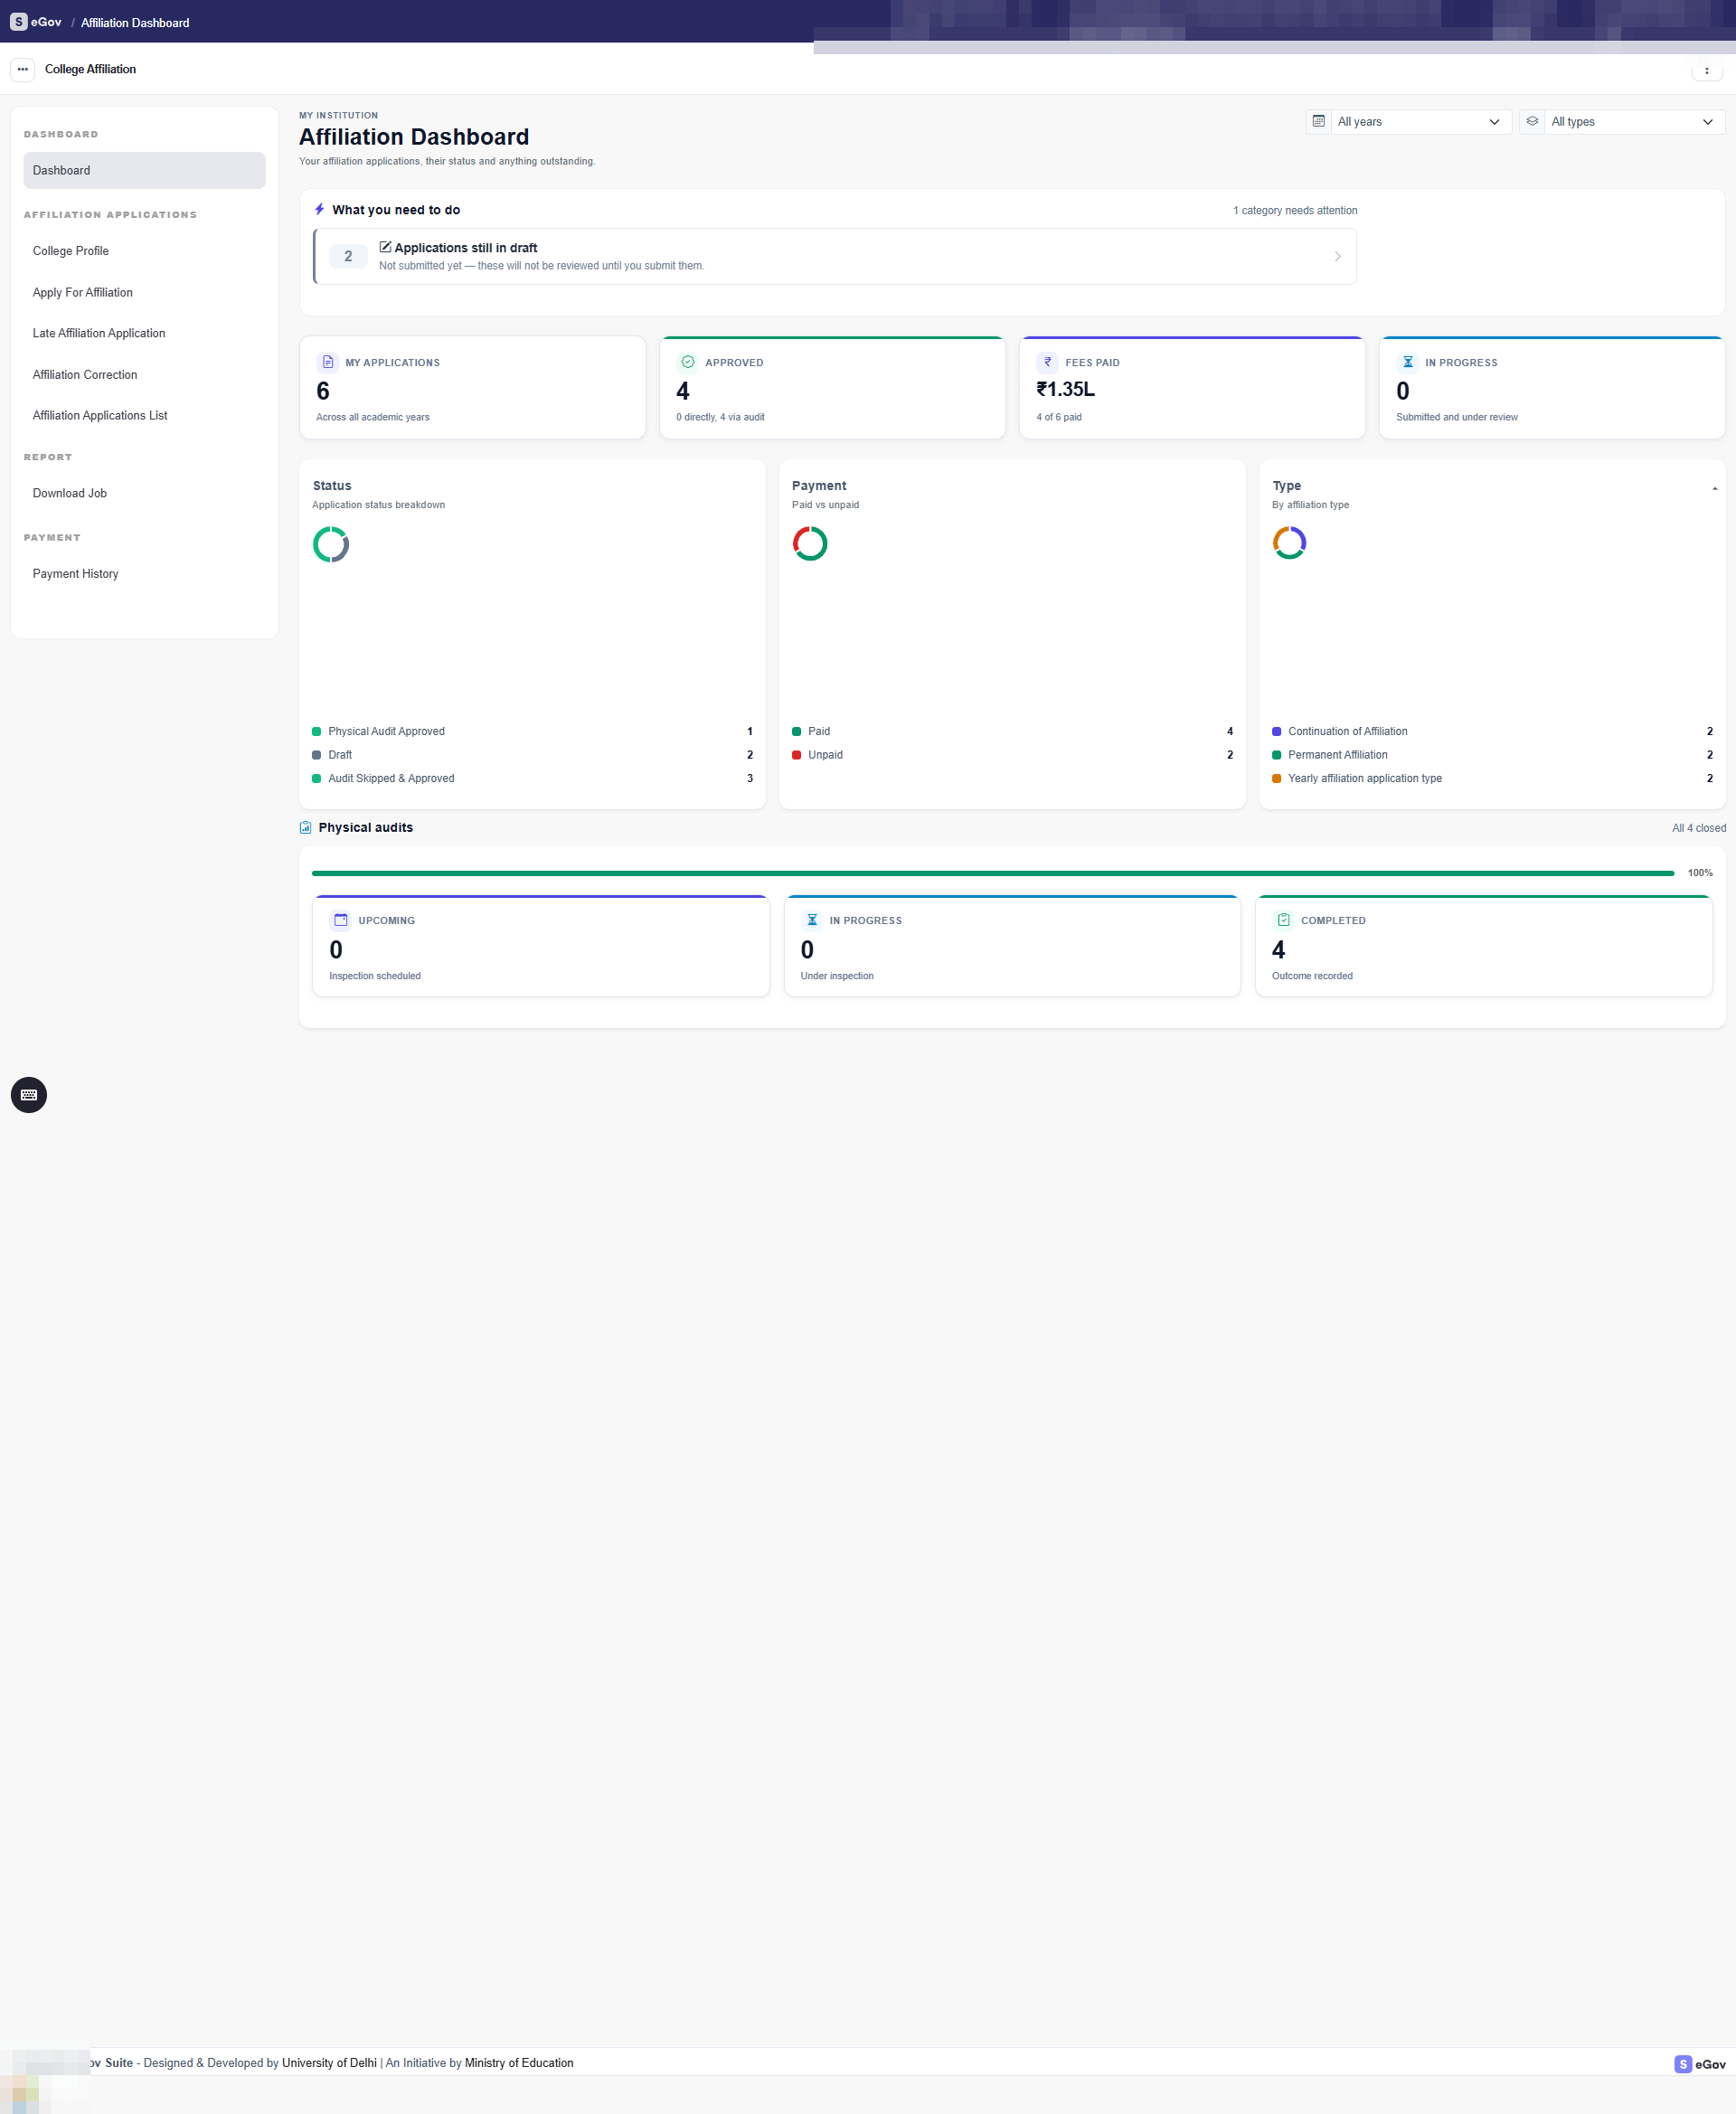
Your dashboard opens with What you need to do — drafts still to submit, payments due, corrections the university has asked for — each row linking straight to the list where you act. Below it are your own figures (applications, approved, fees paid, in progress), how your applications break down by status, payment and type, and the state of any physical inspections.
The College Journey at a Glance
Register (OTP)  →  Log in  →  Build College Profile  →  University approves profile
                                                                    ↓
    Receipt  ←  Pay fee  ←  University approves  ←  Submit  ←  Apply per session
       ↓                                                     (fill sub-forms)
  Physical inspection (if scheduled)  →  Outcome published  →  Documents / certificate
At every stage the work waiting on you is listed on your Dashboard, and every list you need is one click from the sidebar.
College Profile — every section you must complete
The College Profile is your institution’s master record. You complete it once, and it is reused for every affiliation application in every future session — so it is worth filling accurately the first time.
Click Apply For Affiliation the first time and the system routes you to Create College Profile. Every screen shares the same furniture:
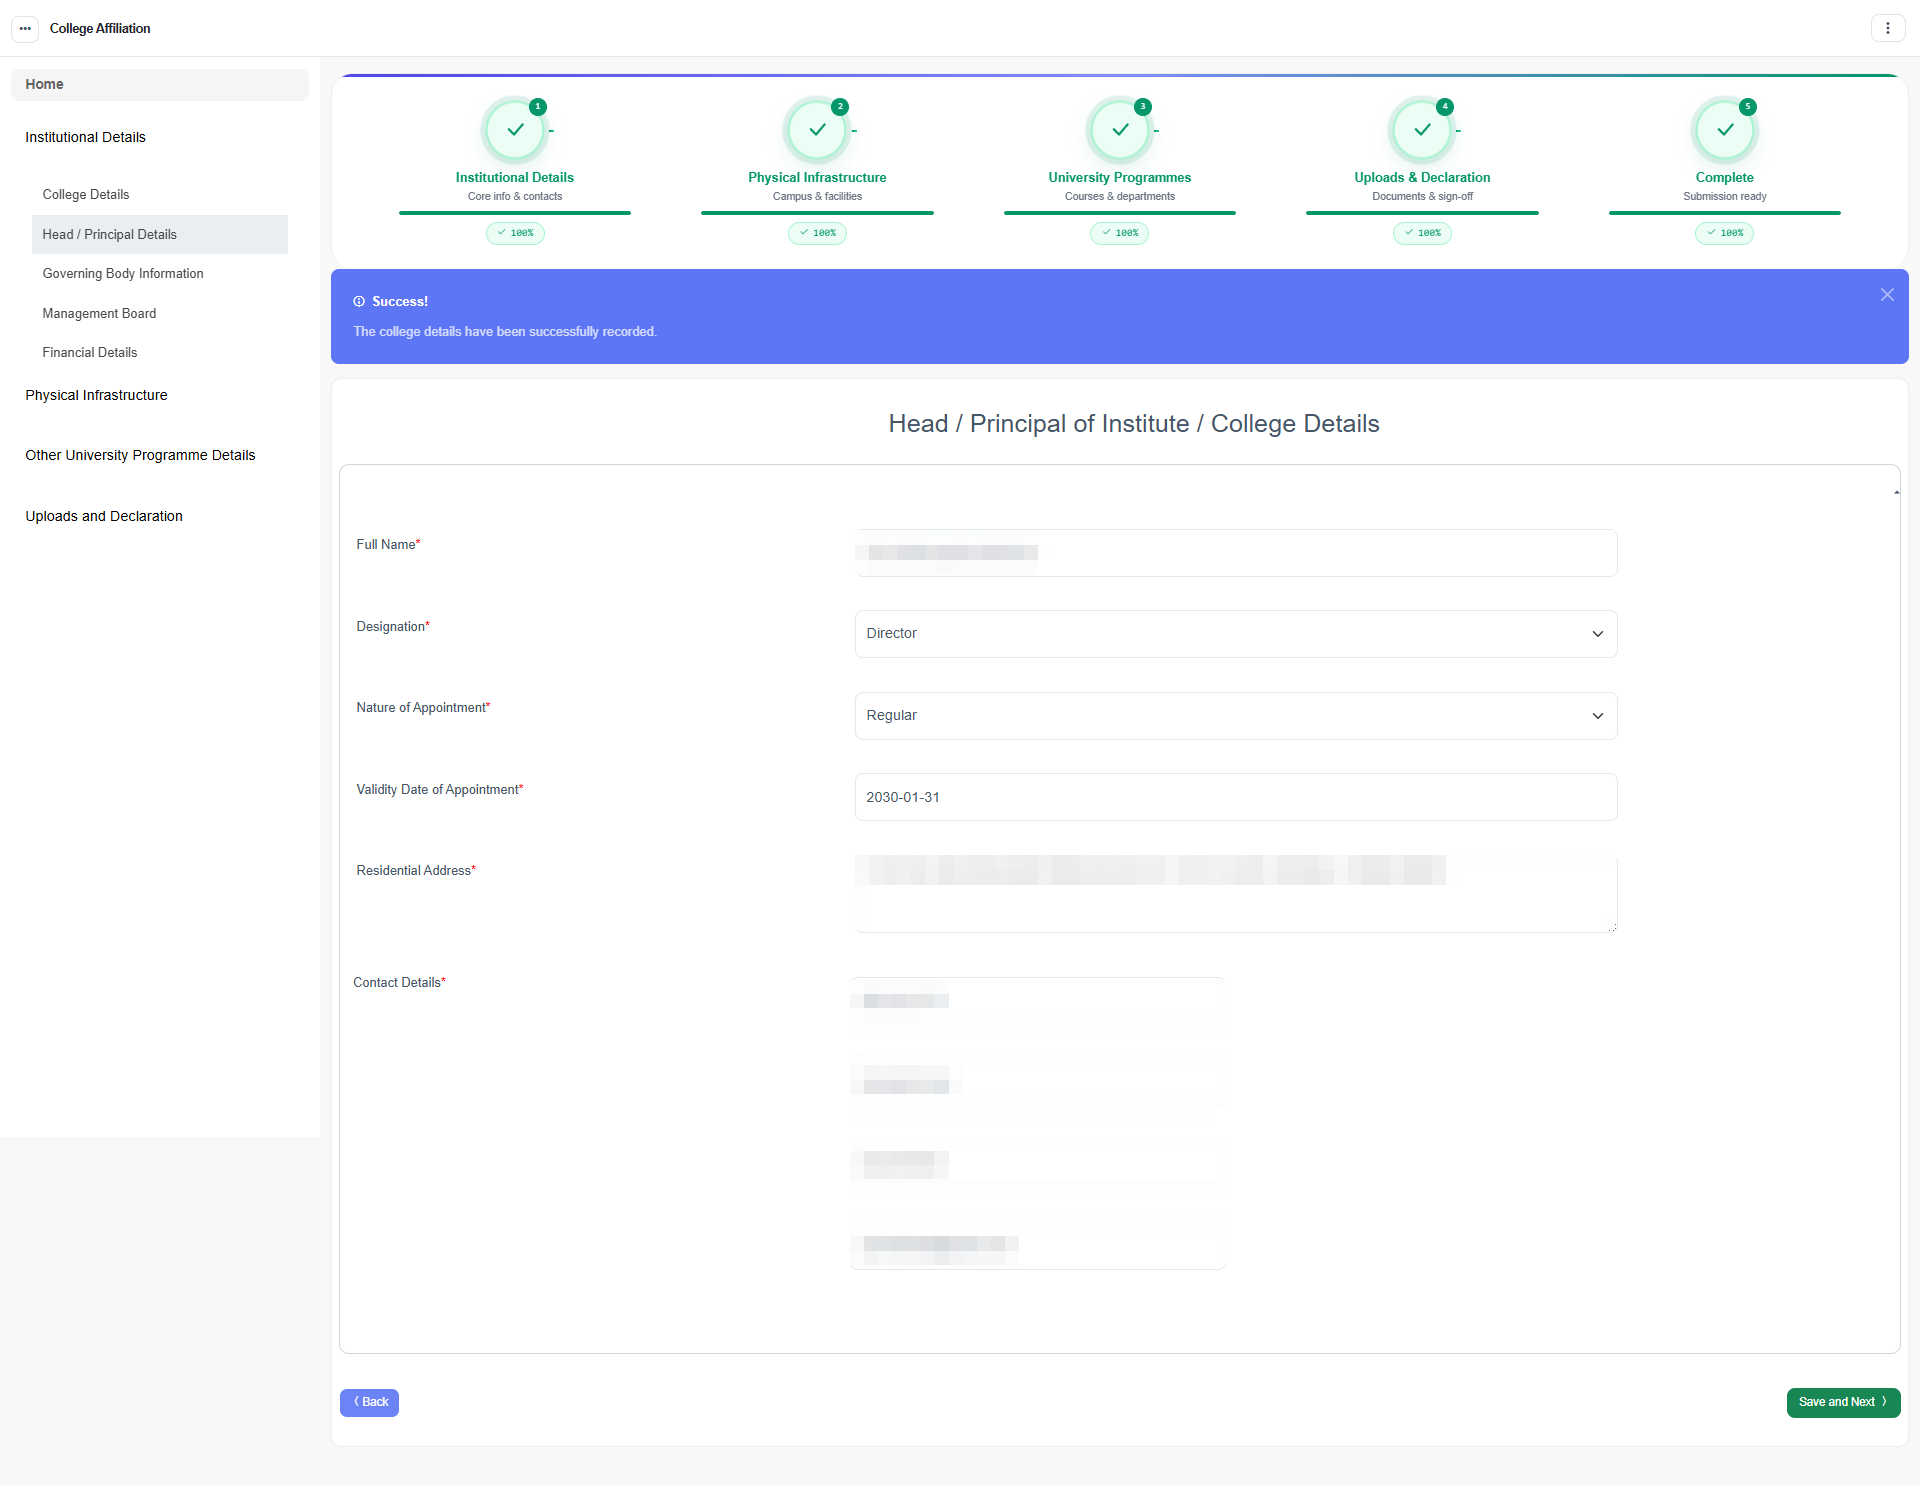
- a five-stage progress tracker across the top — Institutional Details → Physical Infrastructure → University Programmes → Uploads & Declaration → Complete — each showing its own completion percentage;
- a left-hand accordion listing every section within the current stage, so you can jump straight to one;
- Back and Save and Next at the foot of the form.
A stage only reaches 100% once every section inside it holds valid saved data. You may leave and resume at any time — progress is stored per section.
Stage 1 — Institutional Details
College Details — the institution’s own particulars: name, type, address, contact details and identifiers, mostly carried over from your registration.
Head / Principal Details (shown above) — full name, designation, nature of appointment, validity date of appointment, residential address and contact numbers/e-mail for the person heading the college.
Governing Body Information — the trust, society or management body that runs the college, with its registration particulars.
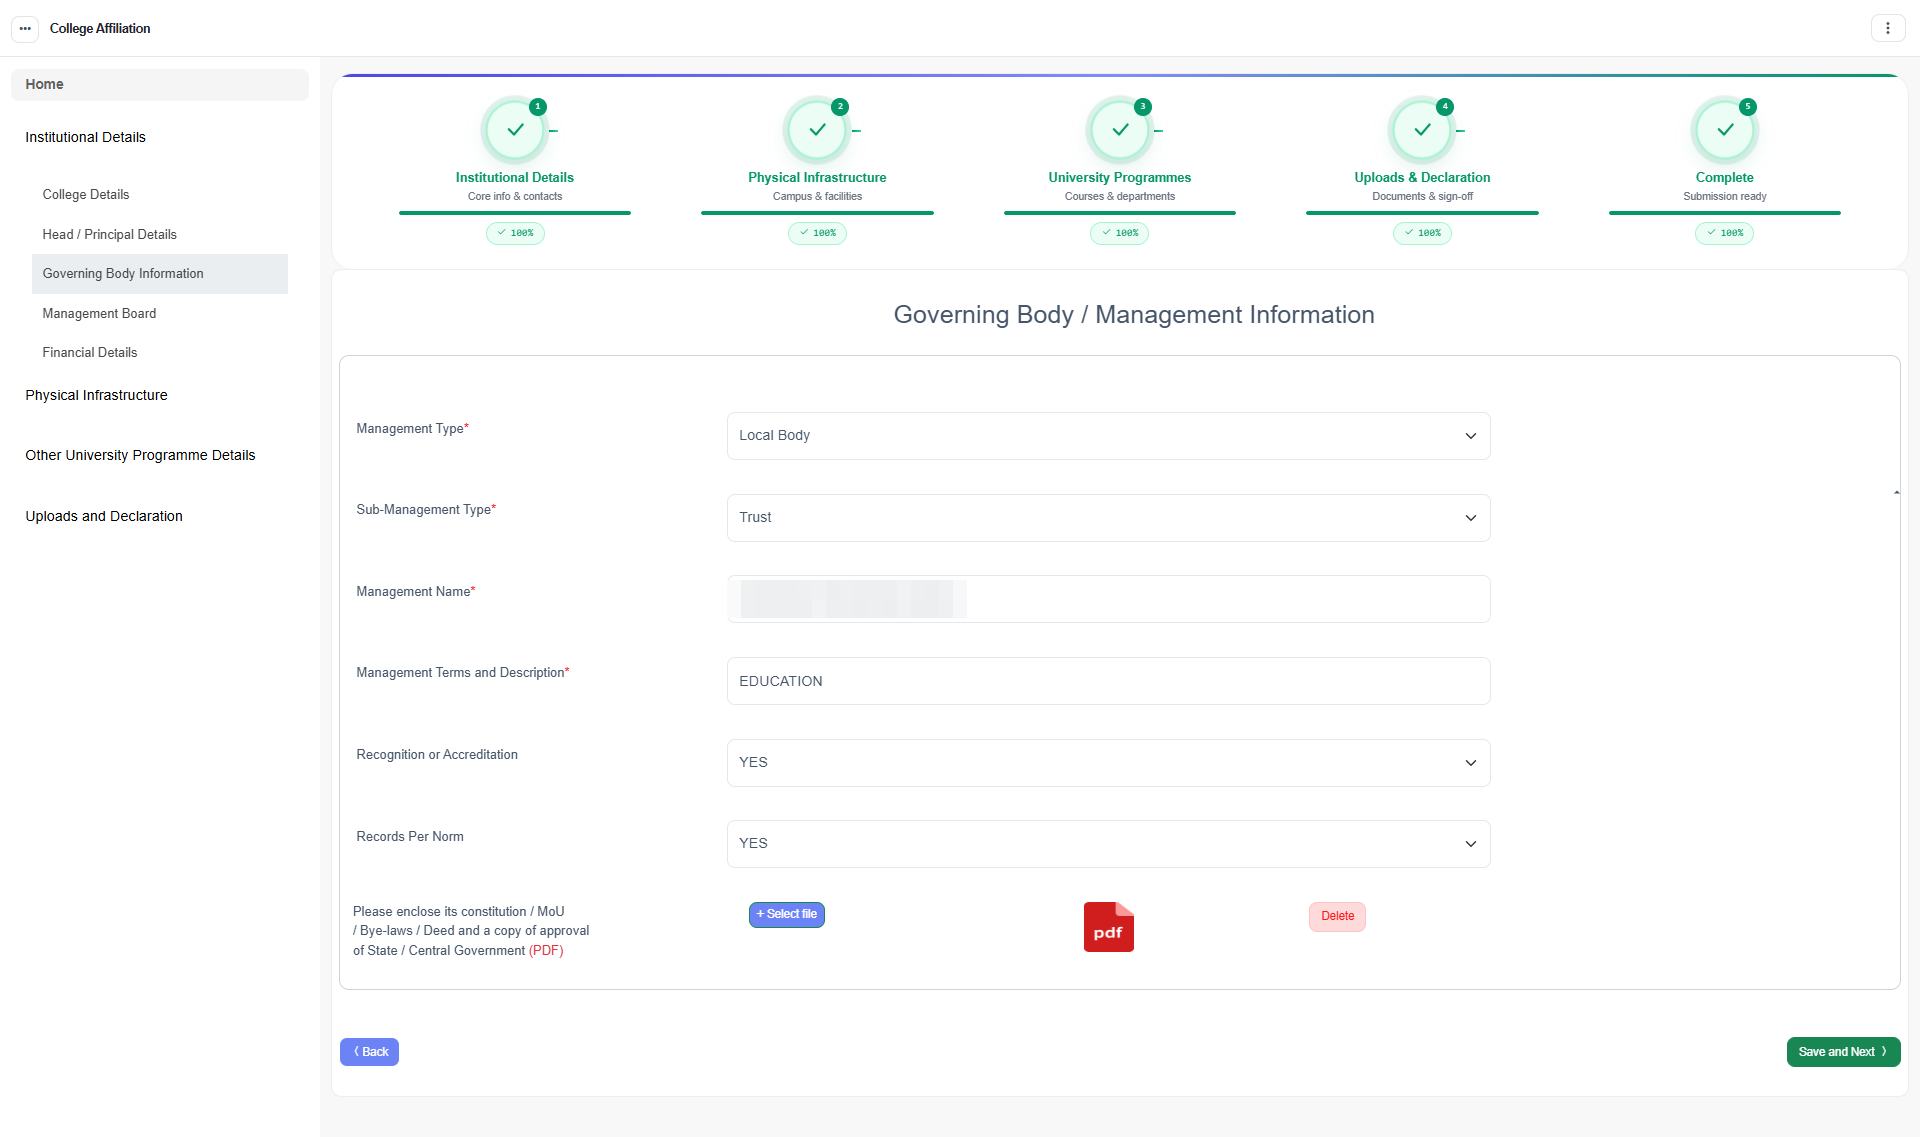
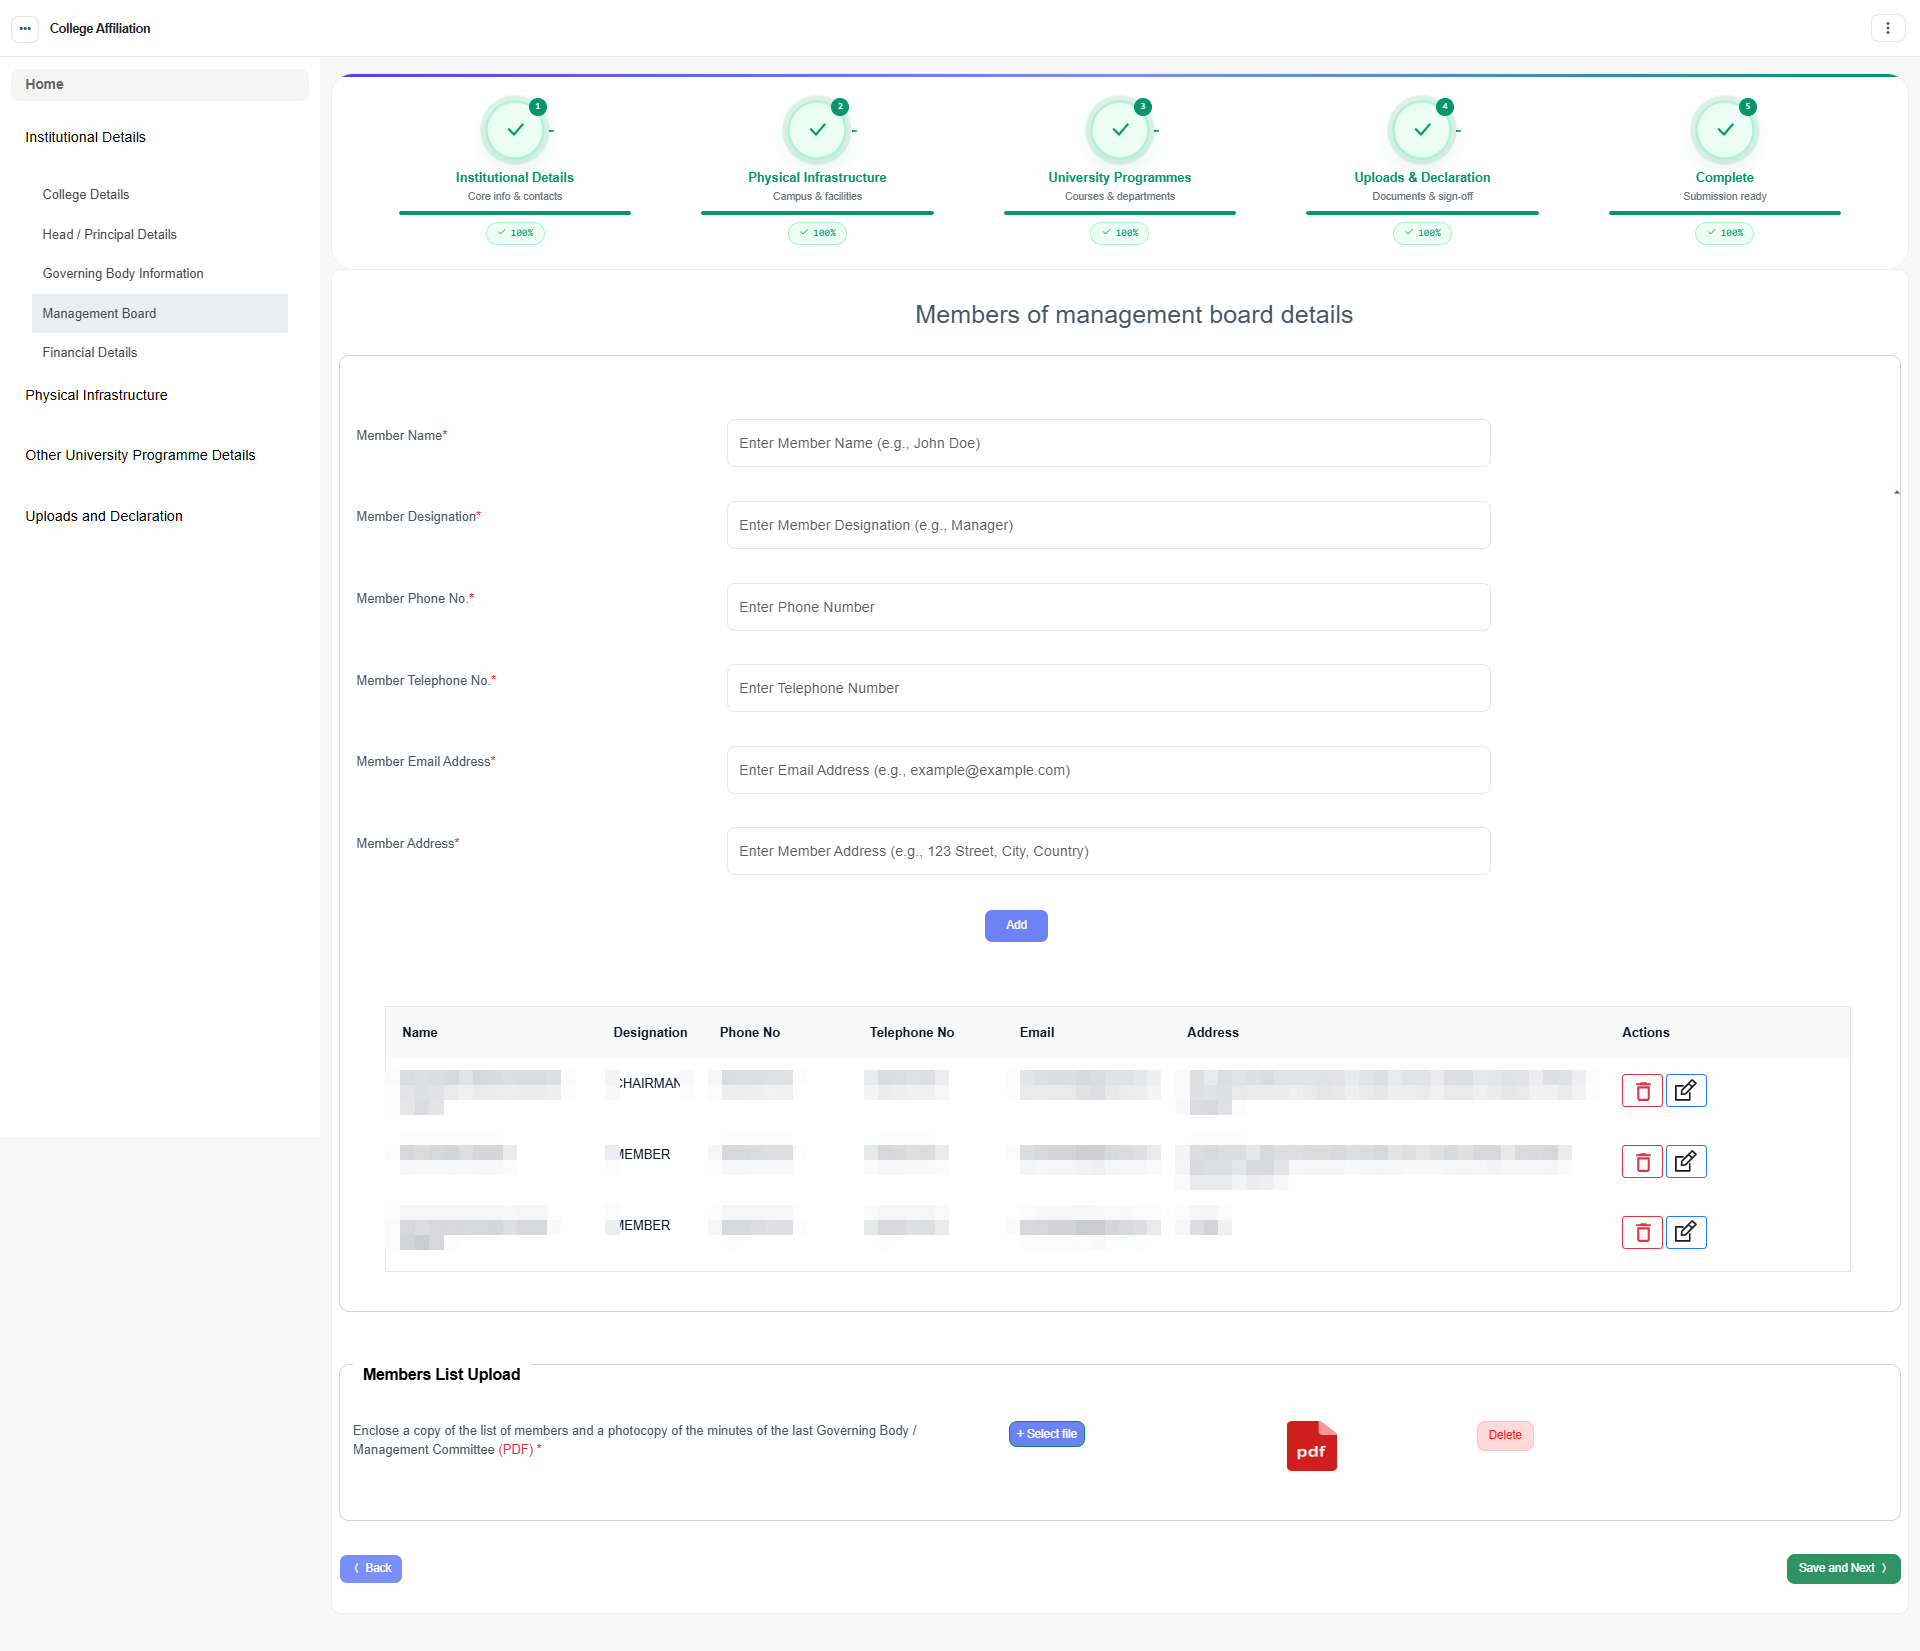
Management Board — one row per board member with their name, designation and contact details.
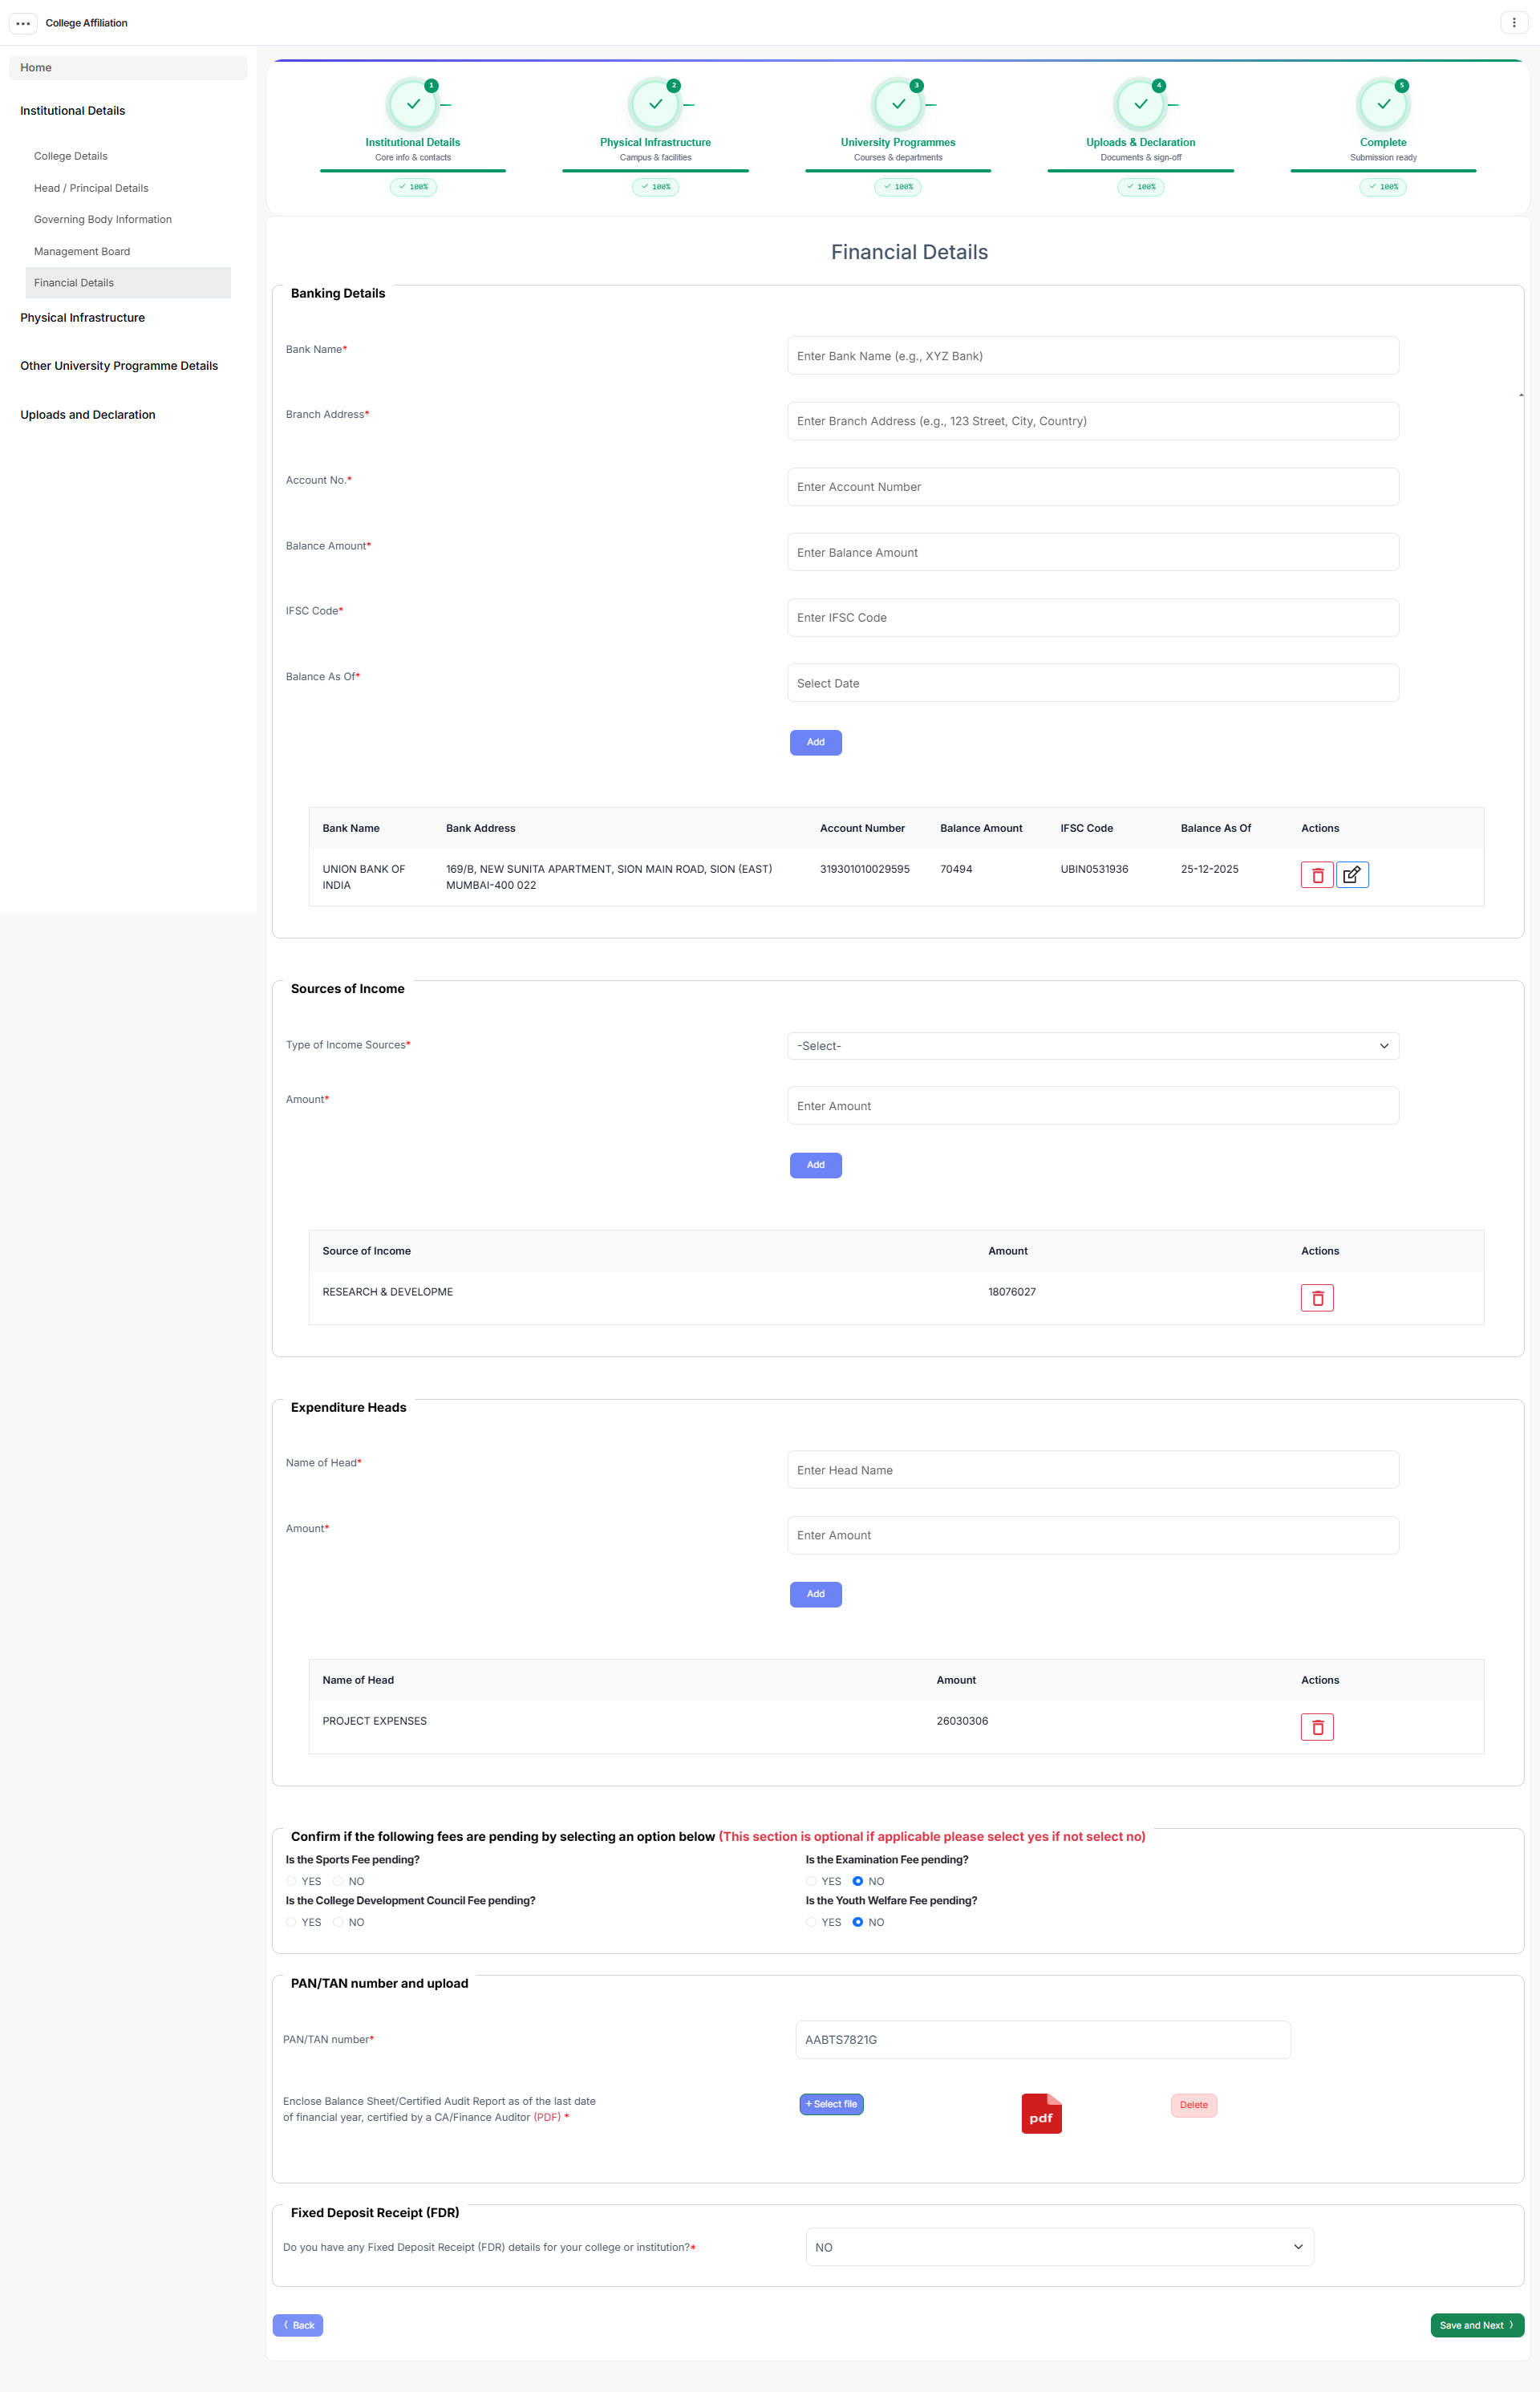
Financial Details — the college’s financial position: bank accounts, fixed-deposit receipts held as security, sources of income and heads of expenditure. (Which of these appear depends on what your university has enabled.)
Stage 2 — Physical Infrastructure
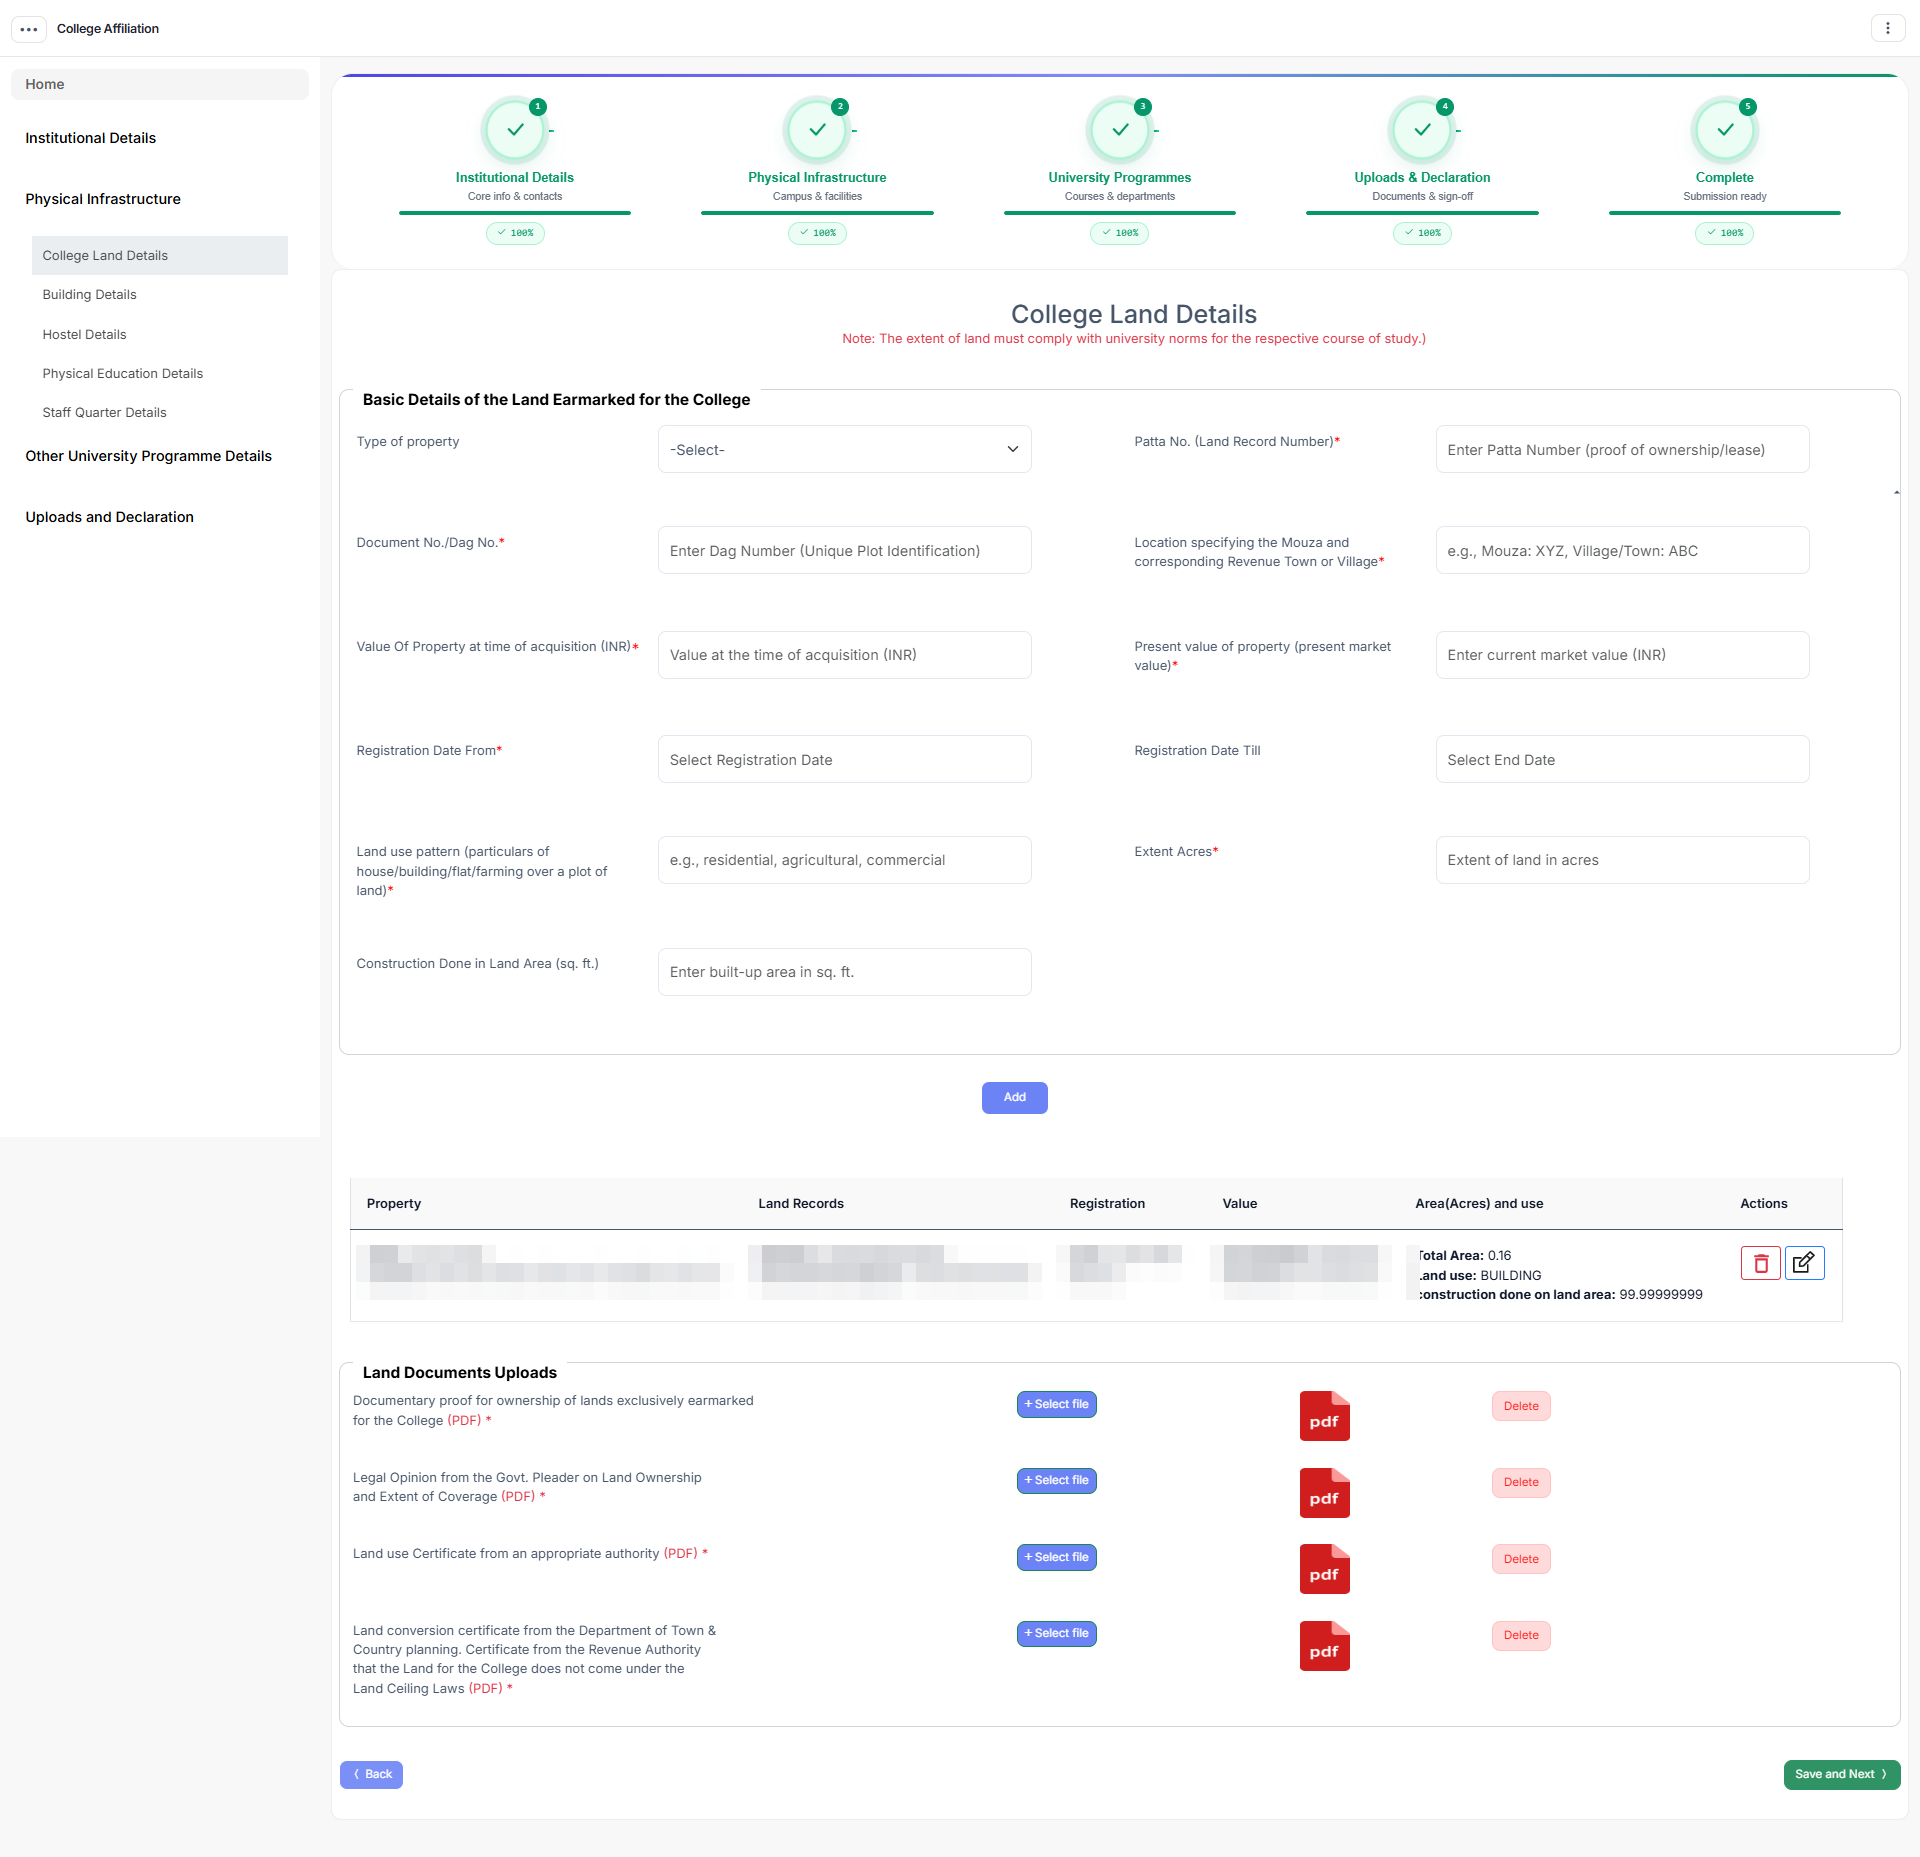
Land Details — total area, ownership, survey/plot numbers, location and supporting land documents. If your university has Land Verification enabled, this is the section a land verifier checks on site.
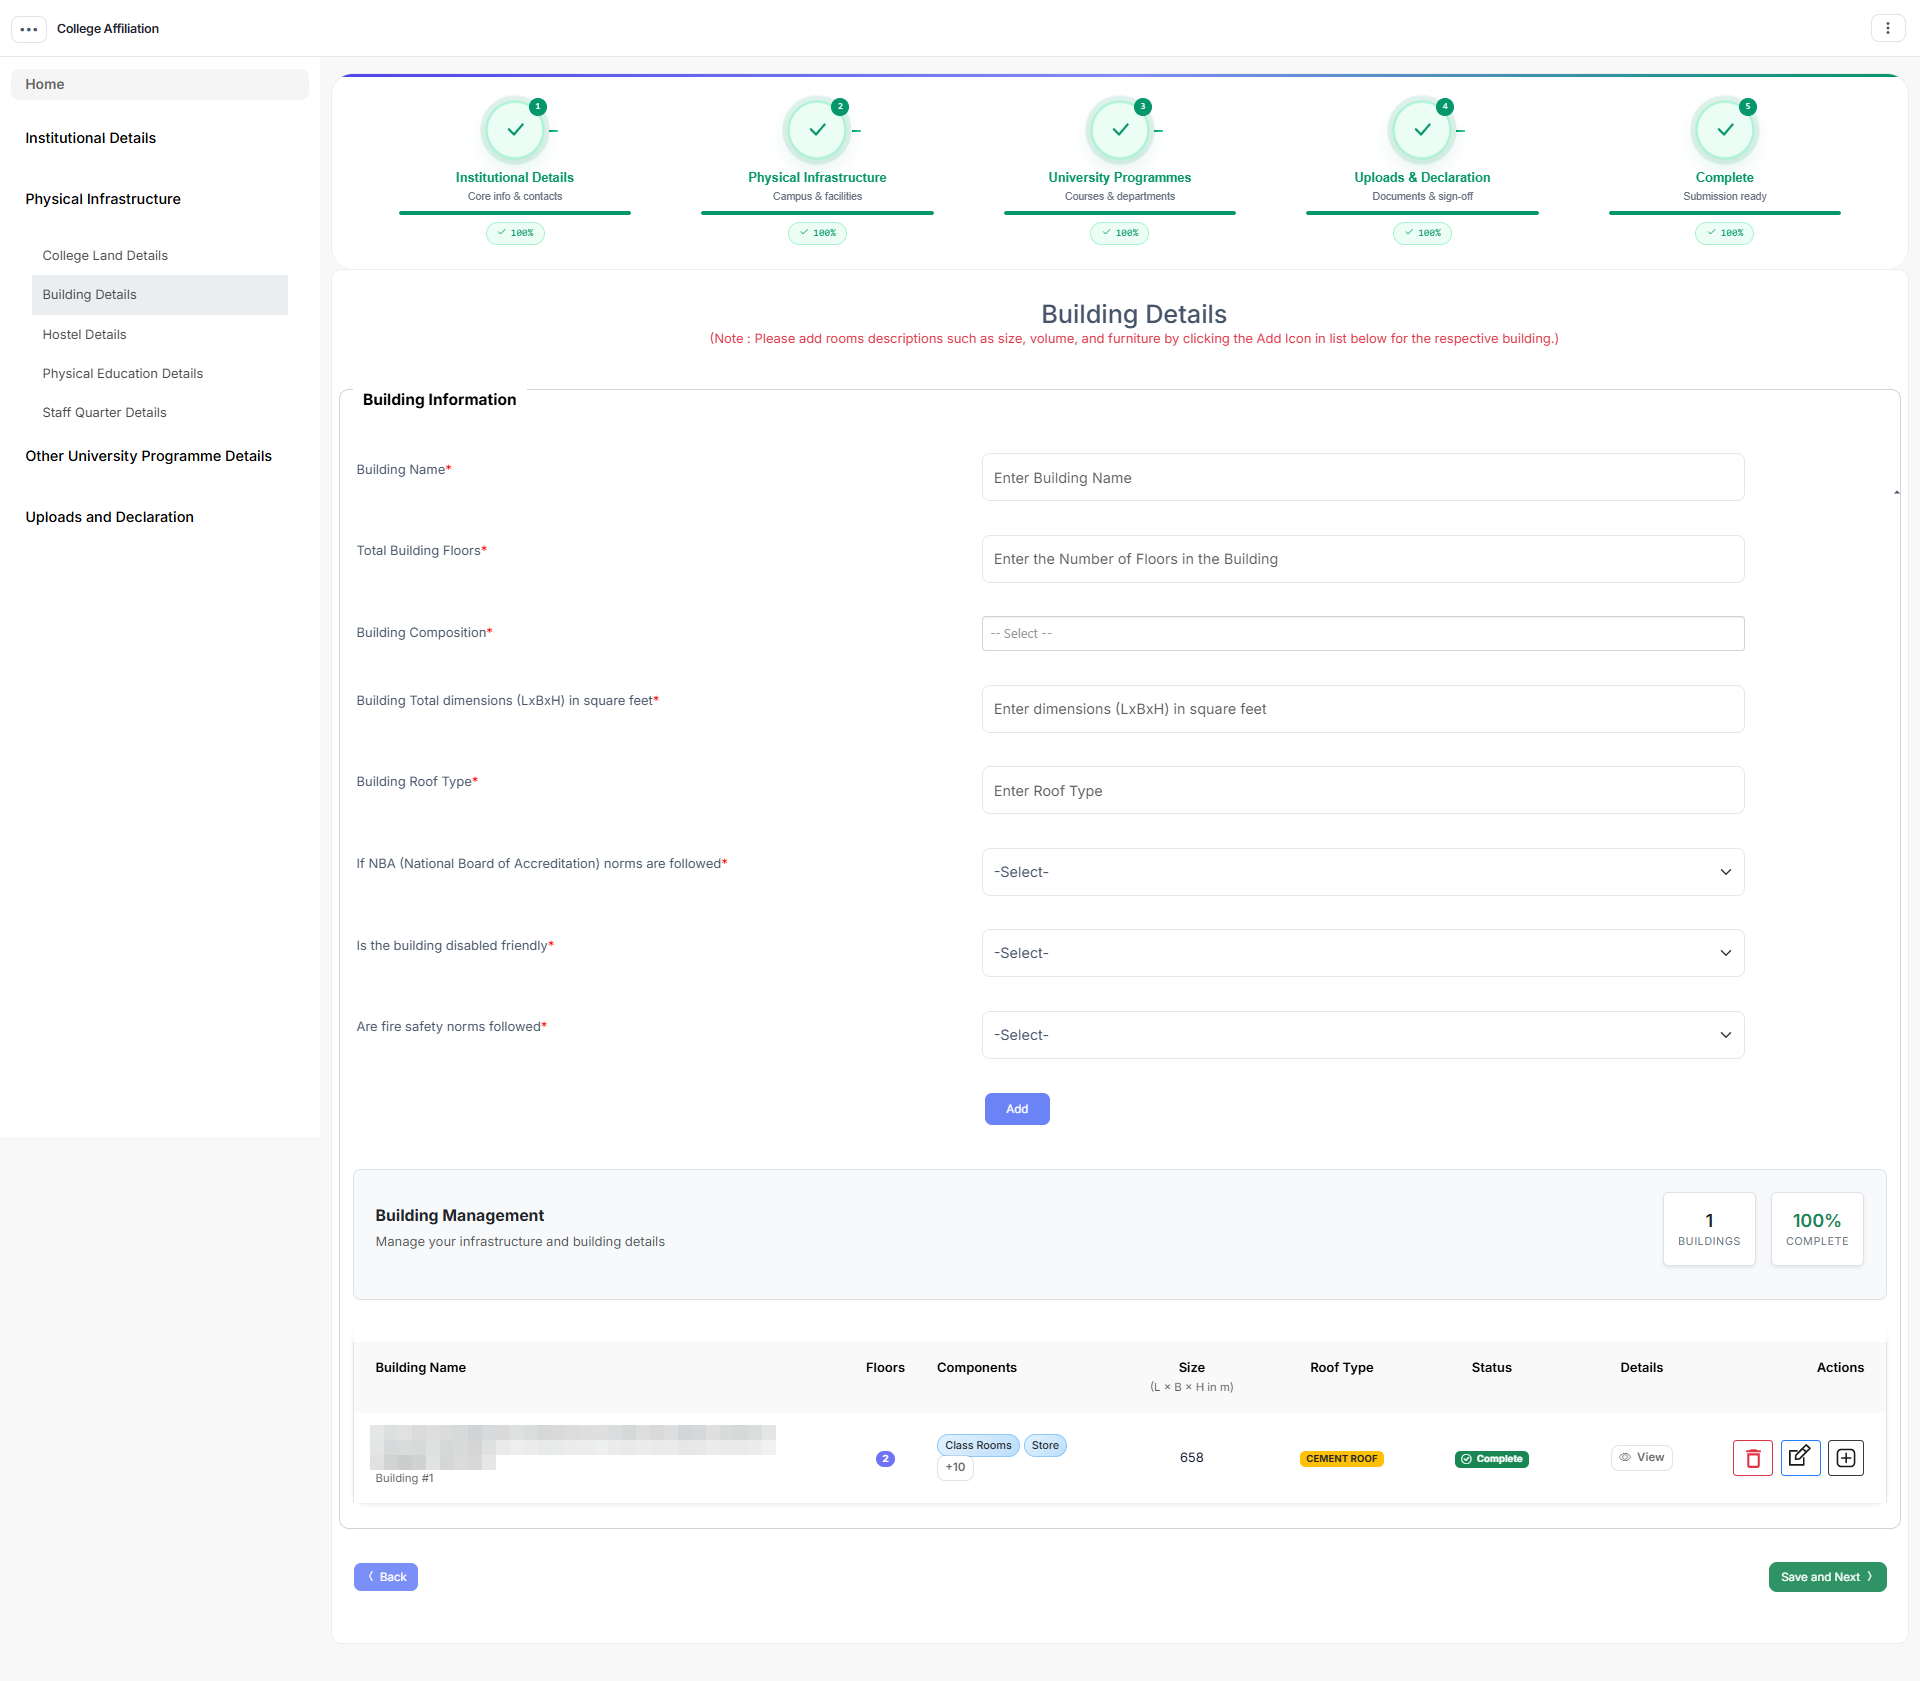
Building Details — each building with its built-up area, floors, year of construction and a component/room-level breakdown.
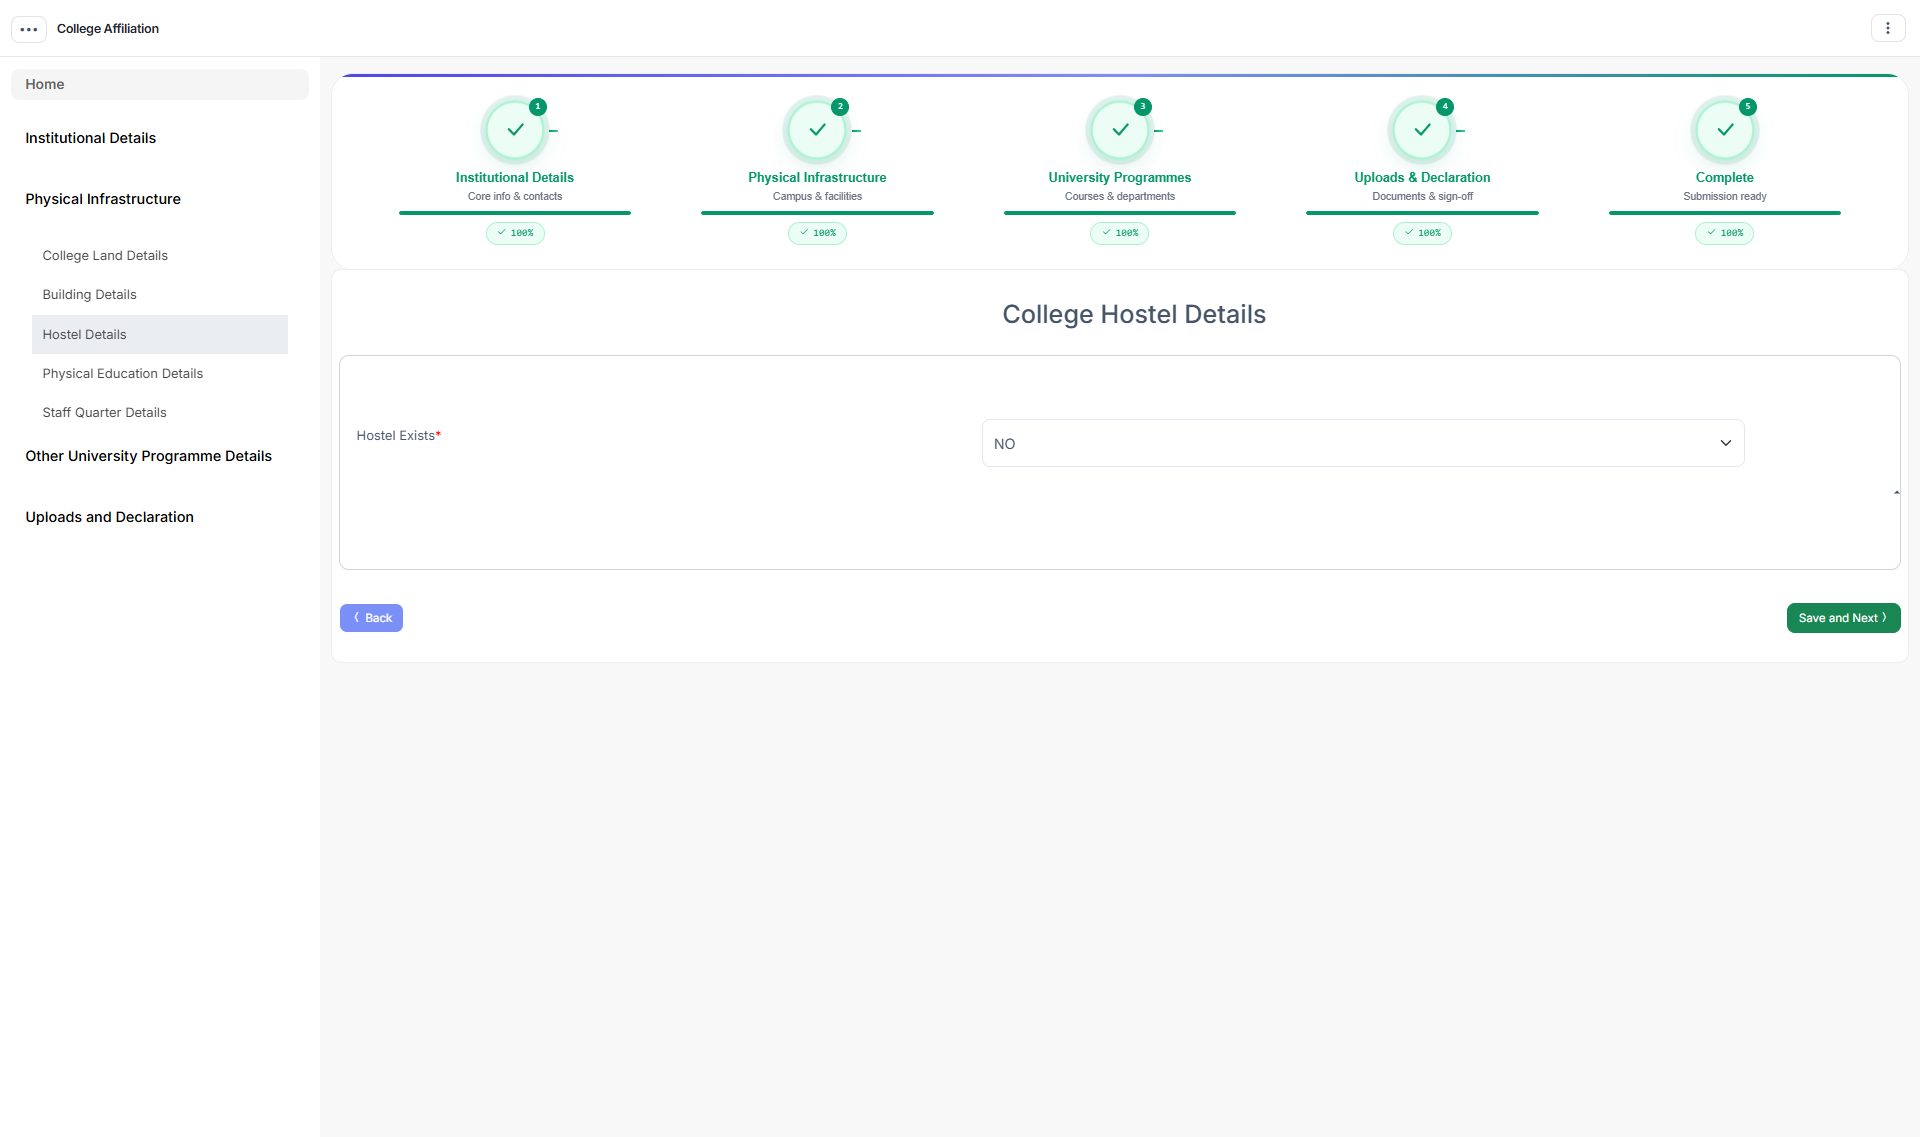
Hostel Details — hostels with capacity, broken down room by room with amenities.
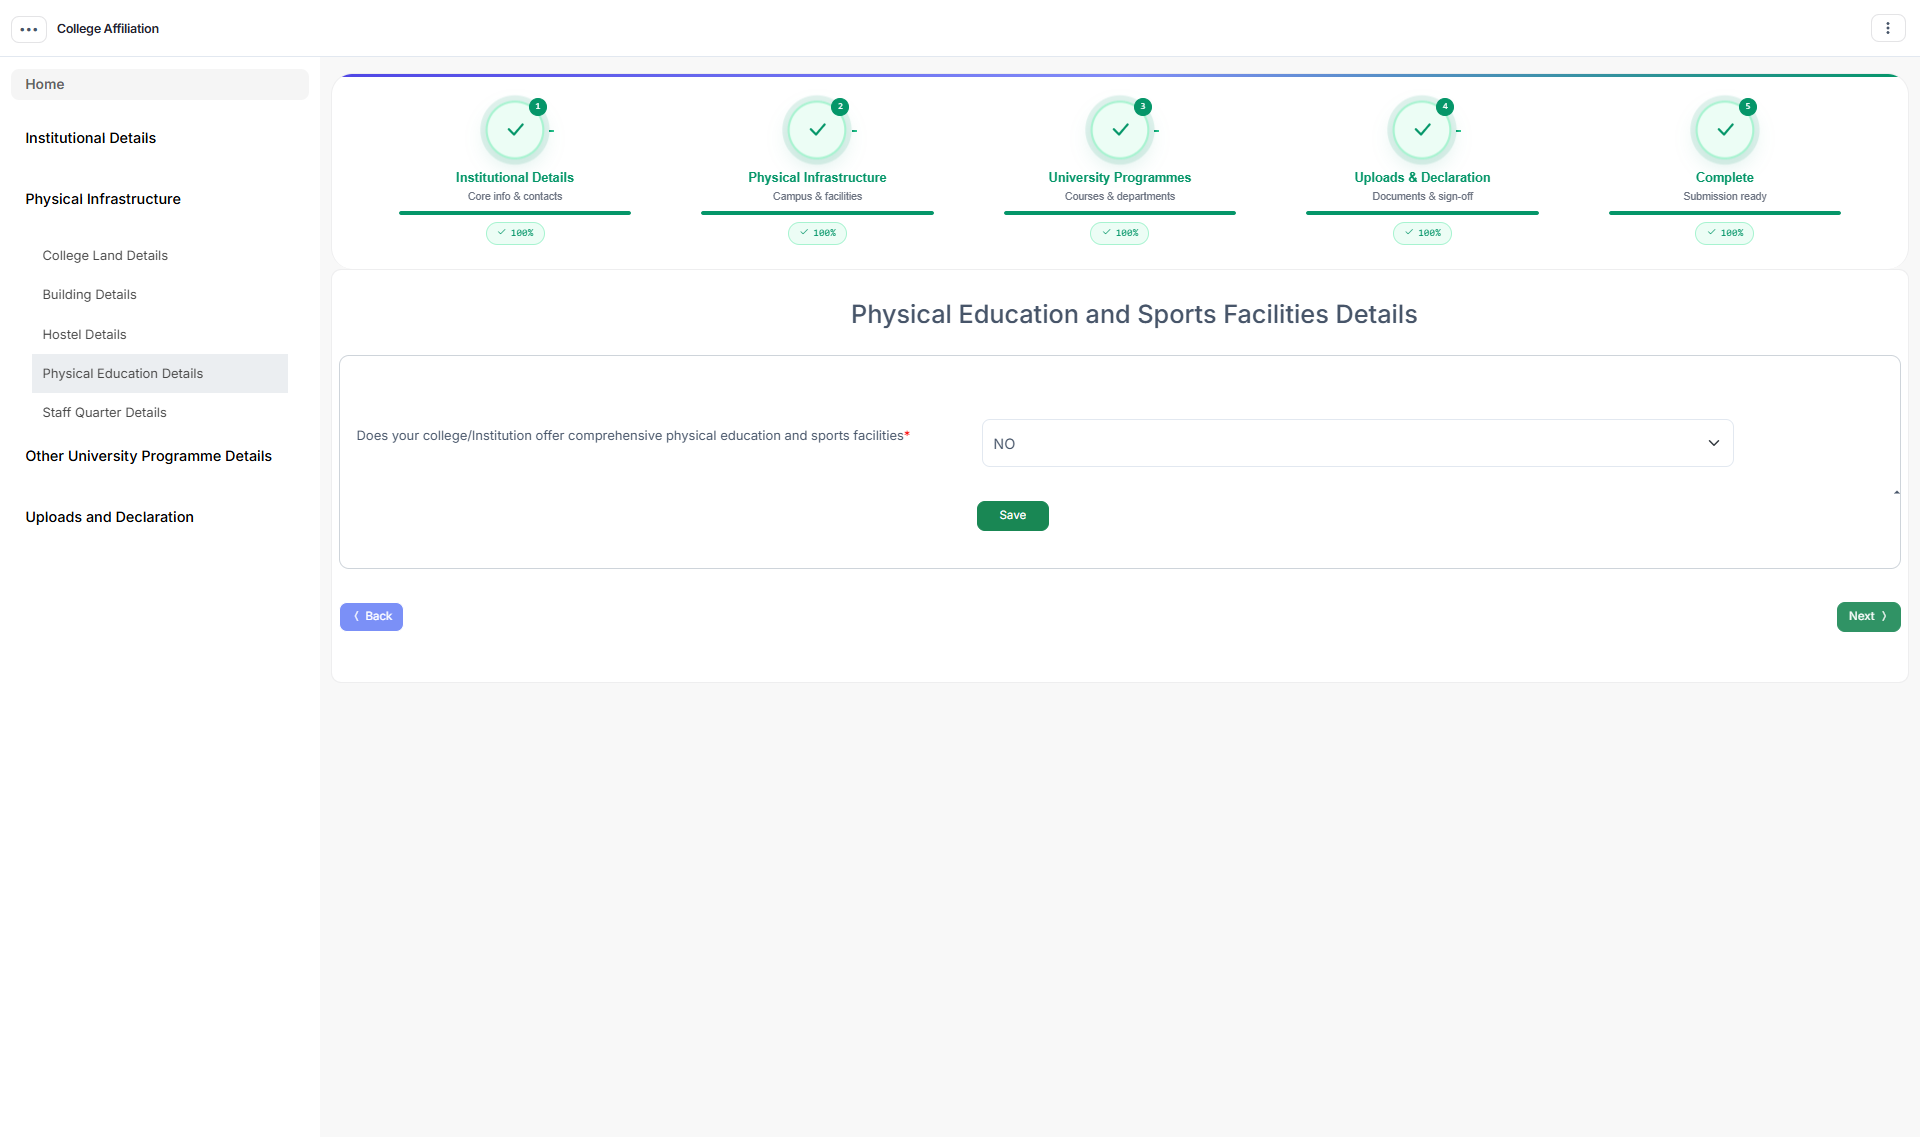
Physical Education / Games — grounds, gymnasium and equipment; each equipment row is marked In Stock, Proposed, To Be Procured, Applied or Received.
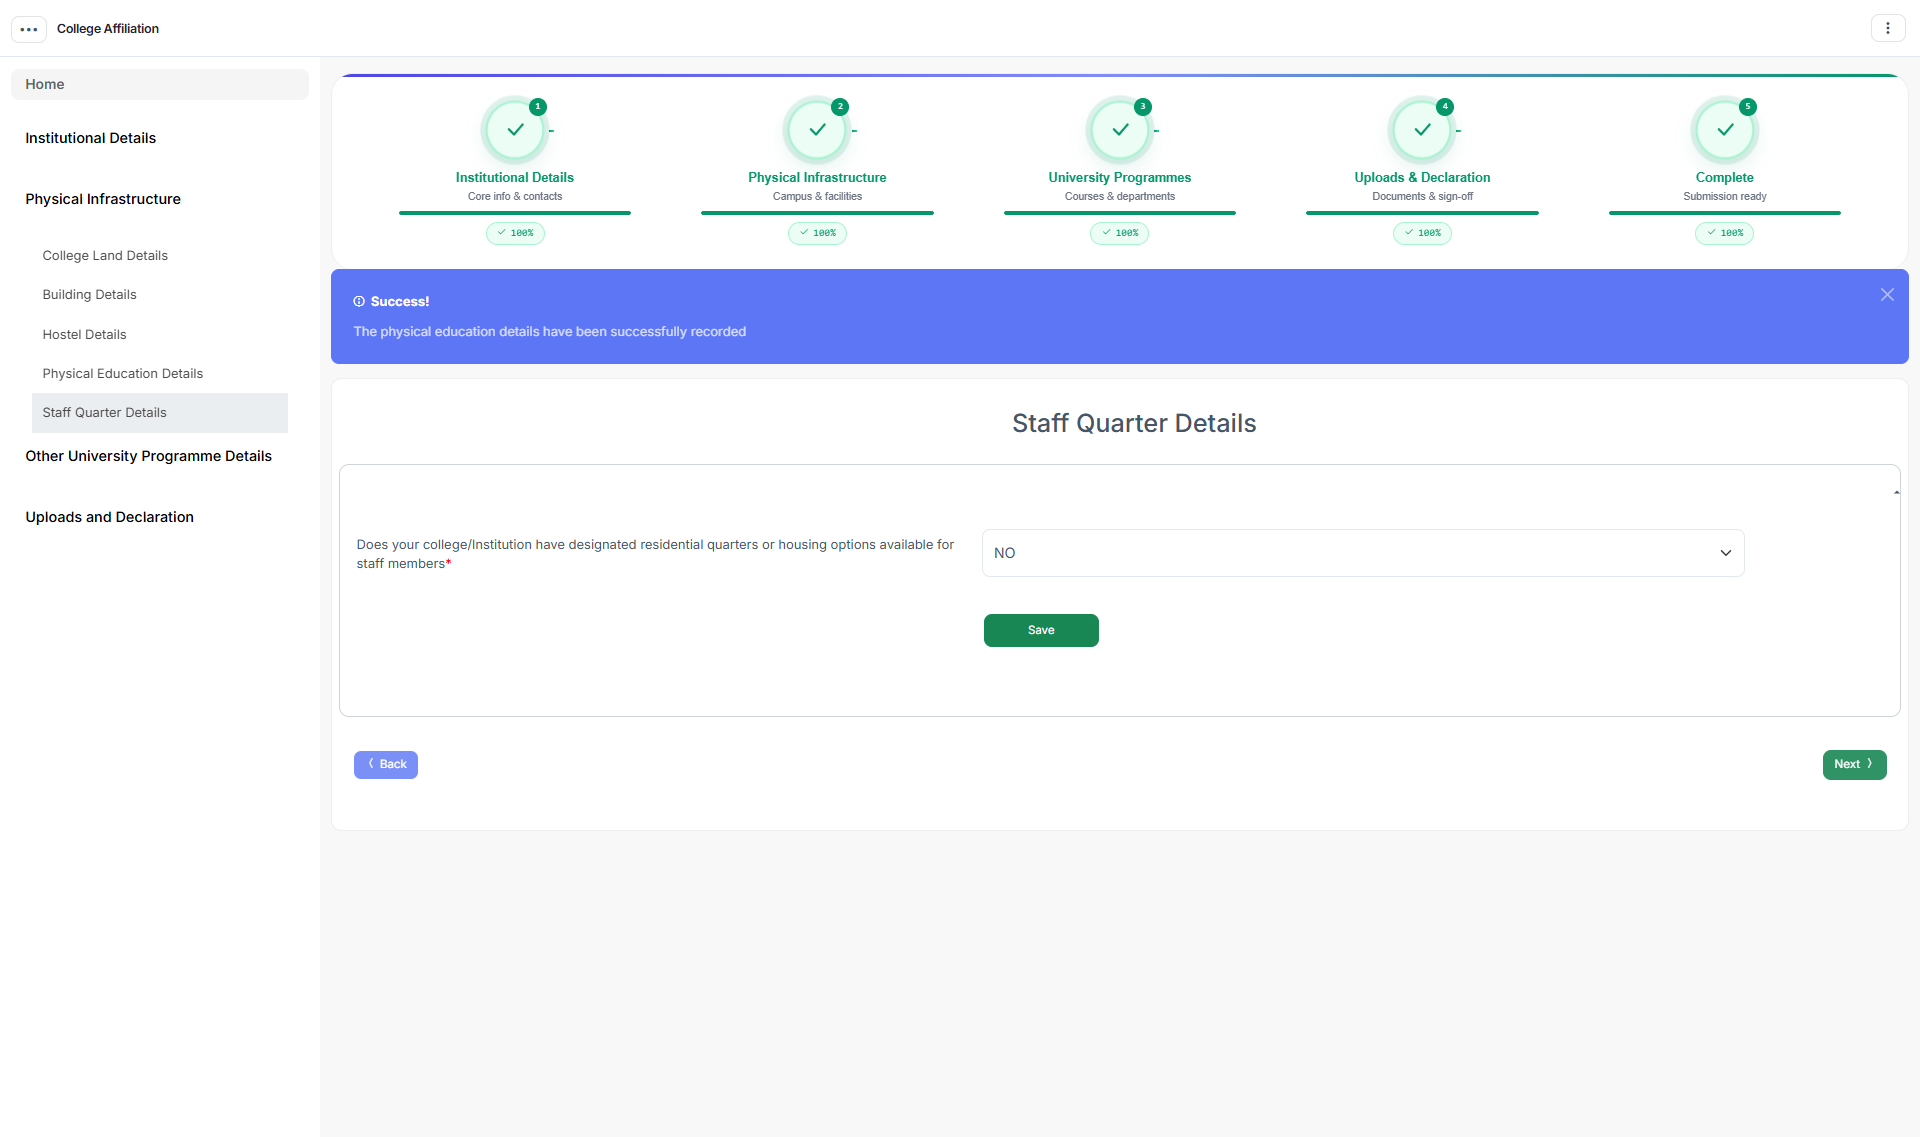
Staff Quarters — number of quarters, type, occupancy and facilities provided.
Stage 3 — University Programmes and Staff
Existing Running Programmes — programmes you already run: name, duration, intake capacity, affiliating body and accreditation status.
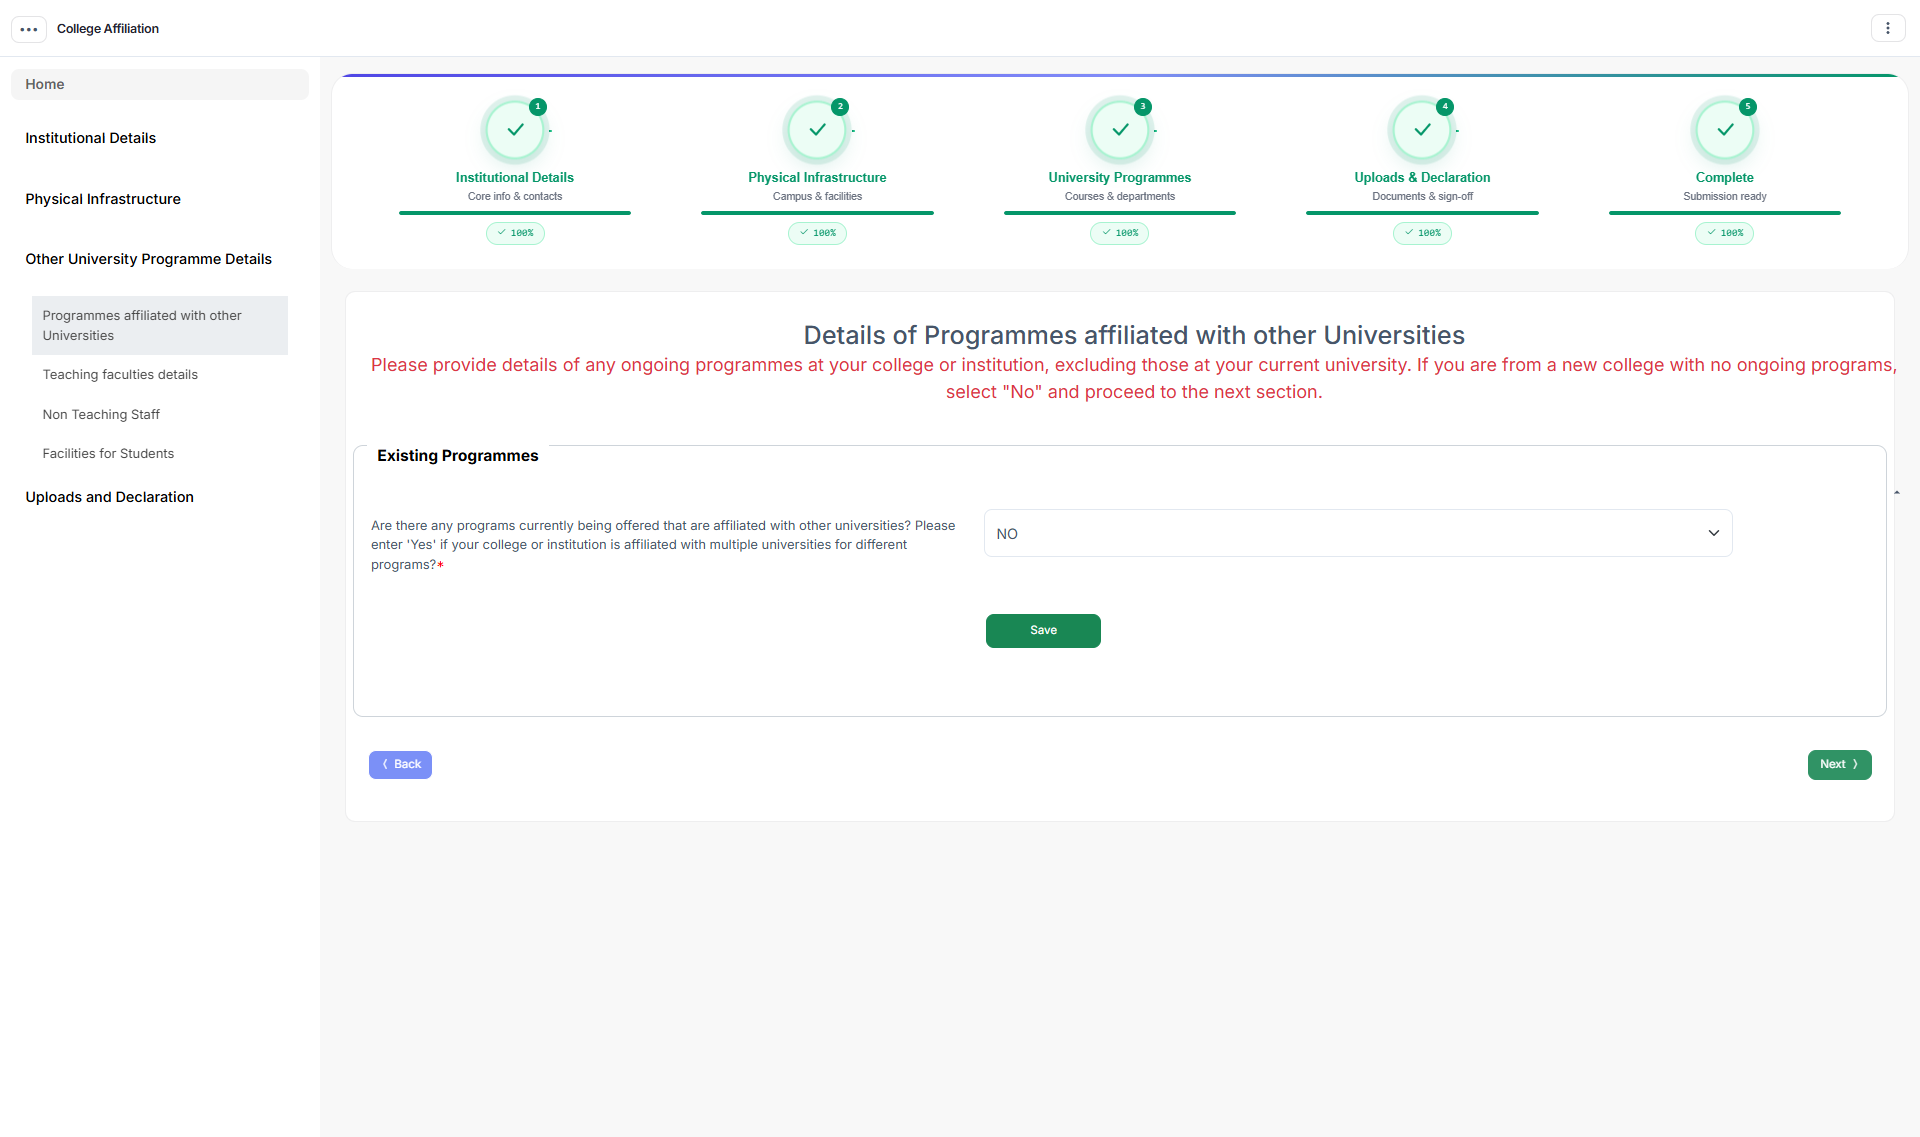
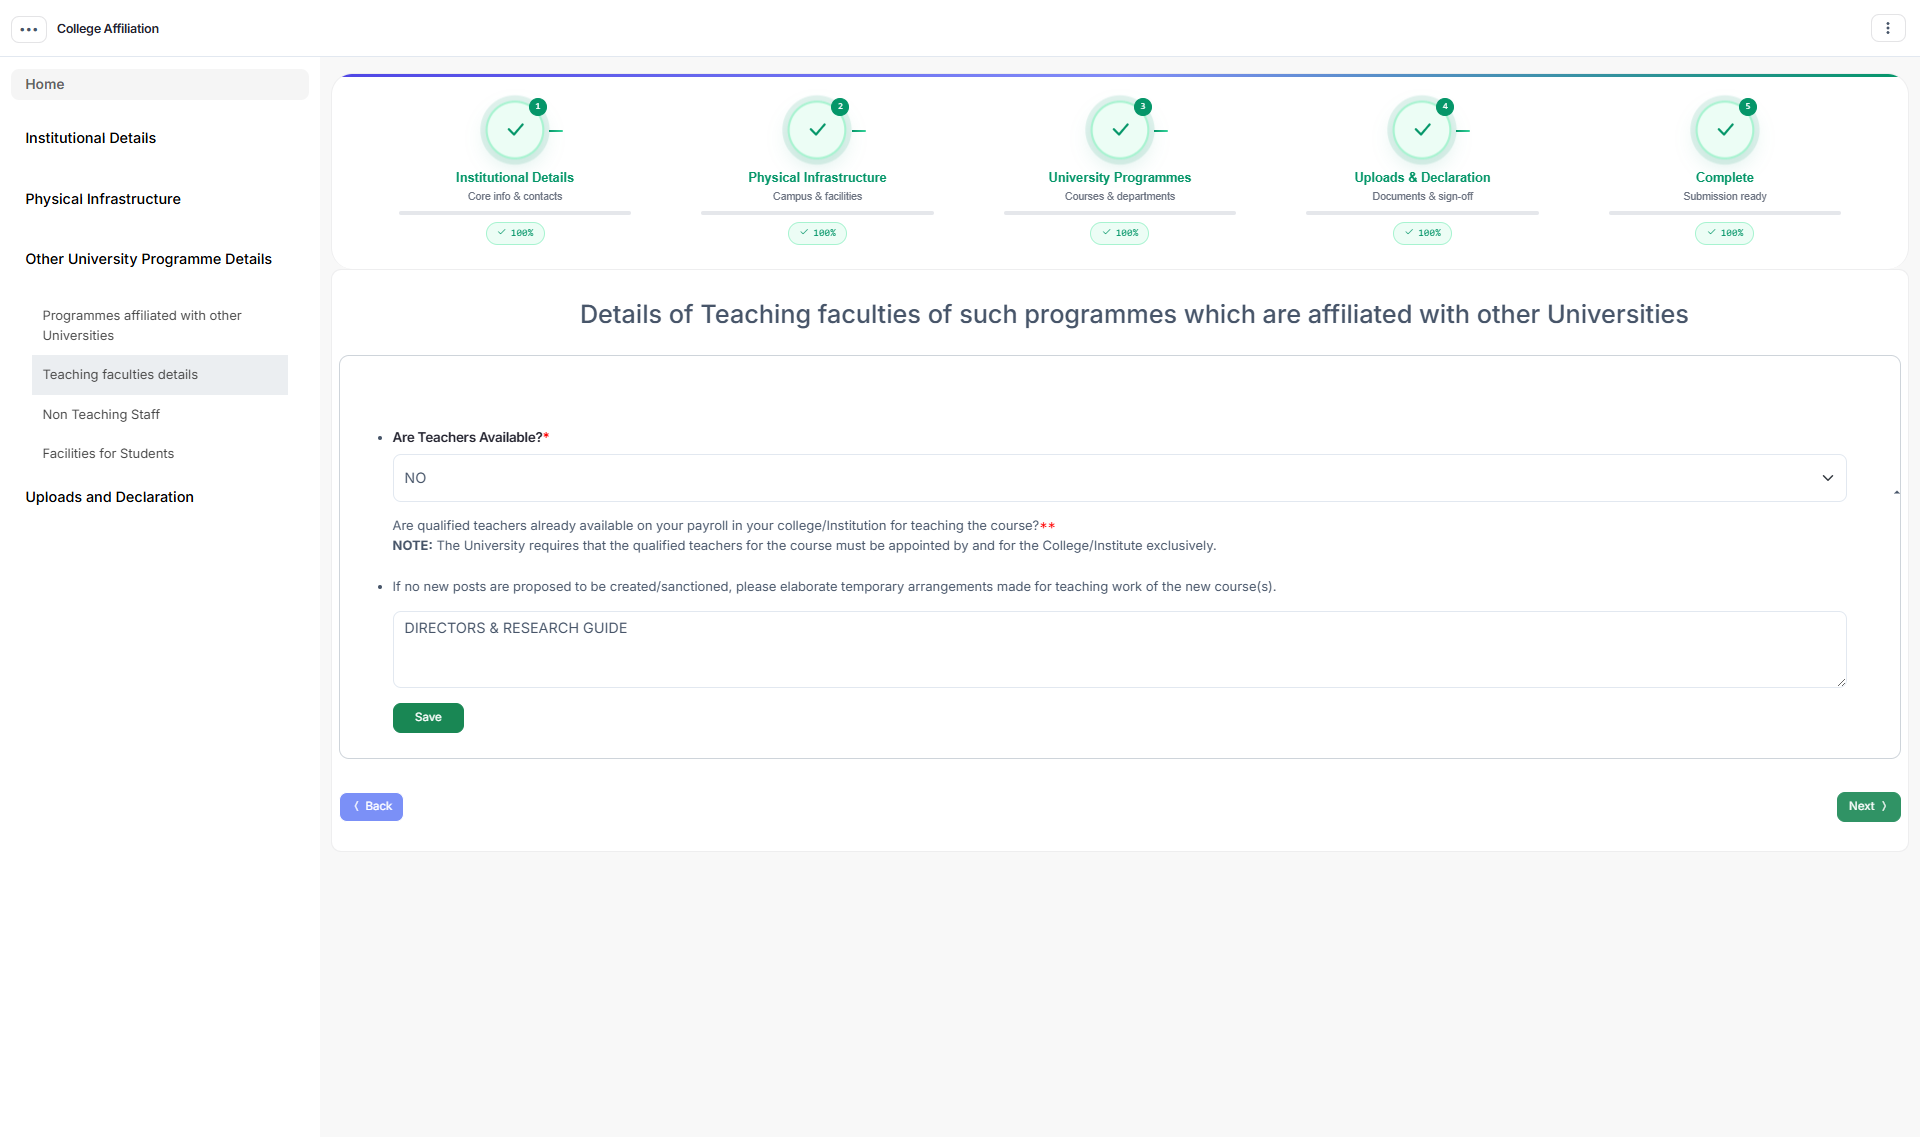
Teaching Faculty — each teacher’s name, qualification, designation, specialisation, experience and appointment type, with a CV / bio-data upload per teacher.
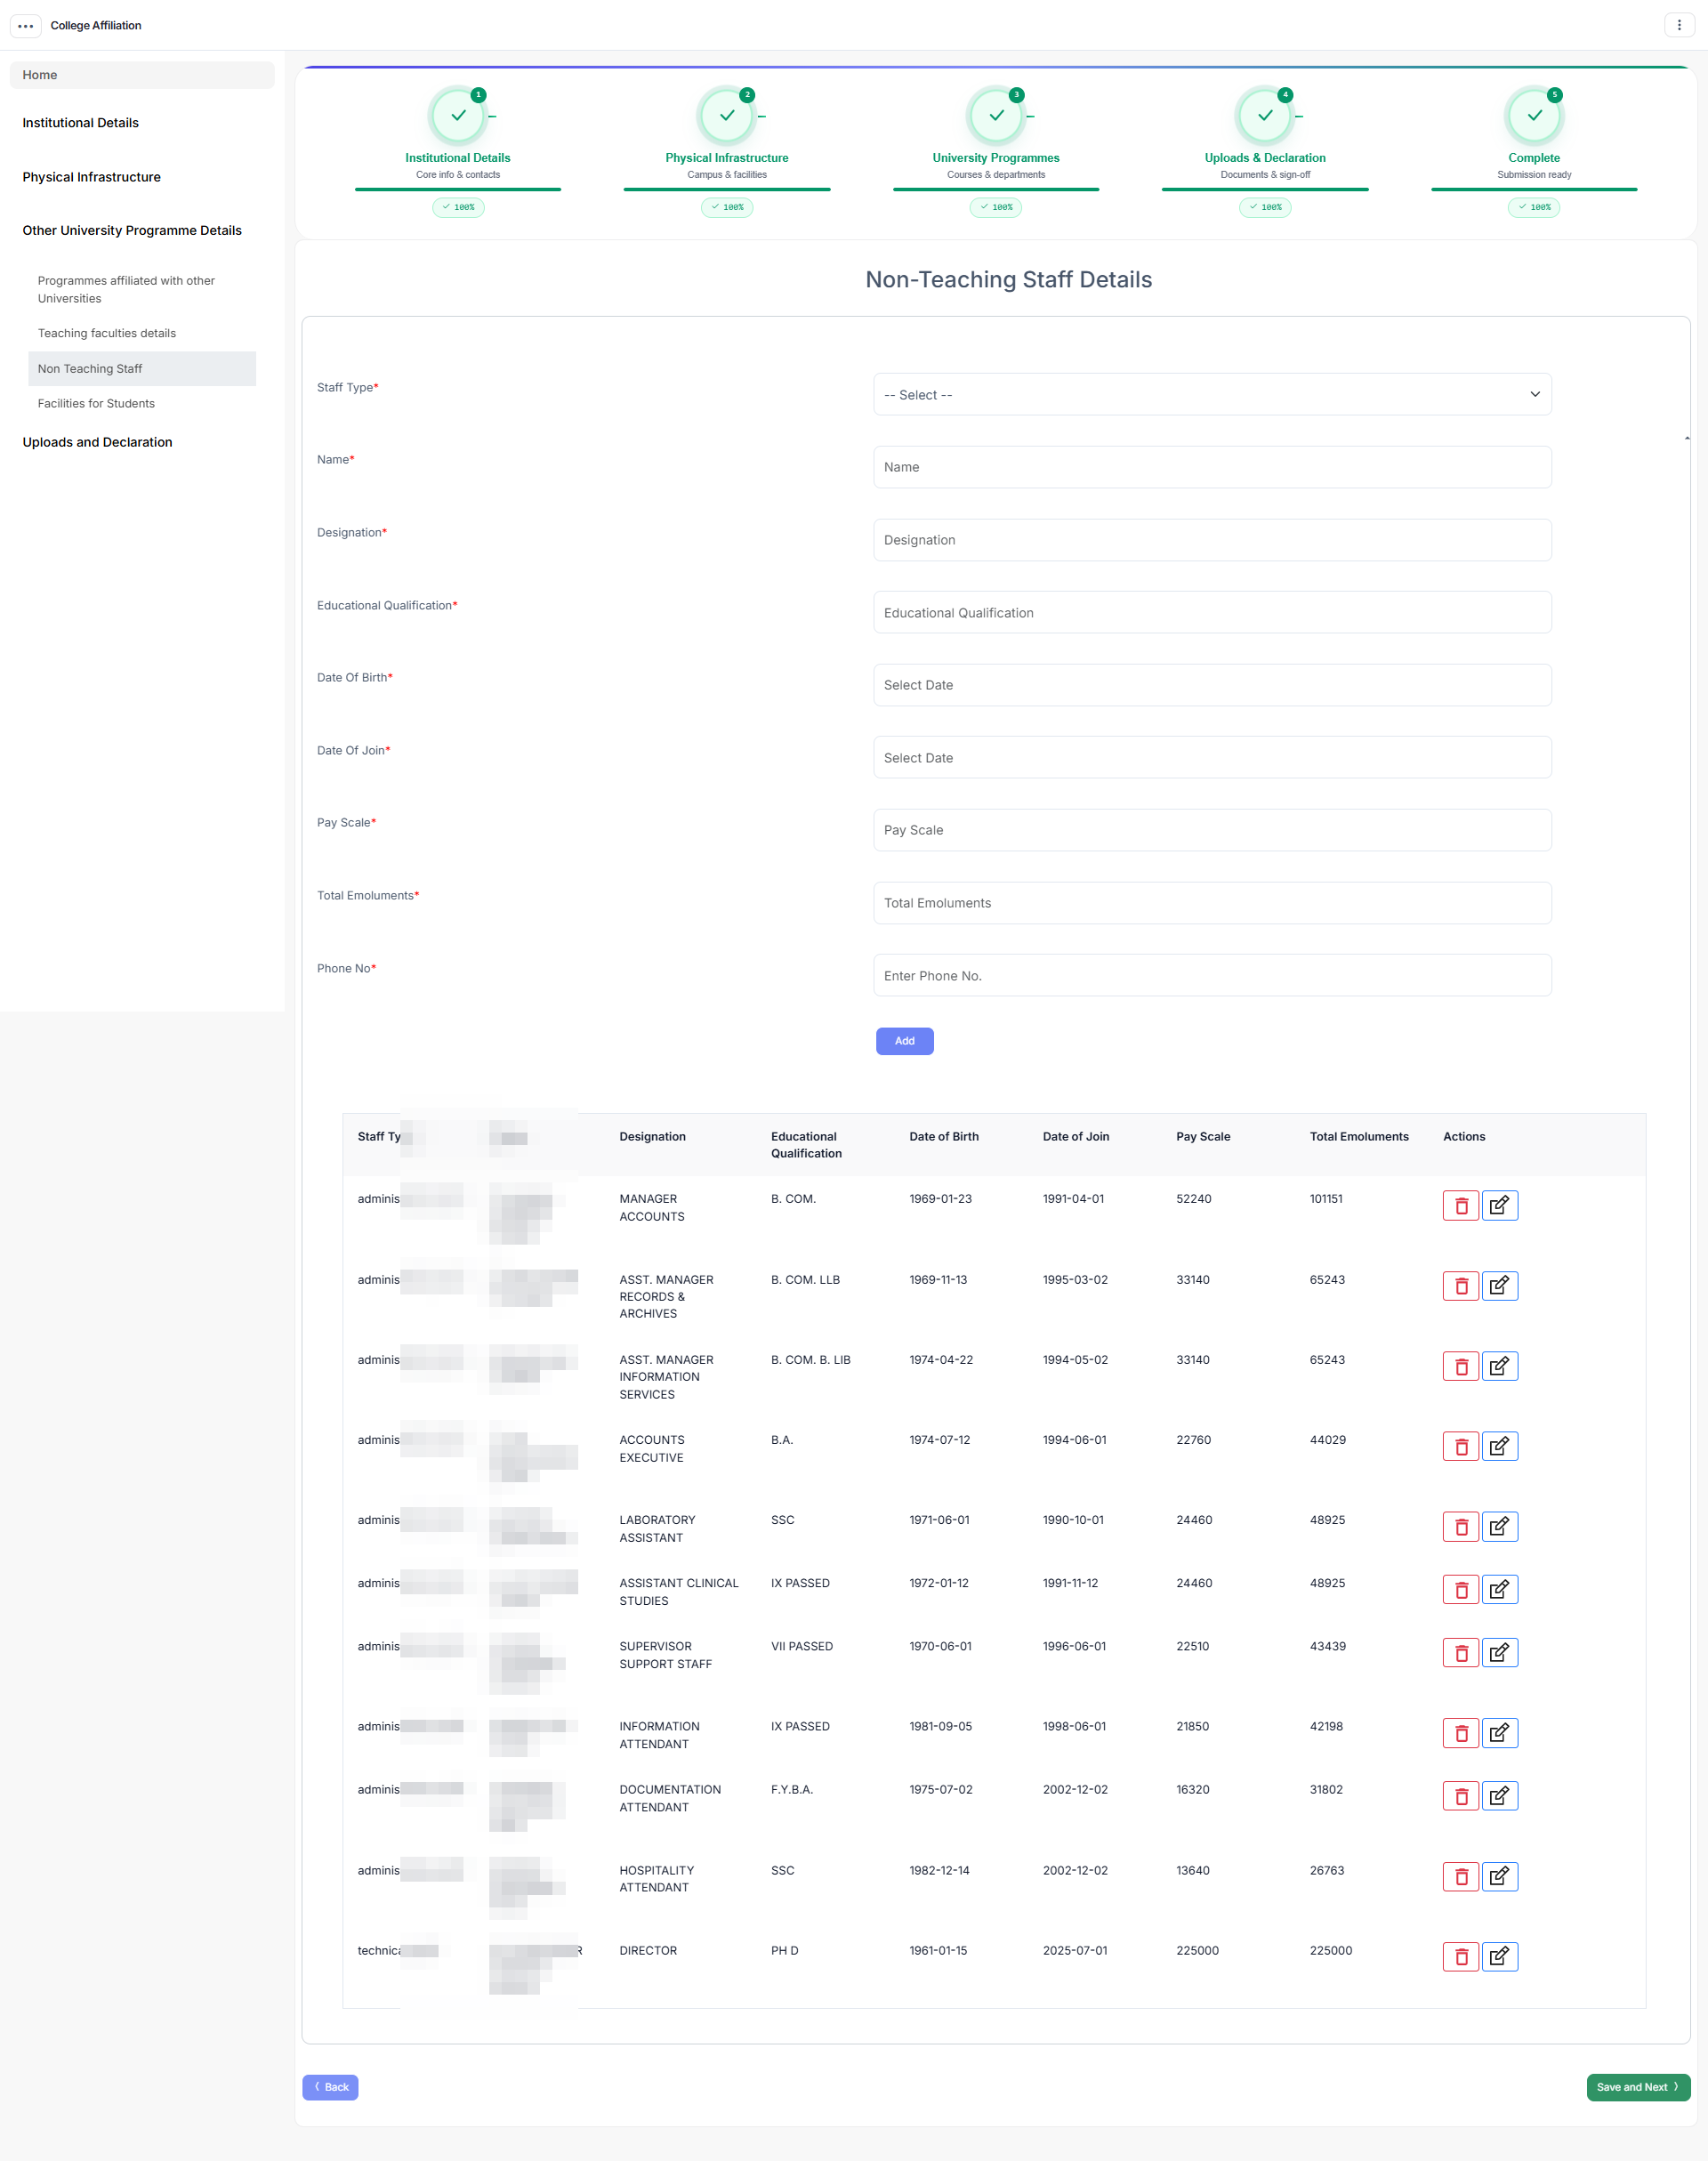
Non-Teaching Staff — administrative, technical and support staff with designation and qualification.
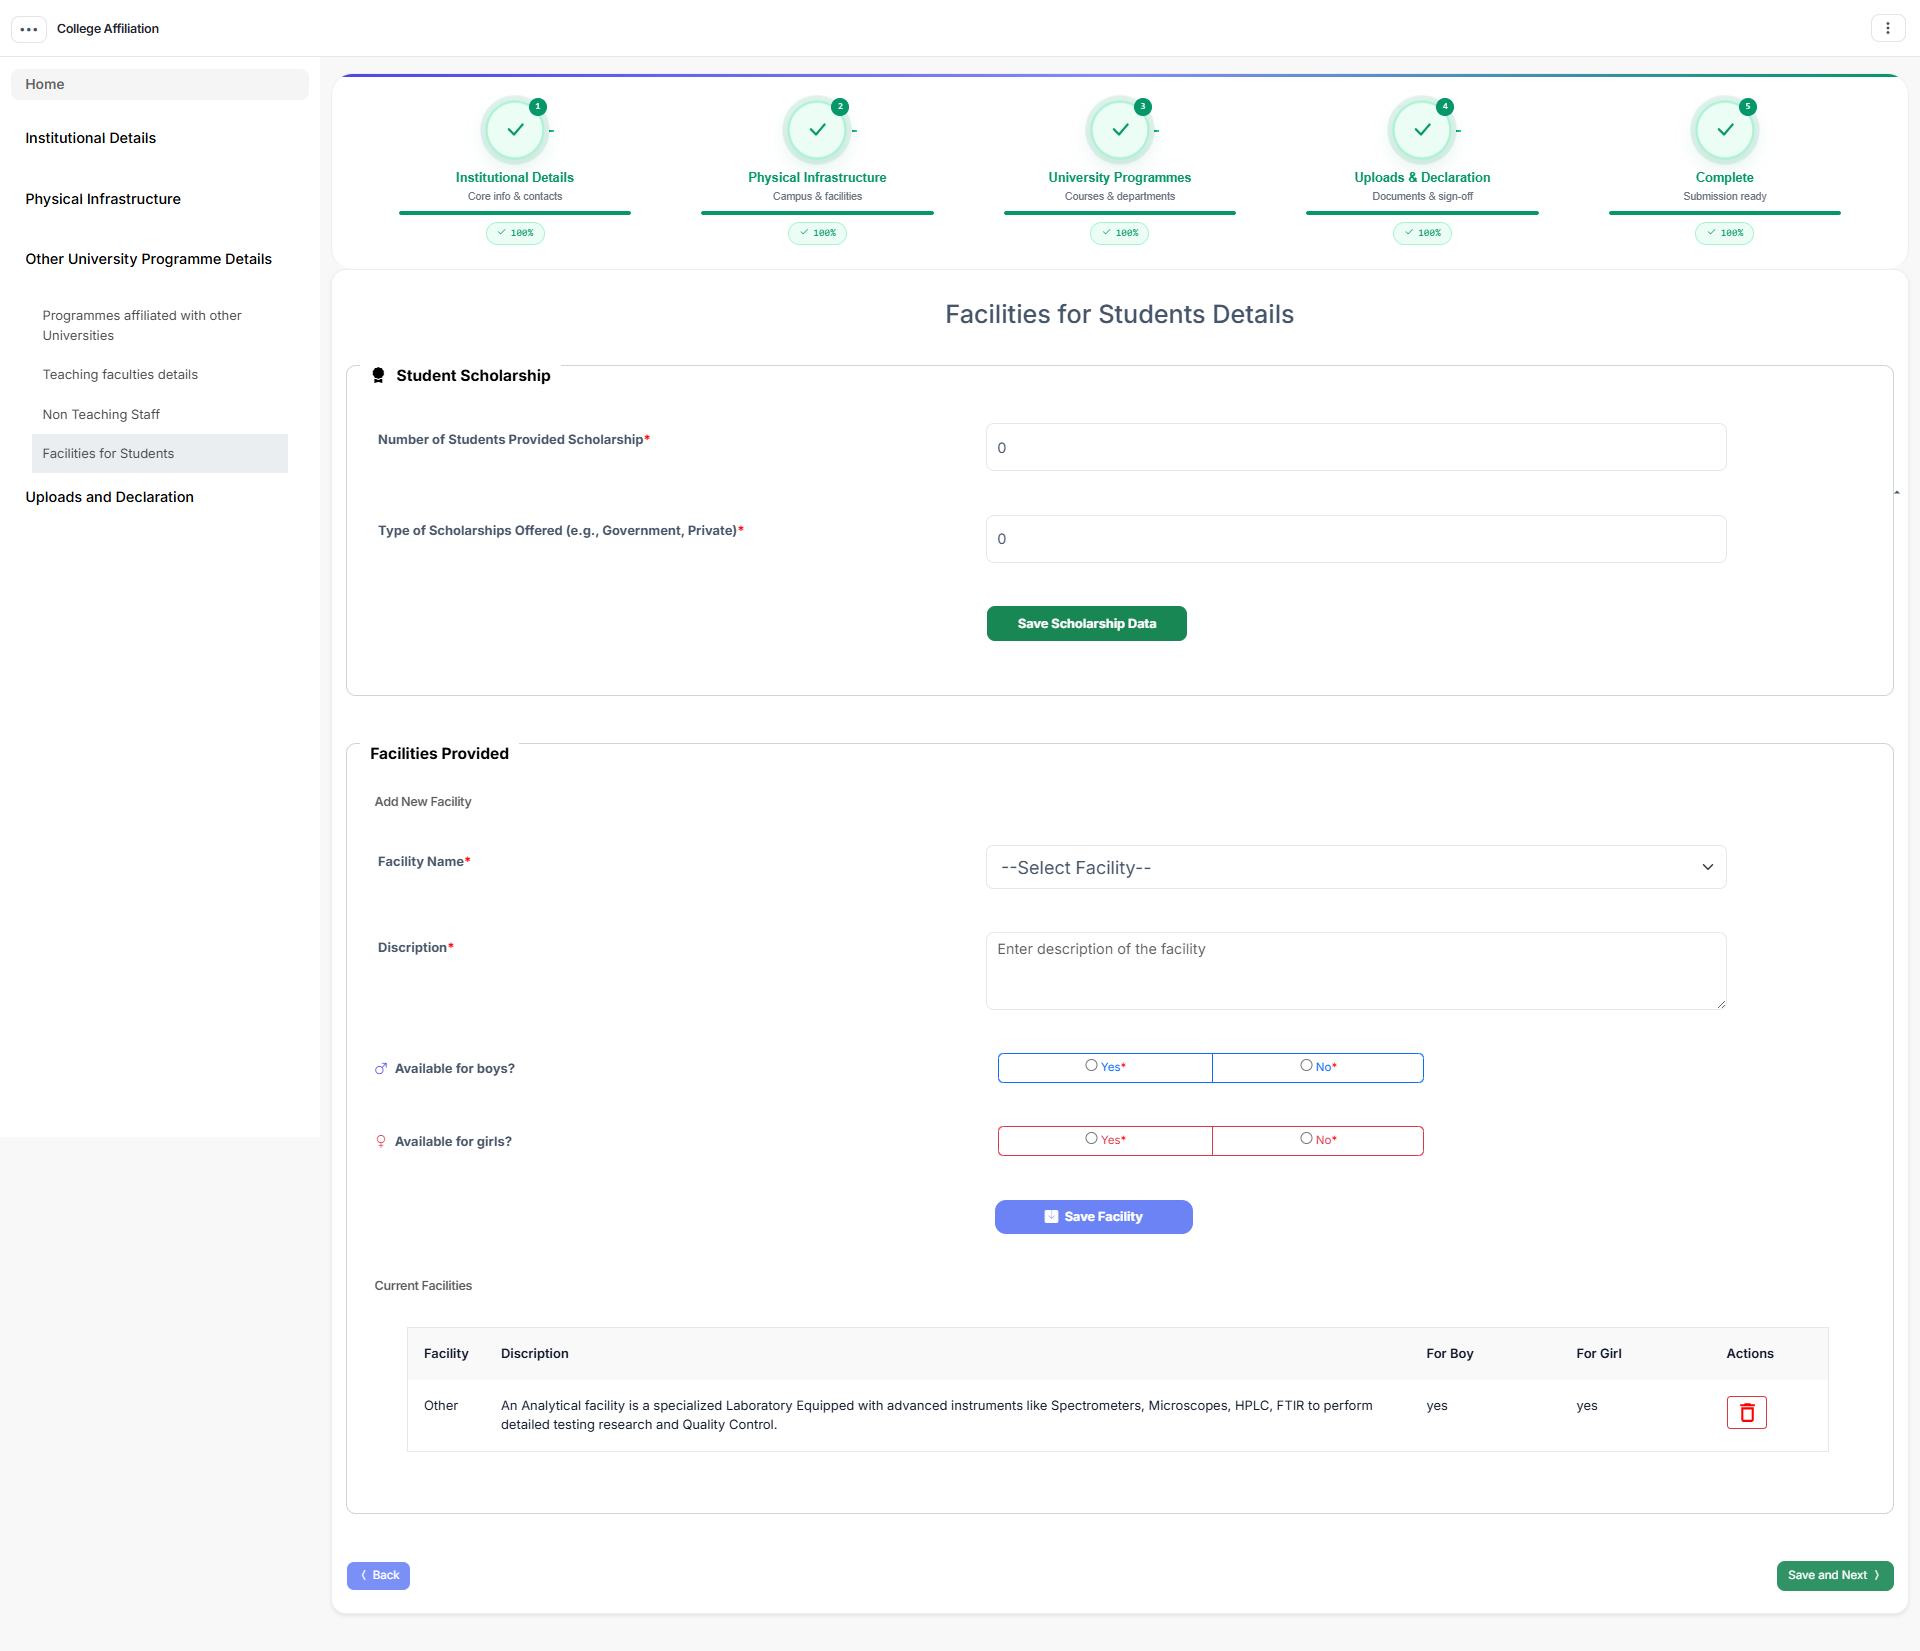
Facilities for Students — library, laboratories, computer centre, canteen, transport, medical and other student support services.
Stage 4 — Uploads and Declaration
Required Documents — a dynamic list showing exactly the documents your university has configured for your college type. Each row’s icon tells you the accepted file type (image / PDF / XLSX); the wrong type is rejected with a clear message.
Declaration — the university’s declaration text. Read it, tick I agree, and save.
Stage 5 — Complete
A read-through of everything you have entered, for a final check before you submit.
Working with list sections: bank accounts, FDRs, land parcels, buildings, hostels, PE equipment, staff quarters, faculty, non-teaching staff and student facilities all accept multiple entries — use Add repeatedly; every row has its own Edit and Delete.
Submitting the profile
When every section shows green: open Declaration → tick I agree → Submit. Your status moves DRAFT → SUBMITTED and the profile becomes read-only while the university reviews it.
The university then either approves it (you may now apply for affiliation), returns it for correction (fix the flagged sections and re-submit), or rejects it (you are e-mailed the reason). If Land Verification is enabled, you will be told your land details have been forwarded, a verifier will visit, and you will be notified when the check is complete — nothing else is required from you during that step.
Note: Only after the profile is approved can your college apply for affiliation applications.
Affiliation Application — every section you must complete
Open Apply For Affiliation (in HED deployments, first pick the university you are applying to).
Step 1 — Pick a session. Each open session shows its academic year, affiliation type, college type, end date and fee mode. Click Apply on the one you want.
Step 2 — The application is created. A draft application (status DRAFT) is created with a unique application number, pre-filled from your profile and the session: college name and type, affiliation type, academic year, fee mode and payment method.
Step 3 — Select your programmes. You land on Required Programmes — choose the programmes you are seeking affiliation for this session, with intake and, where the programme is strength-based, expected student strength. These figures feed the fee calculation directly.
Step 4 — Complete the sub-forms. Your university decides which sub-forms apply when it creates the session, so you will see only the relevant ones. Like the profile, each has its own left-hand navigation and a Save and Next button.
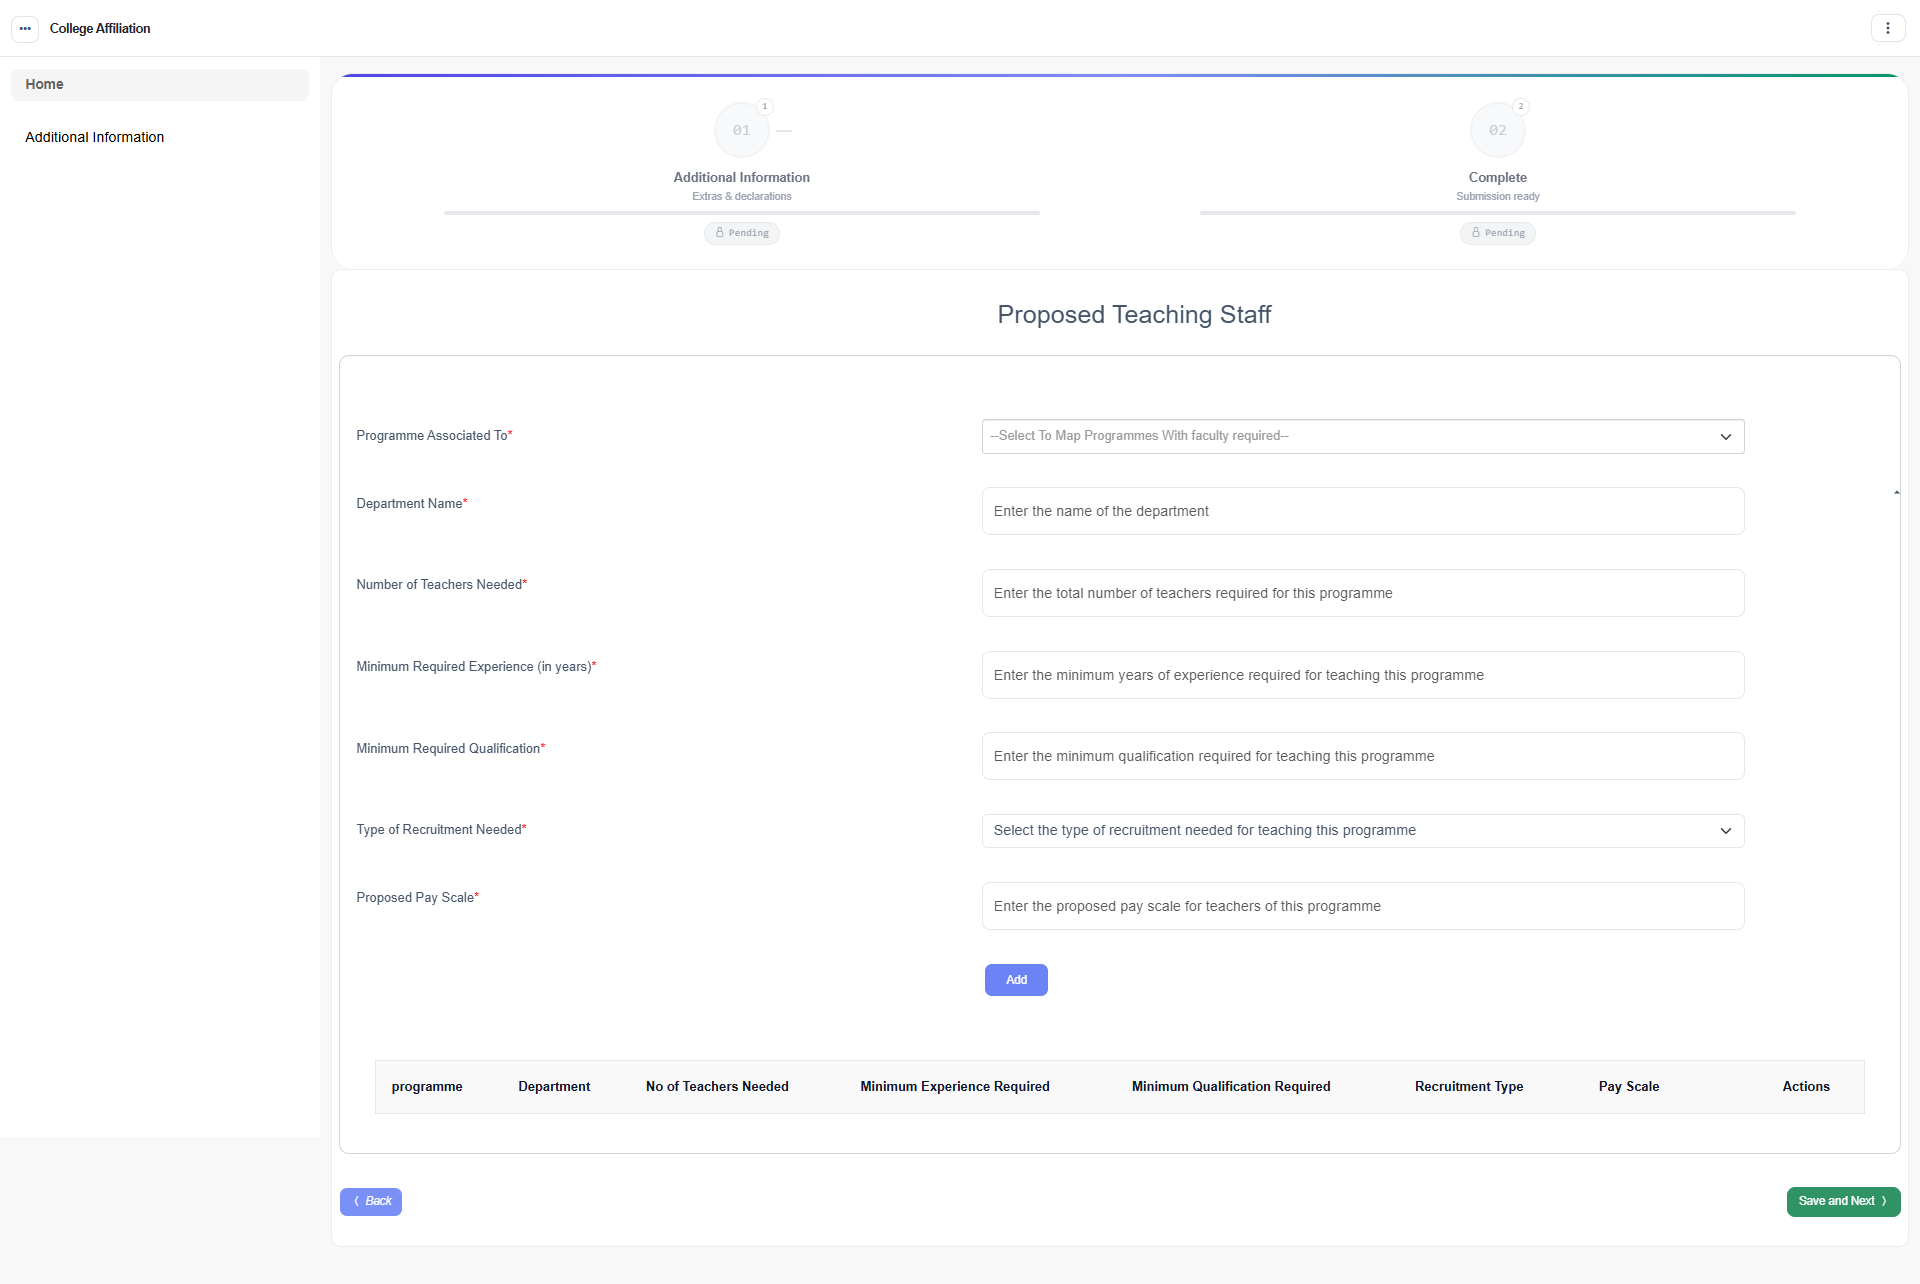
Required (Proposed) Teaching Faculty — how many teachers each selected programme needs, with the minimum qualification, experience, recruitment type and pay scale.
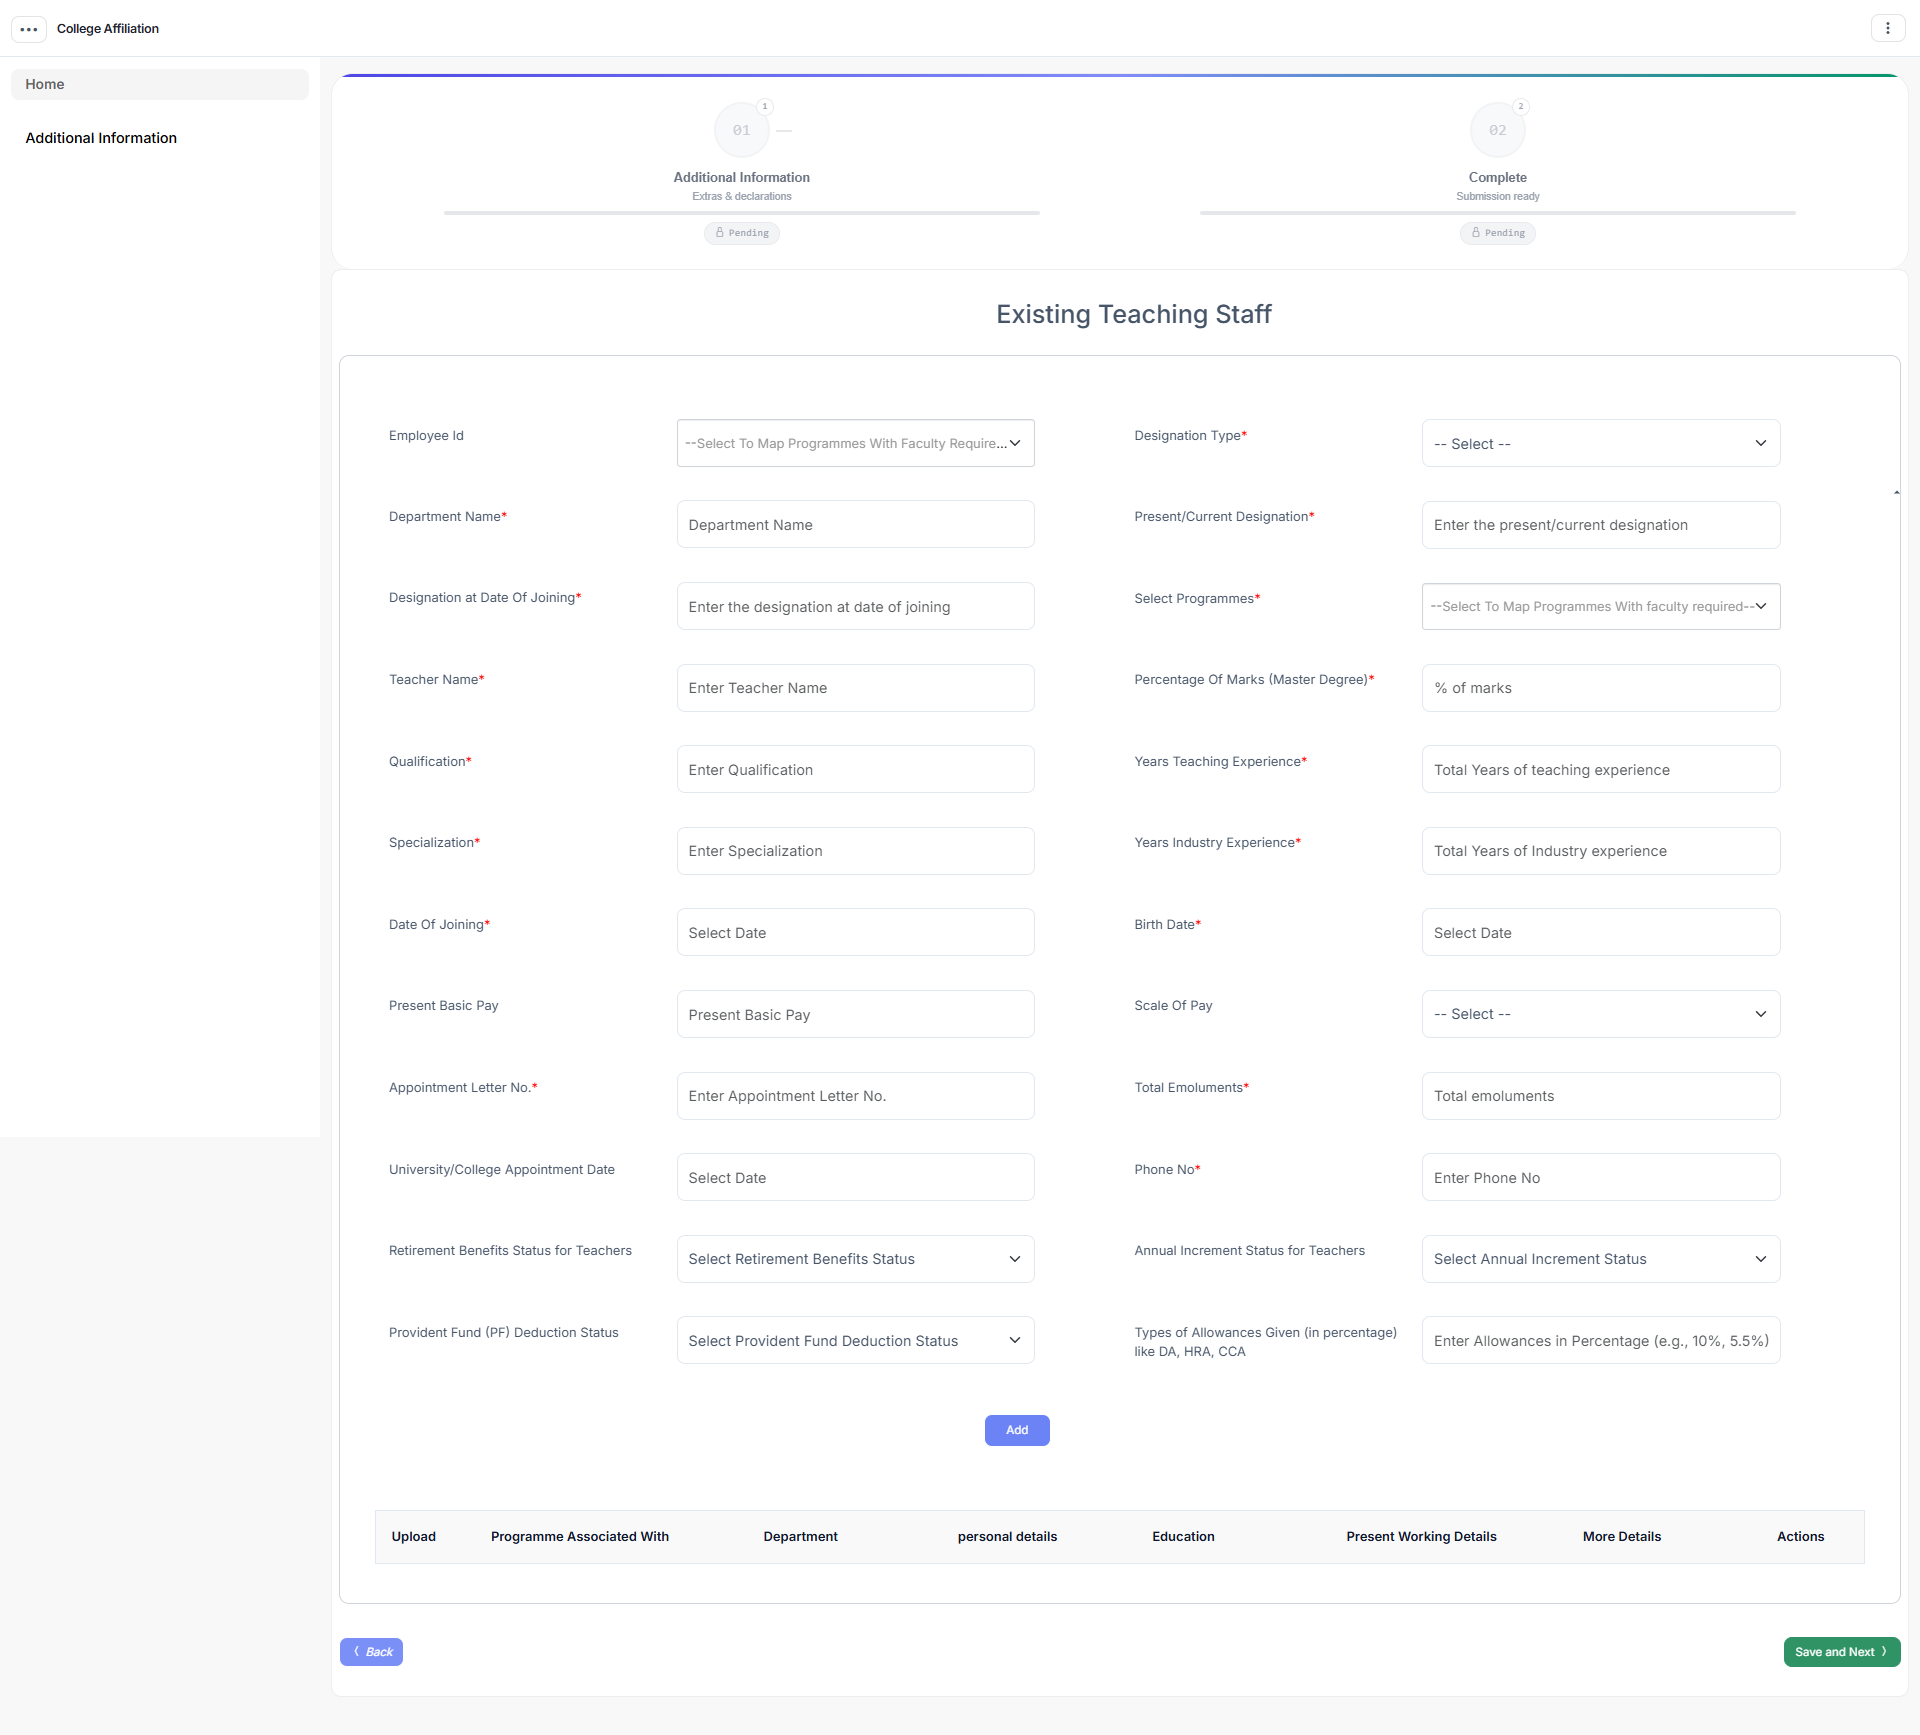
Existing Teaching Faculty — faculty already on your staff for these programmes, with bio-data.
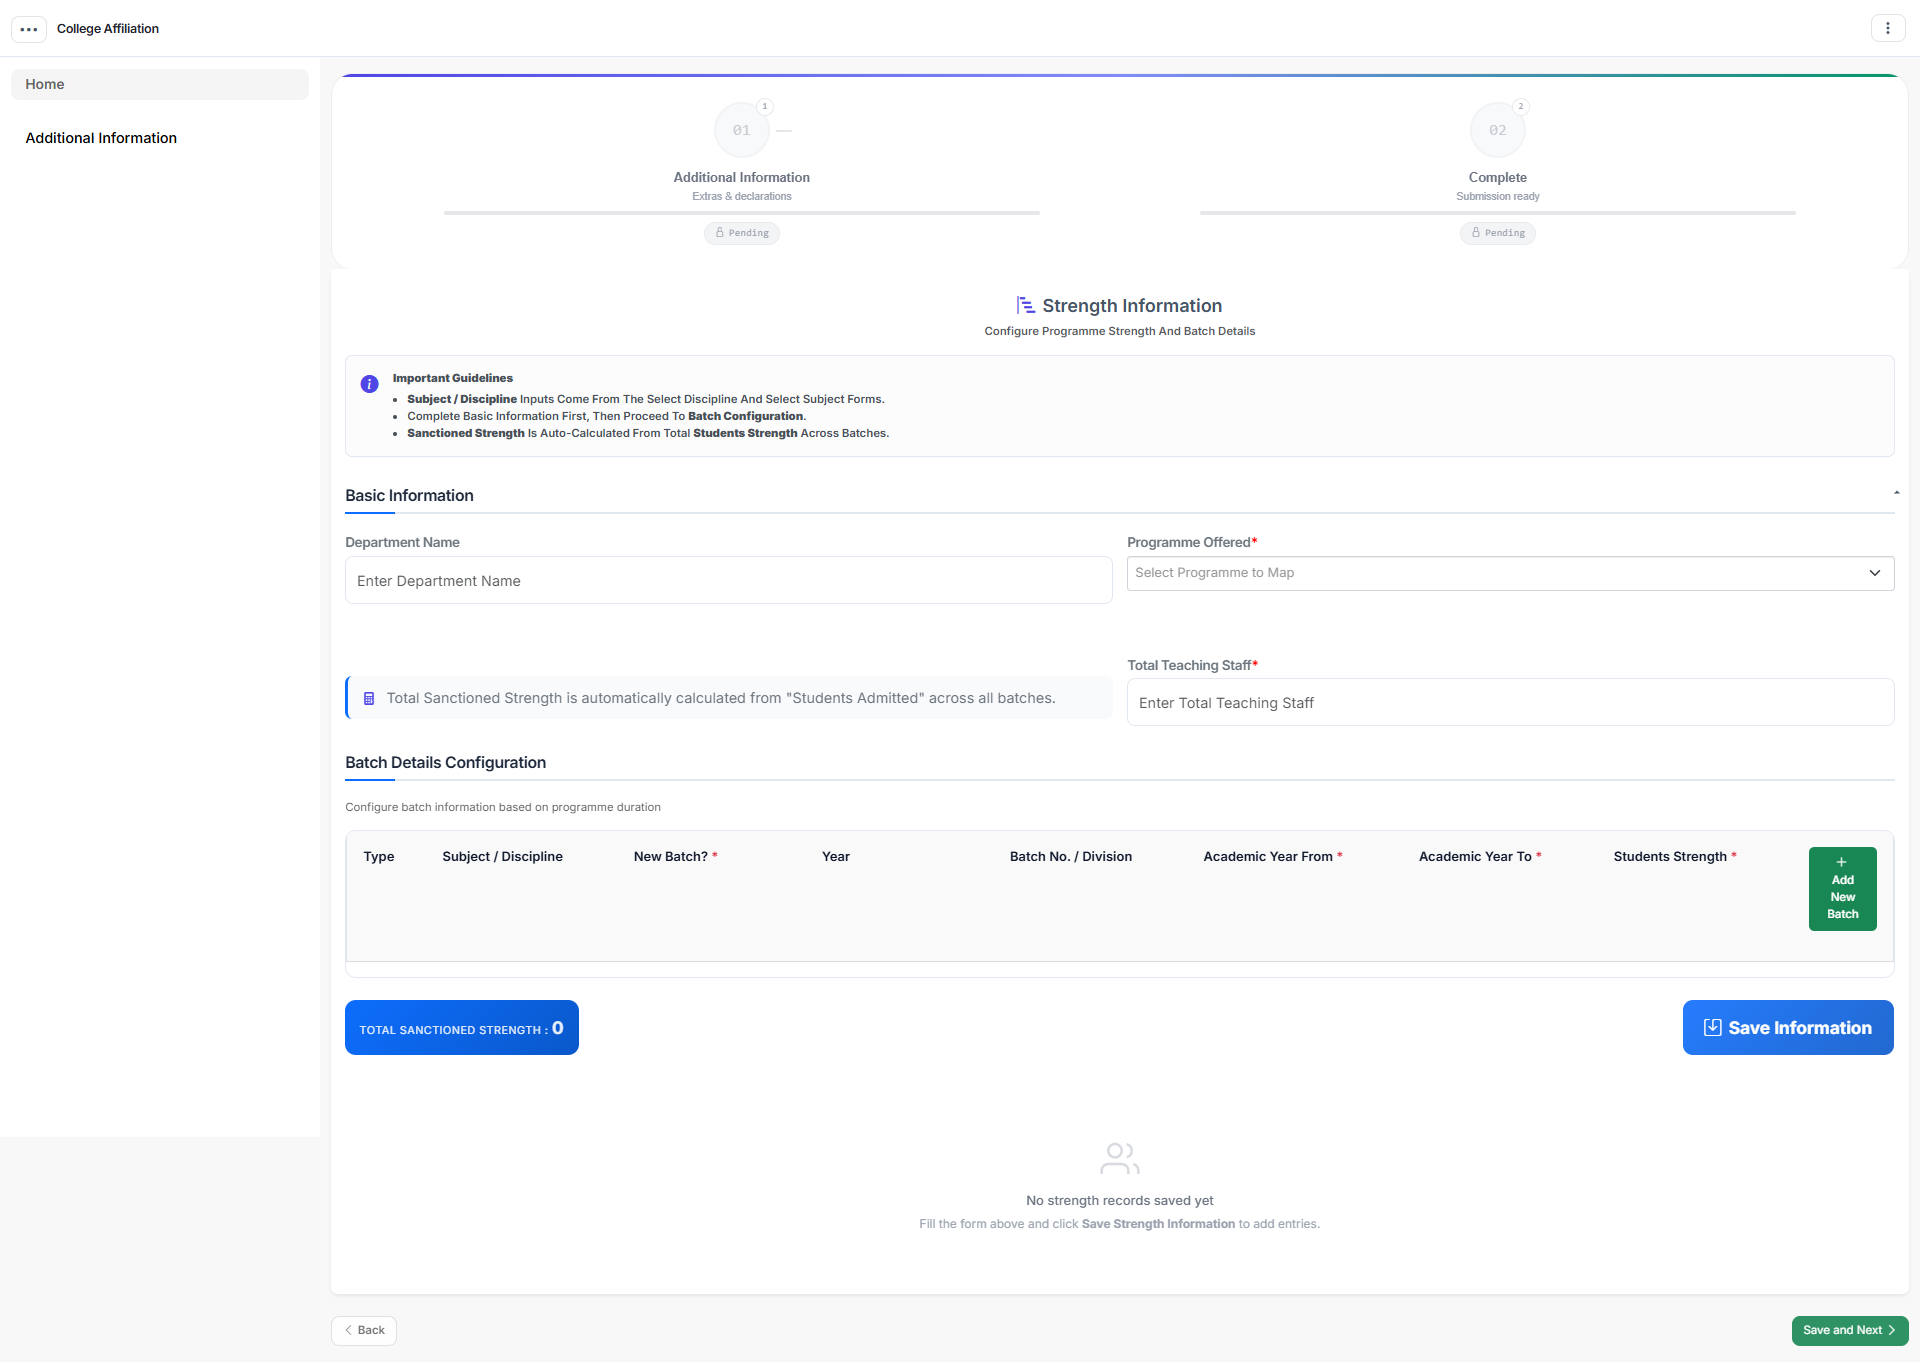
Teacher–Student Ratio — programme-wise batch sizes and totals, producing your declared ratio.
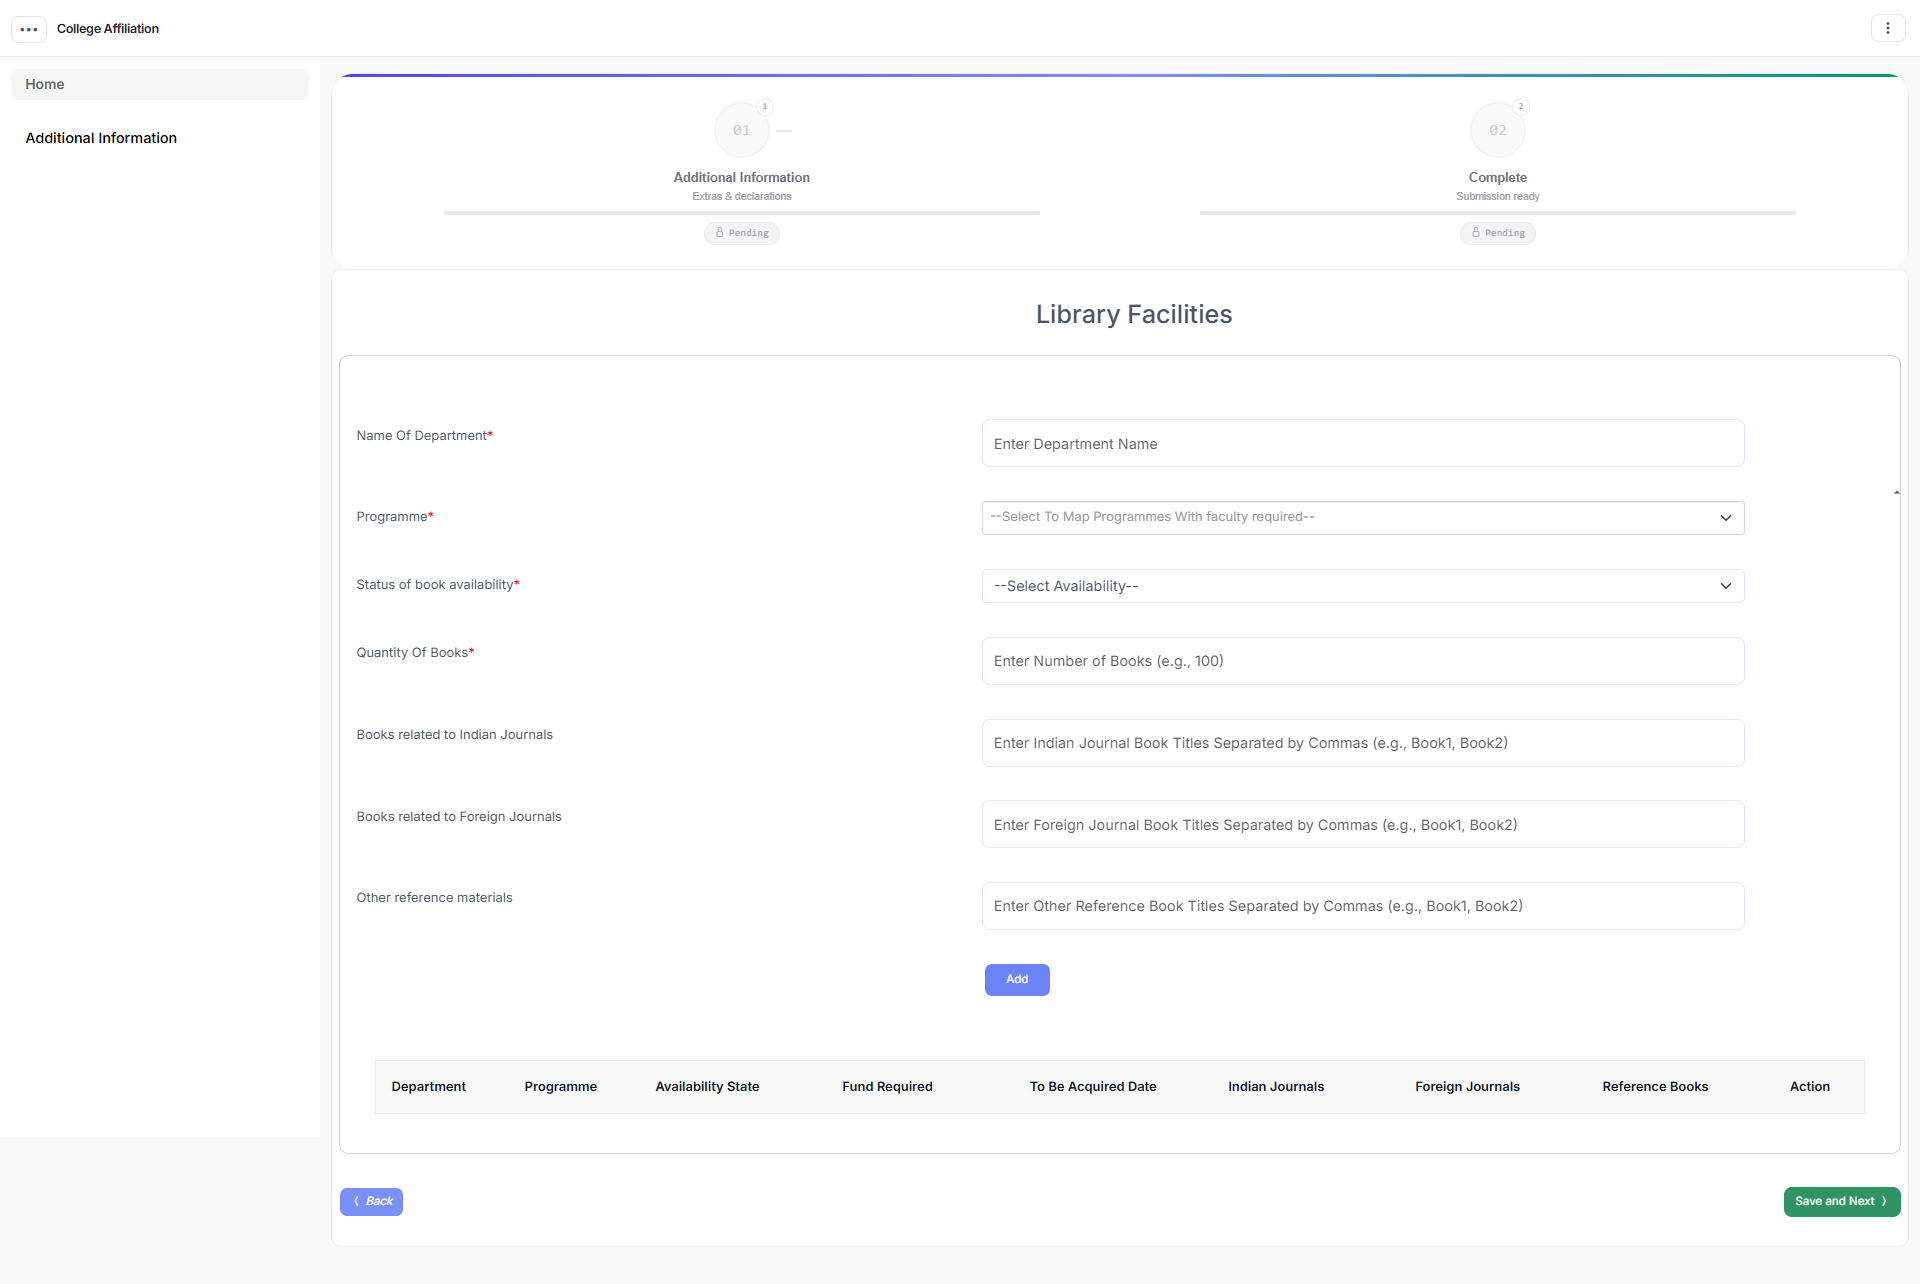
Library Facility — books, titles, journals, sections and reading-hall capacity relevant to the selected programmes.
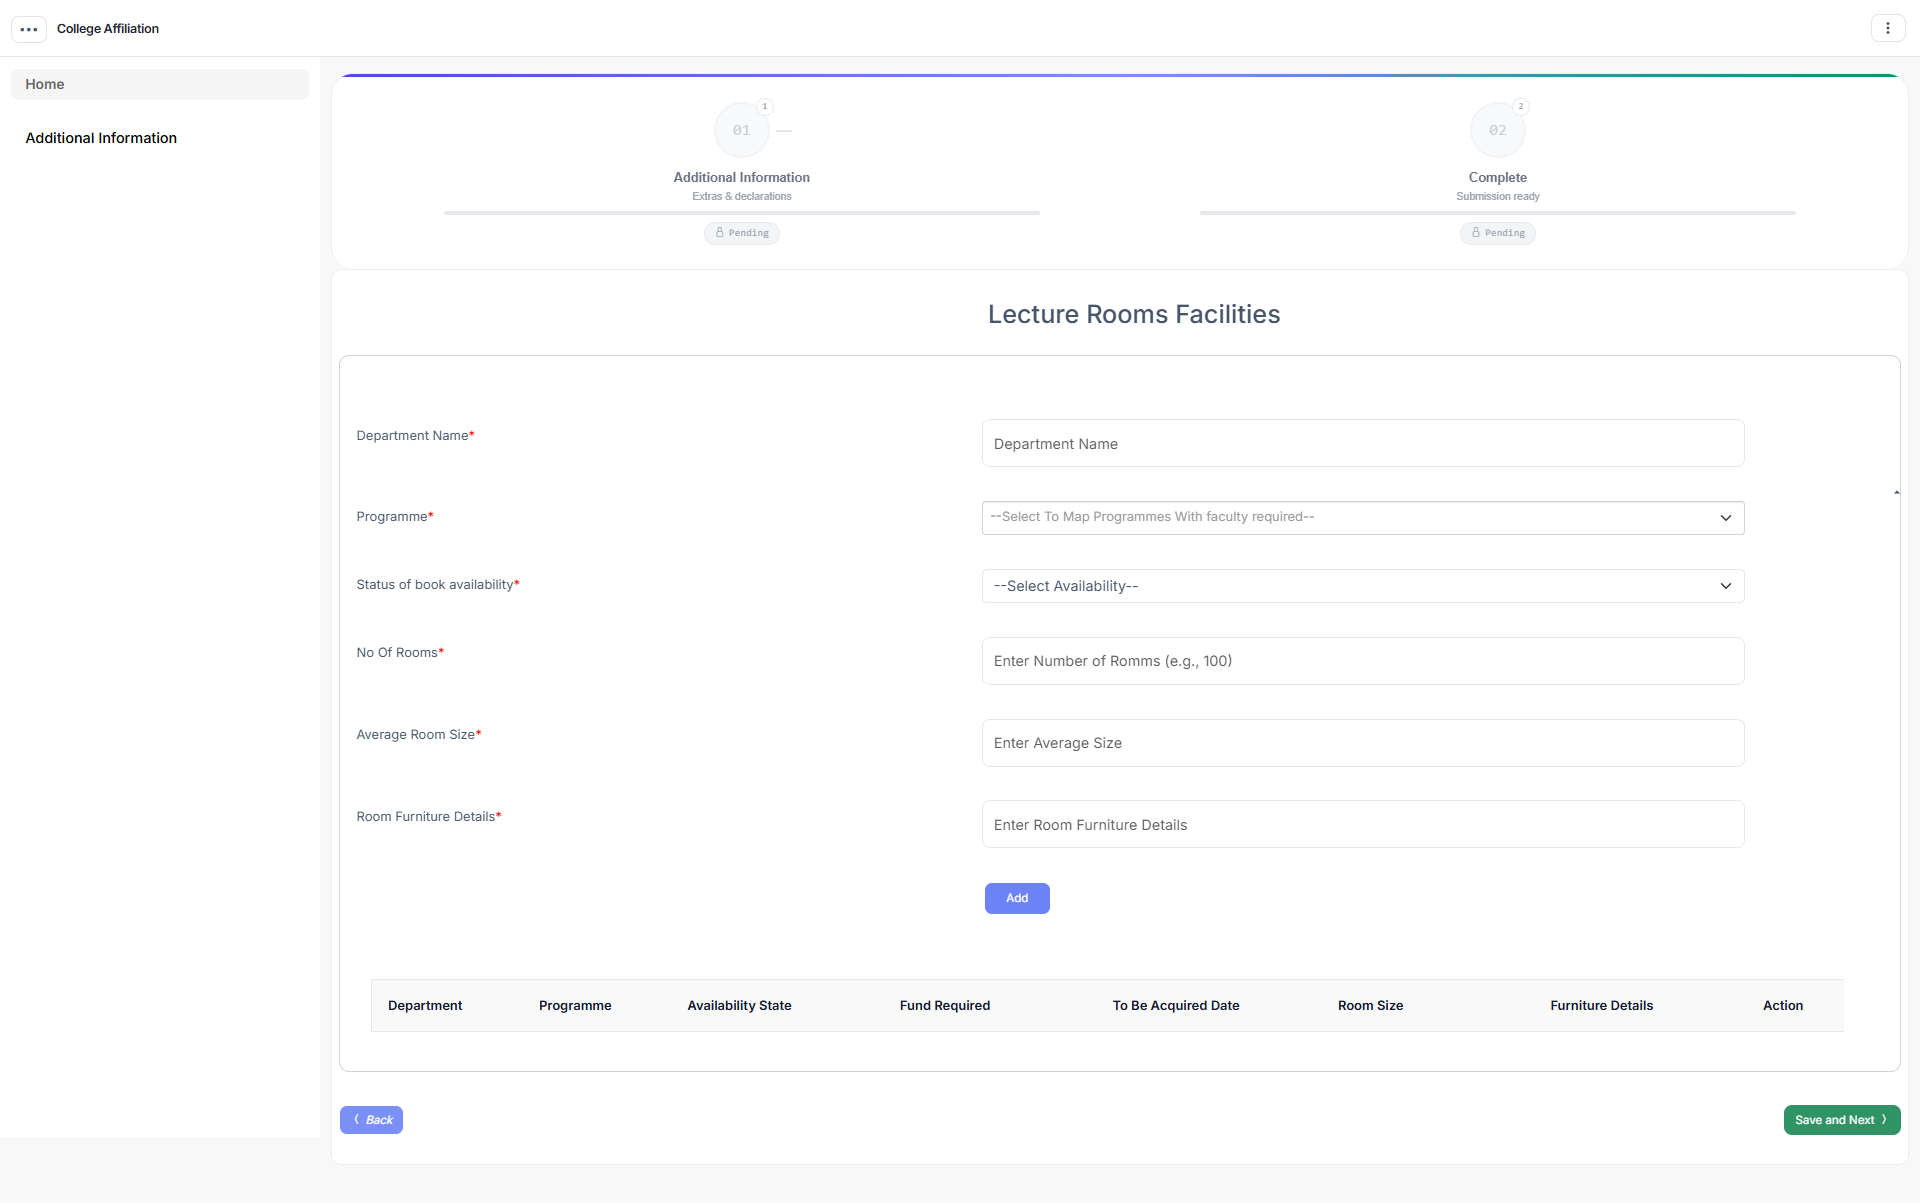
Lecture Rooms — rooms available for the selected programmes, beyond the building data already in your profile.
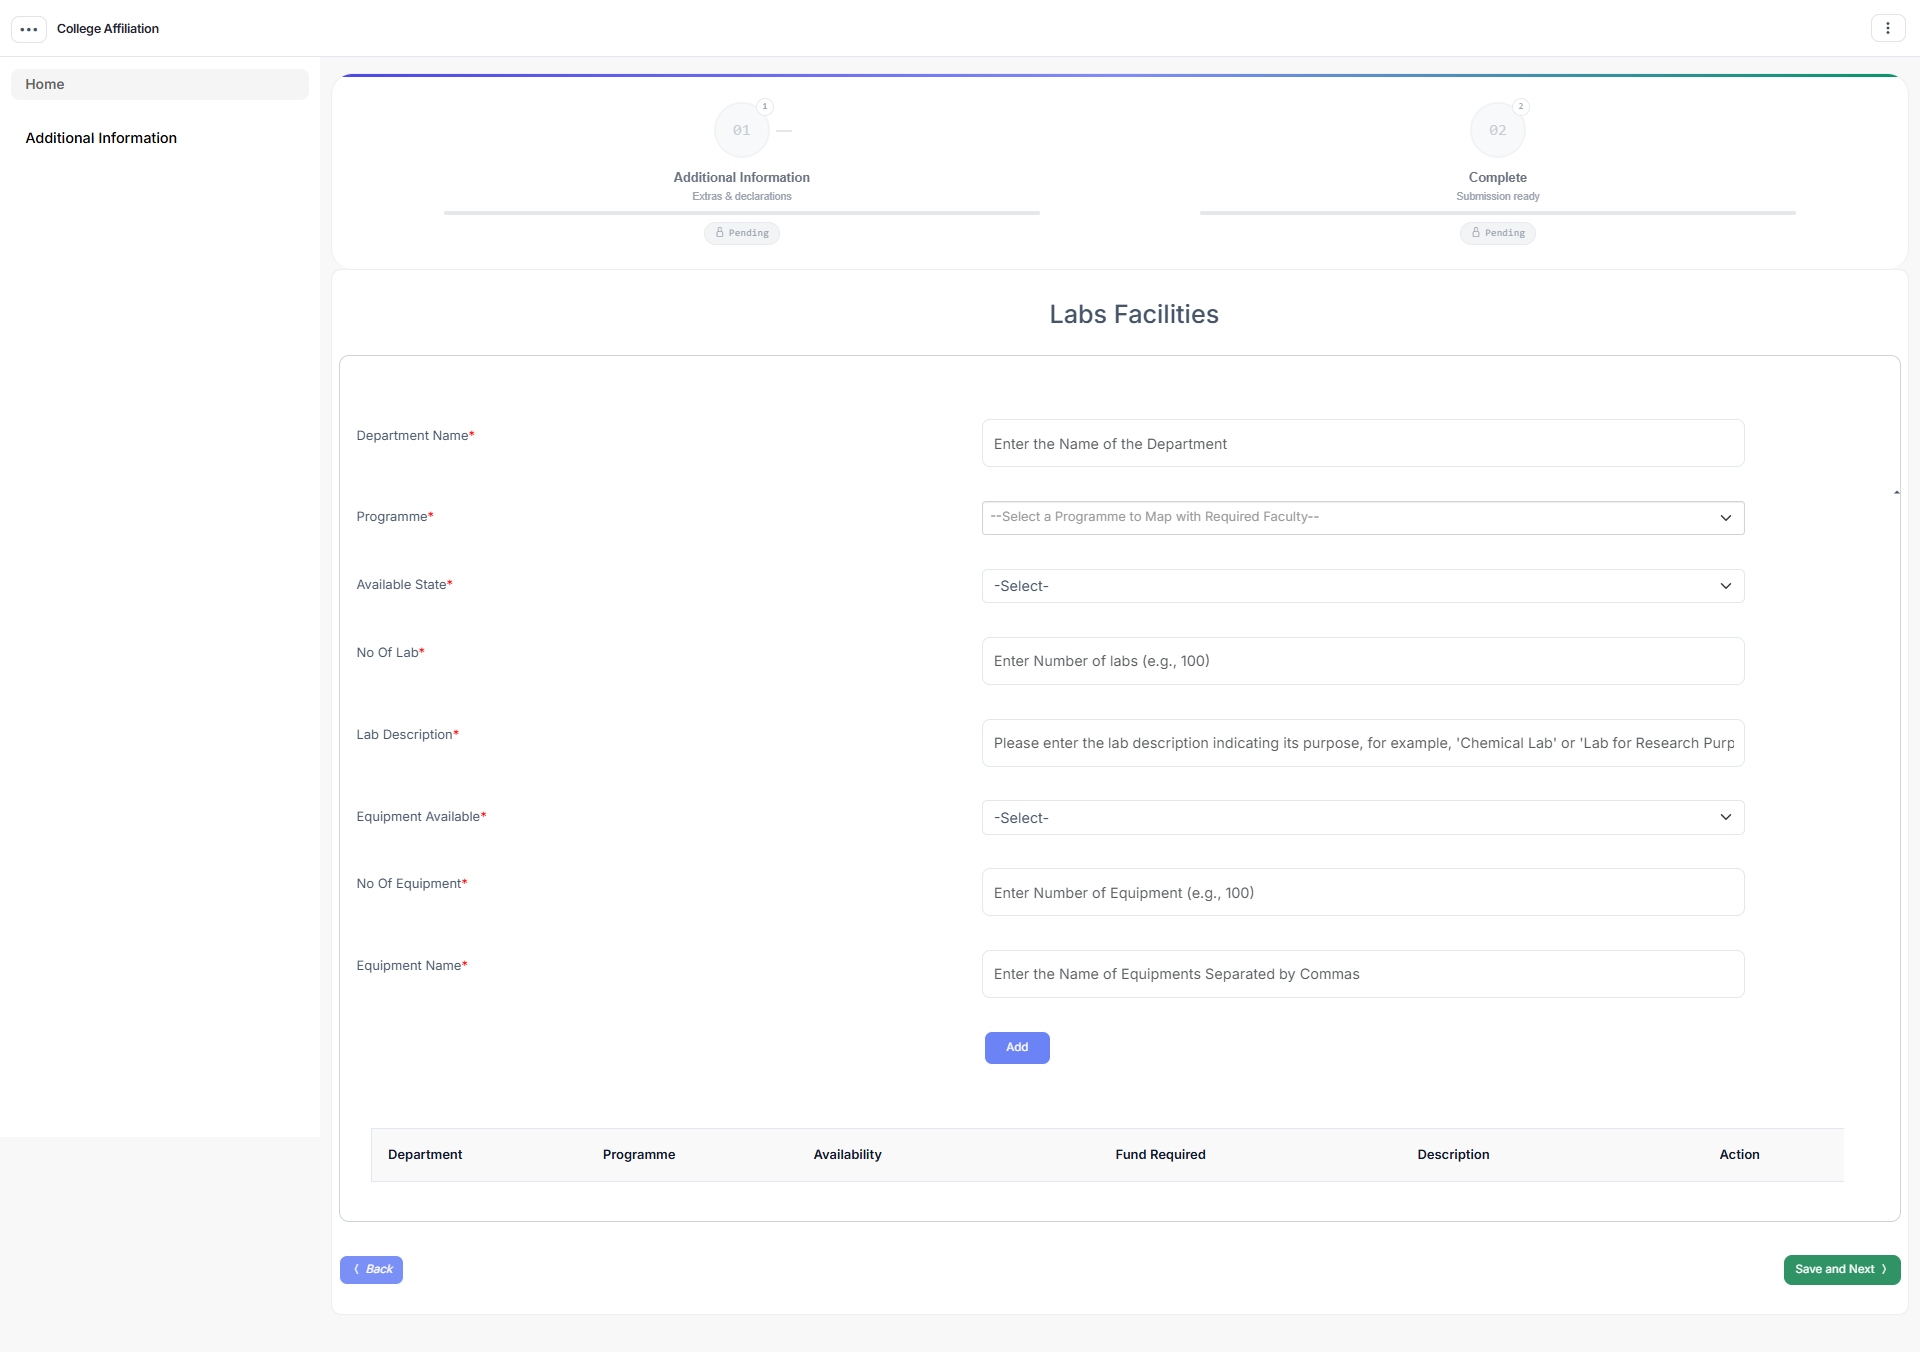
Lab Details — laboratories and their equipment, where the selected programmes require them.
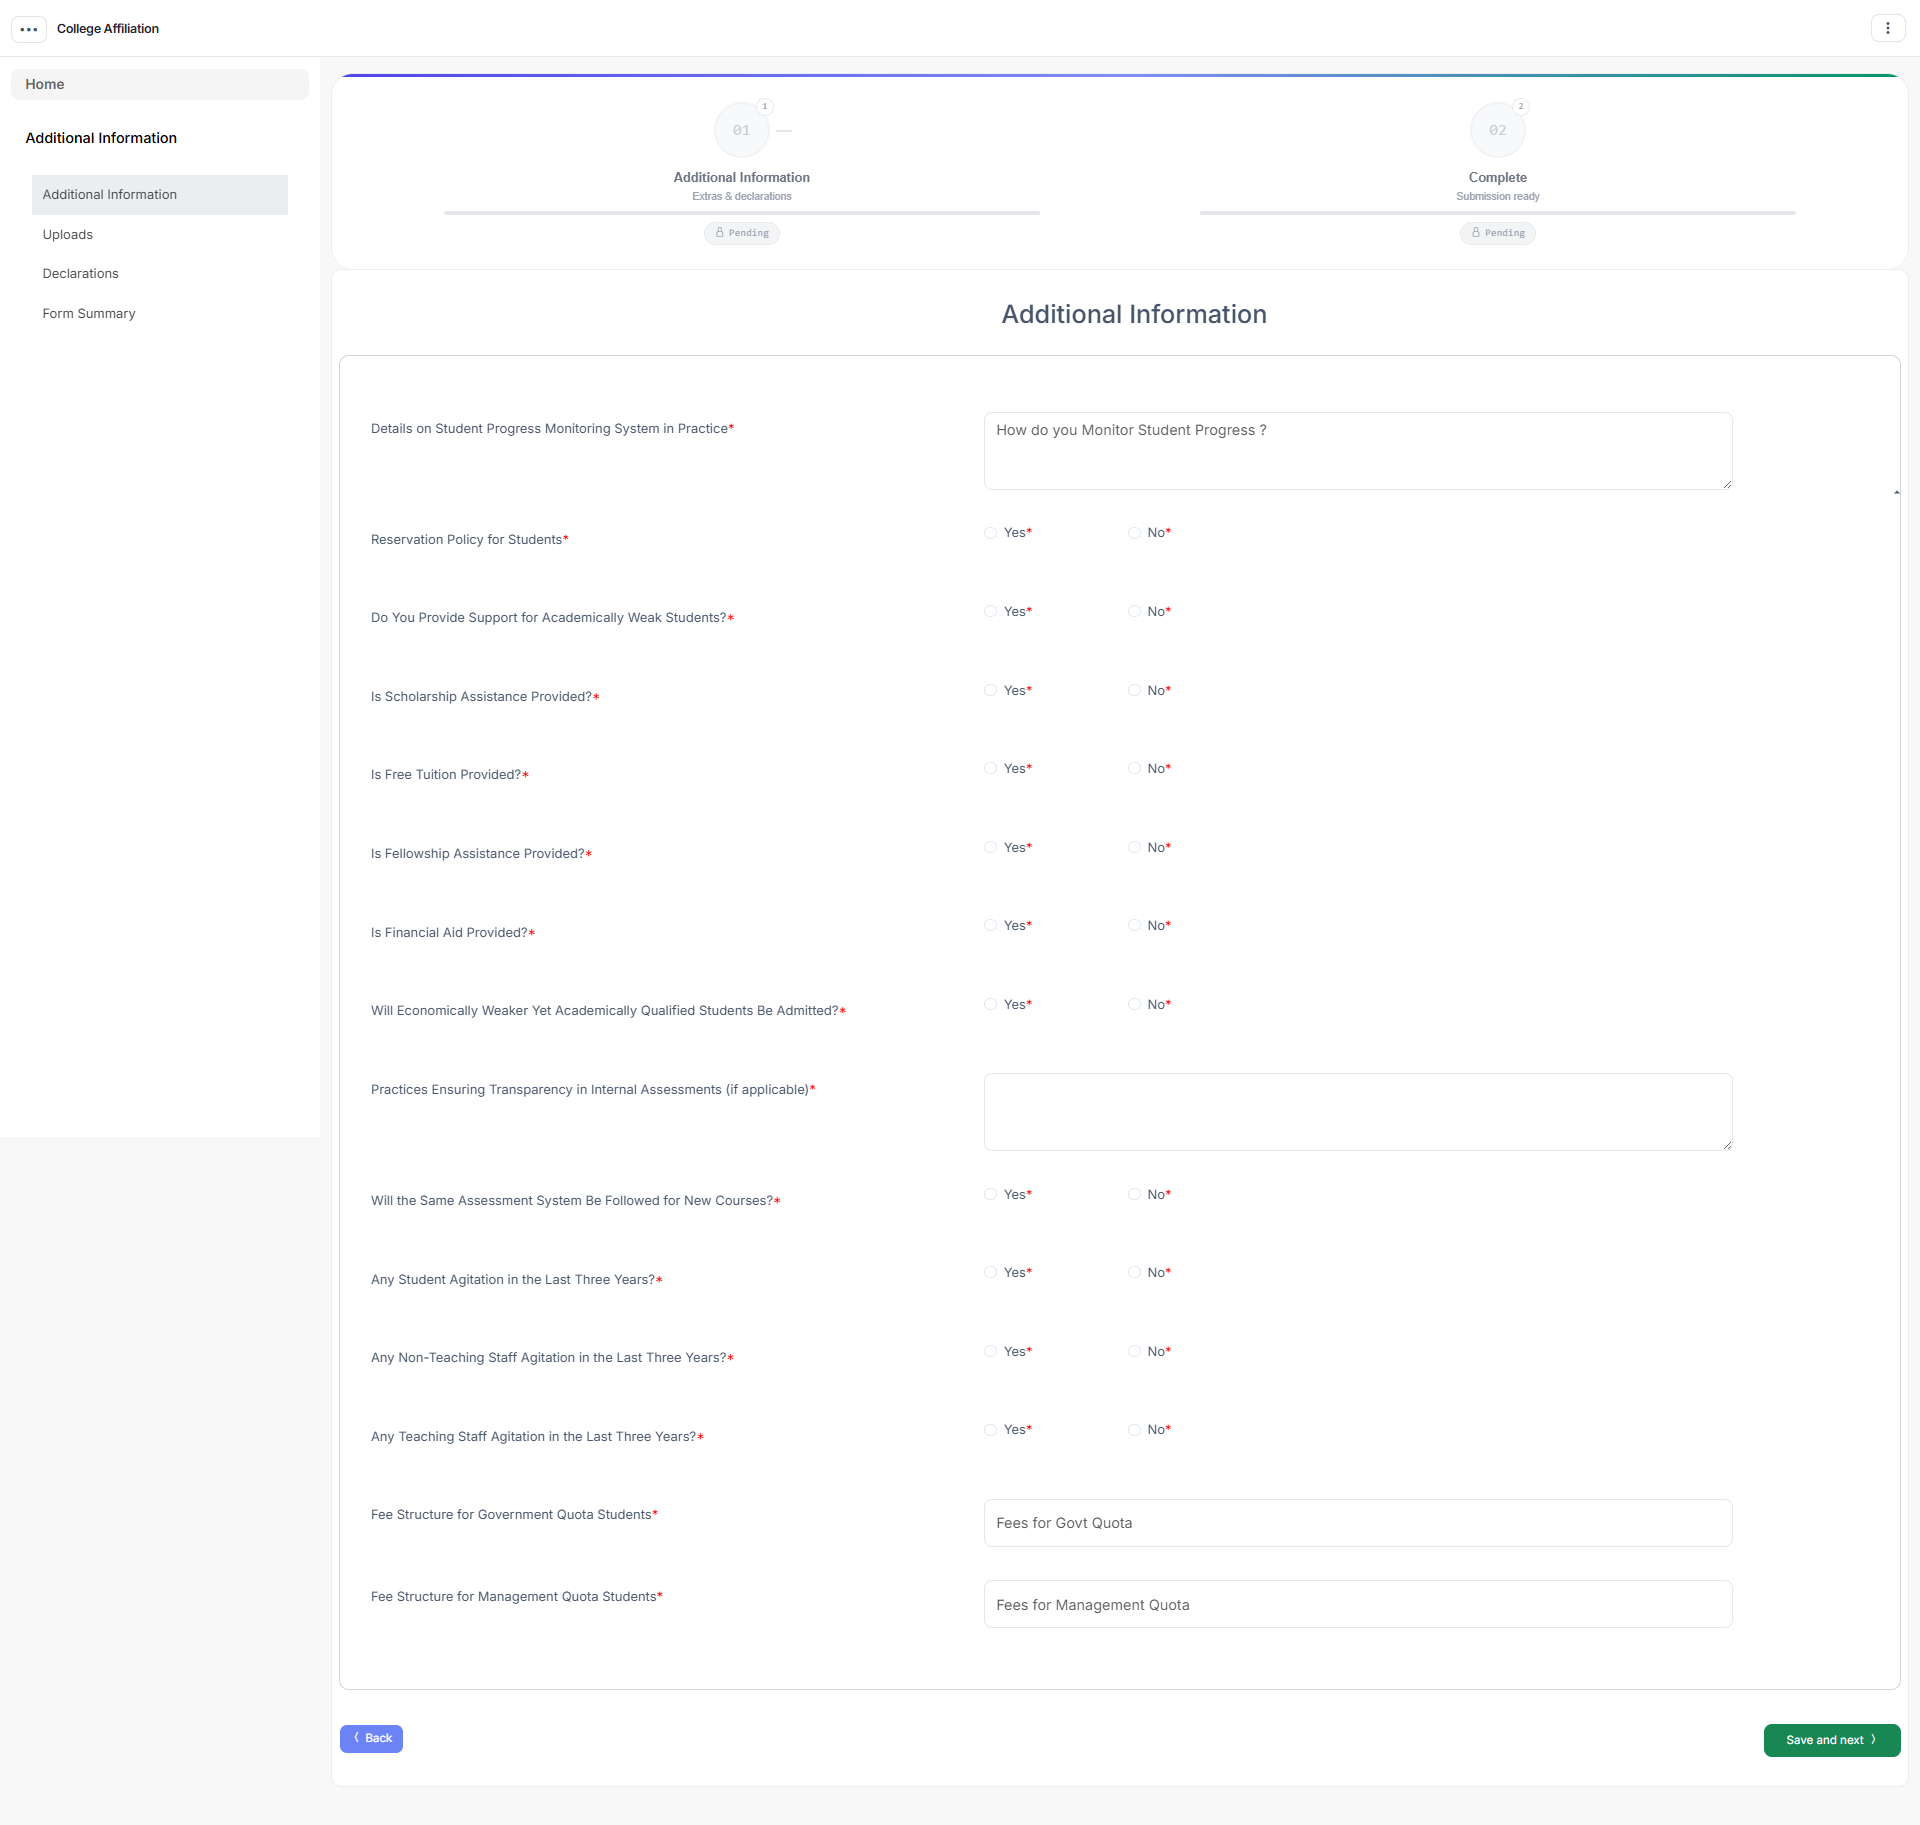
Additional Information — student progress monitoring, reservation policy, student support (scholarships, free tuition, financial aid), transparency practices, and your student fee structure.
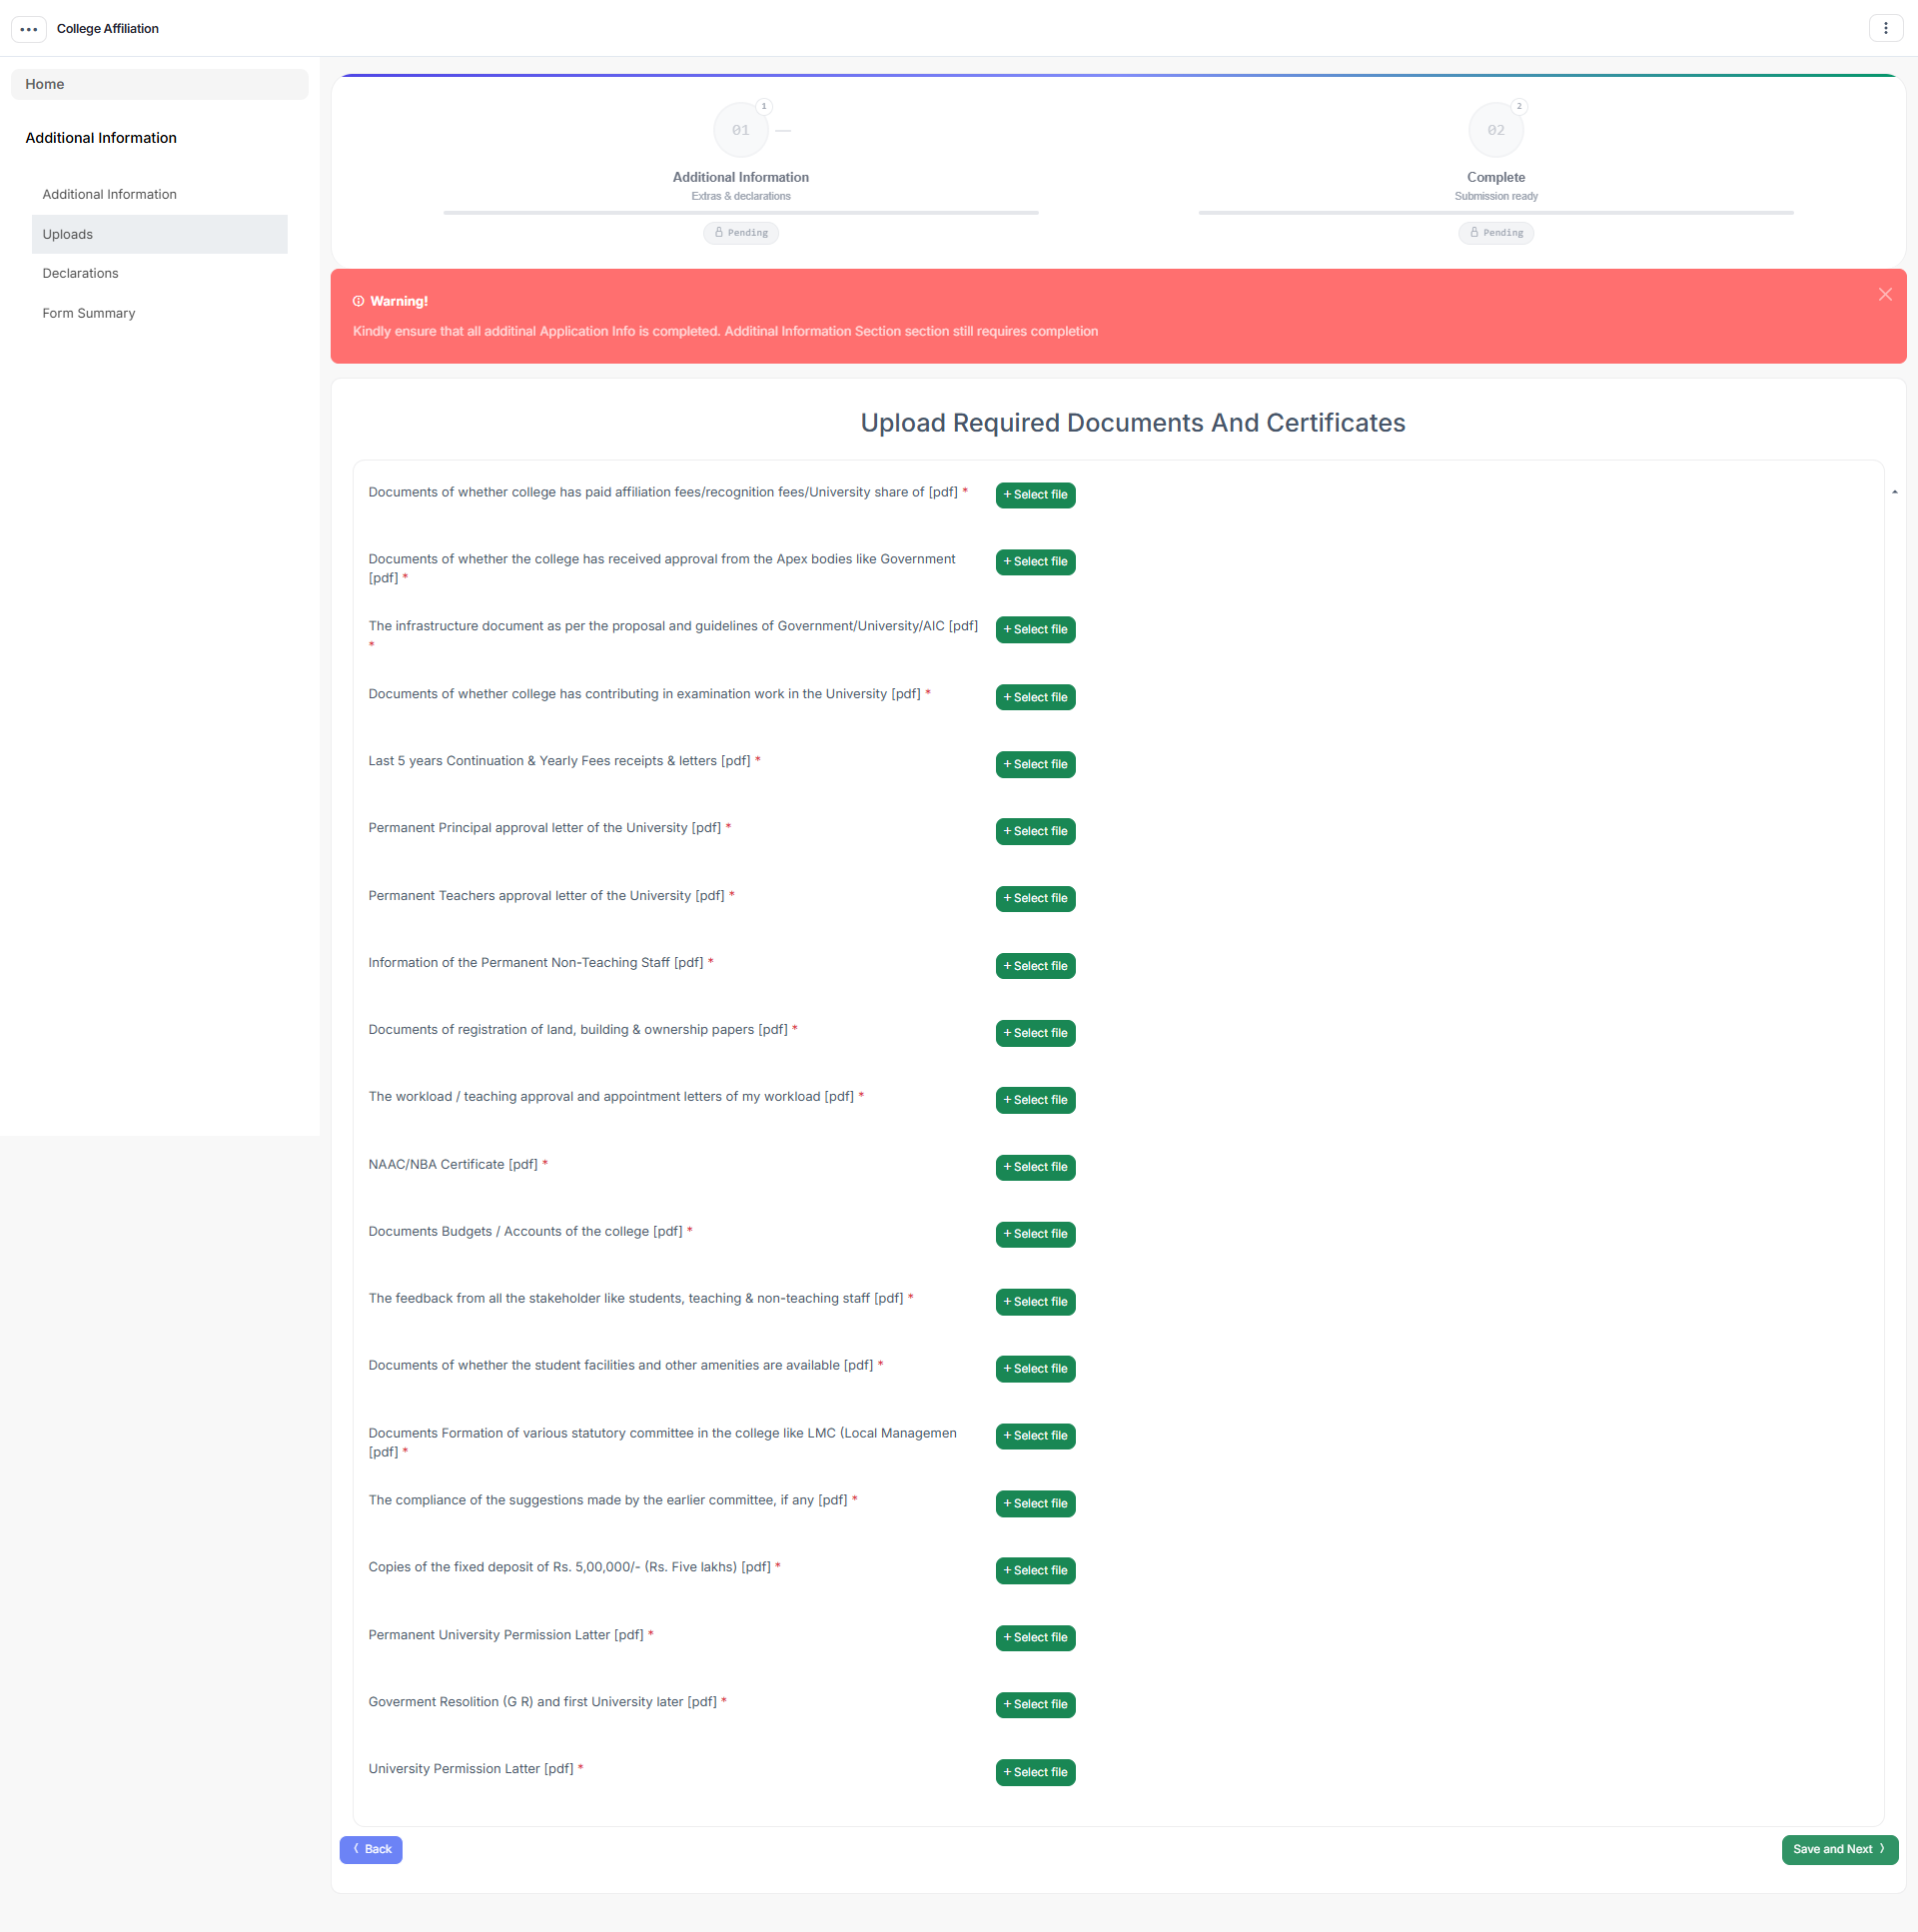
Required Documents (Uploads) — files the university requires for this application type, separate from your profile uploads.
Declaration — final consent for this application.
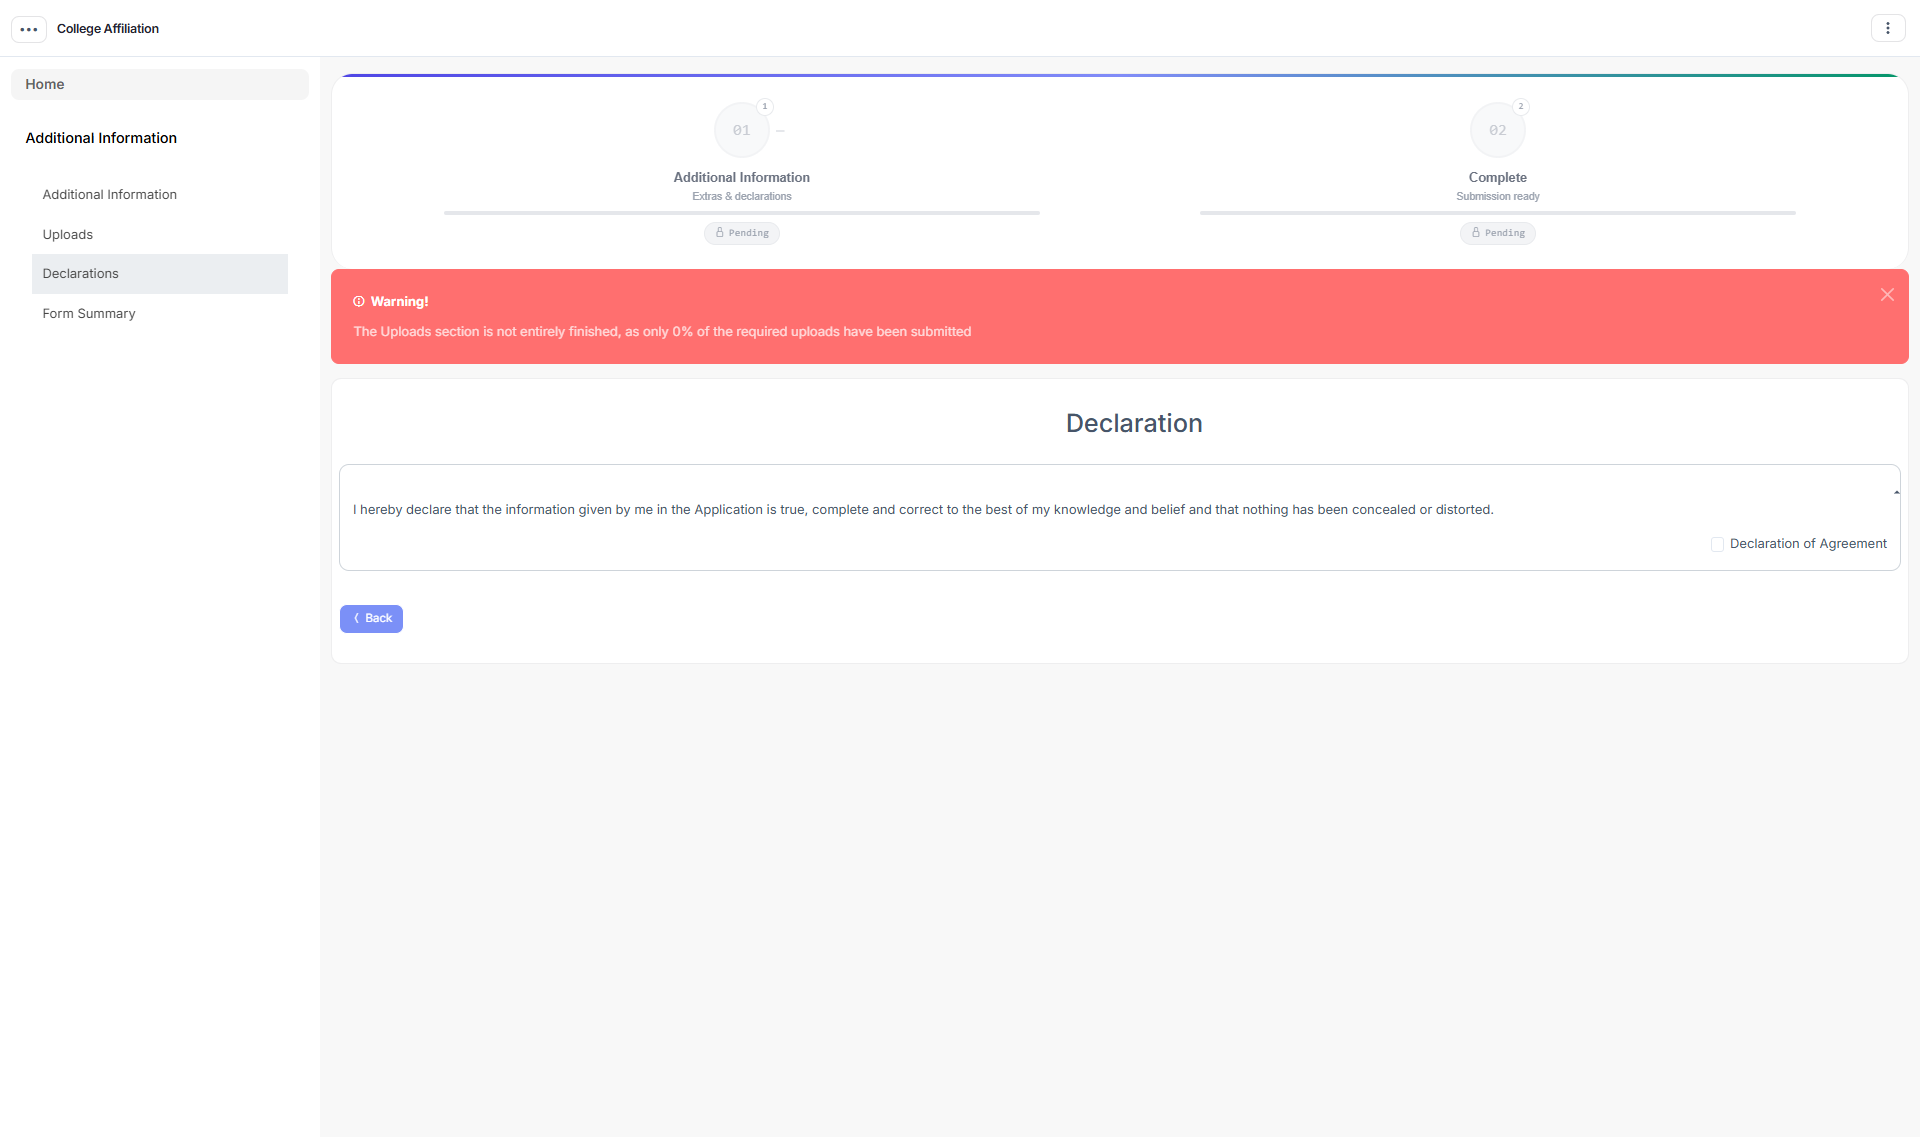
Two further sub-forms appear only when they apply to you:
| Sub-form | When it appears | What you fill |
|---|---|---|
| Research Centre | You are applying as a research centre | Centre details, fees charged, grants, awards, patents, research guides and departments |
| Discipline / Subject Intake | Your selected programmes are NEP-based | Discipline-wise and subject-wise intake numbers. By default a subject cannot be selected twice; your university may allow duplicates |
Step 5 — Review your application and bill, then submit. Open your application from Affiliation Applications List. The page shows every section you filled plus your itemised fee bill — where the session uses the Automatic Fee Engine, each programme’s fee heads are listed with their amounts, then taxes, any late fee, and the grand total.
Read it through, then click Submit. The system stamps your submission date and moves the status to SUBMITTED. If you submit after the session’s end date, the application is automatically tagged Late Application Fee Added, the configured late fee is added to your total, and it moves to your Late Affiliation Application list — it is otherwise reviewed exactly like any other application.
Step 6 — Print your application (optional). Use Print Application PDF on the application to keep a copy of everything you submitted for your own records or for the inspection committee’s visit.
After You Submit
1. The university’s decision
You receive an e-mail for every action, and the remark is shown at the top of your application:
| Decision | What it means | What you do |
|---|---|---|
| Approved | Your application is verified | Pay the affiliation fee |
| Resubmit / Returned | Specific corrections needed | Open the application, read the Remarks, fix those sections, re-submit |
| Reopened | A closed/paid application has been re-opened for changes | It returns to DRAFT under Affiliation Correction; your programme selection is preserved, the amount already paid is retained, and you pay only the difference (if any) |
| Rejected | The application is closed | Contact the Affiliation Department for guidance |
2. Paying your fee
Online (recommended)
- Click Pay on your approved application.
- Choose one of the gateways your university has authorised for this session.
- Complete payment at the gateway; you are redirected back automatically.
- Your application shows Paid.
If the redirect fails or you close the tab too early, do not pay again — wait a few minutes and refresh. The system re-verifies the payment with the gateway automatically.
Offline (only if your university has enabled it)
- Pay at the bank by NEFT, RTGS, DD, Bank Challan, UPI or Cheque.
- Open Offline Payment on your application and enter the mode, reference/transaction number, amount paid, bank and IFSC.
- Upload the payment proof (PDF, up to 8 MB) and submit.
- Your application stays Not Paid until the university verifies the proof. You are notified when it is approved — or rejected, in which case you upload a corrected proof.
3. Your receipt and payment history
Once a payment succeeds — or an offline payment is verified by the university — open the application and choose Receipt View. The Affiliation Bill and Receipt page confirms the payment and doubles as your official bill: application number, college name, application type, transaction id, status, total and received amount, followed by a programme-by-programme breakdown of exactly what was charged and the final total.
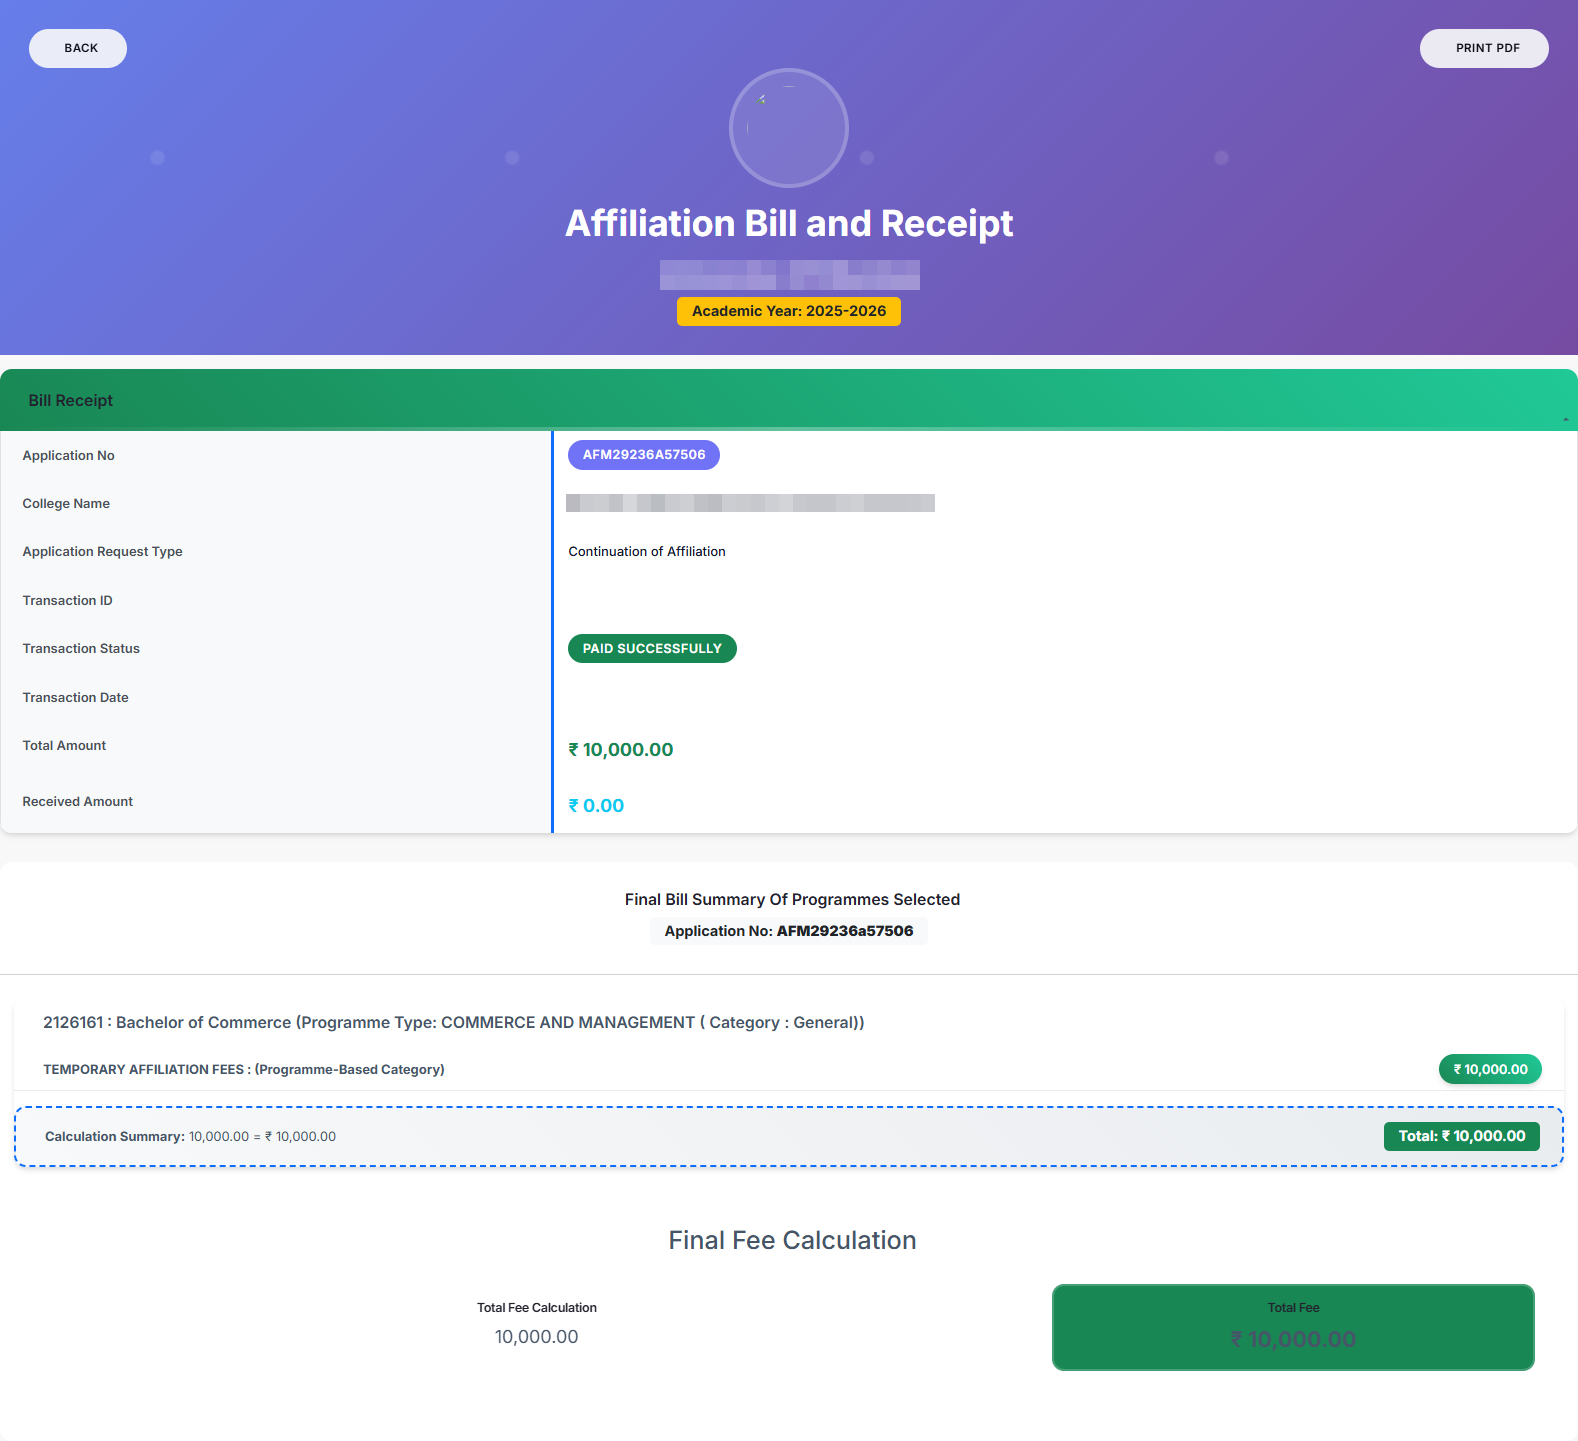
Click PRINT PDF on that page to download or print it. Payment → Payment History separately lists every transaction on your account, online and offline, with its date, mode, reference, amount and status.
4. Physical inspection — your role
If the university schedules a physical audit you receive an e-mail with the inspection window and a pre-audit checklist, and the schedule is always visible on your application under Physical Audit Status.
Be ready to:
- show every facility you have declared — labs, library, hostels, classrooms, building plans;
- produce originals of every document you uploaded;
- coordinate with the committee on logistics for the inspection dates.
You will not see committee member names or per-section scores at any point. The official outcome, with the committee’s overall remark and guidance on what to do next, appears on your application and is e-mailed to you once the university publishes it.
5. Previous affiliation dues
If your university has recorded outstanding dues from an earlier year, the Apply page will send you to Dues Payment with a warning. Settle the dues through the gateway shown; once they are marked paid you can apply as normal.
6. Documents and downloads
- Documents on your application lists any official document the university has issued for it (for example a provisional affiliation certificate), ready to view and print.
- Report → Download Job holds any large export you have triggered — statuses run Queued → Processing → Completed; click Download when it is ready.
FAQs
What is the Affiliation Management System (AMS)? AMS is a digital solution that manages the complete affiliation lifecycle for higher education institutions — registration, profiles, applications, automated fees, payments, physical audits and outcomes.
What are the prerequisites for using AMS? Configuration of the Base module (organisation units and their heads), the Programme module, and the university’s payment gateway kit.
Who are the key user roles in AMS? Affiliation Admin (university), OU/Sub-University Admin (institution-scoped, HED), Affiliation User (college), Committee Admin and Committee Member (inspections), and Land Verifier. External Guest Observers join audits via a secure link without an account.
What is the difference between UNIVERSITY and HED mode? UNIVERSITY mode serves a single university. HED mode hosts many universities on one installation — data is scoped per institution, colleges pick the university they are applying to, and dues checks are enforced before applying.
How are affiliation fees configured? Through Fee Rule Configuration: the admin authors rules (per-programme, per-subject, slab, strength-based, fixed, percentage taxes, late-fee slabs) with validity dates. Sessions set to Automatic fee mode have every application priced by the Fee Engine — itemised, per application, with the applied rules recorded for audit. Manual mode remains available for one-off cases.
How does the physical audit process work? The admin assigns an inspection committee (single or bulk) with an inspection window; committee members declare no conflict of interest and score each section digitally against the session’s audit form template; the committee admin consolidates the scores, records the outcome and finalizes; the university reviews and publishes the outcome, at which point the college is notified. Guest observers can be invited by e-mail link; their input is advisory only.
Why can’t I assign a committee to an application? The application’s session has no Audit Form template linked. Set one in Settings → Configuration Settings → Affiliation Session Configuration, then assign.
When does a college see its audit result? Only when the university clicks Publish Audit Outcome — finalizing is internal. Until then the college sees only its inspection schedule. Colleges never see individual member names or per-section scores.
Can a finalized audit be corrected? Yes — a Committee Admin can Re-open a finalized audit; previous consolidated scores are kept for reference, and the audit is re-finalized after editing.
How is payment handled? Online through the university’s configured payment gateways, or offline (where enabled) by uploading a payment proof that an admin verifies before the application is marked PAID. All transactions appear in Payment History; offline verifications are tracked in an append-only ledger.
What happens if a college submits after the session end date? The application is automatically flagged Late, moved to the Late Affiliation Applications list, and the configured late fee is added. The admin can remove the late fee case-by-case.
What are Affiliation Corrections? Applications the university has reopened for changes. They appear in their own list (Affiliation Corrections, or Late Application Correction if also late), the college fixes what the remark lists, and re-submits.
How will a college apply for an affiliation application? Once the college profile is completed and approved by the university, the college applies through Apply For Affiliation, selecting an open session and completing the application sub-forms.
How can a university create an affiliation application session? In Settings → Configuration Settings → Affiliation Session Configuration — set the dates, college type and affiliation type, fee mode (Automatic or Manual), payment gateways, offline-payment allowance, and the audit form template. Only one active session may exist per college-type/affiliation-type pair.
Can a university create multiple affiliation application sessions? Yes — multiple sessions can run for different college types and affiliation types, each with its own configuration.
How can existing affiliated colleges be added to the affiliation module? Through Registration Requests → Register Existing Organisation Units — select the colleges from the Core directory and mark their types; their heads receive access without an OTP step.
How can a university approve new college registrations? Review each request in Registration Requests and approve or reject it. Approval creates the college’s user account and e-mails the credentials.
Can a university ask colleges to resubmit their profile or application? Yes — both the profile and the application can be returned for correction with a remark, and the college re-submits after fixing the flagged items.
What documents are required for a college’s affiliation application? Whatever the university configures in Extra Document Management — each document specifies where it is collected (profile or application) and the allowed file type.
What information is included in a college’s profile? Institutional details (management, board, finances), physical infrastructure (land, buildings, hostels, quarters), the educational ecosystem (programmes, faculty, staff, student facilities), and the required uploads and declaration.
How can universities track the status of applications? From the action-led admin dashboard (every count links to the filtered list it summarises) and the Affiliation Applications grids, which filter by status, payment state and physical-audit stage. The per-year and per-college drill-down dashboards summarise portfolios at each level.
Can an existing payment gateway be integrated into the system? Yes — the university’s banking gateway kit is a prerequisite. The university should confirm its existing gateway details with the Samarth team.
How does the university keep an audit trail of actions? Every important action — approvals, status changes, fee edits, committee assignments, publishes — is written to the history logs with actor, role, before/after values, IP and timestamp (Logs section). Payment verifications additionally live in the append-only payment ledger.
How are large exports handled? Exports are queued as background Download Jobs; the file is offered for download when the job completes, so large lists never time out in the browser.
Can the university issue official documents such as certificates from the system? Yes — the Document Generation engine lets the admin build reusable templates whose placeholders resolve from each application’s data, generate documents per application, and export them as PDF.
What happens if a college has previous affiliation dues? The dues are recorded under Previous Affiliation Dues; in HED mode the college is blocked from applying until the dues are paid through the module.
How do guest observers join an inspection without an account? They are named on the committee-assignment form and receive a unique e-mail link; they verify with an OTP sent to the invited address, declare no conflict of interest, and record an advisory evaluation. The system never reveals whether a given e-mail was invited.
Does a college get a receipt after paying? Yes. Once a payment succeeds (or an offline payment is verified by the university), the application shows as Paid and a PDF receipt can be downloaded from the application itself and from Payment History, which lists every transaction with its date, mode, reference and amount.