Affiliation — College Guide
Introduction
This guide is for colleges and institutions that take part in their university’s affiliation process. It takes you from your first sign-in to a published outcome: build your College Profile once, apply for affiliation in each open session, pay the fee, answer any corrections, and prepare for a physical inspection.
University staff should read the Affiliation — Admin Guide instead. Committee members, land verifiers and inspection team members have their own guide, the Affiliation — Committee, Inspection & Land Verifier Guide.
Start here:
| I want to… | Go to |
|---|---|
| Understand the whole journey | The journey at a glance |
| Get a login for my college | Get access |
| Sign in for the first time | Sign in for the first time |
| Fill in my College Profile | Complete your College Profile |
| Apply in an open session | Apply for affiliation |
| Start from last year’s application | Copy last year’s application |
| Pay my fee | Pay your fee |
| Fix what the university sent back | Correct an application |
| Prepare for the inspection | Prepare for an inspection |
| Understand a message or a reference number | If something goes wrong |
Before you begin
Keep these ready:
- An email address you check often. Verification codes, sign-in details, decisions, payment receipts and inspection dates all arrive by email.
- A mobile number.
- Soft copies (PDF or images) of your documents: address proof, governing body resolutions, bank letters, FDR receipts, audit reports, building plans, faculty bio-data, and anything else your university lists.
- Your plans: the programmes you intend to apply for, with the intake or student strength for each.
The journey at a glance
and sign in"] --> B["Complete your
College Profile"] B --> C{"University reviews
your profile"} C -- "Sent back for correction" --> B C -- "Approved" --> D["Apply in an open session
fill the forms and submit"] D --> E["Inspection
if arranged"] E --> F["University decides and
publishes the outcome"] F --> G["Pay the fee
and get your receipt"] G --> H["Documents
such as certificates"]
Your Dashboard always shows the work waiting for you, and every list you need is one click away in the menu.
Get access
A college joins the portal in one of two ways. Your university decides which applies to you.
| Your situation | What happens |
|---|---|
| Your college is new to the university | You send a registration request through the university’s public registration form. The university approves it and creates your login. |
| Your college is already known to the university (it is already one of its Organisational Units) | The university registers your college itself. You do not fill in a registration form. You get an email, and sign in with your existing Samarth login. |
A login that has the college role but has not been enrolled does not work: you would see “No College Profile is linked to your account … Nothing was created: a College Profile is created by the university…". If you see this, ask the university’s affiliation administrator to enrol your college.
If you are new: send a registration request
Who The college's head, or someone they appoint
Purpose: Ask the university to affiliate your college and give you a login.
Who: The college’s head, director or principal, or someone they appoint.
Before you begin: You need the registration link from the university’s website, and an email address that has never been used on Samarth. If the address already belongs to any Samarth account, the form says “Email Already Exists … please use a different email address for affiliation registration."
Steps:
- Open the registration link. If registration is closed you will see “Registration is closed. The affiliation registration form is not accepting new submissions at present. Check the university’s official website for the registration dates."
- On a shared portal that serves several universities, choose the university you are applying to. Without it the form is refused: “No university was chosen."
- Fill in the form: college type, name, address, district, state, pin code, phone, email, year established, management type, and whether you have an AISHE code. Submit.
- Check your email for a one-time code. Enter it on the next page.
- The code is valid for 5 minutes.
- After 5 wrong tries it is cancelled. Use Resend OTP; you can ask for a new one once a minute.
- If registration is closed while you are waiting, the page says “University is no longer accepting forms." Wait for the university to reopen it.
- If the university charges a registration fee, the next page tells you what to do:
- Registration not complete yet: pay the fee now with Proceed to Pay. The fee is mandatory and non-refundable.
- Registration submitted: the university collects the fee only after it approves your request. You pay after you sign in.
- Registration saved, fee not payable yet: the university has not set up online payment. Contact its affiliation office. Nothing you entered is lost.
- Wait for the university’s decision. You are told by email either way.
Result: When the university approves, you receive an email with your username and password. If it rejects, the email gives the reason.
Check your registration fee later. Open the public page Check Affiliation Registration Payment Status and enter your registered email, phone number and registration number. The registration number arrives by email when a registration fee is payable. Keep it.
If something goes wrong:
| Message | What to do |
|---|---|
| Email Already Exists | Use another email address, or sign in if you already have a login. |
| Email Already Registered … used by an approved affiliation application | Use Continue Application in the message. |
| That code is not correct. … you have N more tries before it is cancelled. | Check the latest email and enter the code again. |
| The code has expired (it is valid for 5 minutes). | Use Resend OTP. |
| Too many incorrect codes were entered, so this code was cancelled. | Use Resend OTP to receive a new one. |
If the university registered you
The university registers your college using its head’s existing login. You receive an email, Affiliation Registration Completed, and your College Profile is already waiting in draft. Sign in with your usual Samarth username and password. No code or fee is involved at this step.
Sign in for the first time
If you registered through the public form, use the username and password in the approval email. The account is a Guest login: Samarth asks you to change the password at your first sign-in, and two-factor sign-in is switched on, so you are asked for a verification step each time you sign in.
If the university registered you, keep your existing Samarth login. Nothing changes.
Your menu shows Dashboard, Affiliation Applications (with College Profile on portals that serve several universities, Apply For Affiliation, Late Affiliation Application, Affiliation Correction and your list of applications), Report → Download Job and Payment → Payment History.
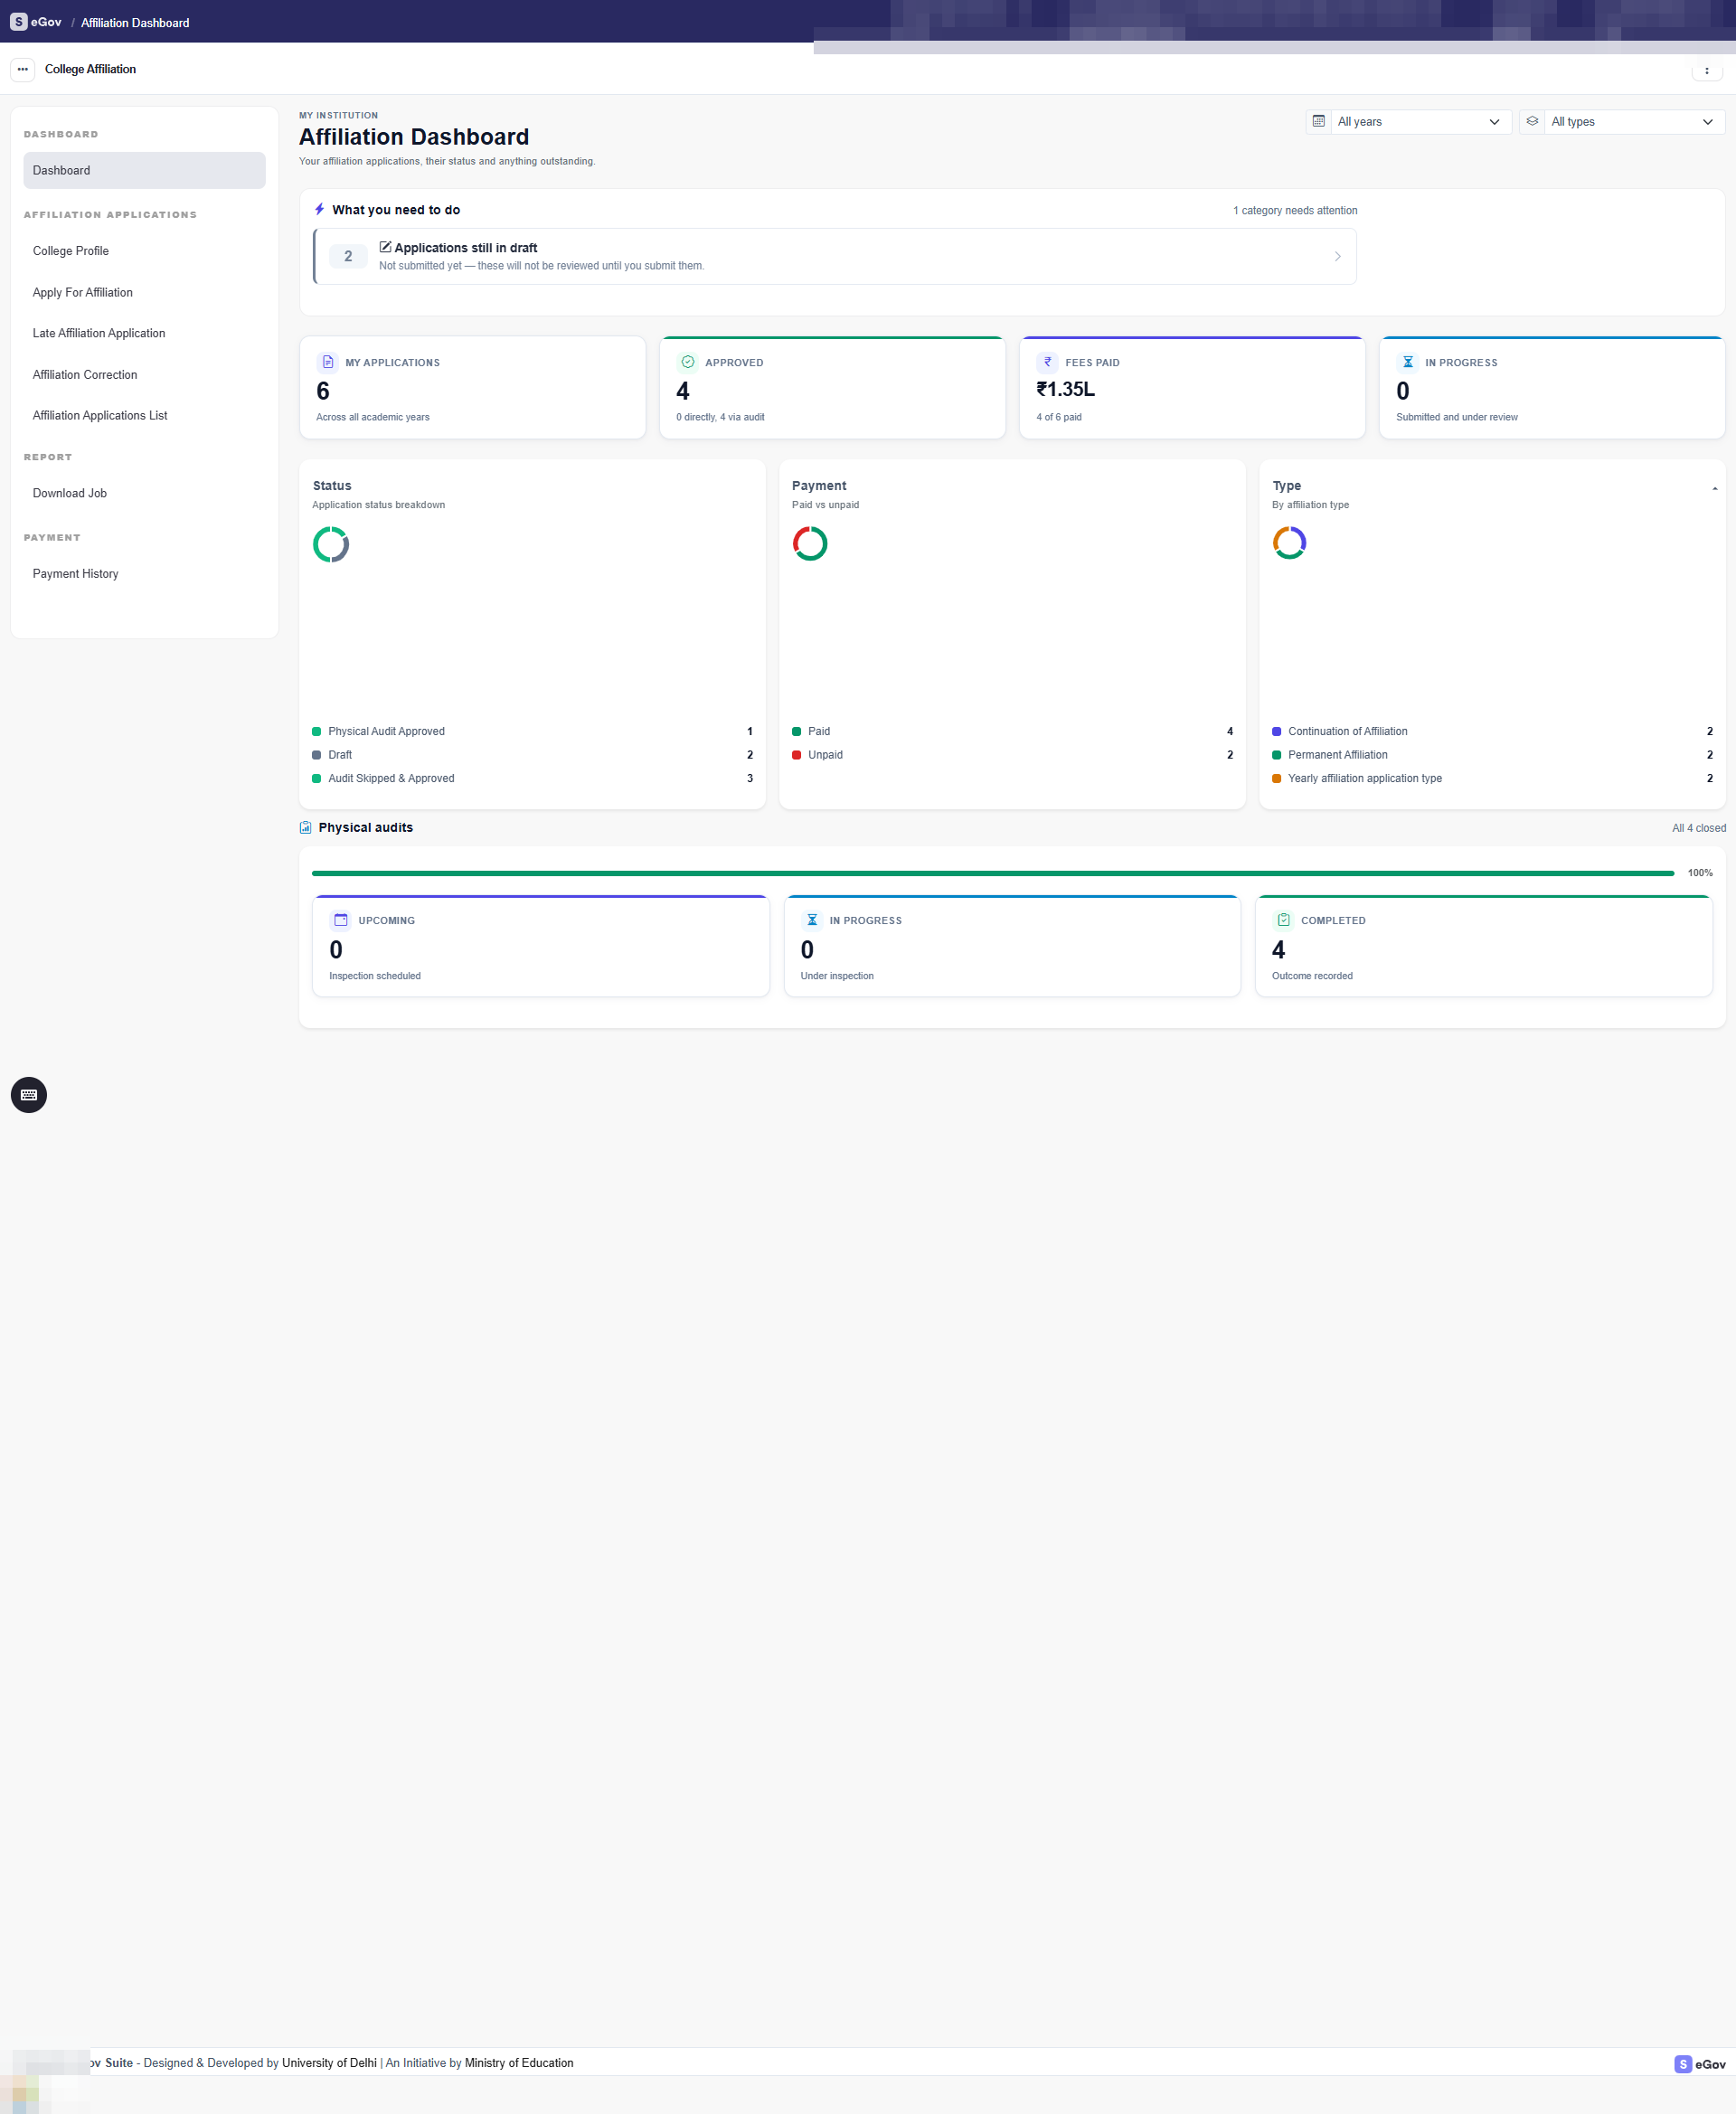
Your dashboard opens with What you need to do: drafts still to submit, payments due and corrections the university has asked for. Each row links straight to the list where you act. Below it are your own figures and the state of any physical inspection.
Complete your College Profile
Purpose: Your College Profile is your institution’s master record. You complete it once, and it is reused for every affiliation application. Fill it in carefully the first time.
Who: The college’s Nodal User, the login that owns the profile.
Where: Apply For Affiliation takes you to your profile the first time. Afterwards use College Profile.
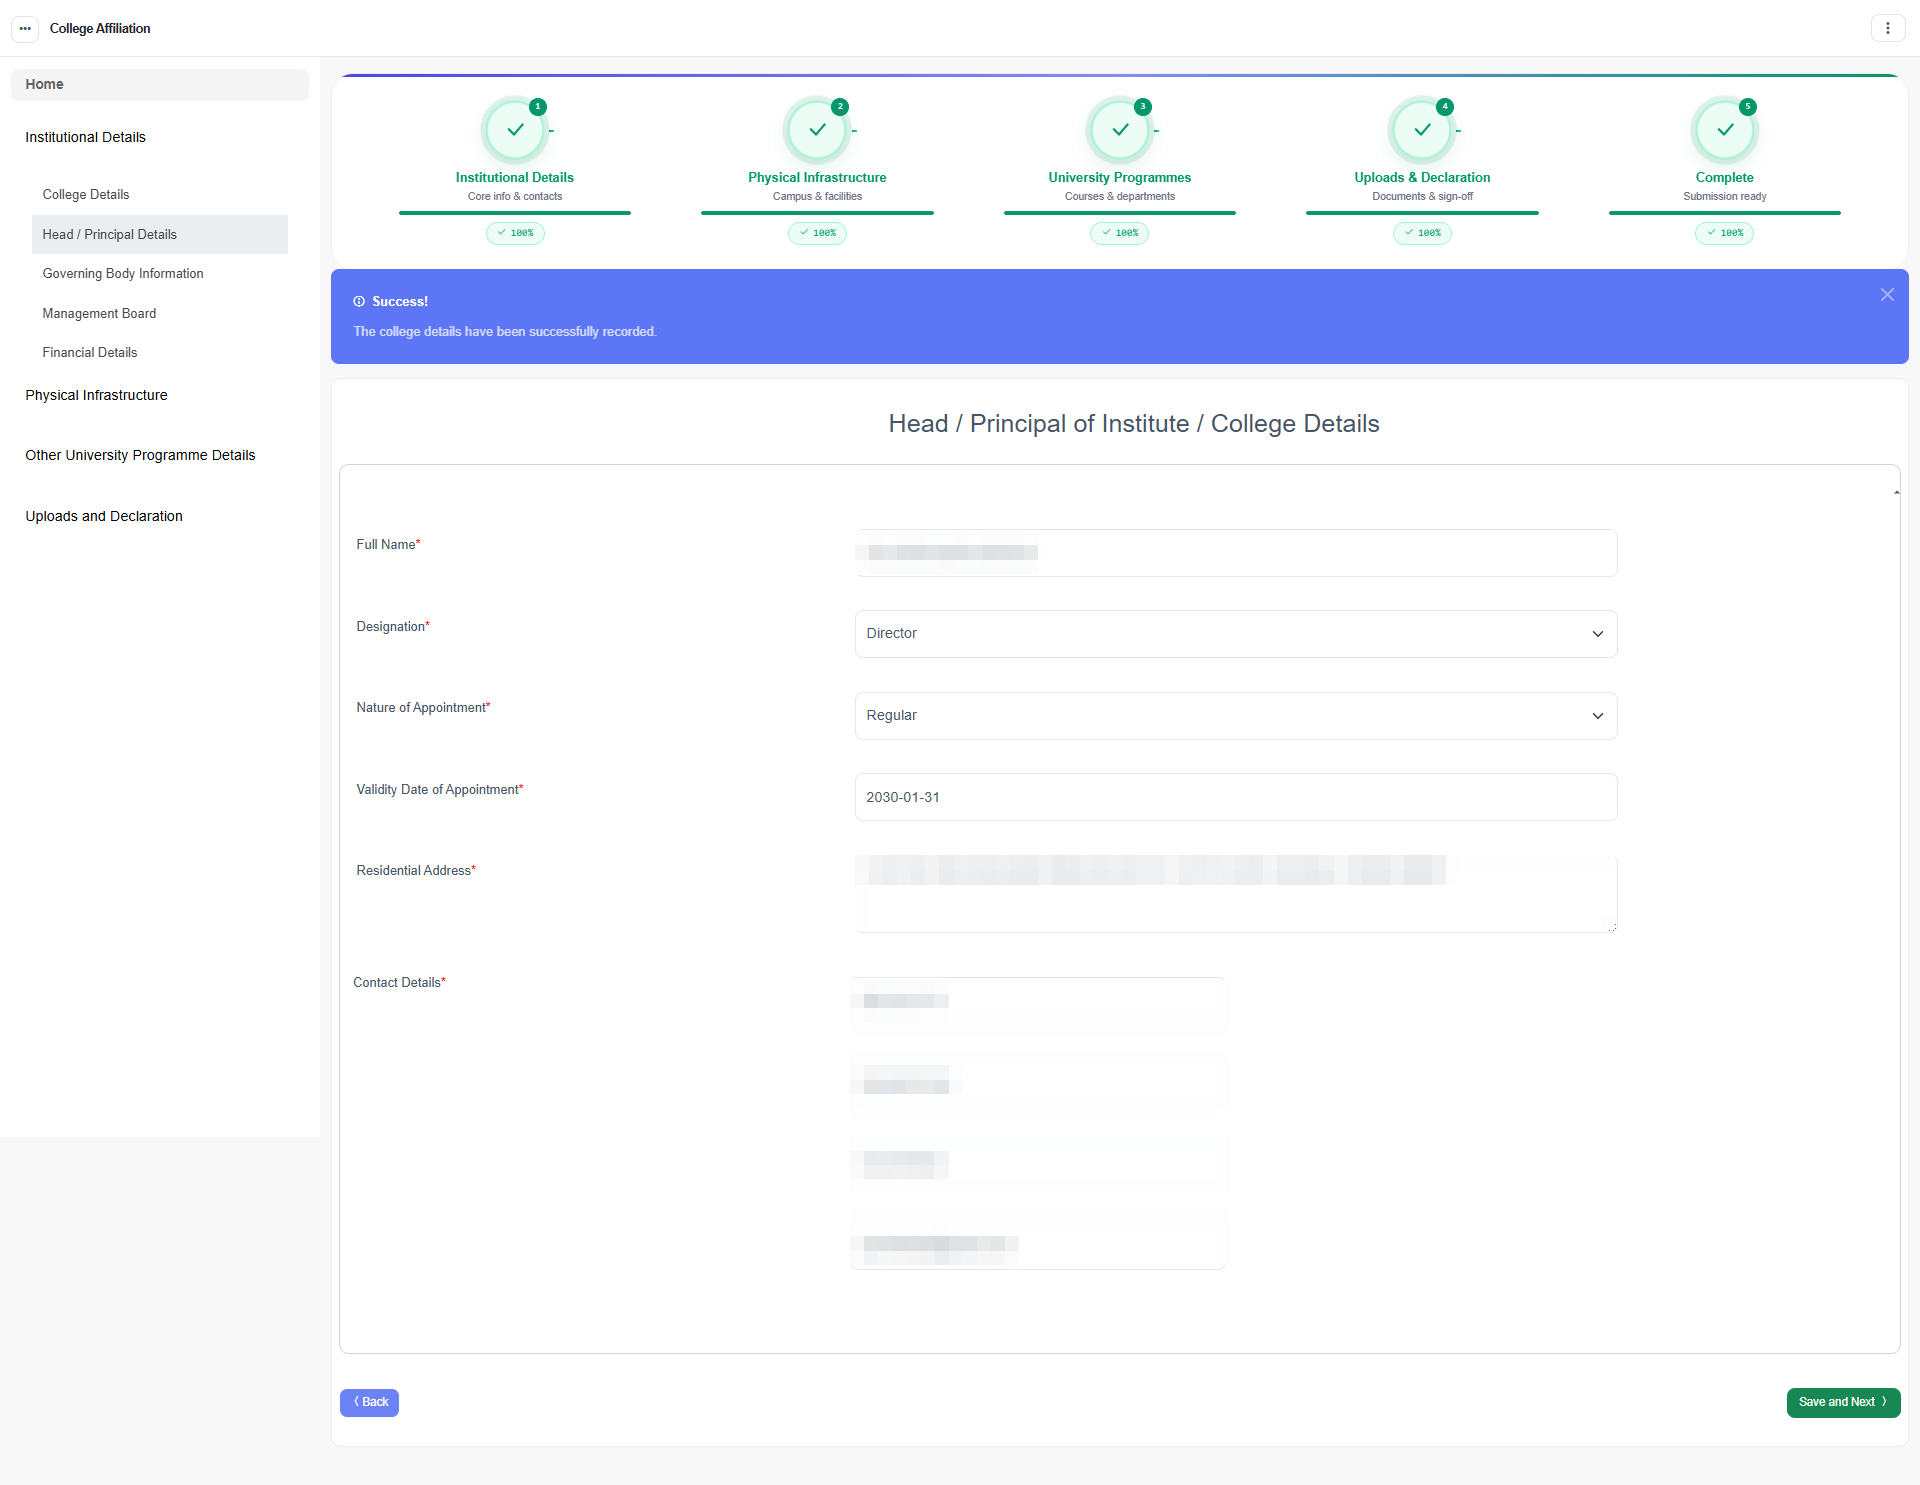
How the profile is laid out. The profile has five stages, shown as a tracker across the top. Each stage shows how complete it is, and a menu on the left lists the sections in the current stage. Use Save and Next to move on. Progress is saved per section, so you can stop and come back.
| Stage | Sections |
|---|---|
| Institutional Details | College Details · Head / Principal Details · Governing Body Information · Management Board · Financial Details |
| Physical Infrastructure | College Land Details · Building Details · Hostel Details · Physical Education Details · Staff Quarter Details |
| University Programmes | Programmes affiliated with other Universities · Teaching faculties details · Non Teaching Staff · Facilities for Students |
| Uploads & Declaration | Uploads · Declaration |
| Complete | A read-through of everything, for a final check |
Sections that list items, such as bank accounts, buildings, hostels, faculty and staff, take many entries. Use Add for each, and Edit or Delete on a row. Which questions appear, such as extra land questions or floor-by-floor building details, depends on what your university has switched on. The page shows what applies to you.
What the sections ask
- College Details: name, type, address, contacts and identifiers, mostly carried over from your registration.
- Head / Principal Details: the person heading the college, their appointment and contacts.
- Governing Body Information: the trust, society or management body that runs the college and its registration details.
- Management Board: one row per board member.
- Financial Details: bank accounts, fixed deposits, sources of income and heads of expenditure, depending on what your university enables.
- College Land Details: area, ownership, location and supporting land documents. If the university uses land verification, a land verifier checks this section.
- Building Details: each building, with its area and its rooms or floors.
- Hostel Details, Physical Education Details, Staff Quarter Details: capacity, grounds and equipment, and quarters.
- Programmes affiliated with other Universities: programmes you already run.
- Teaching faculties details and Non Teaching Staff: your staff, with a bio-data upload for each teacher.
- Facilities for Students: library, laboratories, canteen, transport, scholarships and other student services.
- Uploads: the documents your university requires for your type of college. The icon on each row shows the accepted file type (image, PDF or spreadsheet); a wrong type is refused with a clear message.
- Declaration: the university’s declaration text. Read it, tick the box and save.
See what is left
While the profile is a draft, the What’s left before you can submit panel lists each unfinished section and what it still needs, with a link to fix it. A section is complete only when everything it needs is saved. If you open an incomplete section, the page says "… is not complete yet. Still needed:" and lists the gaps.
The Declaration can be made only when every other section is complete. Otherwise: “The declaration was not recorded: it can be made only when every other section is complete, and N still are not."
Submit the profile
Who The college's Nodal User
Steps:
- Complete every section, and make the declaration.
- Check the Complete stage.
- Choose Submit.
Result: The profile becomes read-only while the university reviews it, and you receive a notification by email. If you try to submit too early: “Your college profile was not submitted: N sections are not complete yet (…). Complete them, then submit again."
What the university decides
| Decision | What it means | What you do |
|---|---|---|
| Approved | The profile is verified. | You can now apply in any open session. The university also keeps a numbered version of the profile exactly as approved. |
| Sent back for correction | The profile returns to draft with the university’s remark. | Read the remark, fix the sections it names, and submit again. |
| Rejected | The university rejected it. The email gives the reason. | Contact the affiliation office. |
| Reopened | An approved profile was reopened for correction. | Correct it and submit again for approval. |
If your university uses land verification, a land verifier checks your land details after you submit. You do not need to do anything during that step. You are emailed when the land check is complete.
If you submit a corrected profile with no changes since the approved version, the system tells you so: “You have submitted your profile without any changes since Version N was approved."
If your profile is on hold
If the university finds more than one live profile for your college, your profile is on hold. You see “Your college profile is on hold” instead of your profile, applications and payments. The page explains what you cannot do, why, who can fix it and what to do next, and it shows a reference to quote. You cannot fix this yourself: contact the university’s affiliation administrator with the reference. Nothing is deleted, and your access returns on its own once the duplicate is fixed. A payment your bank has already confirmed is still recorded.
Apply for affiliation
Who The college's Nodal User
Purpose: Apply to the university for a particular kind of affiliation, in an open session.
Who: The college’s Nodal User.
Before you begin: Your College Profile is approved, and any previous affiliation dues are paid.
Where: Affiliation Applications → Apply For Affiliation
Steps:
Choose the university (only on a portal that serves several universities). Only universities where your college has a College Profile are listed. If none is chosen: “No university was selected: choose one from the list."
Pick a session. Each open session shows its academic year, the kind of affiliation, the college type, the end date and how the fee is worked out. Choose Apply.
- After a session’s end date, Apply changes to Apply Date Over. Use Late Affiliation Application instead, where the session shows Apply late. A late application adds the university’s late fee, and is otherwise reviewed like any other.
- If you have started already, the button says Continue Applying (or Continue late application).
Choose your programmes. The page says how many programmes are available. Select the programmes you are seeking affiliation for, with the intake or student strength the page asks for. These figures decide your fee. Your application is created with its own application number.
- If the page says “No programme can be chosen yet: the university has not finished setting up the programmes for this session," contact the affiliation office. Nothing on your application is lost.
Complete the forms. Your university chooses which forms apply to a session, so you see only the relevant ones. A tracker shows Programmes Details, Faculty Details, Facilities & Resources, Additional Information and Complete. Each form has a menu on the left and Save and Next.
Form What you give Proposed Teaching Faculty How many teachers each programme needs, and their qualification, experience and pay scale. Existing Teaching Faculty Faculty already on your staff for these programmes, with bio-data. Student Intake and Strength Information Batch sizes and totals for each programme, from which your teacher–student ratio follows. Library Facilities Books, journals and reading space. With extended library details on, also holdings, circulation, internet and budget. Lecture Room Facilities Rooms for the selected programmes, beyond your profile’s building data. Lab Facilities Laboratories and equipment the programmes need. Additional Information Student monitoring, reservation policy, student support, transparency practices and your fee structure. Administrative Facilities Offices such as the principal’s, examination and accounts offices, with area against the prescribed minimum. Appears only if your session includes it. Computer Laboratory Each computer lab, with machines and internet. Appears only if your session includes it. Research Center Centre details, fees, grants, awards, patents, guides and departments. Appears only for a research centre. Discipline intake Each discipline with its year and semester, where the session collects intake by discipline. Uploads Documents the university requires for this kind of application, separate from your profile uploads. Declaration Final consent for this application. Review your application and bill. Open the application from your list. It shows every section and, where the university prices applications automatically, an itemised fee bill: each fee head, then taxes, any late fee and the grand total.
Submit. The system stamps your submission date and sets your application to Submitted. If you submit after the end date, it is marked late and the late fee is added.
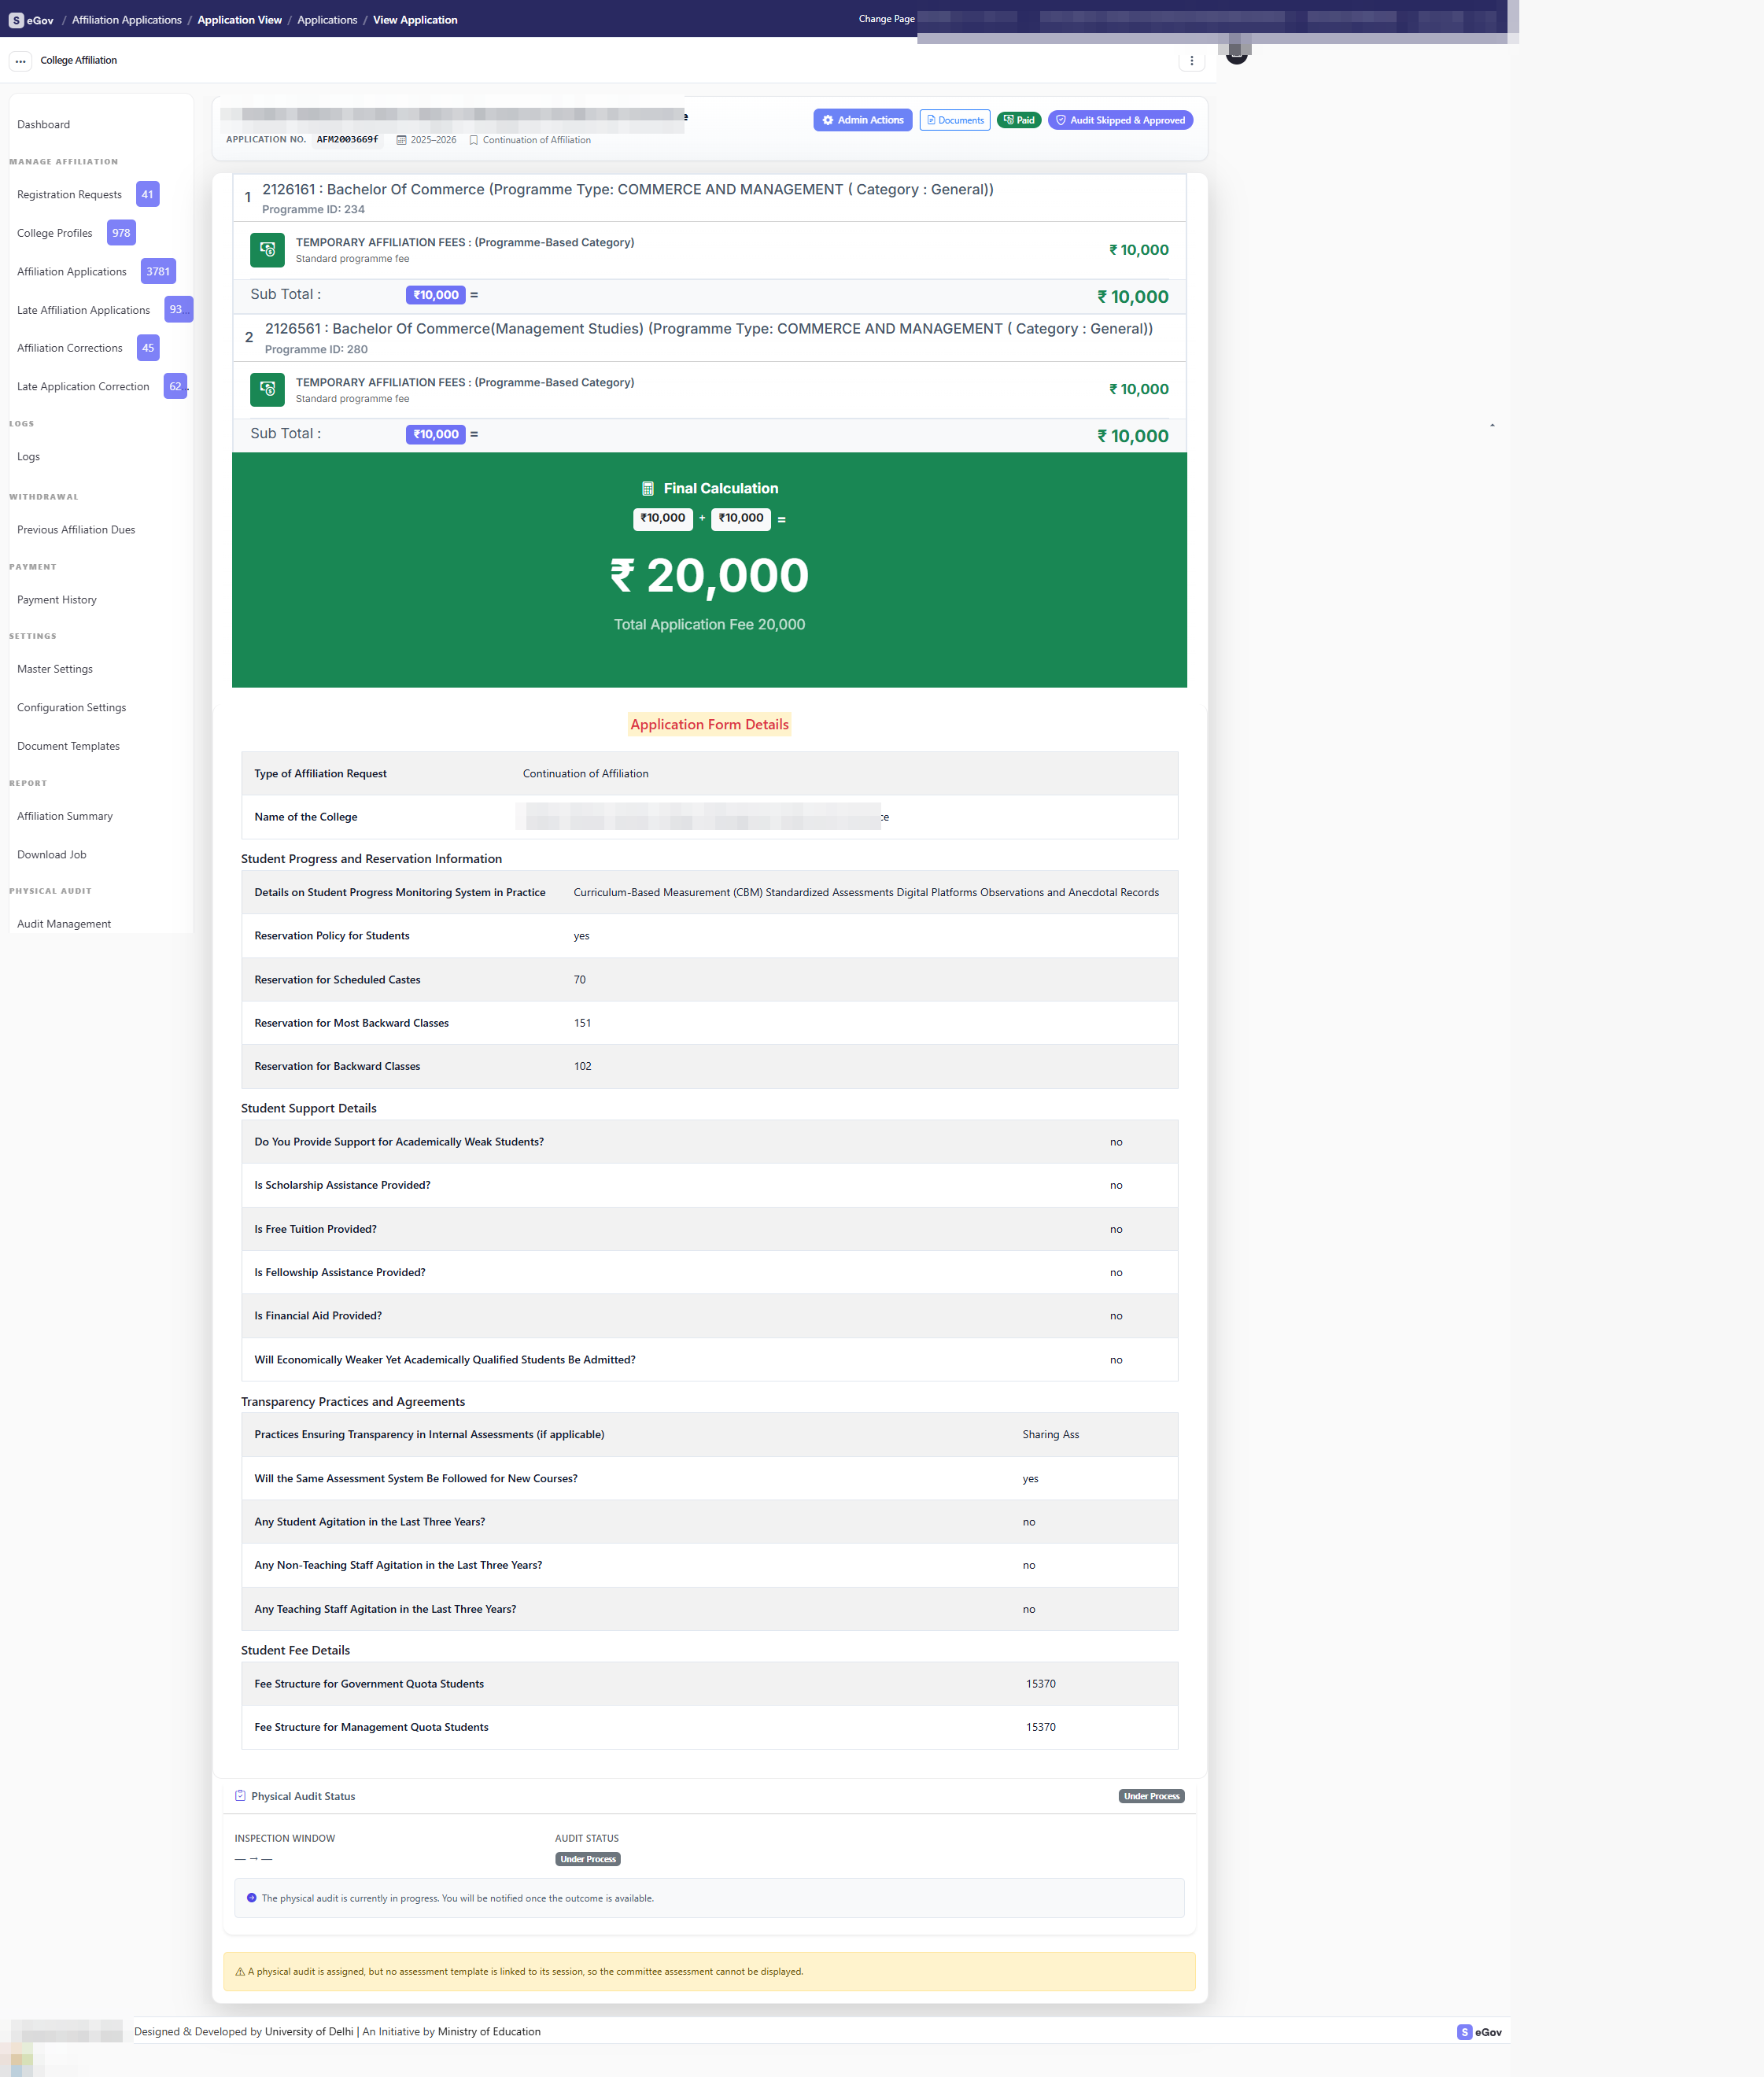
Result: The application goes to the university. You can print a copy with Print Application PDF, to keep for yourself or for the inspection committee’s visit.
If something goes wrong:
| Message | What to do |
|---|---|
| Your application is only N% complete. Please complete all required sections before submitting. | Finish the sections the page lists. |
| Please settle your outstanding affiliation dues before applying for further affiliation | Pay your dues; see Previous affiliation dues. |
| No forms configured for this session. | The university has not finished setting up the session. Contact the affiliation office. |
| Your application was not created: … | Check the programmes you selected and save again. |
Copy last year’s application
Who The college's Nodal User
Purpose: Start this year’s application from an earlier one instead of typing it all again.
Who: The college’s Nodal User.
Before you begin: You have an earlier application that was submitted. Otherwise the page says “None of your earlier applications can be copied into this session."
Where: On the session, choose to copy an earlier application instead of starting a blank one.
Steps:
- Choose which earlier application to copy from. If you have several, pick the year.
- Read What is different this year: fields that are new, entries that are not copied, and programmes not offered in this session.
- Choose Copy everything that can be copied, or copy section by section.
- Check each copied section and confirm it is correct. Submission is refused until you have checked every copied section.
- If a copied section is wrong, use the undo to remove the copied entries.
Result: Your application is filled with last year’s programmes and entries that still pass this year’s checks. Documents are never copied: upload every document again. Nothing is submitted or charged by copying, and you can compare the new application with the old one.
After you submit
You receive an email for every decision, and the university’s remark is shown at the top of your application.
| Decision | What it means | What you do |
|---|---|---|
| Approved | The application is verified. | Pay the fee. |
| Sent back for corrections | The university needs specific changes. | Read the remark, correct those sections and submit again. |
| Reopened for changes | A paid application was reopened so you can change it, for example to add programmes. | See Correct an application. |
| Rejected | The application is closed. | Contact the affiliation office. |
If the university publishes outcomes separately, you see Under review by the university until it publishes the outcome, and you cannot pay until then.
Pay your fee
Purpose: Pay the fee for an approved application.
Who: The college’s Nodal User.
Where: Open your application and choose Pay, or use the offline payment option.
When you can pay. Payment opens after the physical audit is passed or the application is approved. If your university allows it, payment opens earlier, while the application is submitted or being audited. Until then you see “Online payment is not open for this application yet: it opens once the physical audit is passed. Nothing is due until then."
Your payment shows one of six statuses:
| Status | Meaning |
|---|---|
| Unpaid — not open yet | You cannot pay yet. |
| Unpaid — payment due | You can pay now. |
| Awaiting verification | You sent an offline proof; the university is checking it. |
| Paid | Payment is complete. |
| Receipt rejected | The university did not accept your offline proof. Send a new one. |
| Payment reversed | The university reversed a verified payment. Contact the affiliation office. |
Pay online
- Choose Pay.
- Choose one of the gateways the university has set up for this session.
- Complete the payment. You are returned to the portal and your application shows Paid.
If the page does not return, or you close the tab too early, do not pay again. Wait a few minutes and refresh. If the page still shows your application unpaid, contact the affiliation office and quote your transaction reference.
If you see “Online payment has not been set up for this academic session yet” or “No payment gateway is available for this application right now," contact the university.
Pay offline
Available only when your university accepts offline payment.
- Pay at the bank by NEFT, RTGS, Demand Draft, Bank Challan, UPI or Cheque.
- Open the offline payment page on your application and enter the mode, bank, branch or IFSC, payment date, amount paid and reference number.
- Upload the payment proof as a PDF, such as a scanned challan, bank receipt or UPI confirmation.
- Submit. Your application stays unpaid, showing Awaiting verification, until the university verifies the proof. If the university rejects it, upload a corrected proof.
Your receipt and payment history
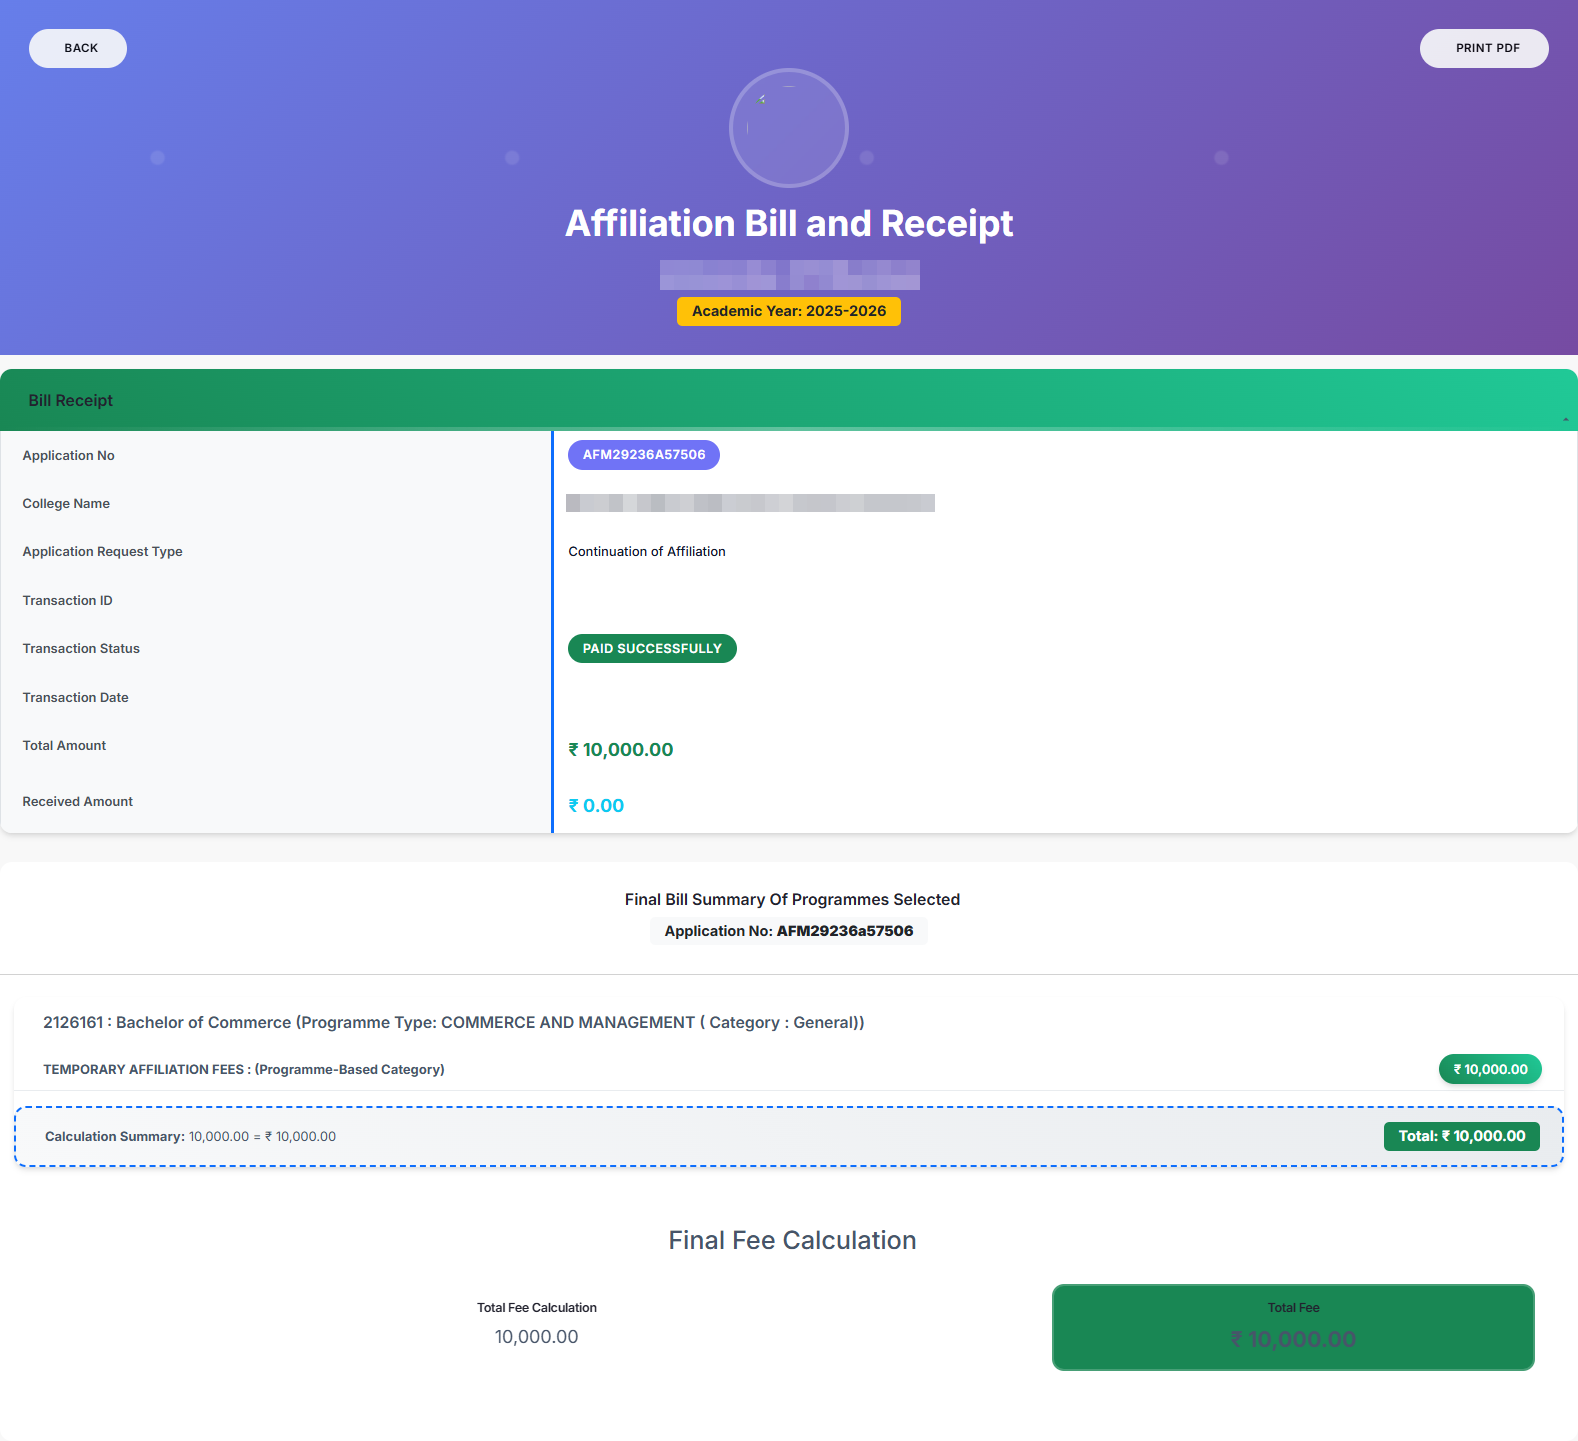
When a payment succeeds, or the university verifies an offline payment, open the application and choose Receipt View. The Affiliation Bill and Receipt page shows your application number, transaction, status, total and amount received, with a breakdown of what was charged. Choose PRINT PDF to download or print it.
Payment → Payment History lists every transaction on your account, online and offline, with date, mode, reference, amount and status.
Correct a profile or an application
Who The college's Nodal User
When the university sends back a profile or an application, or reopens it, it returns to Draft with a remark explaining what to correct.
Steps:
- Open the profile or application. Read the remark at the top.
- Correct the sections it names. A reopened application keeps the programmes you chose, and you can change them. Applications waiting for correction are in Affiliation Correction.
- Submit again.
Result: The university reviews it again. For an application that was already paid and then reopened, your earlier payment stays on record as a snapshot, the application is unpaid again, and the payment page shows the amount now payable.
Prepare for an inspection
If the university arranges a physical inspection, you receive an email with the inspection dates and a checklist, and the dates show on your application under Physical Audit Status. If your university uses inspection teams, your application also shows the team’s status and date, but never the inspectors' names.
Be ready to:
- show every facility you declared: labs, library, hostels, classrooms and building plans;
- produce the original of every document you uploaded;
- arrange logistics with the committee for the inspection dates.
You never see committee members' names or their scores. The official outcome, with the committee’s overall remark and guidance on what to do next, appears on your application and is emailed to you once the university publishes it. If your application shows a status such as Being arranged, the university is still setting up the inspection.
Previous affiliation dues
If the university has recorded dues from an earlier year, your applications cannot be opened until they are paid. You are sent to the Dues Payment page and told “Your affiliation applications cannot be opened yet: the university has recorded previous affiliation dues for your college that are not paid." Pay through the gateway shown. Once the payment is confirmed, your applications open again.
Documents and downloads
- Documents on your application lists any official document the university has issued for it, such as a provisional affiliation certificate, ready to view and print.
- Report → Download Job holds any large export you started. Its status runs Queued, Processing, Completed. Choose Download when it is ready.
If something goes wrong
Reference numbers
Whenever the system refuses an action or fails, it shows a reference such as SAVE-261008-4813 with the message. Quote it when you contact the university. Under Error History you can search your own errors by reference and see what happened. A Refused entry means the system declined something it was not allowed to do. A System failure entry is something the university’s technical team will look into.
Common messages
| Message | What it means | What to do |
|---|---|---|
| No College Profile is linked to your account… | Your college has not been enrolled. | Ask the university’s affiliation administrator to register your college. |
| No College Profile was opened and none was created. … belongs to a different sign-in account… | Your college’s profile is owned by another login. | Ask the university to make your account the owner, or sign in with the right account. |
| Your college profile is on hold | More than one live profile exists for your college. | Contact the university with the reference. |
| … is not complete yet. Still needed: | A section is missing something. | Follow the list and links. |
| Your application is only N% complete… | Some required sections are unfinished. | Complete them, then submit. |
| Please settle your outstanding affiliation dues… | The university recorded earlier dues. | Pay them on the Dues Payment page. |
| Payment was not started. … | Payment is not open yet, or you are not the college that made the application. | Read the reason in the message. |
| Your payment proof was not accepted. … | The proof cannot be sent now. | Read the reason in the message. |
If a message is not here, copy its reference and contact the university’s affiliation office. The Affiliation — FAQ page has more answers.