Pension And Gratuity Management System
| Document Title | Pension And Gratuity Management Guide |
|---|---|
| Document Number | PAGMSG -001 |
| Version | 1.0.0 |
| Author(s) | Junior Software Developer, Finance Team |
| Reviewed By | Solution Architect, Finance Team |
| Approved by | Senior Manager, Operations |
| Last Update Date | April 11, 2025 |
About the Module
Pension And Gratuity: Pension And Gratuity is the comprehensive management of all financial records related to employee compensation, including pension, family pension, commutation, gratuity, leave encashment, gpf, and deductions. From an accounting perspective, pension refers to the payments made to pensioners for their services over a defined time period.
The Pension And Gratuity Management System further streamlines this process by handling the following key functionalities:
- Pension Calculation and Disbursement: Manages pensioners pension, including allowances, deductions and bonuses.
- Report Generation: Automates the creation of monthly pension statements and other pension-related reports.
- Pensioners/Employee Self-Service: Provides employees/pensioners access to their personal information and pension details, ensuring transparency and control.
Key Features of the Pension And Gratuity Module
- Pension Application Process: Pension application form filling and process pension.
- Pension And Gratuity Calculation: Automatic pension, commutation and gratuity calculation.
- Comprehensive Pension Processing: Facilitates pension calculation in alignment with updated pay commissions.
- Budget Management: Covers budget allocation to disbursement for effective fiscal planning.
- Automation and Efficiency: Processes pensions for various pensioners categories such as:
- Self Pension.
- Family Pension.
- Attendance-Linked Pension: Automatically calculates pensioners based on Servics. The pension and gratuity module is a powerful tool designed to meet the financial and fiscal needs of Universities and Higher Education Institutions (HEIs), ensuring smooth and efficient pension operations.
Additional Features of the Pension Module
The Pension And Gratuity Module is equipped with advanced features to cater to the complex needs of employee/pensioners pension and gratuity management in Universities and HEIs:
Pension Application Proccess Tracking
- Pension Application can be track by the status.
Tax Deduction Calculation
- Automatic tax calculations based on the amount added in Income Tax deduction head.
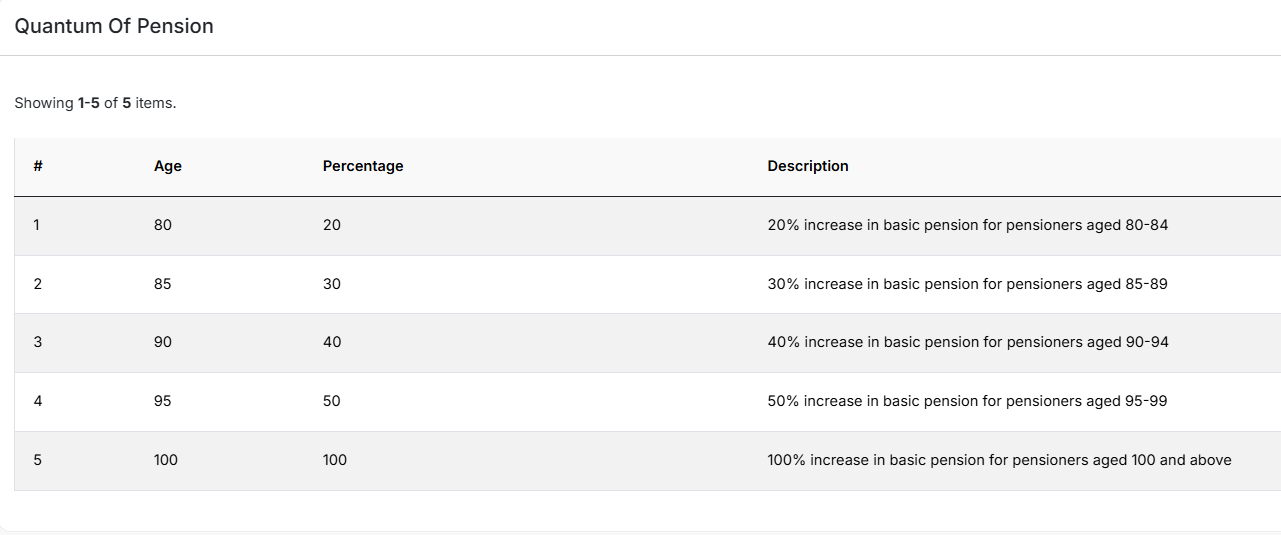
Quantum Of Pension (Additional Pension) Benifites Calculation
- Automatically calculates the quantum of pension according to the age for eligible pensioners.
Pension & Gratuity Calculation
- Manages post-retirement benefits like pensions and gratuities efficiently.
GPF And EOL Calculation
- GPF and EOL calculation also done from the module.
Pension Bills & Deductions Parking
- Generates pension bills and manages parking for deductions.
Pay Slips & Paybill Generation
- Generates detailed pay slips and consolidated pay bills for pensioners.
Comprehensive Reports
- Provides detailed reports on pension, taxes, deductions, arrears, and more, ensuring transparency and compliance.
Module Settings
- Module settings option is given in setting to control the pension module and make it configurable.
These features enhance the efficiency of pension processing while ensuring compliance with institutional and governmental regulations.
Prerequisites to Initiate the Pension And Gratuity Management System
To effectively use the Pension And Gratuity Management System, Universities/HEIs need to complete the following configurations in their Samarth Suite:
- Configuration of the Base Module with Organizational Unit Types
- Define and set up the organizational structure, including all unit types (e.g., departments).
- Addition of Employee Details in Organizational Units
- Ensure all employee records (permanent faculty) are added under the respective organizational units.
- Creation of Administrative and User Accounts
- Create administrative accounts for module administrators.
- Set up user accounts for employees to ensure access and functionality.
Note:
- These configurations must be completed by HR administrators or users assigned the admin role for the respective modules in the Samarth Suite.
- Accurate and complete data entry is crucial to ensure smooth pension processing.
Roles in the Pension Process
There are 4 types of User roles available in the Pension Management Module.
pension_admin (Pension Admin) The role to be given to the administrative account can configure all the settings of the pension module, the Admin can fill pension application form, processed it and calculate the payable pension, commmuate pension , normal pension, enhance pension, gratuity, GPf, EOL, generate,finalize & approve pensions. Admin can change the pensoin heads and fetch all pension reports.
pension_cell (Pension Cell Officer) The role is to be given to the administrative account responsible for review pension application and calulate the the payable pension, commmuate pension , normal pension, enhance pension, gratuity.
pension_cell_approver (Pension Cell Approver Officer) The role is to be given to the administrative account responsible for review and approve thepayable pension, commmuate pension , normal pension, enhance pension, gratuity calculation.
pension_employee (Pension Employee / Pensoiner) The role is to be given to the administrative account of the pensioner.
There are 2 type of user roles are available in the employee Management module which are invole the online No dues certification process and Establishment process.
employee_noc_actor (Employee NOC Approver) The role is to be given to the administrative account of the Department approver of NOC (Auto Added when approver added in group ).
employee_noc_application_admin (Employee NOC Admin) The role is to be given to the administrative account of the NOC Admin to perform NOC action like generate EO order , configure settings, final approve in NOC, creating template , assign template.
Note: Pensioners can download payslips and Application forms, PPO order, through their User login. These roles are automatically configured when the administrator creates the employee/pensioner login.
Administrator’s Guide (pension_admin)
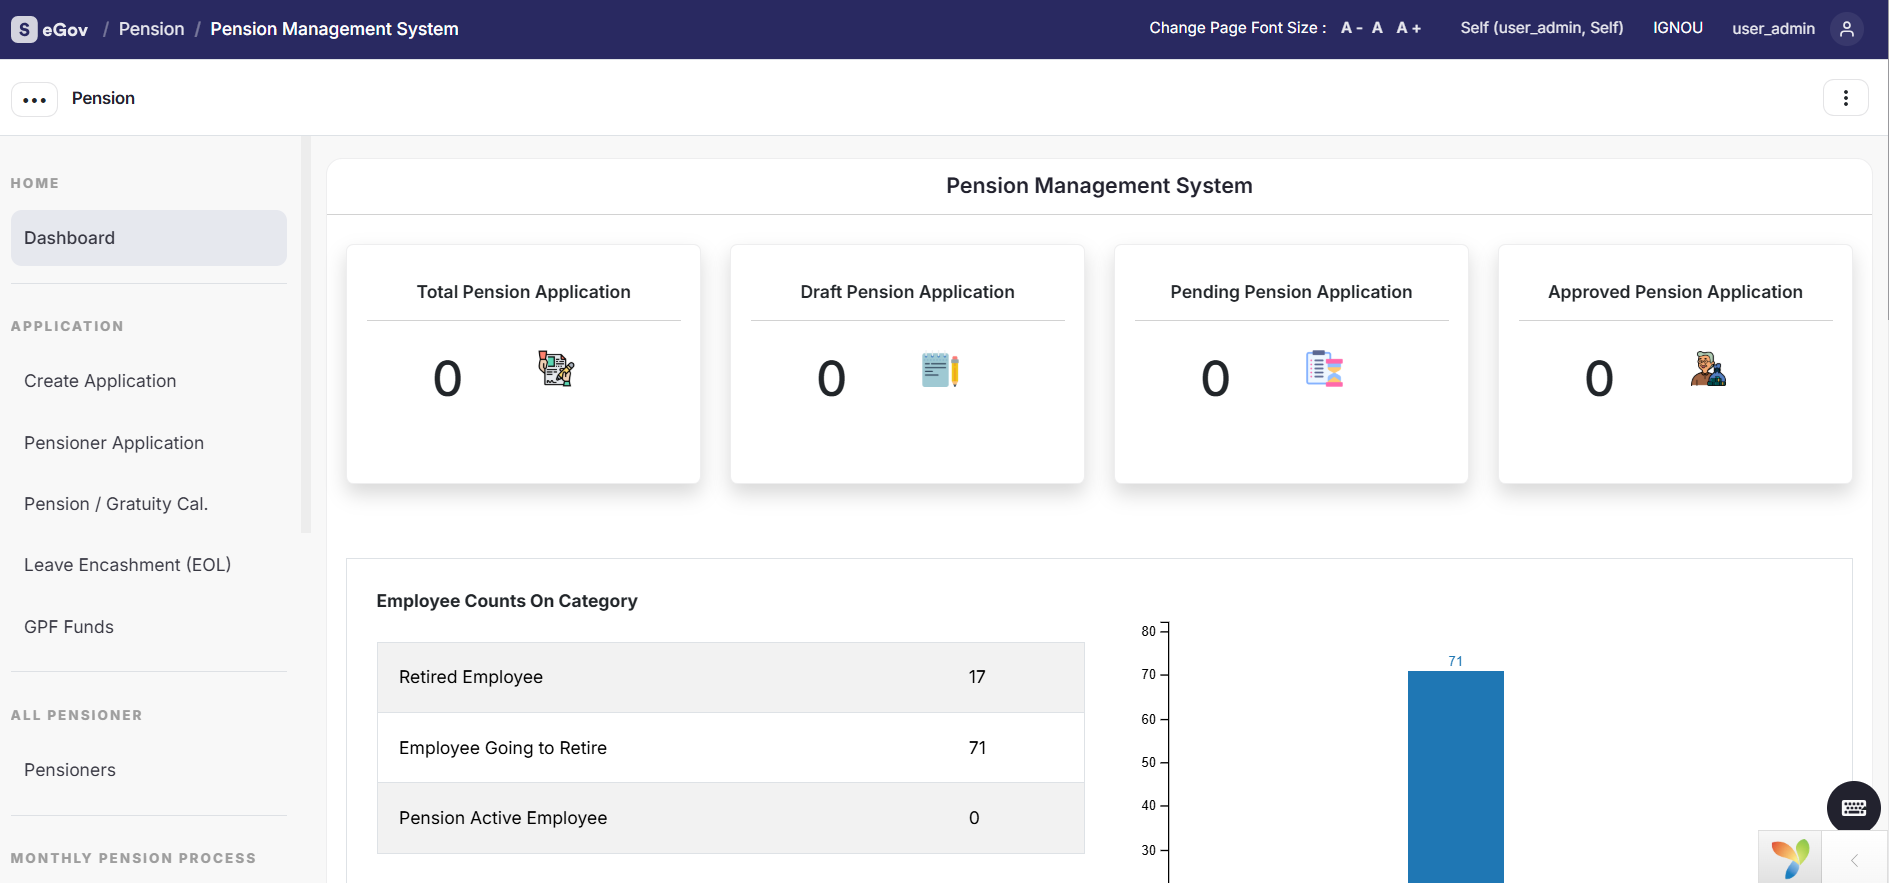
Pension & Gratuity Management Dashboard
The dashboard gives an overview of the Pension & Gratuity Management for all the working and retired employee in the University/Organisation Unit.
Key Dashboard Features Include:
- Total Pension Application: Shows the total active pension application count.
- Draft Pension Application: Shows the Draft active pension application count.
- Pending Pension Application: Shows the Pending active pension application count.
- Approve Pension Application: Shows the Approved active pension application count.
To start the Pension process, the admin is required to configure the pension settings. This can only be done by the admin.
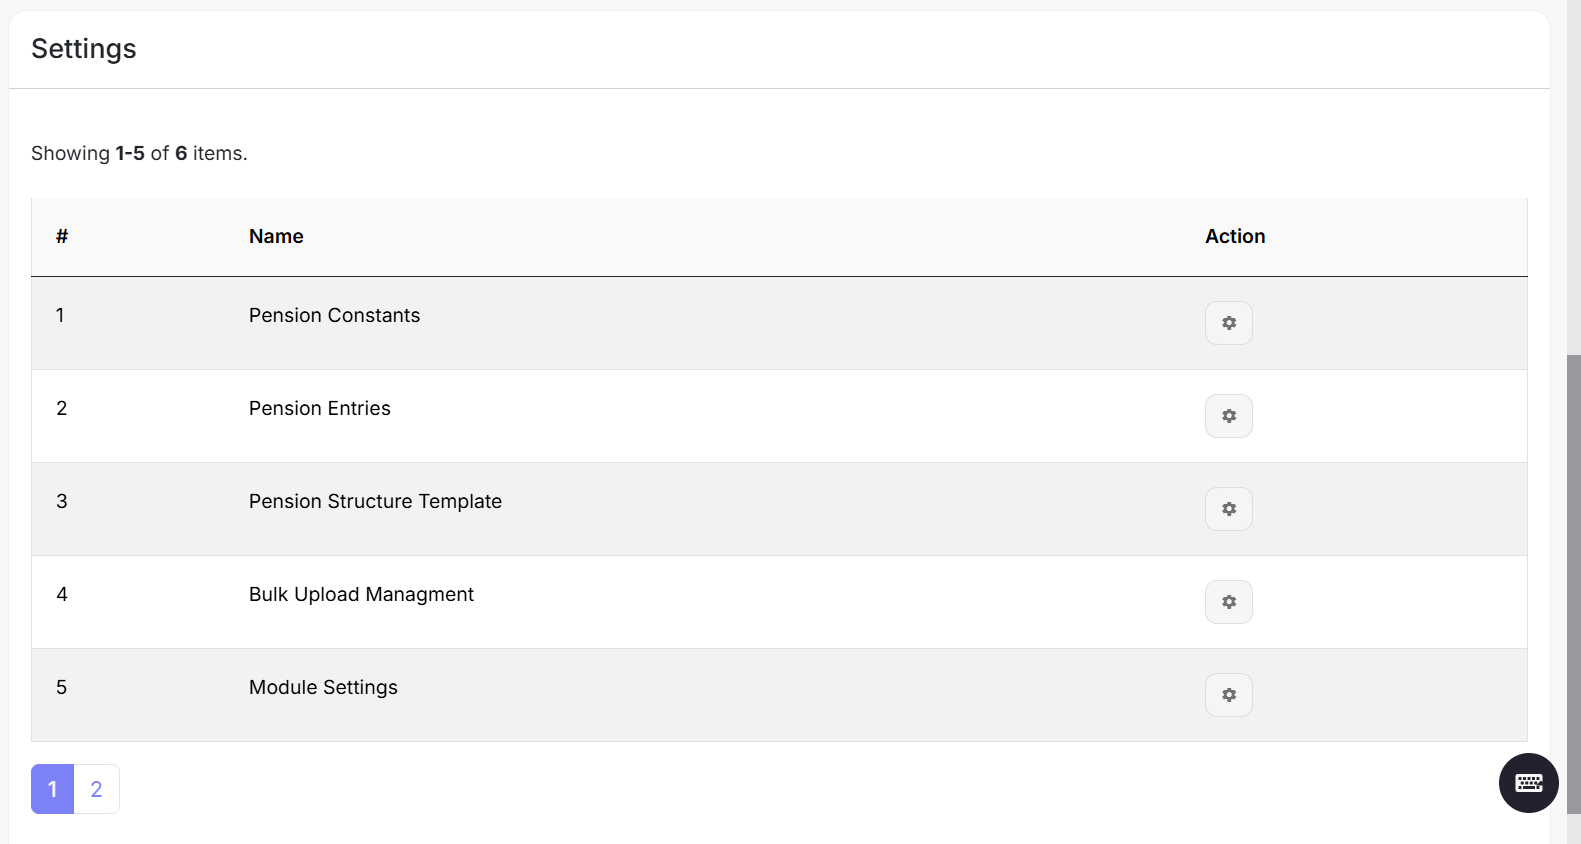
Configuration (Settings)
To start the Pension process, the admin is required to configure the pension settings. This can only be done by the admin.
Bank Lists
Admin - (with the user role pension_admin) can view bank details here. This section also displays the detailed list of banks which will be mapped with the pensioner.
Pension Constants
In this option, constants can be defined for the pension calculation according to the Government policies.
Pension Entries
This section captures the pension entries for each type of pension head. The admin can add and update Pension component heads as needed.
Steps to add pension entries:
- Click on the Pension Entries button provided on the top right-hand side.
- Admin can View/Update Pension Entries' details.
- Click Add Pension Entry and fill in the following information to add a new Pension Entry:
- Entry Type
- Entry Group
- Tax Group
- Report Group
- Entry Name
- Description
- Applicable On
- IT Section
- Maximum Limit (For IT Declaration Use)
- Display Order (For IT Declaration Use.)
- Status (Active/In-Active)
- Click on the Save button
Pension Structure Templates
pension_admin can add various Pension structure templates with this option.
Steps to add Pension Structure Template:
- Click on the Pension Structure Template button provided on the top right-hand side.
- Admin can View/Update Pension Structure Template
- Click Add Pension Structure Template and fill the following details to add new Pension Structure Template:
- name
- Pay Commission ID
- Status (Active/In-Active)
- Click on the Save button
After completing these steps admin can configure the pensioner’s Pension structure (Earning rules and Deduction rules which are formula-wise and actual value also) that is reflected in the configured Pensioner Pension slips.
Bulk Upload Management
In this section, all the Bulk upload sheets are available for Pension Bulk Upload.
- Bulk Pension Detail Upload: The admin can upload Pension configuration data in bulk in the portal he/she does not need to upload Pension data one by one. i.e. Account Number, IFS Code, Basic Pension, etc.
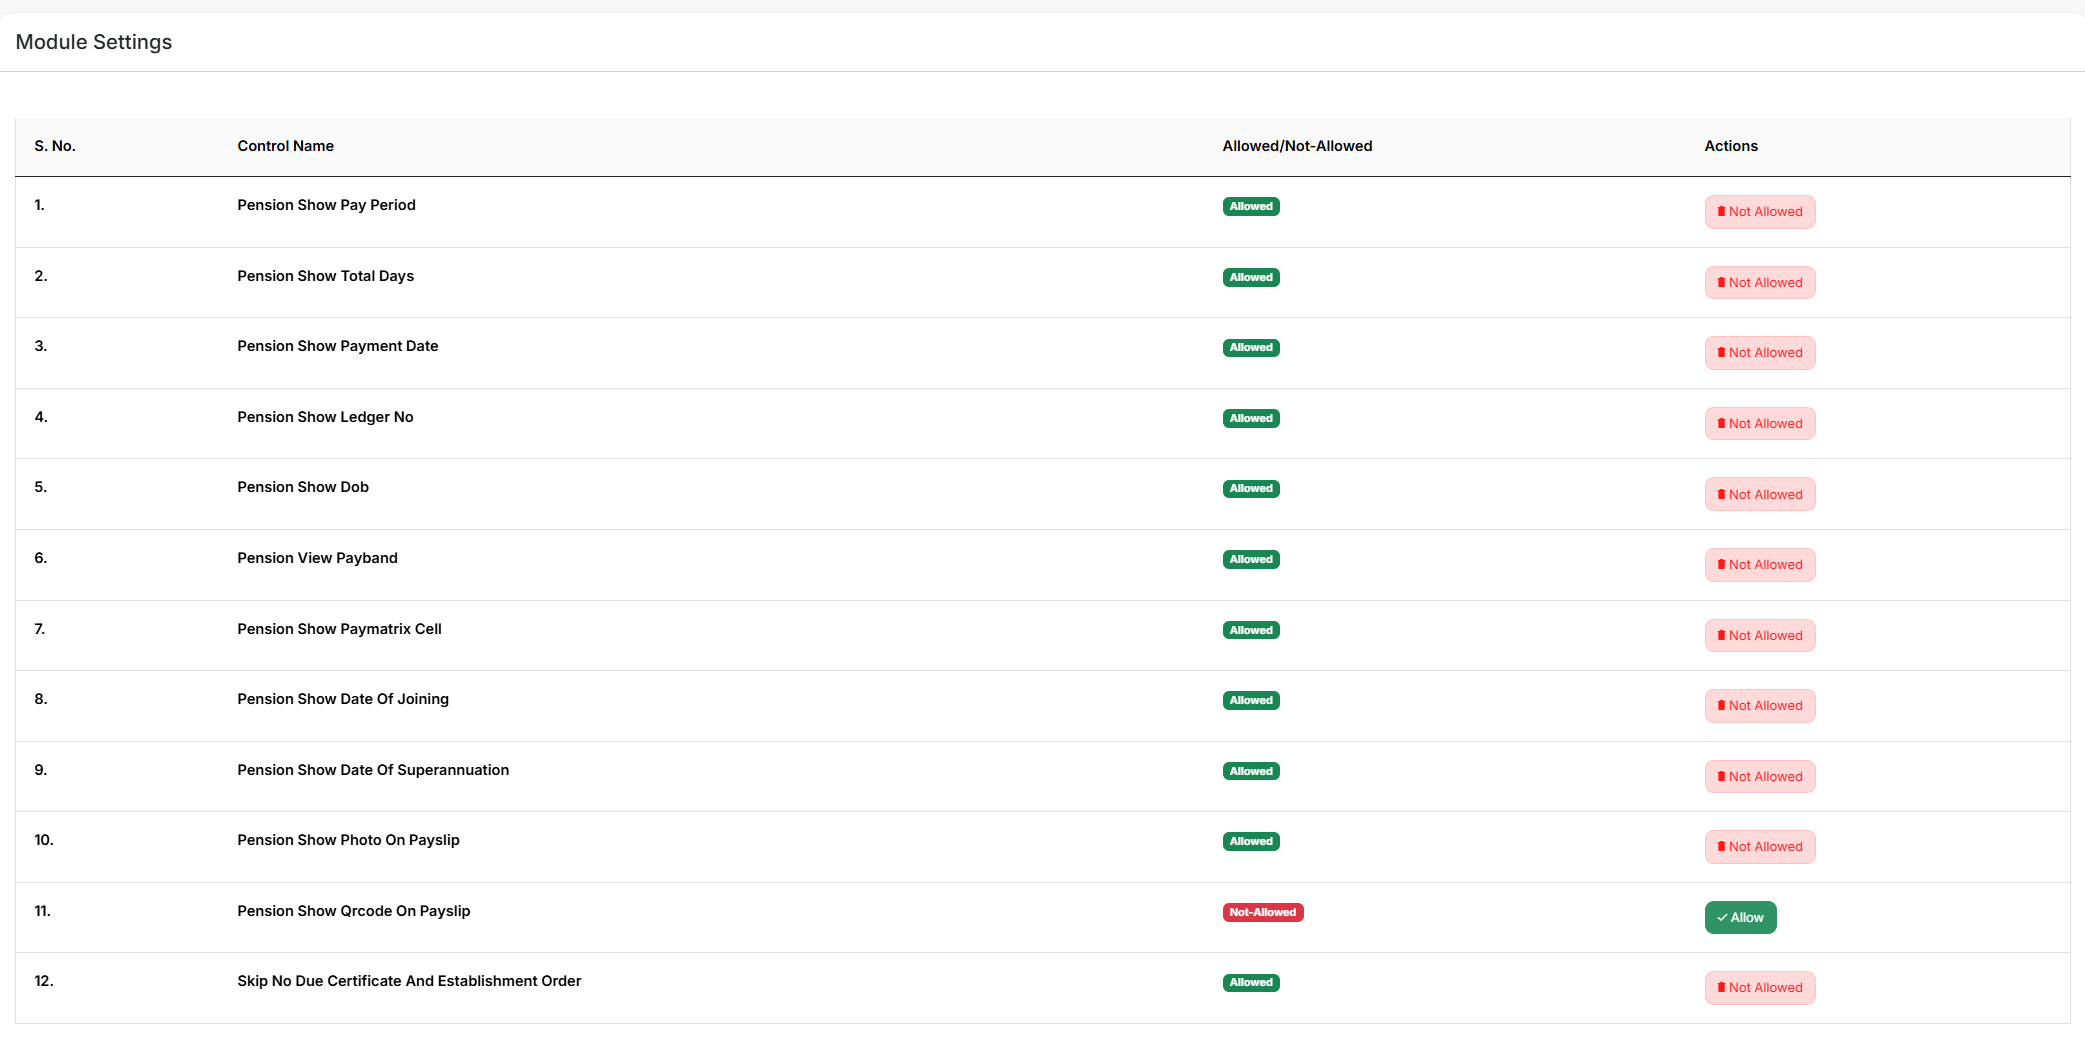
Module Settings
This section displays the following features:
Allow/Not-allowed if required to be applicable in the payslips and reports section by the Pension admin.
The admin can activate/de-activate to show Skip No Due Certificate And Establishment Order on Pension Slip.
Declaration
In this section, the admin can View/Edit the declaration which is reflected in pay slips during tax declaration in both Hindi & English languages.
Configuring employee Pension and other information
The pension processing module manages the calculation of pensions of the employees based on their last basic criteria.
Application
In this section pension application and calculation is created, processed, verify, and approved. Also EOL and GPF are calculated.
- Create Application The List of all the eligible employee who can apply for pension will show.
All Pensioners
All employees are fetched from the employee management module. Here, Pension is configured for all these employees. This section shows 4 pension filters/statuses with counts:
Pension Active (contains a list of all pensionrs whose Pension are configured)
- When Admin defines Pension structure for the employee and configures pension for the pensioners, it automatically appears in the Pension & Gratuity Module Active section as their status is changed from “Not Configured" to “Active”.
Retired - After the date of superannuation/retirement is over, the portal automatically moves to the Retired section.

Employee Pension Structure
Here the employee is mapped with Pension entries like which type of pension heads will be included for that employee. In this section, the admin can view/add/edit pension entries for each employee individually. Admin can even add one-time pension entries.
Add Pension Entry: Pension entry can be added by clicking on either the Add Pension Entry button(Manually) or Add Pension Entry from the Rules Set button (select from the already defined rules set).
Add Pension one-time Entries: Admin can even add one-time pension entries.
Note: Pension entry must be mapped to Employee Pension Structure for the bulk updates.
Generating Pension
Before processing and approving the pension, we need to generate it first. By clicking this option, the user is directed to the Employee Detail Records interface where information on all the employees of the pension active section is displayed.
- Generate Individual Pension
If the Admin wants to generate a pension for each pensioner one by one he/she can click on the Rupee icon.
Additionally - Admin also process the pensioner pension as per the number of working days to follow the mentioned step:
- Click on the ‘Generate Pension’ Tab.
- Click on the ‘Add/Update’ button of the pensioner for whom you want to generate the pension based on the number of working days, and then the form will open.
- After filling in all the details, click on the ‘Final Submit’ button.
- You will get a flash message in the same tab.
- Now the process is completed and you can generate pension for this particular employee.
Generate Bulk Pension
If the Admin wants to generate pensioner pension in bulk, the process is done by selecting all the pensioner whose pension needs to be generated together and clicking on the Generate Bulk Pension button.
If the Admin wants to generate a pension for a single pensioner then they search for the particular pensioner, click on the Rupee button and fill in the required details.
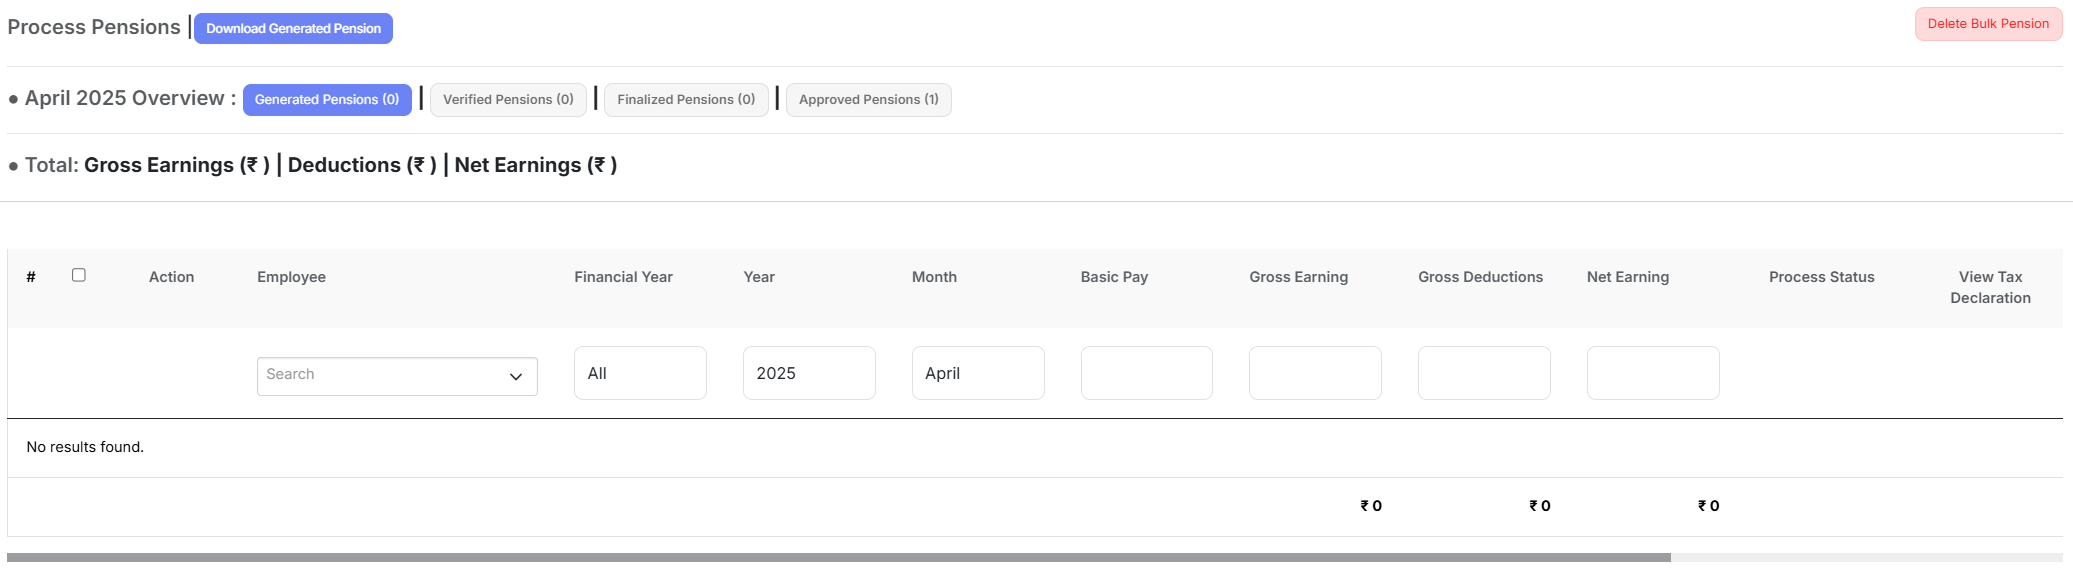
Process Pensions
After the pension is generated by the Admin, it is moved to the Process Pension section.
View Generated Pension
After the pension is generated by the Admin, the pension slip can be viewed after Generation/approval pension slips, by clicking on the View icon.
View Previous Pension
After the pension is generated, the Admin can also view the previous pension slip of an pensioner by clicking on the View icon. It can also be printed from here as per the requirement.
- Delete Bulk Pension
If there is a need to delete a pension entry for any changes, the Admin needs to click on the delete Bulk Pension button. After deleting, the generated pensions, the Admin can regenerate the pensioner pension multiple times.
- Verify Individual/Bulk Pension
Upon clicking this option, Admin is directed to the Pension Processing Interface of all the pensioner whose pension has been generated.
The information displayed on this page is only of those pensioner whose pension has been generated. The Admin can l verify the pension details and mark it as verified by clicking on the Verify Bulk Pension button.
- Un-Verify Individually/Bulk Pension
If Admin wants to un-verify the pension which has been verified but not finalized yet due to some changes, then he/she needs to click on the un-verify Bulk Pension button. It cannot be unprocessed/unverified once finalized. Un-verification can be done for multiple employees in bulk.
- Finalize Bulk Pension
After verification, the Admin can finalize the pension for approval. No changes can be incorporated after the finalization process.
- Approve Bulk Pension
Upon clicking this option, the Admin is directed to the Pension Processing Interface of all the pensioner whose pension has been processed.
The information displayed on this page is only for those pensioner whose pension has been verified and finalized.
- Download Generated pension option
After generating the pension, Admin can generate a Pre-procession reports (Excel/PDF) report by clicking on the Download Generate Pension button.
Approved Pensions
Admin can view the approved pensioner pension details for information.
Removed Pension Logs
In this section, the admin can view deleted pension details that were removed after pension approval.
FSCM Mapping
This section links the Pension module with the FSCM and Vendor Bill modules. After approval, the pension admin can process pension bills and allocate deductions under liabilities and income heads in the FSCM module.
Prerequisites for Creating Pension Bills:
- Ensure a bill type PENSION BILL with the category VENDOR BILL is available (system-generated). If not, create it as specified.
- Create a vendor named PENSION VENDOR in the vendor section of the FSCM module, completing all required fields.
Here are some of the steps for processing the pension bills through the Pension module.
Payment Scheme
In this his section, a feature called “FSCM & Pension Head Mapping Configuration” is added, allowing you to integrate FSCM (Budget) with Pension. You can also find this settings section in the left-side menu bar.
When you click on it, a page with a grid view will open, displaying all the mappings (Configurations).
The first step here should be creating the configuration. For this click on the Create Scheme button. When you click on it, a form will open.
Create the configuration according to the needs of the institute, and fill the require details:
- Name (Add the configuration name according to the Institution)
- Financial Year (like; 2024-2025)
- Type (Group/other)
- Groups (Select the group name)
- Employees (select employee accordingly)
- Description (Mentione according to the Institution)
After creating the combination click on the Map Heads button, and the following page will open:
By clicking on the View Scheme Details button, you can see all the details based on the configuration.
Before this Mapping, you should follow the following rules (Disclaimer):
- Select only that source OU (Organization Unit), for which the Budget Estimate has been done in FSCM Module while mapping net pension head.
- Source details (OU, Category, Head & Subhead) should be the same for all the mapping throughout this configuration.
- While adding the source details, the source budget subhead should be selected if it exists based on the selected source budget head.
- After mapping pension deduction heads, source details of net pension head can not be changed.
- All pension deduction heads (Deduction heads included in gross pension deductions) should be mapped for this configuration.
If there is a source subhead based on the selected source head (Estimate is created based on the sub head) then you should select that subhead while mapping Net Pension Head.
Now, click on the Add/Update button beside Pension Deduction Heads Mapping to map deduction heads with the budget.
After mapping all the pension deduction heads with Source & destination budget details, click on the save button.
If all the details are correct, click on the check box and then click on the to ‘Publish’ button to publish this configuration.
To map a new pension deduction head with this configuration, you have to unpublish the configuration. Then, map the deduction head, and finally publish this configuration again.
Generate Pension Bill
Before generating a pension bill, you should follow the following rules (Disclaimer):
- Bill will be generated based on the configuration that you have created in Payment Scheme.
- Configuration should be published.
- Pension should be approved for the specific Financial Year, Year, and Month before generating the pension bill.
- If you are trying to generate a pension bill for the same configuration (Same Financial Year, Year & month), the previous bill (Deduction Heads) with this configuration should be parked.
After filling in all the details, when you click on the Submit button, a page displaying all the details (Bill Amount, Source Budget Details) will open.
If the pension bill amount is greater than the available balance based on the source details, then the bill will not be generated.
If all the details are correct, click on the Generate Bill button to generate the pension bill.
After generating the pension bill you can view all the details in the Bill & Deduction Details Tab.
Manage Pension Deductions
Before parking pension deduction heads, you should follow the following rules (Disclaimer).
- Generated bill should be approved based on the approval hierarchy in the Vendor Bill Tracking module.
- If the bill is approved, then the configurations corresponding to the Financial Year, Year, & Month will be displayed in the Configuration dropdown.
- All the pension deduction heads (*Deduction heads included in gross pension deductions) should be mapped with the configurations.
After filling in all the details, when you click on the Submit button, a page displaying all the details (Approved Pension Bill Details, Parking details of Individual pension deduction heads) will open.
If there is any mismatch between the amount to be parked and the total deduction amount, then you can not park the deduction heads. You have to map the remaining pension deduction heads in FSCM & Pension Head Mapping Configuration Settings that are used in Gross pension deductions.
If all the details are correct, Click on the Park button to park all the pension deduction heads.
After parking the pension deduction heads, you can view all the details in the Bill & Deduction Details Tab.
Bill & Deduction Details
In this section, the admin can view the parked net and deduction details after parking the pension deduction.
Generating Reports
In this report section, Admin (all requested pension roles) can download the pension reports.
- Monthly Pension Report
- PBR Report
- Pension Payslip Report
- Admin has an option to generate bulk pension slips for all pensioners and print them in PDF format by clicking on the Print PDF button.
- Pensioner Wise Head Report
- Check Bank Data Report Before Approval
- Monthly Bank Advice Report
- Pay Bill Employee Wise Report
- Financial Year Wise Pension Report
- TDS Deduction Report
