Payroll Management System
| Document Title | Payroll Management Guide |
|---|---|
| Document Number | PMSG -003 |
| Version | 2.1.26 |
| Author(s) | Assistant Manager, Payroll |
| Reviewed By (1) | Solution Architect, Payroll |
| Reviewed By (2) | Senior Solution Architect, Payroll |
| Approved by | Head, Research Technology & Development, Finance |
| Last Update Date | May 09, 2026 |
About the Module
The Payroll Management System helps the University manage employee salaries in a simple and automatic way. It handles everything from salary calculation to report generation. The system calculates employee earnings and deductions, generates monthly salary bills, and prepares payroll reports. Employees can view their own salary and personal details which ensures transparency and accuracy. This module manages all financial processes related to salary, starting from budget allocation to salary disbursement. It follows the latest Pay Commission rules, pay bands, pay levels, and pay matrix guidelines. Salary increments are processed automatically through the pay matrix system. The system can calculate salary based on the number of working days. It is also connected with the Leave Management Module, so leave deductions are automatically adjusted in salary processing.
⚠️Note: Kindly check the dropdown to view key and additional features of the Payroll Module.
Key Features of the Payroll Module
- Bulk salary processing Feature.
- Arrear calculation and additional payments (bonus, extra benefits, etc.)
- Income tax declaration and automatic tax calculation.
- Loan and advance management with automatic deduction from salary.
- Integration with FSCM and Budget Management for salary bill creation and approval.
- Leave-based salary calculation.
- Increment Process.
- Generation of reports such as:
- Payslips
- Salary Report’s
- PFMS & CFMS report.
- GPF/NPS Reports
- Arrear Reports
- Financial Summary Reports
Overall, the Payroll Management System makes salary processing easy, accurate, automated, and transparent, helping the University manage payroll efficiently and in compliance with rules.
Additional Features of the Payroll Module
The Payroll Management Module includes several advanced features designed to meet the complex payroll requirements of Universities and Higher Education Institutions (HEIs).
Online Tax Declaration & Calculation
- Employees can submit their tax declarations online.
- The system automatically calculates income tax based on applicable tax slabs depending on Old and New Tax Regime and eligible deductions.
- Reduces manual tax calculation errors.
Other Taxable Payments
- Manages additional taxable components such as allowances, perks, and incentives.
- Ensures correct inclusion of taxable earnings in salary computation.
GPF (General Provident Fund) Calculation
- Automatically calculates GPF contributions for eligible employees.
- Maintains accurate records of contributions and balances.
Pension & Gratuity Calculation
- Calculates pension and gratuity benefits as per applicable rules.
- Supports retirement and post-retirement benefit processing.
Increment Generation
- Automates salary increments based on predefined rules and eligibility criteria.
- Ensures timely and accurate increment processing.
Advances / Loan Calculation
- Manages employee advances and loans.
- Automatically calculates installment deductions and outstanding balances.
Recovery Management
- Handles recoveries related to loans, advances, or any other dues.
- Ensures systematic deduction from salary.
Leave Management
- Automatic salary calculation based on the leave approved in the Leave Management Module.
- This module is interlinked with the Leave Module to ensure accurate salary deduction.
Arrears Processing
- Processes arrears arising from salary revisions, pay commission updates, or other adjustments, i.e., Basic, DA ,DA on TA, HRA Arrears.
- Automatically calculates payable arrear amounts.
Salary Bills & Deductions Parking
- Generates salary bills for processing and approval.
- Allows temporary parking of deductions when required.
Pay Fixation Arrear
- Supports pay fixation during promotions, transfers, or pay revisions.
- Ensures compliance with institutional rules.
Pay Slips & Pay Bill Generation
- Generates detailed employee payslips.
- Creates consolidated pay bills for institutional records.
Comprehensive Reports
- Provides detailed payroll reports covering salaries, taxes, deductions, arrears, and more.
- Supports audit, compliance, and financial transparency.
Prerequisites to Initiate the Payroll Management System
To effectively use the Payroll Management System, Universities/HEIs need to complete the following configurations in their Samarth Suite:
- Configuration of the Base Module with Organizational Unit Types
- Define and set up the organizational structure, including all unit types (e.g., departments, sections, centres).
- Addition of Employee Details in Organizational Units
- Ensure all employee records (permanent, contractual, ad-hoc, guest faculty) are added under the respective organizational units.
- Creation of Administrative and User Accounts
- Create administrative accounts for module administrators.
- Set up user accounts for employees to ensure access and functionality.
⚠️Note: - These configurations must be completed by HR administrators or users assigned the Admin role. Accurate and complete data entry is crucial for smooth payroll processing.
Roles in the Payroll Process
There are 9 types of user roles available in the Payroll Management Module, as listed below:.
payroll_admin (Payroll Admin) This role is assigned to the administrative account and has full control over the payroll module. The user can configure all settings, generate and approve salaries, and modify salary heads.
payroll_admin_view (Payroll Admin View) This role provides read-only access to the payroll module. The user can view payroll-related data and reports.
payroll_ou_admin (Payroll OU Admin) The administrative account should be assigned with this role that can configure limited settings of the payroll module for the employees in his OU and all the child OUs of that particular OU. They can generate and approve salaries of employees in his OU and all the child OUs of that particular OU..
payroll_pcm (Payroll Change Manager) The administrative account should be assigned with this role responsible for bulk updating the salary heads of employees.
payroll_pda (Payroll Dealing Assistant) The administrative account should be assigned with this role responsible for generating salaries.
payroll_pvo (Payroll Verifing Officer) The administrative account should be assigned with this role responsible for verifying salaries.
payroll_pfo (Payroll Finalizing Officer) The administrative account should be assigned with this role responsible for finalizing salaries.
payroll_ar_salary (Payroll Approving Officer) The administrative account should be assigned with this role responsible for approving salaries.
payroll_incometax_admin (Payroll Income Tax Admin) The administrative account should be assigned with this role responsible for handling Income tax.
⚠️ Note: Employees can download payslips and declare Income Tax forms through their User login. These roles are automatically configured when the administrator creates the employee login.
Administrator’s Guide (Payroll_admin)
Payroll Management Dashboard
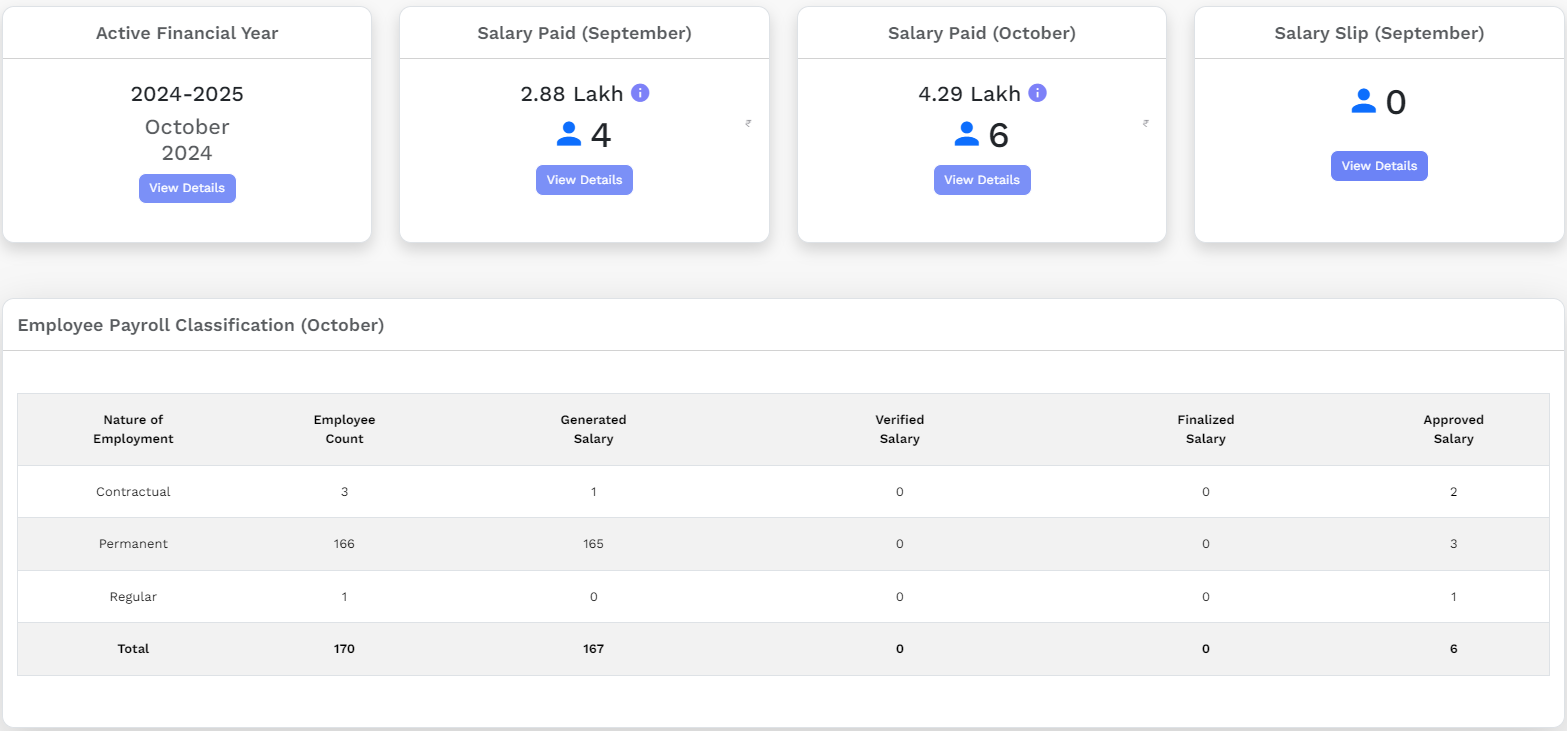
The dashboard gives an overview of the Payroll Management for all the employees working in the University/Organisation Unit.
Key Dashboard Features Include:
- Active Financial Year: Displays the salary processing status for the current financial year and month.
- Salary Paid (Previous month): Shows the total number of employees and the total salary amount disbursed in the previous month.
- Salary Paid (Current Month): Highlights the number of employees whose salaries have been approved along with the total payable amount for the current month.
- Salary slips: Displays the list/count of employees who have downloaded their payslips in the previous month through their user login.
- Employee Payroll Classification (Current Month): Enables the admin to verify the total number of employees categorized based on employment type.
- Employees Retiring (Current Month): Provides a list of employees scheduled to retire in the current month for verification.
- Organizational Units Payroll Classification (Current Month): Allows the admin to view department-wise active employees along with their payroll processing status.
Payroll Settings
In this section, only the Payroll Admin can configure and update all types of payroll settings as per the University rules. This is a one-time initial configuration.
Once the Admin completes all the required settings, the University can smoothly process salaries every month without any issues.
If the Government or University announces any new salary rules or changes, the Admin needs to update the relevant details in this section accordingly.
1. Configuration (Settings)
To start the Payroll process, the admin is required to configure the payroll settings. This can only be done by the admin.
⚠️Note: To configure the Payroll configuration settings, kindly click the dropdown.
1. Financial Cycle
A Financial Year is a 12-month accounting period used by the University for budgeting, salary planning, and financial reporting.
In the Payroll Management Module, the financial year plays a crucial role in managing salary calculations and tax processing for employees.
- Financial Year Structure
The University defines a fixed start and end month for the financial year. All payroll activities are carried out within this period.
Example: Financial Year 2026–2027
Start Date: 1st March 2026 End Date: 28th February 2027
All salary transactions processed between these dates are considered part of the same financial year.
Role of Financial Year in Payroll Processing
The system calculates the monthly salary within the defined financial period.
It accumulates the total annual gross salary for each employee.
Income tax is calculated based on the total annual earnings.
Declared investments and exemptions are adjusted automatically.
Annual reports and tax summaries are generated as per the financial year.
Some fields were added in the Financial Cycle Setting in the settings section
No. of Increments: Universities can add the total number of increments in a Financial Year in this field. This is entirely dependent upon the Universities/HEI whether they want to give increments once, twice, or thrice to their employees in that Financial Year.
Increment Interval: This field defines the duration between two increments in terms of months. Universities/HEIs should add this field for the date of the next increment for each employee. For example, if the number of increments in a financial year is one, then the increment interval should be 12 months. If the number of increments is two then the increment interval will be six months.
Increment Percentage: Universities/HEIs can set increment percentages according to the Government rules as well as their own, for their employees.
2. Pay Band Categories
The University consists of pay band categories for its employees. It lists all the available categories of pay bands along with their descriptions.
Some pay band category already exists in the system by default, namely such as:
- 5200-20200
- 9300-34800 etc.
Steps to Add a Pay Band Category:
- Go to the Pay Band Categories section.
- The Admin can view or update existing pay band details from this section.
- Click on Add Pay Band Category to create a new pay band.
Enter the required details:
- Pay Band Name: Enter the name of the pay band (for example: 5200–20200).
- Description: Enter a short description for the pay band.
- Status: Select Active or Inactive.
3. Grade Pay Scale (only for 6th Pay commission)
The Grade Pay scale depends upon pay band categories. It is a term used in the 6th Pay Commission that defines the pay structure.
Steps to add Grade Pay Scale:
- Go to the Grade Pay Scale section.
- The Admin can view or update existing details from this section.
- Click on Add Grade Pay Scale to create a new Grade Pay Scale.
Fill in the required details:
- Pay Band: Select the pay band from the dropdown list.
- Grade Pay Name: Enter the grade pay name (for example: GP-1800).
- Grade Pay Amount: Enter the grade pay amount (for example: 1800, 1900).
- Description: Enter a short description if required.
- Status: Select Active or Inactive.
- Click the Save button to save the details.
4. Levels
In the 7th Pay Commission, Pay Band and Pay Scale are merged into levels.
There are different levels ranging from 1 to 18 (according to academic and non-academic).
Steps to Add a Level
- Go to the Levels section.
- The Admin can view or update existing level details from this section.
- Click on Add Level to create a new level.
Enter the required details:
- Level Name: Enter the level name (for example: Level 1, Level 2).
- Pay Range: Enter the starting and ending pay amount within the same pay band.
- Pay Band: Select the pay band from the dropdown list.
- Description: Enter a short description if required.
- Status: Select Active or Inactive.
- Click the Save button to save the details.
Note: If you select pay commission to be 6th pay commission, then you will see two options of Pay band and Grade Pay, which are used to make salary on 6th pay commission. If you select the 7th pay commission, then you see the only matrix required, i.e. Level.
5. Pay Matrix
In the Pay Matrix section, the admin needs to define the Pay Matrix that is present in the salary structure defined for the Central government employees. The pay structure is segregated into 18 different pay levels. The university/Institution will add a Pay matrix according to the institution’s rules.
There are different levels ranging from 1 to 18 (According to academic and Non-academic).
Step to add Pay Matrix:
- Click on the Add Pay Matrix button on the top right-hand side of the screen.
- Admin can view/update the details.
Click the Add Pay Matrix option and fill the required details to add a new pay matrix in the section:
- Pay Matrix Name: Enter the name of the pay band (for example: PB 1 5200–20200)
- Pay Band: Select the pay band from the dropdown list.
- Grade Pay: Select the grade pay from the dropdown list.
- Level (1 to 15): Select the level from the dropdown list.
- Cell No: Select the cell (1-40) from the dropdown list.
- Basic Pay: Put the Basic Amount
- Description: Enter a short description if required.
- Status: Select Active or Inactive.
- Click the Save button to save the details.
6. Payroll Entries
This section captures the payroll entries for each type of payroll head. The admin can add and update salary component heads as needed. Steps to add payroll entries:
- Click on the Payroll Entries button provided on the top right-hand side.
- Click Add Payroll Entry and fill in the following information to add a new Payroll Entry:
- Entry Type: Select whether the entry is an Earning or a Deduction.
- Entry Group: Select the appropriate group for the payroll entry.
- Tax Group: Select Yes or No depending on whether the entry is taxable.
- Report Group: Select the report category for this entry.
- Entry Name: Enter the name of the salary component (for example: HRA, DA, PF, etc.).
- Description: Enter a short description of the payroll entry (optional).
- Applicable On: Select All Employees if the entry applies to everyone.
- IT Section: Select the Income Tax section if applicable (for example: 80C, 80DD, etc.).
- Maximum Limit: Enter the maximum limit for Income Tax declaration, if required.
- Display Order: Set the order in which this entry will appear in the IT declaration section.
- Status: Select Active or Inactive depending on whether the entry should be used.
- Click on the Save button.
7. Salary Structure Templates
Payroll Admin can add various Salary Structure Templates using this option. Follow the steps below to add a Salary Structure Template:
- Click on the Salary Structure Template button available at the top right-hand side.
- The admin can View/Update existing Salary Structure Templates.
- Click Add Salary Structure Template and fill the following details to add new Salary Structure Template:
- Nature of Employment: (Permanent/Contract)
- Cadre: (Teaching/Non-teaching)
- Salary Structure Template Name: Enter a unique name
- Pay Commission ID: (&th Pay commission/6th Pay commission)
- Level: (Level 1, Level 2 etc.)
- Status:(Active/In-Active)
- Click on the Save button to create the template.
After completing these steps admin can configure the employee salary structure (Earning rules and Deduction rules, which are formula-wise and actual value also) that is reflected in the configured Employee salary slips. Non-Practicing Allowance (NPA) is a special kind of allowance payable to Doctors occupying the posts of Medical and Veterinary Services.
8.System Wide Changes
Admin can update DA, DA on TA, and HRA percentages for all active employees in bulk based on the latest government announcements using this feature.
The Admin can also edit, update, and review previous changes by using the System / View Old Changes option available on the right-side icons.
9. Group Management
Payroll_admin can create various Employee payroll groups from this section. Admin can create groups based on designation, nature of employment, type of employee, department-wise, etc., as per the requirement and assign accordingly.
Steps to create a group in Group Management:
- Click on the Gear button in front of the Group Management.
- Click on the Create Groups button and fill in the required details i.e. Name and Description.
- Click on the Save button.
The Employee Group Management section enables the Admin to create, manage, and organize payroll groups efficiently. The Admin can create groups based on Designation, Nature of Employment, Cadre, or any other institutional requirement. Employees can be added to or removed from these groups as needed.
10. Employee Group Management
- Create Group- The Admin can create a new group by clicking on the Create a Group button.
- Edit Group- The Admin can modify existing group details by clicking on the Edit Group button.
- Overview- The Overview option provides a list of all created groups, Total number of members in each group and a summary of group details.
- View- The Admin can view the complete list of group members (with names) by clicking on the View icon.
- Add/Remove Members- The Admin can add or remove employees from a group using the Add/Remove Members button.
- Add Manage Payroll Management Group- The Admin can create a new managed payroll group by clicking on the Add Managed Payroll Management Group button.
Role-Based Configuration in Payroll Groups, Each Payroll Group has:
- One Payroll Dealing Assistant (PDA)
- One Payroll Change Manager (PCM)
- One Verify officer(PVO)
- One Finalize Officer(PFO)
- One Approval officer(ar_salary_approal)
A single Payroll Group can contain multiple Employee Groups.Each Employee Group may include one or more employees.These assignments are done group-wise in the Managed Payroll Management Group section.
11. Feature Settings
The Feature Settings section provides control to the Admin to enable or disable system functionalities as per institutional requirements. Through this section, the Admin can configure various payroll-related features to ensure smooth and accurate processing. Example: Automatic Income Tax Calculation
The Admin can activate the Automatic Income Tax Calculation option by enabling the designated button.
Once activated:
- The system automatically calculates income tax.
- Tax is computed based on the employee’s annual gross salary.
- Applicable exemptions and declarations are considered.
- Manual tax calculation is not required.
If this feature is disabled, income tax must be managed manually as per institutional procedures.
Lists are below:
| S.No | Control Name | Allowed/Not Allowed |
|---|---|---|
| 1 | Show PF Employer Contribution on Salary Slip? | Allowed |
| 2 | Show Pay-Band on Salary Slip? | Not Allowed |
| 3 | Send Salary Slip on Mail? | Allowed |
| 4 | Automatic Income Tax Calculation? | Not Allowed |
| 5 | Show Payment Date on Salary Slip? | Allowed |
| 6 | Show Single Sheet Report? | Allowed |
| 7 | Show Description on Tax Declaration? | Allowed |
| 8 | Show PF Arrear Employer Contribution on Salary Slip? | Allowed |
| 9 | Show Tax Declaration Form to Employee? | Allowed |
| 10 | Show Signature on E-Pay Reports? | Allowed |
| 11 | Show Ledger No on Salary Slip? | Allowed |
| 12 | Show Pay Matrix Cell on Salary Slip? | Not Allowed |
| 13 | Show Date of Joining on Salary Slip? | Allowed |
| 14 | Show Date of Superannuation on Salary Slip? | Allowed |
| 15 | Show Date of Next Increment (DNI) on Salary Slip? | Allowed |
| 16 | Show Pay Period on Salary Slip? | Allowed |
| 17 | Show Total Days on Salary Slip? | Allowed |
| 18 | Reporting OU’s Mapping? | Not Allowed |
| 19 | Display Employer Contribution on Both Earnings & Deduction in Salary Slip? | Allowed |
| 20 | Show Employee Advance Paid on Salary Slip? | Not Allowed |
| 21 | Show DOB on Salary Slip? | Not Allowed |
| 22 | Show Salary Slip Template? | Allowed |
| 23 | Budget Head Mapping? | Allowed |
| 24 | Send Salary Slip on Personal Email? | Not Allowed |
| 25 | Show QR Code on Salary Slip? | Allowed |
| 26 | Show Photo on Salary Slip? | Not Allowed |
| 27 | Stop GPF before Retirement? | Not Allowed |
| 28 | Send Salary on Mobile using SMS? | Not Allowed |
| 29 | NPS Rounding off to Next Higher Rupee? | Not Allowed |
| 30 | Department-wise Account Head Mapping with Earning/Deduction? | Allowed |
| 31 | Show Remarks on Employee PayBill Report? | Not Allowed |
| 32 | Show Gross Salary on Generate Tax Declaration? | Allowed |
| 33 | Show Masked Mobile No on Salary Slip? | Not Allowed |
| 34 | Show Masked PAN No on Salary Slip? | Allowed |
| 35 | Show Masked Account No on Salary Slip? | Allowed |
| 36 | Show University Accommodation on Salary Slip? | Allowed |
| 37 | Show Employer Contribution in Earnings & Deductions on PBR Report? | Allowed |
| 38 | Show Date-wise Employee Bill on Single Sheet Report? | Allowed |
| 39 | Show Salary Heads Percentage on Salary Slip? | Allowed |
| 40 | Allow Payroll Admin to Assign Grouping to Payroll OU Admin? | Not Allowed |
| 41 | Allow Bulk Salary Generation using Background Job? | Not Allowed |
| 42 | Display Arrear Employer Contribution in Earnings & Deduction in Salary Slip? | Allowed |
| 43 | Display Net Amount in Hindi Words on Salary Slip? | Allowed |
| 44 | Salary Bill Generation Through Payment Scheme? | Allowed |
| 45 | Select User to Receive OTP to Archive Salary | Update |
12. TA Allowance Master
The TA (Transport Allowance) can be configured in the system based on the employee’s Pay Level and City Category, as per institutional or government norms.
The TA amount is determined using the following parameters:
- Pay Level – Employee’s pay level as defined in the pay commission structure.
- City Category – Classification of the city (e.g., X, Y, Z category) where the employee is posted.
13. Report Template
In this section, the Payroll admin can design the Salary slips template according to the nature of employees’ such as permanent/contractual with the University/Institution logo and require the Employee details in the Payslips.
2. Bulk Upload Management
In this section, all the Bulk upload sheets are available for Payroll Bulk Upload.
| SI No. | Name | Description |
|---|---|---|
| 1 | Bulk Salary Configuration Data | Admin can upload payroll salary configuration data in bulk in the portal. No need to upload salary data one by one (Account Number, IFSC Code, Basic Salary, PFMS number, etc.). |
| 2 | Bulk Salary Data | Admin can upload earning heads, deduction heads, Gross, Net, and basic details in bulk. After upload, all details will be visible in the portal. |
| 3 | Bulk Progression Data | Admin can upload/update basic salary in bulk by using employee code and salary details in the sheet. |
| 4 | Bulk Recurring Data | Admin can upload recurring data for a specific head and time period (e.g., LIC with start and end date). After the defined period, the head becomes inactive automatically. |
| 5 | Bulk One-Time Data | Admin can upload one-time data (arrears, recoveries, etc.) for a specific month. After that month, it will be automatically deactivated. |
| 6 | Bulk City Category Configuration Data | Admin can upload/update city-wise configuration data in bulk. |
| 7 | Bulk Update Recurring Data | Admin can update salary head status (active/inactive) and extend start/end dates in bulk. |
| 8 | Bulk Update Salary Configuration Field Data | Admin can update payroll configuration details in bulk (Account Number, IFSC Code, Basic Salary, PFMS number, etc.). |
| 9 | Bulk Arrear Data | Admin can upload NPS arrear data (employee and employer contribution) in bulk. |
| 10 | Bulk Paymatrix Cell Data | Admin can upload employee pay matrix cell in bulk for automatic increments. |
| 11 | Bulk PF Contribution Data | Admin can upload NPS/CPF/NPS arrear (only employer contribution) in bulk after salary approval. |
| 12 | Bulk Running Advance Loan Data | Used to upload existing loan/advance records into the system. |
3. Loan & Advance Configuration
In the Advance & Loan Configuration, the Admin can configure different loan and advance heads along with their rules (such as HBA Loan, Festival Advance, etc.).
⚠️Note: Kindly check the dropdown to configure the Loan & Advance configuration.
1. Long Term Advances Head
In this section, the Admin can add the long-term advance heads by clicking on the right side of the Add Long-term Advance Head button. Fill in the required details:
- Head Name: (That is reflected in the Payroll entries)
- Interest Head: (Yes/No)
- Description: (this is not mandatory but can be filled in as per University/HEI requirement)
- Taxable?: (Yes/No)
- Visible: (For IT Declaration Use.) - (Yes/No)
- Status: (Active/Inactive)
Once saved, the admin/ you can view or update. Click on the three dots button on the right side to get two options to view or update the section.
2. Loan Term Advances
In this section, the admin can add and configure the Long Term Advance category and rules which is applicable in the Institutions. The admin can create long-term advance heads and rules by clicking on the Add Long Term Advances/Loan button and fill the required fields:
- Name: (In shortcode)
- Code: (Heads code)
- Category: (Advance/Loan)
- Description: (this is not mandatory but can be filled in as per University/HEIs requirement)
- Status: (Active/In-active)
After saving, the admin/ you can view or update. When he clicks on the three dots button on the right side he will get three options to view, update or update rules.
After clicking on the Update rule section, the admin can set the Loan/Advance interest rule (Interest deduction and principal deduction) for a particular head.
4. Master Settings
In the Master Settings section, all configurations are pre-defined based on government guidelines and common institutional rules.
However, the Admin can also add or update these master configurations as per their institution’s specific requirements.
⚠️Note: Kindly check the dropdown to view & update the Payroll Master settings.
1. Roles Description
There are following types of user roles available in the Payroll Management Module:
| SI No. | Name | Role | Description |
|---|---|---|---|
| 1 | Payroll Admin | payroll_admin | Administrative account with full access to configure payroll settings, generate & approve salaries, and modify salary heads. |
| 2 | Payroll Admin View | payroll_admin_view | Read-only access to payroll module. Can view payroll data and reports. |
| 3 | Payroll OU Admin | payroll_ou_admin | Can configure limited settings and manage payroll for employees within assigned OU and its child OUs. |
| 4 | Payroll Dealing Assistant | payroll_pda | Responsible for generating salaries. |
| 5 | Payroll Change Manager | payroll_pcm | Responsible for bulk updating employee salary heads. |
| 6 | Payroll Verifying Officer | payroll_pvo | Responsible for verifying salaries. |
| 7 | Payroll Finalizing Officer | payroll_pfo | Responsible for finalizing salaries. |
| 8 | Payroll Approving Officer | payroll_ar_salary | Responsible for approving salaries. |
| 9 | Payroll Income Tax Admin | payroll_income_admin | Responsible for handling income tax processes. |
⚠️Note: Employees can download payslips and declare Income Tax forms through their User login. These roles are automatically configured when the administrator creates the employee login.
2. Role User Mapping
The Payroll Admin has the authority to assign salary-related roles to designated administrative personnel responsible for payroll processing.
This functionality is available in the User Management System (Base Module).
Payroll Roles & Responsibilitiest
The Payroll Admin can assign the following payroll-specific roles:
- Payroll PCM (Payroll Change Manager) - Responsible for configuring payroll settings and updating employee salary component heads and amounts.
- Payroll PDA (Payroll Dealing Assistant) – Responsible for salary generation and processing.
- Payroll PVO (Payroll Verification Officer) – Responsible for verifying payroll data before approval.
- Payroll PFO (Payroll Finalization Officer) - Responsible for finilize payroll data before approval.
- Payroll ar salary (Payroll Approval Authority) – Responsible for approval payroll data.
The Admin can also add and remove assigned roles. The Admin can also check the activity logs to see all role changes and updates.
3. Bank Lists
Admin - (with the user role payroll_admin) can view bank details here. This section also displays the detailed list of banks which will be mapped with the employees.
4. Pay Commissions
This section displays a list of various Pay Commissions active in Universities/HEIs.
The Pay Commissions section displays the following:
- 6th Pay Commission
- 7th Pay Commission
- Not Applicable (Not Applicable for only Contractual Employees)
5. Declaration
In this section, the Admin can view or edit the tax declaration by clicking on the Action button. The updated details will be reflected in the payslip during tax declaration in both Hindi and English languages.
6. Head Missing Listing
In the Head Missing Listing section, the portal uses this feature for internal purposes, such as identifying missing salary heads in the Employee Single Sheet for one-time and recurring entries during the Income Tax calculation process.
The Admin can skip this setting if it is not required.
7. Payroll Generation Date Setting
This feature is used for Payroll Generation for a set period (required to specify start date and end date). If the finance section has to generate salary for a particular month, the Admin needs to set a start and end date period and set it as Active. The HR/Establishment section cannot update the employee profile in the duration date.
8. Payroll PF Subscriptions
In this section, the Payroll admin can add various PF subscriptions that apply to the University/HEI, like:
- General Provident Fund (GPF)
- Central Provident Fund (CPF)
- National Pension Scheme (NPS)
- Employees' Provident Funds (EPF), etc.
If a University/Institution has another PF subscription, they will add it by clicking on the Add on Subscription button and filling in the required details.
9. Other Payment Listing
- In settings, a feature is added (Other Payment Listing), from where you can add heads for other payments separately.
- Only these heads will be shown in the drop-down while entering other payment data of employees individually.
- While uploading other payments of employees in bulk through an Excel sheet, they can only upload the values of the heads mapped in Other Payment Listing in the settings section.
- When you click on the Settings button on the right side, a page with a grid view will open, where all the heads that are added by the admin / you for other payments will be shown.
- When the payroll admin / You click on the Add Other payment Head button in the top right corner, a form view will open where the admin/ You can add a new head for other payments by clicking on the Save button.
After saving, the admin/ you can view or update. When he clicks on the three dots button on the right side, there will be two options from where the section can be viewed or updated.
10. PFMS / Salary Component Code
The PFMS Component section is used to configure and map payroll components with the required PFMS (Public Financial Management System) structure for reporting and compliance purposes.
Configuration Parameters
The following fields are required for PFMS component mapping:
| Field Name | Description |
|---|---|
| Employee Cadre | Select the cadre/category of the employee (e.g., Teaching, Non-Teaching, Administrative, etc.). |
| Nature of Employment | Define the employment type (e.g., Regular, Contractual, Temporary, Daily Wage, etc.). |
| Component Code | Enter the PFMS-approved component code corresponding to the salary component. |
Purpose
- Ensures correct mapping of salary components with PFMS codes.
- Facilitates seamless integration with PFMS reporting.
- Helps maintain compliance with government financial guidelines.
5. Income Tax
In the Income Tax Configuration settings, all government rules are pre-configured based on the announced New and Old Tax Slab regimes, along with all applicable Income Tax sections.
The Admin can only view these settings; no changes or modifications are allowed.
Whenever the Government announces revisions in income tax slabs or rules, the Samarth Team automatically updates all income tax configurations and related details accordingly.
⚠️Note: Kindly check the dropdown to view the Income Tax configured details.
1. Income Tax Sections
All sections are already added according to the government rules. Admin can only view the Income Tax section.
2. Income Tax Slabs
All Tax slabs (New slab and Old Slab) are already added as per the Government Rules. Admin can only view the Income Tax Slabs.
3. Payroll Constants
In this option, some new income tax constants can be defined for the New Slab and Old slab according to the Government policies.
4. Income Tax Surcharge Slabs
In this option, some new income tax surcharge slabs can be defined for the New Slab and Old slab according to the Government policies.
5. Payroll Employer Contribution Setting
The Employer Contribution section allows the Admin to configure contribution percentages applicable to employees for statutory deductions and tax calculations. The Admin can define the employee contribution share as 10% for tax computation purposes, particularly in cases where employees belong to Autonomous Bodies or other specified institutions.
All Application/Menu
In the All Applications / Menu section, the Admin and respective administrative roles can configure all payroll-related settings, process salaries, and approve them.
To perform these actions, click on the dropdown and select the Admin / respective authority, then configure the details accordingly.
1. All Employee (Payroll)
All employees are fetched from the employee management module. This section shows 4 payroll filters/statuses with counts:
1. Payroll Active: (contains a list of all employees whose payrolls are configured)
- When Admin defines a salary structure for the employee and configures payroll for the employee, it automatically appears in the Payroll Active section as their status is changed from Not Configured to “Active.
2. Flagged/Debarred: (contains a list of employees who are marked debarred or whose payroll-related profile has been changed).
- Changed Value - By clicking on the I icon, one can view all the details if changed.
- If Payroll is active for a particular employee but some changes have been made which can affect the salary processing and generating mechanism, then entry for a particular employee automatically appears in the Flagged/Debarred section.
- To transfer the entry from flagged to the payroll active section, the admin needs to activate that entry by changing the status to Active again. Also, Employee Payroll status can be explicitly marked as debarred by the organization due to certain cases.
3. Payroll Not configured: (contains a list of all those employees whose payroll is not configured yet)
- Salary not structured - This column specifies whether the particular employee’s salary structure is defined or not. When the salary structure is not defined then the cross icon appears, and the check icon appears.
4. Retired - After the date of superannuation/retirement is over of the eployee, the portal automatically moves to the Retired section.
2. Employee Salary Structure
Here the employee is mapped with Payroll entries like which type of salary heads will be included for that employee. In this section, the admin can view/add/edit payroll entries for each employee individually. Admin can even add one-time payroll entries.
Add Payroll Entry: Payroll entry can be added by clicking on either the Add Payroll Entry button(Manually) or Add Payroll Entry from the Rules Set button (select from the already defined rules set).
Add Payroll one-time Entries: Admin can even add one-time payroll entries.
Admin/Dealing assistant can upload the salary slips through the Upload Bulk recurring sheet and Upload Bulk One Time Datasheet in the portal rules.
If the Admin/PD (Payroll Dealing Assistant) wants to add/deduct some amount to/from the employees, then it can be done in bulk under that salary head. For example: to provide bonuses, we can select multiple employees together and update that bonus amount.
⚠️Note: Payroll entry must be mapped to Employee Salary Structure for the bulk updates.
3. Generating Salary
Before processing and approving the salary, we need to generate it first. By clicking this option, the user is directed to the Employee Detail Records interface where information on all the employees of the payroll active section is displayed.
- Generate Individual Salary
If the Admin/PD (Payroll Dealing Assistant) wants to generate a salary for each employee one by one he/she can click on the Rupee icon.
Additionally - Admin/PD (Payroll Dealing Assistant) also process the employee salary as per the number of working days to follow the mentioned step:
Click on the Generate Salary Tab.
Click on the Add/Update button of the employee for whom you want to generate the salary based on the number of working days, and then the form will open.
After filling in all the details, click on the Final Submit button.
You will get a flash message in the same tab.
Now the process is completed and you can generate salary for this particular employee.
Generate Bulk Salary
If the Admin/PDA(Payroll Dealing Assistant) wants to generate employee salaries in bulk, the process is done by selecting all the employees whose salary needs to be generated together and clicking on the Generate Bulk Salary button.
If the Admin/PDA(Payroll Dealing Assistant) wants to generate a salary for a single employee then they search for the particular employee, click on the Rupee button and fill in the required details.
4. Process Salaries
After the salary is generated by the Admin/PDA (Payroll Dealing Assistant), it is moved to the Process Salary section.
- View Generated Salary- After the salary is generated by the Admin/PDA (Payroll Dealing Assistant), the salary slip can be viewed after Generation/approval salary slips, by clicking on the View icon.
- View Previous Salary- After the salary is generated, the Admin/PDA (Payroll Dealing Assistant) can also view the previous salary slip of an employee by clicking on the View icon. It can also be printed from here as per the requirement.
- Delete Bulk Salary- If there is a need to delete a salary entry for any changes, the Admin/PDA (Payroll Dealing Assistant) needs to click on the delete Bulk Salary button. After deleting, the generated salaries, the Admin/PDA (Payroll Dealing Assistant) can regenerate the employee salary multiple times.
- Verify Individual/Bulk Salary Upon clicking this option, the PVO (Payroll Verification Officer)/Admin is directed to the Salary Processing Interface of all the employees whose salary has been generated.
The information displayed on this page is only of those employees whose salary has been generated. The PVO(Payroll Verification Officer)/Admin can l verify the salary details and mark it as verified by clicking on the Verify Bulk Salary button.
- Un-Verify Individually/Bulk Salary- If Admin/PVO (Payroll Verification Officer) wants to un-verify the salary which has been verified but not finalized yet due to some changes, then he/she needs to click on the un-verify Bulk Salary button. It cannot be unprocessed/unverified once finalized. Un-verification can be done for multiple employees in bulk.
- Finalize Bulk Salary- After verification, the PVO (Payroll Verification Officer)/Admin can finalize the salary for approval. No changes can be incorporated after the finalization process.
- Approve Bulk Salary- Upon clicking this option, the AR(Assistant Registrar)/Admin is directed to the Salary Processing Interface of all the employees whose salary has been processed.
The information displayed on this page is only for those employees whose salary has been verified and finalized.
- Download Generated salary option- After generating the salary, Admin/PDA (Payroll Dealing Assistant) can generate a Pre-procession reports (Excel/PDF) report by clicking on the Download Generate Salary button.
5. Approved Salaries
Admin can view the approved employee salary details for reference. When the admin processes the automatic salary bill through the portal, this section allows them to check how many employee salary bills have been created and how many are still pending. The admin can also review details by clicking on Bill Status, Deduction Heads Parking Status, and Bill Category.
6. Provident Fund Contributions
Admin can view the Provident fund employee/employer contributions details for just information to each employee. Admin can select the filtration for our according information.
7. Income Tax Section
When the user clicks on this option, they are redirected to the Income Tax Management Interface. This interface allows the user to manage/deposit and generate slips for payments of income tax returns for each employee.
Income tax Depositions- When the user clicks on the tax deposition, the control is redirected to the tax deposition entries. This interface allows the user to add new tax depositions details by the approval date of salary.
- Add Tax Deposit: Admin can add Tax Deposit by clicking on Add Tax Deposit and filling in the required details.
Income Tax Generation & Declaration- Tax Declaration & Verification (Financial Year Wise), To generate an Income tax declaration, click on the Show List icon then select the year and click on submit.
This section allows the Admin to view and manage employee tax declarations submitted through their personal login.
All tax declarations are maintained financial year-wise for accurate tax computation and reporting.
View Tax Declarations
- The Admin can view tax declarations submitted by employees.
- Declarations can be filtered based on the Financial Year.
- The Admin can check the total declared amount under the Old Tax Regime (Old Slab).
Edit / Modify Declarations
- If required, the Admin can review and edit the tax declaration details of any employee.
- Corrections can be made in case of incorrect entries or missing information.
Verification & Final Submission
- After verifying all details and supporting documents, the Admin uploads and validates the information.
- Once finalized and submitted by the Admin, the system automatically recalculates and applies the applicable tax deduction.
Important Points
- Tax deduction will be processed automatically only after the final submission by the Admin.
- Any modification after submission may require re-verification.
- All calculations are aligned with the selected tax regime and applicable rules for the financial year.
Admin can download the tax declared data into excel format for further verification
Previous Income:- Admin can define the employee’s previous income details:-
- Single Sheet Tax Calculation Report – Analysis: This report provides a consolidated view of:
- Received salary details
- Projected salary for the remaining months
- Employee tax declarations
- Deductions and exemptions
- Tax calculation under Old Slab and New Slab
- Final tax liability and balance
It helps the Admin and employee understand the complete yearly tax position in one sheet.
Salary Structure Overview- The report captures salary under four columns:
- Previous – Salary already processed
- Current – Current month salary
- Projected – Estimated salary for remaining months
- Total – Annual consolidated amount
Form 24
Form 24 generally refers to a statutory Income Tax report generated by an employer for tax deduction and reporting purposes.
However, in the payroll and Indian taxation context, it is important to clarify the exact form name because commonly used forms are:
Form 24Q – Quarterly TDS return for salary
⚠️Note: IT Form 24, it is usually refers to an internal payroll-generated report used for verification of tax details before filing statutory returns.
8. Archive Salary
The Payroll Admin has the authority to remove (archive) approved salary records, either individually or in bulk, using the Archive button.
Since the salary has already been approved, this action is secured through an OTP-based authentication process.
1. Archive Option- The Admin can archive salary:
- For a single employee
- In bulk for multiple employees.
2. OTP-Based Authentication- When the Archive action is initiated, an OTP (One-Time Password) is sent to the registered Payroll Admin ID.
The Admin must enter the correct OTP to complete the process.
This ensures secure authorization.
Archive Salary log In this section, the admin can view deleted salary details that were removed after salary approval.
9. Archive Salary logs
In this section, the admin can view deleted salary details that were removed after salary approval.
FSCM Mapping
This section links the Payroll module with the FSCM and Vendor Bill modules. After approval, the salary admin can process salary bills and allocate deductions under liabilities and income heads in the FSCM module.
Prerequisites for Creating Salary Bills:
- Ensure a bill type PAYROLL BILL with the category VENDOR BILL is available (system-generated). If not, create it as specified.
- Create a vendor named PAYROLL VENDOR in the vendor section of the FSCM module, completing all required fields.
Here are some of the steps for processing the salary bills through the Payroll module.
1. Payment Scheme
In this his section, a feature called “FSCM & Salary Head Mapping Configuration” is added, allowing you to integrate FSCM (Budget) with Payroll. You can also find this settings section in the left-side menu bar.
When you click on it, a page with a grid view will open, displaying all the mappings (Configurations).
The first step here should be creating the configuration. For this, click on the Create Scheme button. When you click on it, a form will open.
Create the configuration according to the needs of the institute, and fill the required details:
- Name: (Add the configuration name according to the Institution)
- Financial Year: (like; 2026-2027)
- Type: (Group/other)
- Groups: (Select the group name)
- Employees: (select employee accordingly)
- Description: (Mentione according to the Institution)
After creating the combination click on the Map Heads button, and the following page will open:
By clicking on the View Scheme Details button, you can see all the details based on the configuration.
Before this Mapping, you should follow the following rules (Disclaimer):
- Select only that source OU (Organization Unit), for which the Budget Estimate has been done in FSCM Module while mapping net salary head.
- Source details (OU, Category, Head & Subhead) should be the same for all the mapping throughout this configuration.
- While adding the source details, the source budget subhead should be selected if it exists based on the selected source budget head.
- After mapping salary deduction heads, source details of net salary head can not be changed.
- All salary deduction heads (Deduction heads included in gross salary deductions) should be mapped for this configuration.
If there is a source subhead based on the selected source head (Estimate is created based on the sub head) then you should select that subhead while mapping Net Salary Head.
- Now, click on the Add/Update button beside Salary Deduction Heads Mapping to map deduction heads with the budget.
- After mapping all the salary deduction heads with Source & destination budget details, click on the save button.
- Now, click on the Add button beside Employer Contribution Heads Mapping to map employer contribution heads with the budget.
If all the details are correct, click on the check box and then click on the to ‘Publish’ button to publish this configuration.
To map a new salary deduction head with this configuration, you have to unpublish the configuration. Then, map the deduction head, and finally publish this configuration again.
2. Generate Salary Bill
Before generating a salary bill, you should follow the following rules (Disclaimer):
- Bill will be generated based on the configuration that you have created in Payment Scheme.
- Configuration should be published.
- Salary should be approved for the specific Financial Year, Year, and Month before generating the salary bill.
- If you are trying to generate a salary bill for the same configuration (Same Financial Year, Year & month), the previous bill (Deduction Heads) with this configuration should be parked.
After filling in all the details, when you click on the Submit button, a page displaying all the details (Bill Amount, Source Budget Details) will open.
If the salary bill amount is greater than the available balance based on the source details, then the bill will not be generated.
If all the details are correct, click on the Generate Bill button to generate the salary bill.
After generating the salary bill you can view all the details in the Bill & Deduction Details Tab.
3. Manage Salary Deductions
Before parking salary deduction heads, you should follow the following rules (Disclaimer).- Generated bill should be approved based on the approval hierarchy in the Vendor Bill Tracking module.
- If the bill is approved, then the configurations corresponding to the Financial Year, Year, & Month will be displayed in the Configuration dropdown.
- All the salary deduction heads (*Deduction heads included in gross salary deductions) should be mapped with the configurations.
After filling in all the details, when you click on the Submit button, a page displaying all the details (Approved Salary Bill Details, Parking details of Individual salary deduction heads) will open.
If there is any mismatch between the amount to be parked and the total deduction amount, then you can not park the deduction heads. You have to map the remaining salary deduction heads in FSCM & Salary Head Mapping Configuration Settings that are used in Gross salary deductions.
If all the details are correct, Click on the Park button to park all the salary deduction heads.
After parking the salary deduction heads, you can view all the details in the Bill & Deduction Details Tab.
4. Bill & Deduction Details
In this section, the admin can view the parked net pay and deduction details after parking the salary deductions. If, for any reason, the University needs to inactivate the parked net pay and deduction details through the Bill Tracking module, they can reverse the entries by clicking on Budget Reversal.5. Manage Employer Contribution
In the Manage Employer Confribuation section, Admin can parked the Employer part to select the following details:- Financial Year: Select the financial year.
- Year: Select the respective year.
- Month: Select the respective month.
⚠️Important Note: Before parking the employer contribution, please verify the following prerequisites:
- All employer contribution heads should be mapped with the required configurations.
- The generated bill should be approved as per the approval hierarchy configured in the vendor module.
- The bill should be generated based on the selected Financial Year, Year, Month, and Configuration in the Generate Salary Bill tab.
- Salary deduction heads should be parked based on the selected Financial Year, Year, Month, and Configuration in the Manage Salary Deductions tab.
6. Employer Contribution Details
In this section, the admin can view the parked Employer Contribution details. If, for any reason, the University needs to inactivate the parked net pay, deduction, or employer contribution details through the Bill Tracking module, they can reverse the entries by clicking on Budget Reversal.7. Reversed Salary Bill & Deduction Details
In this section, the admin can view the reversed salary bill and deduction details. The admin can check the reversed bill details based on the Reference No., Year, and Month, as well as employee-wise details.8. Reversed Employer Contribution Details
In this section, the admin can view the reversed employer contribution details. The admin can check the reversed bill details based on the Reference No., Year, and Month, as well as employee-wise details.Advances/Loan
In the Advance and Loan section, the Admin can add any type of advance or loan details for employees. Before adding these details, the Admin must configure and set the advance and loan rules in Payroll Settings. Once the rules are configured, the Admin can easily add and map the details to the respective employees.
⚠️Note: After adding the employee loan or advance details, the portal automatically displays the total installments and remaining installments in the employee payslips.
1. Loan Request
When the Admin clicks on the Loan Request section, a page opens where all applied loans and advances can be viewed. To add a new loan request, click on the Add Loan Request button. After clicking the button, the loan request form will open. All fields marked with a label (*) are mandatory and must be filled in.- View page- When you submit this form, you will be redirected to the View page, where you can see all the information about the Advance or Loan that you created. And the admin APPROVE OR REJECT THE FORM FROM the View page, the instalment deduction date is automatically generated by the system.
When you approve the head map automatically, and form the starting date of the instalment deduction, the deduction or recovery will start and redirect to the Loans page, where all Approved loans and complete loan lists will be displayed.
⚠️Note: Admin can also upload bulk running advance and loan details of the employees.
2. Loans
LoansThe Loans section, where all approved loans and complete loan lists will be displayed.
- View Loan- To view loan details, click on the view detail button, after that loan details view will be displayed.
Other Taxable Payment
In this section, the Admin can upload and map payments other than salary for the automatic income tax calculation process, such as Honorarium, Child Education Allowance, etc. Once the Admin uploads and approves all Other Taxable Payment details, the portal automatically reflects the uploaded details in the Employee PBR, Single Sheet, and Financial Year reports.
For uploading the details, please configure/follow the below steps:
1. Entries
In the Entries section, the Admin can add other payment head details for a smooth upload. By clicking the Other Payment Listing button (top right corner), institutions can add salary details paid to employees individually or in bulk via an Excel sheet.- Other Payment Bulk Upload
When the Payroll Admin clicks the Upload Bulk Other Payment Data button (top right), a modal appears, providing key details on bulk uploading other payments through Excel. It includes data type requirements (Integer, String), mandatory fields, and necessary entry guidelines.
- Other Payment Single Entry
When the Admin clicks the Entry button, a view page opens displaying the selected employee’s details for generating other payments.
- Adding a Single Other Payment Entry: Click the Add Single Other Payment Entry button to open a modal. Enter the required details and click Save.
If an entry already exists for the same Employee Code, Other Payment Head, Financial Year, Year, Month, and Diary No, an error message appears: “Other Payment Entry Already Generated For This Diary No [Diary No].”
If the entry is new, it is saved successfully, and a success message appears: “Other Payment Entry Generated Successfully For This Employee.”
The system redirects to the previous page after submission.
- Viewing and Managing Entries: Successfully generated other payments appear in a grid below the Add Single Other Payment Entry button. If the payment is still in the generated stage, the Admin can update or delete the entry as needed.
2. Process
When the Admin clicks the Process section in the left-side menu bar, all Other Payments in the Generated stage are displayed in a grid view.- Actions in the Process Section:
Verify Other Payments: Admin can verify payments individually or in bulk. Once verified, payments move from the Generated stage to the Verified section.
Delete Other Payments: Admin can delete payments individually or in bulk. Once deleted, the data is removed from the Generated section.
Un-verify Other Payments: Admin can un-verify payments individually or in bulk. Once unverified, payments return from the Verified section to the Generated stage.
Finalize Other Payments: Admin can finalize payments individually or in bulk. Once finalized, payments move from the Verified stage to the Finalized section.
Approve Other Payments: Admin can approve payments individually or in bulk. Once approved, payments move from the Finalized stage to the Approved section.
3. Approved List
When the Admin clicks on the Approved List section in the left-side menu bar, all Other Payments that have reached the Approved stage will be displayed in a grid view.This section provides a final overview of all approved payments, ensuring transparency and easy tracking.
Impact: -Other Taxable Payments
The Other Taxable Payments section is used to record payments made to employees that are not part of the regular monthly salary, but still impact the employee’s annual gross income and tax calculation.
Examples of Other Taxable Payments*
- Child Education Allowance
- Arrears
- Honorarium
- Special Incentives
- Bonus (if processed separately from salary)
- Any other taxable payment credited directly to the employee’s account
Purpose- These payments:
- Increase the employee’s Annual Gross Income.
- Impact the Taxable Income.
- May change the applicable tax slab.
- Affect total TDS (Tax Deducted at Source) calculation.
How It Works
- The Admin enters the payment details in this section.
- The system adds the amount to the employee’s annual earnings.
- The tax is automatically recalculated based on the updated total income.
- The revised tax is adjusted in the upcoming salary deductions.
4. Removed logs
In this section, the Admin can view details that have been removed from the system, excluding salary details, after approval.Key Features:
- Tracks removed non-salary-related entries post-approval.
- Provides transparency on data modifications and deletions.
- Helps in auditing and maintaining data integrity.
This section ensures that all removals are properly logged and monitored.
Daily Wages
Leave Salary Component
This module is integrated with the Leave Management Module, where employee leave configurations are already defined by the university. For configur the details, please configure/follow the below steps:
1. Leave Mapping
This feature allows the admin to map those leave types that have a financial impact on salary to specific employees.Examples of leave types that may impact salary:
- Half Pay Leave (HPL)
- Extraordinary Leave (EOL)
- Any other leave category defined by the university policy
Only mapped leave types will be considered during salary processing.
While creating a Leave Salary Component, the admin needs to configure the following fields:
- Title – Enter the name of the leave salary component.
- Leave Type – Select the leave type from the dropdown list (auto-fetched from the Leave Module).
- Payable Option – Define how the leave will impact salary:
- No Salary (Full deduction)
- Half Basic (50% of basic pay deduction)
- Description – Provide remarks or internal notes for reference.
- Status – Keep the status as Active to make the component applicable in salary processing.
Only active leave salary components will be considered during payroll calculation.
2. Date Range configuration
This feature provides flexibility to the admin to define a custom date range for salary calculation within a month.Example:
- If the salary period is configured from 20 February 2026 to 20 March 2026, the system will:
- Automatically fetch leave records within the defined date range.
- Calculate salary deductions based on the number of leave days falling within this period.
This ensures accurate salary processing for non-standard payroll cycles.
Repeat this action each month before salary processing.
2. Levae record
The admin can view all leave records that are eligible for salary impact within the selected date range.Click on the Fetch button by choosing the financial year and month. Repeat this action each month before salary processing.
Click on the sync button for Final Submitting the details. Here employee leave record will display. Admin will submit it for approval.
3. Approved
In this section, Admin can check the approved leave record for further action.4. Archive leave record
If required, the admin can archive approved leave records that have already been processed.5. Archive leave record logs
The system maintains a complete log of archived leave records. This ensures transparency and audit compliance.Arrear Process
In this section, the Admin can generate the DA, DA on TA, and NPS Arrear after revising the DA percentage according to the Government notification. The Admin only needs to configure the DA Arrear configuration, and the portal automatically calculates the DA, DA on TA, and NPS arrear in a single configuration process.
⚠️Note: Before processing the arrear, the employee salary must be approved through the portal. Once the salary is approved, the portal smoothly generates the arrears.
Please follow the steps below to configure and generate the arrear:
1. Arrear Type
In this section, the admin must first define the Arrear type.Steps to Define Arrear Type:
- Navigate to the Arrear Section.
- Click on the “Add Arrear Type” button to create a new arrear type.
- Fill in the required details in the form.
- Click on the “Save” button to store the entry.
Editing & Logs: If no Arrear Configuration has been created, the Admin can update the arrear type details. Changes made can be tracked in the History section under the Action column.
Restrictions: Once an Arrear Configuration is created based on a specific arrear type, the Arrear Type cannot be updated.
This ensures data consistency and prevents unauthorised modifications.
2. Arrear Configuration
In this section, the Admin needs to configure the arrears accordingly. Steps to Create Arrear Configuration:- Click on the Add Configuration button.
- Fill in the required details in the form.
- Click on the Save button to store the entry.
Validation Checks:
- Unique Name: Each arrear configuration must have a unique name.
- Duplicate Data Prevention: The same arrear data cannot be entered twice for the same employee within the same date range.
Date Validation:
- The To Date must be greater than the From Date.
- While configuring an arrear head, the From Date & To Date must not overlap with the date range of any existing arrear entries for the same arrear head.
Once the configuration is successfully created, arrears will be generated based on this setup.
⚠️Note: Admin only needs to configure the DA Arrear configuration, and the portal automatically calculates the DA, DA on TA, and NPS arrear in a single configuration process.
3. Generate Arrear
In this section, the Admin can generate the arrears according to the configured arrears configuration.- Select the Configuration from the dropdown menu.
- Click on the “Submit” button.
The arrear will be generated based on the selected configuration.
After submission, the system will redirect to the Process tab, where the generated arrears can be reviewed and further processed.
4. Process Arrear
In this section, the Admin needs to verify, finalise, and approve the generated arrears accordingly.- Select the Configuration from the dropdown menu in the Process section.
- Click on the “Submit” button.
- The arrear will be generated based on the selected configuration.
- The system will redirect to the Process tab, where the admin can review the generated arrears.
Verification & Approval Process:
- Admin can verify increments individually or in bulk.
- Verified arrears move to the Verified section.
- Admin can un-verify increments, which moves them back to the Generated section.
- After verification, arrears can be finalized and moved to the Finalized section.
- Once finalized, arrears can be approved, shifting them to the Approved section.
- Once approved, arrears are ready for salary processing and report generation.
⚠️Note: Ensure all details are checked before proceeding to the next step.
5. Arrear Payment
In this section, the Admin can process the arrear payment with salary or without salary accordingly.Select the Payment Type:
- With Salary: The arrear amount will be added as a one-time entry for the selected employee.
- Without Salary (Bill): A bill will be generated for the employee in the Bill Tracking Module.
- Click on the Submit button to proceed.
System Actions:
- If the payment type is With Salary, the arrear amount is automatically included in the employee’s next salary cycle.
- If the payment type is Without Salary, the system will generate a bill entry in the Bill Tracking Module, where it can be processed separately.
⚠️Note: Ensure the correct payment type is selected before submission, as changes may not be allowed once processed.
6. Arrears Paid with Salary
In this section, the admin can view all the arrears that have been paid along with the salary.⚠️Note: This tab helps in tracking arrears that have been successfully processed as part of the employee’s salary.
7. Arrear Paid through Bill
In this section, the admin can view all the arrears that have been paid separately through the bill.⚠️Note: This tab helps in tracking arrears that have been processed as independent payments through the Bill Tracking Module.
8. Removed/Reversed Arrear bill
In this section, the admin can view all the arrear bills that have been reversed or marked as inactive.⚠️Note: This tab helps in tracking arrears that were either canceled or deactivated for any reason.
Fixation Arrear
Using this feature, the Admin can calculate Pay Fixation Arrear in cases such as promotion, pay revision, or other applicable scenarios.
The arrear can be calculated in two ways:
- Based on Previously Approved Salary – The system automatically considers the last approved salary and calculates the arrear accordingly.
- By Entering Actual Revised Values – The Admin can manually enter the revised pay values, and the system will calculate the pay fixation arrear based on the entered details.
This ensures accurate and transparent arrear calculation after promotion or pay revision cases.
1. Configuration
In this section, Admi needs to configur the Employee Fixation arrear configuration for From month to End month, perious Basic to new basic and DA, HRA percantage they have pay accordingly admin can configure in the Configuration section. Please Click on add configuration details for Fixation Arrear Configuration – Steps & Field Details:Create Configuration: While creating a new fixation arrear configuration, fill in the following details:
- Configuration Name– Enter the name of the configuration.
- Employee– Select the employee from the dropdown list.
- Round Off – Enable this option if you want the system to round off the amount after generating the fixation arrear.
- Fetch From Salary – You may fetch details directly from the approved salary, or Manually enter required details such as Basic, HRA percentage, etc.
Fields Required in the Grid: The following fields need to be added in the grid for arrear calculation:
- Date Range- (From Date / To Date)Select the specific date range for which the fixation arrear needs to be calculated.
Basic Details:
- Previous Basic – Either auto-fetched from the system or manually entered (used for arrear calculation).
- New Basic – Enter the revised basic amount up to which arrear is to be calculated.
- DA (%) – Enter the current DA percentage. This will be calculated based on the approved (already processed) salary basic.
HRA Details:
- HRA Arrear– Select Yes/No (whether HRA arrear should be calculated).
- HRA Type– Select either (Percentage/Actual)
- HRA (%)– Required if HRA Type is Percentage.
- Previous HRA– Enter previous HRA amount (if HRA Type is Actual).
- New HRA– Enter new HRA percentage or amount (based on promoted level of the employee).
Contribution Details:
- Employee Contribution (%) – Enter 10%.
- Employer Contribution (%) – Enter 14%.
NPA Details:
- NPA Arrear– Select (Yes/No).
- NPA (%)– Enter applicable NPA percentage.
Level Details:
- Previous Level– Mention the employee’s previous level.
- New Level– Mention the promoted/revised level.
TA Details:
- TA Arrear– Select (Yes/No).
- Previous TA– Enter previous TA amount.
- New TA– Enter revised TA amount
⚠️Note:- Admin can draw fixation arrear in case of salary not processed or uploaded in previous month in the system by putting a few details here.
2. Generate
In this section, the Admin can generate the arrears according to the configured arrears configuration.- Select the Configuration from the dropdown menu.
- Click on the “Generate” button.
The arrear will be generated based on the selected configuration.
After submission, the system will redirect to the Process tab, where the generated arrears can be reviewed and further processed.
3. Process
In this section, the Admin needs to verify, finalise, and approve the generated arrears accordingly.Verification & Approval Process:
- Admin can verify details individually or in bulk.
- Verified arrears move to the Verified section.
- Admin can un-verify details, which moves them back to the Generated section.
- After verification, arrears can be finalized and moved to the Finalized section.
- Once finalized, arrears can be approved, shifting them to the Approved section.
- Once approved, arrears are ready for salary processing and report generation.
⚠️Note: Ensure all details are checked before proceeding to the next step.
4. Payment
In this section, the Admin can process the Fixation arrear payment only with salary.Select the Payment Type:
- With Salary: The arrear amount will be added as a one-time entry for the selected employee.
- Click on the Submit button to proceed.
⚠️Note: Ensure the correct payment type is selected before submission, as changes may not be allowed once processed.
5. Paid with Salary
In this section, the admin can view all the arrears that have been paid along with the salary.⚠️Note: This tab helps in tracking arrears that have been successfully processed as part of the employee’s salary.
6. Archived/Reversed
In this section, the admin can view all the arrear bills that have been reversed or marked as inactive.⚠️Note: This tab helps in tracking arrears that were either canceled or deactivated for any reason.
Increment
Before processing increments, universities/HEIs must ensure that the following employee details are accurately entered:
- Pay Band– Define the employee’s pay structure.
- Level ID– Assign the appropriate level as per the pay matrix.
- Pay Matrix Cell– Specify the correct pay cell within the assigned level.
- Date of Next Increment– Set the increment date based on the employee’s eligibility.
These details are crucial for the automatic calculation and processing of increments within the system.
Pay Matrix (Settings): Before running the Increment Process, the Payroll Admin must verify and update the Pay Matrix under the Payroll Settings section.
It is important because, When an employee’s Basic Salary is incremented, the system validates the new salary amount using the Pay Matrix Data Table. The system checks if the new Basic Salary, Level ID, and Cell ID combination exists in the Pay Matrix. If this combination is not found, the increment will not be applied to that employee.
If the combination does not exist in the pay matrix table then the increment for that employee will not happen.
Financial Cycle (Settings): The Financial Cycle Setting in the Settings section now includes the following new fields:
No. of Increments:
- Universities can specify how many increments an employee will receive in a Financial Year.
- They can choose to grant increments once, twice, or even thrice, depending on their policies.
- Defines the gap between two increments in months. It is dependent on the No. of Increments field.
Example:
- If No. of Increments = 1, then Increment Interval = 12 months (i.e., yearly).
- If No. of Increments = 2, then Increment Interval = 6 months (i.e., biannual).
Increment Percentage: Universities can set increment percentages based on government rules or their own internal policies for employees. This flexibility allows institutions to define salary increments as per their financial planning and regulatory requirements.
⚠️Note: Before processing the increment, please ensure the following details are configured and updated for all employees:- Financial Cycle, Pay Matrix Cell, Date of Next Increment.
1. Generate
When the Payroll Admin clicks on the Generate section in the left-side menu bar of the Payroll module, a form will appear.Form Submission: The admin fills in the required details (Financial Year, Month & Employee Group). Clicks on the Submit button.
A grid view will display all employees whose Payroll Status & Salary Configuration Status are active and whose increment is due in the selected financial year and month.
- Generating Increments: Users with the necessary permissions can access this page.
- Single Increment Generation: Click the Generate button next to an employee’s name.
- Bulk Increment Generation: Select multiple employees using checkboxes and click the Generate Bulk button.
After submission, the system will redirect to the Process tab, where the generated arrears can be reviewed and further processed.
2. Process
When the Payroll Admin clicks on the Process section in the left-side menu bar, all increments in the Generated stage will be displayed in a grid view. Actions Available in the Process Section:- Verify Increments: The admin/you can verify increments individually or in bulk. Verified increments will move to the Verified section.
- Delete Increments: The admin/you can delete increments individually or in bulk. Deleted increments will be removed from the database and no longer appear in the Generated section.
- Un-Verify Increments: The admin/you can un-verify increments individually or in bulk. Un-verified increments will return to the Generated section.
- Finalize Increments: The admin/you can finalize increments individually or in bulk. Finalized increments will move to the Finalized section.
- Approve Increments: The admin/you can approve increments individually or in bulk. Approved increments will move to the Approved section.
- Additional Details: Flash Messages: Every action (verification, deletion, un-verification, finalization, approval) will be confirmed with a flash message for user feedback.
3. Approved List
When the Payroll Admin clicks on the Approved List section in the left-side menu bar, all increments in the Approved stage will be displayed in a grid view.Key Features: Displays only increments that have reached the Approved stage.
- Provides a clear overview of all approved increments.
- Ensures that only verified and finalized increments are shown.
This section allows the admin to track and review approved increments for payroll processing.
Steps to Configure Pay Matrix Cell & Employee Next Increment Date
Step 1: Create/Update Pay Matrix:- Go to Payroll Management Module
- Click on Settings
- Open Pay Matrix Settings
- Add Pay Matrix individually OR download the bulk upload Pay Matrix sheet
- Prepare the sheet as per the provided format
- Click on Proceed to upload the prepared sheet in the same section
Step 2: Update Employee Next Increment Date & Pay Matrix Cell:
- Go to Payroll Module
- Click on Settings
- Select Bulk Upload Management
- Click on Bulk Update Salary Configuration Field Data.
- From the dropdown, select: Next Increment Date & Pay Matrix Cell Number
- Download the Excel format
- Fill in the required details along with employee name
- Upload the file in the same section by clicking the Proceed button
⚠️Note: If the increment is not generated, it may be due to a mismatch in the Pay Matrix Cell Number or Basic Pay. In such cases, kindly verify the employee’s individual basic pay and related details.
Other Section
In this section, the Admin can download PFMS, CFMS, Treasury, Payroll reports, and other payroll-related reports.
1. PFMS Report
Once salaries have reached the Approved stage, users with Admin/PDA roles can download PFMS reports in Excel format.Key Features:
- Accessible Only After Approval: The option to download appears once salaries are approved.
- Excel Format: Ensures compatibility with financial systems and reporting tools.
This feature ensures smooth payroll processing and compliance with financial reporting standards.
2. CFMS Report
Overview: The CFMS Report is a state-level consolidated report used for processing employee salary payments through the bank.This report is broadly similar in nature to the PFMS report, as it facilitates centralized salary disbursement directly into employees’ bank accounts.
The report consolidates approved salary data across the state and generates a structured output required by the bank for payment processing.
Key Fields in CFMS Report- The following parameters are required to generate the report:
- Year – Select the financial or calendar year.
- Month– Select the salary month.
- Employee Group (Optional)– Filter by specific employee group, if required.
- Employee Type– Select the type of employee (e.g., Regular, Contractual, etc.).
- Salary Approved Date (Optional)– Filter records based on salary approval date.
3. Treasury Report
Once salaries have reached the Approved stage, users with Admin/PDA roles can download JSON reports in Text format.Key Features:
- Accessible Only After Approval: The download option appears once salaries are approved.
- Text Format: The JSON data is structured in a text file for easy processing and integration.
This feature ensures seamless data integration with financial and payroll systems.
4. Payroll Reports
In this Reports section, the Admin and all assigned payroll roles can download the payroll reports. For better understanding and easy access, this section is divided into different categories within the Payroll module for downloading the required reports.1. Salary Generate Section Reports- In this section, the Admin and respective payroll roles can download three types of reports after generating the salaries.
(A). Pre-Processing Report: Pre-Processing Report generates reports of those employees who have some missing details which can affect the salary generation process. All details need to be completed before processing salaries so that they can be verified and finalized accordingly.
(B). Monthly Salary Comparison Report: It will provide an Excel sheet for comparing Employee’s previous month’s salary details and the current month’s salary details for verification purposes.
(C). Check Bank Data Report Before Approval: It will be generated for monthly salary purposes and institutions will be able to generate an Employee monthly bank statement before approve the salary for a particular month.
2. Employee Wise Reports- In this section, the Admin and respective payroll roles can download six types of employee-wise reports accordingly.
(A). PaySlip Report: Admin has the option to generate bulk salary slips for all employees and download/print them in PDF format by clicking on the Print PDF button. Admin can also send salary slips to all employees on their registered official email IDs by clicking on the Compose Mail button.
(B). Employee Wise Approved Salary Report: It will provide financial year reports to a Particular Employee (From Date to Date).
(C). Employee Wise Monthly Pay Report: This report is generated/approved monthly for each employee and downloaded in PDF.
(D). Employee Wise Head Report: This report has provided particular employees’ heads reports from date to end date accordingly.
(E). Employee Wise PBR Report: This report generates a particular employee’s financial statement in the single format for financial wise in the portal in PDF/Excel format.
(F). Employee Wise Report: This reports generates paid salary details statement for a particual financial year in the single Excel format.
3. Income Tax Reports- In this section, the Admin and respective payroll roles can download five types of Income Tax reports to verify the automatic income tax calculation accordingly.
(A). Single Sheet: It shows the list of all the employees with their pay level, department, Designation, and basic pay along with all the deductions and savings. The Employee single sheet will display the employee’s savings and Income Tax projection (according to the Old slab and New slab).
(B). Bulk Single Sheet Report: It shows the list of all the employees with their pay level, department, designation, and basic pay along with all the deductions and savings. The Employee single sheet shows all saving and Income Tax projection (according to Old slab and New slab). The Admin can generate all employee single sheet statements in bulk (PDF).
(C). Salary TDS Deduction Report: This reports generates Income Tax quarterly statement in the single format in PDF/Excel.
(D). Other Payment TDS Deduction Report: This reports generates other payement Income Tax statement accoding to the from approved date to approved date in the single format in PDF/Excel.
(E). Income tax Deduction Statement: It will be generated here to give the Information about the Employee’s income tax deduction statement.
4. Salary Approved Section Reports: In this section, the Admin and respective roles can download the reports in Excel and PDF formats after the salary has been approved.
(A). Export Approved Salary Report: It will provide an approved Excel report for the particular month and after the salary approval.
(B). Provident Fund Report: In this section admin and respective administrative role can download the PF subsciption wise report.
- GPF/CPF: It is categorized by different employee categories and shows the amount of CPF/GPF subscriptions added for the particular month.
- NPS: The National Pension System(NPS) is calculated and computed based on the employee’s basic pay with the salary head Dearness Allowance (DA).
- Note: The amount of NPS calculated for Doctors also includes NPA.
(C). Salary Head Report: Salary heads reports are generated with all salary heads details for a particular month and can be downloaded in Excel/PDF format.
(D). Monthly Bank Advice Report: It will be generated for monthly salary purposes and institutions will be able to generate an Employee monthly bank statement after approved the salary for a particular month.
(E). OU Wise Pay Report: This report is generated monthly for each Organizational Unit.
(F). Other Payment Report: This report generates other taxable information for each employee month-wise after the upload in the portal in PDF/Excel format.
(G). Financial Year Report: This report has been generated for Financial year reports for each employee’s salary details.
(H). Financial Year Wise Other Payment Report: This report generates other taxable information for each and particular employee as per financial year after the approval in the portal and can be downloaded in PDF format.
(I). Contingent Bill Report: Contingent bills are generated on the basis of extra expenses in the management of an office.
(J). Remittance Letter: A remittance letter is issued to employees as payment towards some expenses made in the office or is sent as a gift to the employee.
(K). Earning-Deduction Report: It will generate an Earning and Deduction Report of an employee for a particular month.
(L). LIC Report: The LIC report generated here gives information about the employees who have opted for LIC policy.
(M). Last Pay Certificate: This is given to the employee who is going to be transferred from the existing organization or is on superannuation. It is very important for any employee because of its defined pay of employees or pension in the case of superannuation.
(N). Financial Year Wise Consolidated Report: This report provides the consolidated financial year data in PDF format for reference, verification, and record-keeping purposes.
5. Monthly Wise Reports: In this section, the Admin and respective roles can download the reports in Excel and PDF formats after the salary has been Generated & approved.
(A). Pay Bill Employee Wise Report: This report generates monthly paybill information for each employee and shows a total summary of Paybill and can be downloaded in PDF format.
(B). Salary Summary Report: This reports generates a total Earning and dedcution details statement for a particular month in PDF format.
(C). Head View Wise Salary Head Report: This reports generates salary heads wise statement in the single PDF format.
(D). Group Wise Summary Report: This report provides consolidated group-wise salary details in PDF format.
(E). Month-Wise Salary Summary Report: This report provides a month-wise consolidated salary summary in PDF format.
(F). Pay Bill Department Wise Report: This report generates monthly paybill information for each employee department wise and shows a total summary of Paybill which can be downloaded in PDF format.
(G). Increment Report: This report generates increment information for each employee for process status as per financial year after the generated/approved status in the portal in PDF/Excel format.
(H). Month Wise Employee Pay Bill Report: This report generates employee-wise monthly pay bill summary details and can be downloaded in PDF format.
(I). Annual Increment Report: This report generates increment information for each employee for process status as per financial year status in the portal in PDF/Excel format.
6. Department Wise Reports: This section Admin/respective roles can download the Departement wise detaiils accordingly.
(A). Department Summary Before Approval: It shows the overall earnings and deductions of the entire department before approval of salary.
(B). Department Summary: It shows the overall earnings and deductions of the entire department after approval of salary.
5. Bulk Upload Logs
In this section, the Admin can view all logs of unloaded Excel details related to bulk uploads.Key Features:
- Displays a complete log of unloaded Excel files.
- Helps track any upload failures or missing data.
- Allows admins to review and troubleshoot bulk uploads efficiently.
This section ensures transparency and accuracy in the bulk upload process.
6. Mail Logs
The Mail Logs section allows the admin to monitor and track emails sent from the system, particularly for bulk posting of payslip details to employees.This feature ensures transparency and helps in tracking email delivery status.
The following details are available in this section:
- Employee: Name of the employee to whom the email was sent.
- Email: Registered email ID of the employee.
- Financial Year: Selected financial year.
- Year: Salary year.
- Month: Salary month.
- Mail Subject: Subject line of the email sent.
- Status: Email delivery status (e.g., Sent, Failed, Pending).
- Created By: Name of the user who initiated the email.
- Created At: Date and time when the email was triggered.
7. Download Status
In this section, the Admin and respective roles can track the status of bulk salary processing, report generation, and salary slip emails sent through the portal. Once the process is initiated, the portal automatically records the job details in this section for verification and monitoring purposes.The following details are available for status verification:
- Type: Displays the file name or process type.
- Financial Year: Displays the selected financial year.
- Year: Displays the salary year.
- Month: Displays the salary month.
- Job Status: Shows the current status of the process (e.g., Completed / Failed).
- Download: Provides the link to download the generated file.
- Link: Displays related notifications or process links.
- Password: Provides the password required to open the generated file, if applicable.
- File Error: Displays error notifications, if any, related to file generation or processing.
- Created By: Displays the name of the user who initiated the process.
- Created At: Displays the date and time when the process was initiated.
- Age: Displays the elapsed time since the process was triggered.
8. Activity Logs
The Activity Logs section allows the Admin to track user-level activities performed within the system. This feature ensures transparency, accountability, and audit compliance.The following details are recorded in this section:
- User ID: Unique ID of the user who performed the action.
- Employee: Name or ID of the employee related to the activity.
- Action: Type of action performed (e.g., Create, Update, Approve, Delete, Archive).
- Remarks: Additional comments or notes related to the action.
- IP Address: IP address from which the action was performed.
Administrator Guide for Employee User
This guide helps employees access payroll-related information through their login, including salary details, salary slips, tax declarations, and other payment records.
Overview- The Employee Portal allows employees to:
- View personal payroll information
- Check salary and bank details
- Download salary slips and payroll reports
- View and download financial year reports
- Declare income tax and investment details
- View other taxable or additional payments
Employee Login
To access the Payroll Management Module:
- Log in using your Login ID and Password.
- After successful login, navigate to the Finance section from the menu.
- Click on Payroll Management to access payroll-related services.
Dashboard
The dashboard provides an overview of the employee’s payroll and financial information, including recent salary details and payslip records.
Key Dashboard Features Include:
- Employees can view their last 5 months’ salary details, including Gross Salary, Total Deductions, and Net Pay.
- Employees can view complete salary profile details on a single page, including Pay Commission, Pay Level, Basic Salary, PF Subscription, Banking Information, Salary Information, and Organizational Information.
- Employees can view and download financial year-wise payslips by clicking on the View All Payslips option.
All Application/Menu
1. Payroll Details
In this section, the Employee can view:- Salary Details The employee can view all details like name, department, designation, pay level, basic salary amount, PF account details, beneficiary name, date of birth etc.
- Bank Details Employee can view salary account details like Bank name, account number, IFSC code, branch name etc.
2. Single Sheet Report
Employees can fetch/download single sheet reports in this section to view the approved salary and estimated salary details. The single sheet report shows the employee’s financial year overview to declare the Income tax form.3. PBR Report
Employees can view PBR reports financial year-wise and can download these reports in PDF format by clicking on Print PDF.4. Salary Slips
Employee can view the Salary Slip as per Financial Year by clicking on the View button and can download the Salary Slip in PDF format by clicking on Print PDF.5. Income Tax
Employees can view their Estimated income tax details for the current financial year in the income tax section. This section helps declare the income tax form.6. Declare Your Income Tax
The employee can view/add all Income tax declarations like Employee details, Other income, Permissible Deductions, and Tax Calculations.After declaring the Income tax form, the Employee can download the declaration form in PDF format and submit it to the University/Institution finance department/section.
7. Other Payment Report
In this section, employees can check other details received apart from Salary (eg; Children’s Education Allowance, Honorarium etc.) as per Financial Year and can also download the details in PDF format by clicking on Print PDF.8. Advance/Loan
In this section, employees can view their active and completed advance/loan details, including Loan Type, Principal Amount, Monthly EMI Amount, Total Tenure (in months), Recovery Status, Approval Status (Approved/Pending), and other related loan information.Provident Fund Management (GPF)
About
The Provident Fund module is designed to facilitate the efficient management of employee provident fund accounts in a University/HEI. It automates tasks related to contributions, withdrawals, interest calculations, and account maintenance for employees eligible under the GPF scheme.
Key Features of the Provident Fund Management (GPF)
- Employee Subscription Management: Tracks monthly contributions based on the percentage chosen by the employee.
- Loan and Withdrawal Processing: Handles advanced payments, withdrawals, and their recovery through payroll.
- Interest Calculation: Calculates yearly interest on the fund balance as per government-specified rates.
- Annual Statement Generation: Provides detailed statements of contributions, interest earned, withdrawals, and closing balances.
- Account Management: Maintains individual GPF account ledgers with historical data and current status.
- Integration with Payroll System: Syncs deductions and recoveries seamlessly with the payroll module.
Benefits of Provident Fund Management (GPF)
- Ensures transparency and accuracy in fund management.
- Reduces manual work and potential errors.
- Facilitates easy access to employee fund information.
- Complies with government regulations and financial audits.
Prerequisites to initiate the Provident Fund Management module
To use the Provident Fund Management module smoothly, Universities/HEIs must complete the following steps in the Samarth Suite:
- Set up the Base Module with Organizational Units
- Create and define the structure of the university, like departments, sections, and centres.
- Create Admin and User Accounts
- Create administrative accounts for module administrators.
- Set up user accounts for employees to ensure access and functionality.
- Process GPF Subscription Salary
- Make sure the salary for GPF-subscribed employees is processed through the Payroll Management module.
Roles in the PF Process
- pf_admin: This administrative role should be assigned to an account responsible for configuring all settings in the Provident Fund module. The assigned user will have full access and authority to perform all actions within the module.
- pf_ou_admin: The administrative account should be assigned with this role that can done all the operations of the Provident Fund module for the own and child OUs.
Administrator’s Guide (pf_admin)
Provident Fund Management Dashboard
The dashboard provides a summary view of the Provident Fund (GPF) details for all employees enrolled under the GPF scheme.
Key Dashboard Features Include:
- Active Financial Year: Displays the current financial year for processing GPF statements.
- Current Year: Displays the current year of the active financial year for processing GPF statements.
- Current Month: Displays the current month of the active financial year for processing GPF statements.
- Employees with GPF Subscription Retiring in Current Month: Highlights the employees enrolled under the GPF scheme who are scheduled for superannuation in the current month.
Configuration (Settings)
In the GPF Settings section, the Admin can configure the Provident Fund rules and parameters according to Government guidelines and institutional policies.
This configuration is generally required to be completed once in each financial year. At the beginning of every new financial year, the Admin must review and update the settings as per the latest Government rules and institutional requirements before processing GPF statements.
⚠️Note: To configure the GPF configuration settings, kindly click the dropdown.
1. Payroll Financial Year
The PF Admin can set the duration of the payroll financial year in the settings. (This duration should be the same as the Payroll Financial Cycle Settings.)
Steps to add Payroll Financial Year:
- Click on the Add button provided on the top-right side to add the duration.
- After adding the detail, click on the Save button to confirm this entry if the entered data is correct.
⚠️Note: After confirmation, data cannot be deleted.
2. GPF Financial Year
PF Admin can add and set the duration of GPF financial year in the setting.
Steps to add GPF Financial Year:
- Click on the Add button available at the top-right corner to configure the financial year duration.
- Enter the required details and click on the Save button to confirm the entry.
After confirmation, data cannot be deleted.
⚠️Note: If the GPF calculation is configured on a financial year basis (April to March), the GPF contribution will be calculated one month later than the payroll month. For example, March payroll will be calculated in April, April payroll in May, and so on. Similarly, February payroll will be calculated in March. If the GPF calculation is configured on a calendar month basis, the GPF contribution will be calculated in the same month as the payroll, such as April payroll in April, May payroll in May, and so on.
3. GPF Interest Rate
The PF Admin set the GPF interest rate (Set by the Government) for each month based on the Financial Year.
- Click on the Add in Bulk button to add interest rates in bulk for each of the financial years set in the GPF financial year duration in settings.
4. GPF Heads & Payroll Head Mapping
The PF Admin can define and map GPF deduction heads used in the Payroll module.
For example:
If the Finance Section has deducted GPF Advance or Loan amounts under different heads and now wants those deductions to appear correctly in the GPF Statement Reports with the correct interest calculation, they can map those deduction heads here. This ensures accurate reporting and interest calculation for GPF-related deductions.
5. Declaration
The PF Admin can update and add the declaration for the GPF statement.
To edit the declaration for the GPF statement:
- Click on the three-dot button provided on the right side.
- Then click on the Update button and update the declaration.
6. Feature Settings
The Feature Settings section allows the PF Admin to enable or disable specific GPF statement features visible in the employee login and GPF statements. The Admin can manage these settings using the Allow / Not Allow options available in the Actions column. The system also maintains the change history for audit purposes.
⚠️Note: Click on the Allow / Not Allow button in the Actions column to enable or disable features.
These settings will be applicable in the employee’s login.
| Sl. No. | Control Name | Description | Action Available |
|---|---|---|---|
| 1 | Show GPF Interest on Statement in Employee Login | Displays the GPF interest amount in the employee GPF statement according to the selected financial year. | Hide GPF interest |
| 2 | Show GPF Closing Balance on Statement in Employee Login | Displays the GPF closing balance amount in the employee GPF statement according to the selected financial year. | Hide Closing Balance |
| 3 | Show GPF Account Closure Details on Statement in Employee Login | Displays account closure details in the employee GPF statement. | Allow / Hide |
| 4 | Show GPF Adjustment Remarks on Statement in Employee Login | Displays adjustment remarks or comments related to GPF transactions. | Allow / Hide |
| 5 | Show Label “Recovery / Refund Towards Advance” on GPF Statement | Displays the recovery/refund label for GPF advances in the statement. | Allow / Hide |
| 6 | Add Both GPF Subscription on GPF Statement | Displays both subscription entries in the GPF statement, if applicable. | Allow / Hide |
All Application/Menu (Configuring employee GPF and other information)
1. Opening Balance
In this section, PF Admin can add and uplaod the employees GPF opening balance, these configuration will be cofigure and uplaod only one time.
Steps to add Opening Balance:
- Click on the Bulk Upload button to upload the opening balance for each employee for a particular financial year in bulk.
- After uploading the opening balance, click if the data is correct and Confirm the entry individually or in bulk.
2. Manage GPF Bill
This section is interlinked with the FSCM and Bill Tracking modules. The portal automatically fetches paid GPF Advance and GPF Withdrawal bill details based on the entered bill reference number.
The Admin can fetch and upload GPF bill details individually or update multiple records through the bulk Excel upload option.
- Steps 1 for Add Individual GPF Bill Details
Fill in the following details:
| Field | Description |
|---|---|
| Employee | Select the employee from the dropdown list. |
| Financial Year | Select the applicable financial year from the dropdown. |
| Year | Select the applicable year. |
| Month | Select the applicable month. |
| GPF Head | Select either GPF Withdrawal or GPF Advance. |
| Bill Reference No. | Enter the paid bill reference number. |
| Upload Document (Optional) | Upload the supporting document in PDF format. |
After entering all details, click on Save to fetch and update the GPF bill details.
- Steps 2 for Prepare the Excel Sheet for Bulk Upload
Prepare the Excel sheet using the following format:
| Field Name | Format / Example |
|---|---|
| Employee ID | Same as available in the system (e.g., 1994) |
| Financial Year | 2026-2027 |
| Year | 2026 |
| Month | 4 (for April) |
| GPF Head | GPF Withdrawal / GPF Advance |
| Bill Reference No. | 2025APREBT0002XXXX (Bill should be paid) |
After preparing the Excel sheet, upload it through the bulk upload option to update multiple GPF bill records.
3. Manage GPF Monthly Data
In this section, the Admin can upload monthly GPF head values, including GPF Arrear, Withdrawal, Refund, and Advance, either individually or through bulk upload.
The Admin can fetch and upload GPF details individually or update multiple records through the bulk Excel upload option.
If no data is uploaded for a particular month, the system will automatically consider the value as 0 for that respective head.
The uploaded values are processed according to the configured Payroll Financial Year cycle.
Steps 1 for Add Individual GPF Details
Fill in the following details:
| Field | Description |
|---|---|
| Employee | Select the employee from the dropdown list. |
| Financial Year | Select the applicable financial year from the dropdown. |
| Year | Select the applicable year. |
| Month | Select the applicable month. |
| Subscription (Optional) | Mention the amount |
| Provide subscription (Optional) | Mention the amount |
| Recovery (Optional) | Mention the amount |
| GPF Arrear (Optional) | Mention the amount |
| Withdrawal (Optional) | Mention the amount |
| Advance (Optional) | Mention the amount |
| Subscription (Optional) | Mention the amount |
After entering all details, click on Save to fetch and update the GPF bill details.
Steps 2 for Prepare the Excel Sheet for Bulk Upload
Prepare the Excel sheet using the following format:
| Field Name | Format / Example |
|---|---|
| Employee ID | Same as available in the system (e.g., 1994) |
| Financial Year | 2026-2027 |
| Year | 2026 |
| Month | 4 (for April) |
| subscription, recovery, gpf_arrear, withdrawl, refund, advance | Mention the amount |
4. Generate Statements
In this section, the Admin can generate monthly GPF statements for employees.
To Generate GPF Statements:
- Fill in the required details.
- Click on the Submit button.
Statements can be generated for a single employee or for multiple employees at once.
Example:
Case 1: Payroll Financial Year – March to February (2026–2027)
If you want to generate the GPF statement for April 2026, fill in:
- Financial Year: 2026–2027
- Year: 2026
- Month: March
After submission, the GPF statement for April 2026 will be generated.
Case 2: Payroll Financial Year – April to March (2026–2027)
If you want to generate the GPF statement for April 2026, fill in:
- Financial Year: 2026–2027
- Year: 2026
- Month: April
After submission, the GPF statement for April 2026 will be generated.
5. Process GPF Statements
In this section, the Admin can verify, finalize, and approve the generated GPF statements, either individually or in bulk.
⚠️Note: If there is any error in the generated GPF statement, you can delete the entry (individually or in bulk) before approval. Once approved, changes cannot be made.
6. Approved Statements
This tab displays only the approved GPF statements separately for easy reference.
7. Closed GPF Account Listing
In this section, the Admin can temporarily close an employee’s GPF account after the employee’s superannuation, retirement, or in other applicable cases.
Once the employee is marked under Temporary Closure, the portal automatically stops further GPF statement generation and monthly GPF processing for that employee.
Steps to Temporarily Close an Employee’s GPF Account:
- Click on the Temporary Closure button available at the top-right corner.
- Fill in the required details:
- Employee: Select the employee whose GPF account needs to be temporarily closed.
- Upload Document (Optional): Upload supporting documents related to GPF account closure.
- Remarks: Enter the reason for temporary closure.
After entering all details, click on the Submit button.
8. Final Payment & Adjustment
After temporarily closing an employee’s GPF account in the Closed GPF Account Listing section, the Admin can calculate the employee’s GPF Closing Balance and Interest Amount by clicking on the Calculation & Payment button.
The Admin can also record and manage the employee’s Final GPF Payment and Adjustment Details in this section.
Features Available in this Section:
- Calculate the employee’s final GPF closing balance.
- Calculate the applicable interest amount up to the closure date.
- Record final payment details made to the employee.
- Add and manage part payments and adjustment entries based on the applicable payment date.
- Maintain a complete payment and adjustment history for audit and verification purposes.
This section helps ensure accurate settlement of the employee’s GPF account before final closure.
9. Final Closed GPF Accounts
Once the Admin has completed the GPF final calculation, payment, and adjustment process, and the final payment has been made to the employee, the Admin can permanently close the employee’s GPF account in this section.
After the account is marked as Final Closed, the employee’s GPF account will be permanently closed in the system, and no further transactions or statement processing will be allowed for that account.
⚠️Important Note: Once a GPF account is marked as Final Closed, it cannot be reopened or modified by the Admin. Please verify all calculations, payments, and adjustments before final closure.
Reports
There are 5 reports available in the GPF module:
1. Month-Wise GPF Opening Balance
This report provides the monthly GPF opening balance details.
To download the report:
- Click on the Generate Report button provided in front of the respective report.
- Fill in all the details that are required.
- Click on the Submit button
The report will be downloaded in Excel format.
2. Month-Wise GPF Heads Data
This report provides details of the GPF Heads data.
To download the report:
- Click on the Generate Report button provided in front of the respective report.
- Fill in all the details that are required.
- Click on the Submit button.
The report will be downloaded in Excel format.
3. Month-wise GPF Statement
This report provides details of the GPF Statement for the month.
To download the report:
- Click on the Generate Report button provided in front of the respective report.
- Fill in all the details that are required.
- Click on the Submit button.
The report will be downloaded in Excel format.
4. Financial Year Wise GPF Statement
This report provides details of the GPF Statement on a yearly basis.
To download the report:
- Click on the Generate Report button provided in front of the respective report.
- Fill in all the details that are required
- Click on the Submit button
The report will be downloaded in PDF format.
5. GPF Broad Sheet Report
This report provides details of the Broad Sheet Of GPF Account(Yearly basis).
To download the report:
- Click on the Generate Report button provided in front of the respective report.
- Fill in all the details that are required
- Click on the Submit button
The report will be downloaded in PDF format.
Frequently Asked Questions (FAQs) – Payroll Management Module
| Q. No. | Question | Answer |
|---|---|---|
| 1 | What is the Payroll Management Module? | The Payroll Management Module is a system used to configure salary structures, process monthly salaries, calculate deductions, generate reports, and disburse payments to employees. |
| 2 | Can leave impact salary automatically? | Yes. Leave types such as HPL or EOL can be mapped in the Leave Salary Component. Based on the defined date range, the system automatically calculates salary deductions. |
| 3 | What is Date Range Configuration in salary processing? | It allows the Admin to define a custom salary period (e.g., 20 Feb to 20 Mar). The system calculates salary and leave deductions within that specific range. |
| 4 | What is the purpose of the Pre-Processing Report? | The Pre-Processing Report helps verify salary data, deductions, and bank details before final salary approval. |
| 5 | Can salary details be fetched automatically during arrear calculation? | Yes. While creating a Fixation Arrear configuration, salary details can either be fetched from approved salary data or entered manually. |
| 6 | What is the CFMS Report used for? | The CFMS Report generates a consolidated salary file required by banks for salary disbursement. |
| 7 | Can the system send payslips in bulk? | Yes. The system allows bulk posting of payslips via email. Mail Logs help track the delivery status. |
| 8 | What happens after salary approval? | Once salary is approved, it cannot be modified directly. Reports such as Pay Bill, Bank Advice, and CFMS can be generated, and the salary becomes ready for bank disbursement. |
| 9 | What is the purpose of Activity Logs? | Activity Logs maintain an audit trail of user actions including approvals, updates, deletions, and archives along with IP address and timestamps. |
| 10 | Can approved leave records be removed? | Yes. Approved leave records can be archived if required. The system maintains archive logs for transparency. |
| 11 | What reports are available in the Payroll Module? | The system provides Pre-Processing Reports, Employee-wise Reports, TDS and Income Tax Reports, Financial Year Reports, Department-wise Summaries, Pay Bill Reports, and Bank Advice Reports. |
| 12 | What is Round Off in Fixation Arrear? | The Round Off option automatically rounds off the final arrear amount after calculation. |
| 13 | What type of employees can be processed through the Samarth Portal? | The portal supports salary processing for Regular Employees, Contractual Employees, Teaching Staff, Non-Teaching Staff, School Teachers, and Daily Wage/Temporary Staff (if configured). Employee grouping can be configured as per institutional requirements. |
| 14 | Is there a provision to configure Pay Commission, Pay Band, and Level? | Yes. The portal provides configuration options for Pay Commission, Pay Band, Pay Level, Grade Pay (if applicable), and Pay Matrix as per institutional or government norms. |
| 15 | Is the portal compatible with the 6th Pay Commission and Grade Pay structure? | Yes. The system supports the 6th Pay Commission structure including Grade Pay. It also supports Pay Matrix-based structures such as the 7th Pay Commission, depending on configuration. |
| 16 | Can tax be calculated through the portal? | Yes. The portal automatically calculates Income Tax (TDS), salary-based tax deductions, and tax on other taxable payments based on defined rules and employee declarations. |
| 17 | How can employees submit tax declarations through the portal? | Employees can log in to their portal account, navigate to the Tax/IT Declaration section, submit investment and deduction details, and upload supporting documents if required. |
| 18 | Can users download payslips through the portal? | Yes. Employees can log in and download their monthly payslips directly from the portal. Admins can also generate payslips in bulk. |
| 19 | Is there a provision to handle other taxable payments through the portal? | Yes. The portal allows processing of other taxable payments such as arrears, honorarium, child education allowance, and other additional payments. These amounts are included in annual income and tax calculation. |
Frequently Asked Questions (FAQs) – Provident Fund (GPF)
| Q. No. | Question | Answer |
|---|---|---|
| 1 | What is the Provident Fund (GPF) Module? | The GPF Module is designed to manage General Provident Fund accounts of employees. It automates contribution tracking, interest calculation, withdrawals, statement generation, and integrates seamlessly with the Payroll module. |
| 2 | Who can access and manage the GPF Module? | Only users assigned the pf_admin role can configure and manage the GPF module. Employees can view their GPF statements through their login, based on the feature settings enabled by the Admin. |
| 3 | Is integration with the Payroll Module mandatory? | Yes. GPF deductions and recoveries are processed through the Payroll module. Salary must be processed before generating GPF statements. |
| 4 | Can the GPF financial year be configured? | Yes. The PF Admin can configure both the Payroll Financial Year and GPF Financial Year as per institutional policy. Once confirmed, the financial year duration cannot be deleted. |
| 5 | How is GPF interest calculated? | Interest is calculated based on government-notified interest rates. The PF Admin must configure monthly interest rates for each financial year. The system automatically applies the configured rate during statement generation. |
| 6 | Can interest rates be uploaded in bulk? | Yes. The PF Admin can use the Add in Bulk option to upload interest rates for the entire financial year. |
| 7 | How is the Opening Balance added? | Opening balances are uploaded only once, generally for the first month of the financial year, using the Bulk Data option. Once confirmed, the opening balance cannot be deleted. |
| 8 | What happens if monthly GPF data is not uploaded? | If no monthly data such as arrears, withdrawals, advances, or refunds is uploaded for a specific month, the system automatically considers the value as 0. |
| 9 | Can uploaded GPF monthly data be deleted? | No. Once the data is confirmed, it cannot be deleted. Therefore, all entries should be verified carefully before confirmation. |
| 10 | How are GPF advances and withdrawals handled? | GPF advances, withdrawals, and refunds are uploaded monthly and reflected in the employee’s GPF statement. Recoveries are processed through Payroll integration. |
| 11 | How can GPF statements be generated? | The PF Admin needs to select the Financial Year, Year, and Month, and then click on Submit to generate statements for single or multiple employees. |
| 12 | Can GPF statements be edited after approval? | No. Once a GPF statement is approved, changes cannot be made. Any corrections must be completed before approval. |
| 13 | What reports are available in the GPF Module? | The module provides Month-wise Opening Balance Reports, Month-wise GPF Heads Data Reports, Month-wise GPF Statements, Financial Year Wise GPF Statements, and GPF Broad Sheet Reports. Reports can be downloaded in Excel or PDF format. |
| 14 | Can employees view their GPF interest and closing balance? | Yes. However, the visibility of GPF interest and closing balance can be controlled by the PF Admin through Feature Settings. |
| 15 | Is the system compliant with government audit requirements? | Yes. The module maintains structured records, interest calculations, historical ledgers, and approved statements, ensuring transparency and audit compliance. |
Glossary – Payroll Management Module
| Term | Definition |
|---|---|
| Arrear | Additional salary amount payable due to revision in pay, promotion, or other salary adjustments. |
| Basic Pay | Fixed component of salary on which other allowances and deductions are calculated. |
| CFMS | Centralized Financial Management System used for consolidated bank payment processing. |
| DA (Dearness Allowance) | Allowance paid as a percentage of basic pay to offset inflation. |
| EOL (Extraordinary Leave) | Leave without pay, which impacts salary deduction. |
| HPL (Half Pay Leave) | Leave where 50% of salary/basic pay is paid. |
| HRA (House Rent Allowance) | Allowance provided to employees for housing expenses. |
| NPA (Non-Practicing Allowance) | Allowance provided to eligible employees, such as medical staff. |
| TA (Travel Allowance) | Allowance provided for travel-related expenses. |
| TDS (Tax Deducted at Source) | Income tax deducted from salary at the time of payment. |
| Pay Bill | Official salary document generated for salary disbursement. |
| PBR (Pay Bill Register) | Register containing detailed salary and pay bill information. |
| Financial Year | A 12-month accounting period, generally from April to March in India. |
| Salary Approval | Final confirmation step after which salary becomes ready for disbursement. |
| Archive | Process of removing approved records while maintaining audit history. |
| Employee Group | Category used to classify employees, such as Teaching, Non-Teaching, or Contractual employees. |
| OU (Organizational Unit) | Department, campus, or administrative unit within the institution. |
Glossary – Provident Fund (GPF) Module
| Term | Definition |
|---|---|
| GPF (General Provident Fund) | A government-managed provident fund scheme applicable to eligible employees, where a portion of salary is contributed monthly and earns interest. |
| Subscription | Monthly contribution made by the employee towards the GPF account. |
| Opening Balance | The GPF balance at the beginning of a financial year, generally added in the first month of the financial year. |
| Closing Balance | The total GPF balance at the end of a financial year after adding contributions, interest, and adjusting withdrawals/refunds. |
| GPF Financial Year | The financial period defined for GPF calculation, generally from April to March. |
| Payroll Financial Year | The salary processing cycle used in the Payroll module, which may differ from the GPF financial year. |
| Interest Rate | Government-notified interest rate applied annually on the GPF balance. |
| Interest Calculation | System-generated calculation of interest on the accumulated GPF balance as per configured rates. |
| Advance | Temporary withdrawal from the GPF account, recoverable through payroll deductions. |
| Withdrawal | Partial withdrawal from the GPF account, generally non-recoverable under applicable rules. |
| Refund | Repayment of a previously taken GPF advance. |
| Arrear (GPF Arrear) | Additional GPF amount deducted due to salary revision or arrear processing. |
| Head Mapping | Linking payroll deduction heads with GPF heads to ensure accurate reporting and interest calculation. |
| Ledger | Detailed record of all GPF transactions, including contributions, withdrawals, refunds, and interest. |
| GPF Statement | Monthly or yearly statement showing opening balance, contributions, interest, withdrawals, and closing balance. |
| Broad Sheet | Annual consolidated summary of GPF accounts used for audit and verification purposes. |
| pf_admin | Role assigned to the administrator responsible for managing and configuring the GPF module. |
| Bulk Upload | Feature that allows uploading GPF data such as opening balances, interest rates, and monthly values for multiple employees at once. |
| Approval Process | Final verification step after statement generation. Once approved, changes cannot be made. |
| Feature Settings | Configuration option that controls the visibility of GPF details, such as interest and closing balance, in employee login. |
| Confirmation | Final submission of uploaded data. Once confirmed, the data cannot be deleted. |