DU Admission - PG
Introduction
DU Admissions 2020 to various PG programmes is both merit and entrance-based.
PG Courses
DU PG admission 2020 is based on two modes, namely direct entry, and entrance exam
For selective PG courses, admission is done through DUET 2020 and DU-JAT 2020
SC/ST/OBC/PwD candidates are given admission directly by the college based on the declared cut-offs for merit-based programmes
EWS quota candidates must submit an EWS certificate along with an income certificate from 2019 onwards to avail admission.
While filling the DU Admission form applicant need to follow sequential steps one by one like below:-
Step 1- Read all the important information present on the screen.
Step 2- Check eligibility according to the course selected.
Step 3- Read important dates to apply and attempt the entrance exam on time.
Step 4- Registration
Step 5- Login
Step 6- Apply
Step 7- Fill all relevant details.
Step 8- Finally Submit the application and pay the fee.
User Registration and Verification
Registration for Admission
Applicant can register himself/herself by clicking on the portal link and following sequential steps one by one like below:-
Steps For New Registration
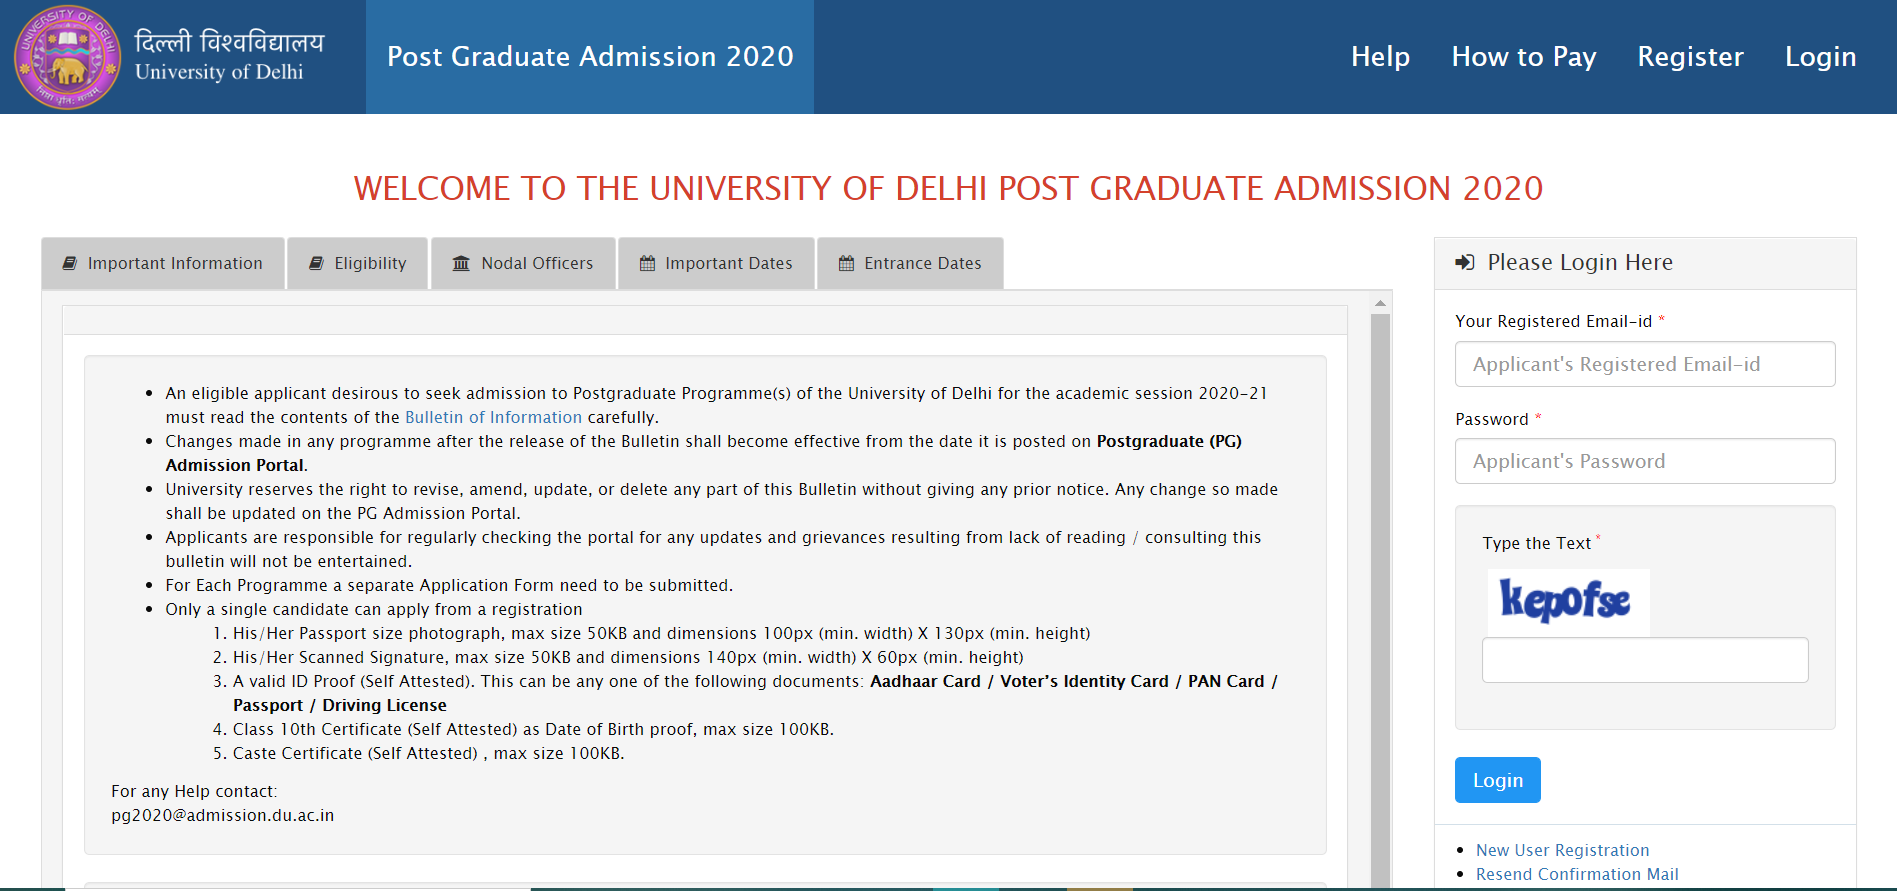
Step 1: Open the website: https://pgadmission.du.ac.in/testlink.php/site/login
Step 2: Read the instructions carefully given on the left side of the screen.
Important Information:- This section contains all the important information relevant to the PG admission.
Eligibility:- In this section, the applicant can check his/her eligibility for courses/he is applying for admission.
Nodal officer:- This section contains the contact details of the respective contact person of all the departments for the courses offered by the PG programme.
Important Dates:- This section contains important dates. For example:- Start and End date for online Registration, Tentative Dates for the conduct of the Entrance Examinations, announcement of the result, etc.
Entrance Dates:- This section contains entrance dates.
Step 3: Click on the button 'New Registration' present at the bottom right-hand side.
Step 4: Click on the “Registration Help” button to take a tour to understand the flow and procedure to register.
Step 5: Fill the following field in the Student Registration Form given on the right-hand side:-
Login Details:- Your login details will be captured under this section.
Applicant's Email Address: Please enter your own active email address which is functional and of which you have access to it throughout the admission process. It will be used for all official communication.
Confirm the Applicant's Email Address: Re-enter your email address.
Create Password (minimum 6 characters): Please choose a password. While choosing your password it must be alphanumeric and between 8 to 16 characters long.
Confirm Password: Enter your password again.
Mobile Number: Please enter your phone number which is functional and of which you have access to it throughout the admission process. It will be used for all official communication.
Applicants Details:- Your personal details will be captured in this section. Please ensure that all the information provided here is as per Certificates (10th class/High School)
Applicant's Full Name: Please enter your full name as mentioned in your academic documents(12th mark sheet).
Full Name
Middle Name
Last Name
Applicant DOB (Enter your date of birth as mentioned in your certificate).
Category -Select your category(UR, OBC, SC, ST, EWS)
Applicant Gender(Male/Female/Other)
Nationality(Indian/Others)-If you are a Foreign National applying for PG Admission in the University of Delhi please select the "Foreign National" option from the drop-down list and enter your nationality in the space provided.
State of domicile(Select from the drop-down)
Persons with Disabilities (PwD) Category(Select the PwD category from the drop-down menu, if you belong to PwD Category, else select "Not Applicable").
Mother's/Father's / Guardian's Name
Children/ Widows of Armed Forces Personnel(Select the CW category from the drop-down menu, if you belong to the CW category, else select "Not Applicable").
Minority Category(Select the Minority category from the drop-down menu, if you belong to Sikh or Christian Minority, else select "Not Applicable").
University attended for Qualifying Exam- Select the university you attended lastly or are enrolled with while you are applying to the University of Delhi from the drop-down menu. If the name of the university you have attended lastly or are currently enrolled with is not on the list, please select the "Other" option from the drop-down list (Last in the drop-down list) and enter the name of the university in the space provided.
Captcha Verification: Type the text shown in the image. You can change the captcha by clicking on the image.
Step 6: Select the “Yes” radio button and click on the “Register” button.
After the successful submission of the Registration Form, a confirmation email with a verification link will be sent to your registered email id.
Please check your email (including the SPAM/BULK folder) and click on the link to verify your registration. After successful verification, you can apply for admission to Post Graduate Programmes (2020-2021).
Account Registration Verification:
After clicking on the “register” button a mail/SMS is sent to the applicant registered email id containing the OTP.
The applicant can verify his/her account by clicking on the link and following sequential steps one by one like below:-
Steps For Account Verification
Step 1: Copy the OTP received on the Mail/Sms.
Step 2: Enter the OTP on the verification account screen and captcha as asked.
Step 3: Click on the “Submit OTP” button.
Resend Confirmation Mail
In case the OTP is lost or time exceeds, an applicant can again resen confirmation mail by clicking on the “Resend Confirmation Mail” button present on the main screen of the portal.
Applicants need to enter the registered email address to receive OTP again.
Note:-
Do Not refresh the page.
There is a limited time count associated with OTP to be valid i.e.15 min.
Users can only log in to his/her account after the account is activated and verified.
Please check your SPAM/Bulk Folder if the confirmation email is not found in INBOX.
Login
User can log in in his/her account by clicking on the portal link and fill in the required details:-
Registered Email-id
Password
Captcha Verification
Existing User
In case you forgot your password, you may click on the 'Reset Password' link which is given at the bottom.
Create a profile
Upload:
Important Instruction
Applicant must read all the important instruction present in this section before moving further and adding details:-
The PHOTO must be uploaded with:-
a. Minimum Resolution should be “100px X 130px”.
b. Minimum File size should be 10 KB.
c. Maximum file size should be 50 KB.
The SIGNATURE must be uploaded with:-
a. Minimum Resolution should be “140px X 600px”.
b. Minimum File size should be 10 KB.
c. Maximum file size should be 50 KB.
For all other uploads:-
a. Minimum File size should be 100 KB.
b. Maximum file size should be 500 KB.
The accepted file types are : .jpg, .jpeg, .png.
All the Uploads must be self-attested scan copies of the original document.
Upload Documents
In this section, the user has to upload all the corresponding and supporting documents:-
Upload Applicant’s Photo: Upload your photograph.
Signature: Upload the scanned copy of your signature
ID Proof: Upload any id proof.
Matriculation Marksheet or Certificate: Upload Matriculation (10th) Marksheet or Certificate for D.O.B.
- After filling all the available details click on the " Next " button to proceed further.
Steps on how to check the file size and file type?
Step 1: Locate the file in the folder section.
Step 2: Right-click the file, and then click properties.
Step 3: As visible you can determine the size of the file or files you have highlighted from the file properties window. In this example, the chrome, .jpg file is 18.5 KB (19,032 bytes), and that the size on disk is 20.0 KB (20,480 bytes)
Postal Address
Applicant must enter his/her address
i. Address Line 1
ii. Address Line 2
iii. City
iv. Country(Select from the drop-down)
v. State (Select from the drop-down)
vi. Select District(Select from the drop-down)
vii. Pincode
viii. Do you have a Passport(Yes/No)
Bank Details
Applicant has to enter bank Details for Refund
Name of the Account Holder
Account Number
Confirm Account Number
Name of the Bank(select from the drop-down)
IFSC Code
Note:- If you don’t have your own bank account, please provide details of your parents' bank account where you would like to receive the refund if any.
Hostel Requirements
The applicant has to enter his/her hostel requirements.
Once the applicant clicks on the “Upload” button the preview appears to either edit the details entered or submit the profile.
Dashboard
After the applicant submits the profile a screen of important instruction appears.
Read the Important Instructions carefully and click on the checkbox 'I confirm the above' and click on the 'Submit' button.
User can apply by clicking on the “Apply” or “Continue Application” button present on the portal and fill in the required details:-
Educational details
Other preferences
Preview
Payment
Educational Details
Add Academic Details
In this section, the user has to enter all the relevant academic qualification details according to all the important instruction available in this section:-
a. Examination passed(XII/Graduation/Other)-Select the name of the Examination from the drop-down list. If you can not find your choice of Examination in the drop-down list, choose “Other”(Last in the drop-down list) option and enter the name of Examination in the space provided next.
b. Subject-Mention the names of the Stream/ Subject you have studied.
c. Board/University-Select the name of your Board/University from the drop-down list. If you can not find the name of your board/university, choose “Other”(Last in the drop-down list) and enter the name of your Board/University in the space provided next.
d. Year of Passing-Mention the year of passing for the Examination you selected.
e. Maximum Marks/Grade Points-Mention the maximum marks/grade points(10) of the given Examination.
f. Marks Obtained/CGPA-Mention the maximum marks/CGPA you obtained in the given Examination.
g. Percentage/CGPA-Mention the marks you obtained in the given Examination. It gets converted to a percentage automatically.
h. Result Awaited-Only for Applicants who are appearing/have appeared in the final year Examination in the year 2018.
i. Name of Last College Attended-Mention the name of the College last attended.
Select Programme
Select programme(select from drop-down)
Admission criteria(select from drop-down)
Select eligibility criteria(select from radio button)
Examination Centre- Enter your Entrance Test Centre Preferences
Subject Category- (select from drop-down)
Select Teaching subject-(select from drop-down)
Declaration
The candidate declares that all the statements made and documents uploaded are true from belief. If any information is found to be incorrect, his candidature is liable to be canceled and he may be subject to legal/disciplinary proceedings.
Note:- check all the entries made in the form. Any wrong information will lead to the cancellation of Admission and also penal action.
After filling all these details click on the “Save Application” button to proceed further.
Other preferences
Add Other Details
Please give your preference for each college/department by selecting preference no./choice.
Important Instruction
Applicant must read all the important instructions present in this section before moving further and click on the checkbox 'I confirm the above' and click on the 'Submit' button.
Preview
The complete form is available for preview. There are three options available at the bottom of the page:-
'Click to Modify Application' -In case you think you have not given correct information or have missed out something in the application form click on the 'Click to Modify Application' button to edit the form.
'Pay Fee' -If all the entries are correct click on the ‘Pay Fee’, you will be redirected to the Payment Gateway option, select the payment gateway, and pay fees. After a successful payment, you will get the acknowledgment mail.
'My Home'-If you want to apply for a new programme or want to pay later you can click on the 'My Home' button.
Payment
In this section, you can make payment of fee through payment gateways provided.
Check the fee details of the programme selected and click on the payment gateway button.
Note:- If payment has been deducted from your account but the same is not updated in your application, you will not be able to make another payment for the next 60 minutes. If the payment is not updated in 60 minutes, the amount shall be automatically credited back to the account from which the payment was received. Then you can initiate the payment fresh.
You can see the transaction status in your account.
Click on the button “Print Form” to view your submitted form with form number and Qrcode.
Annexure
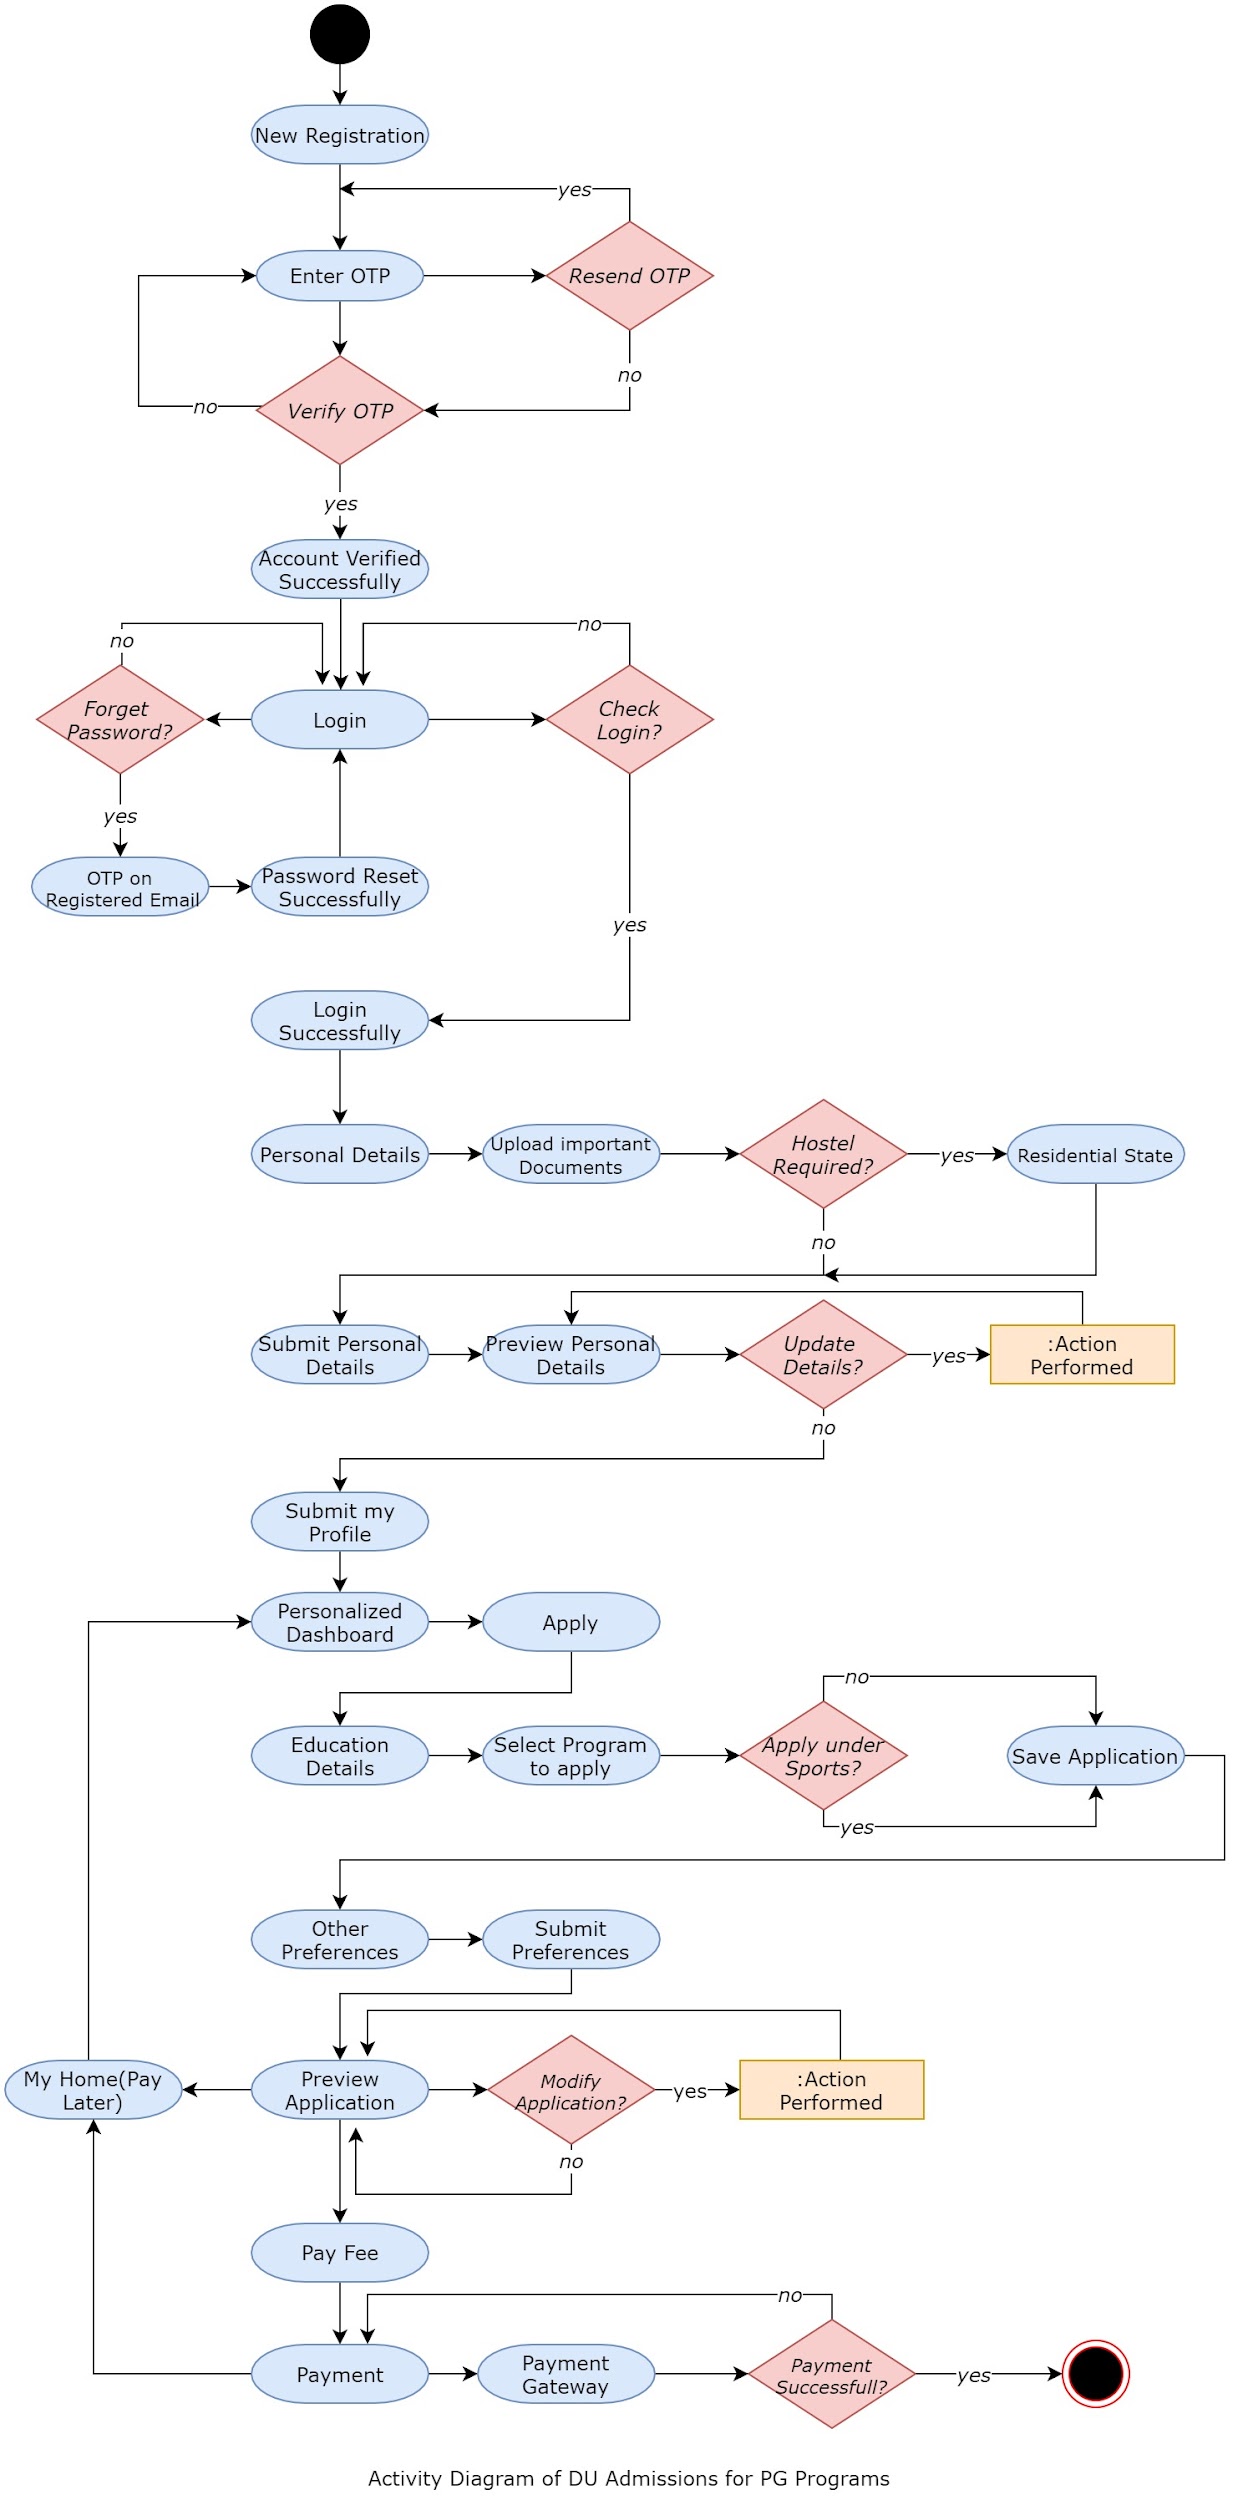
Activity Diagram
Activity Diagram for DU Admissions - PG
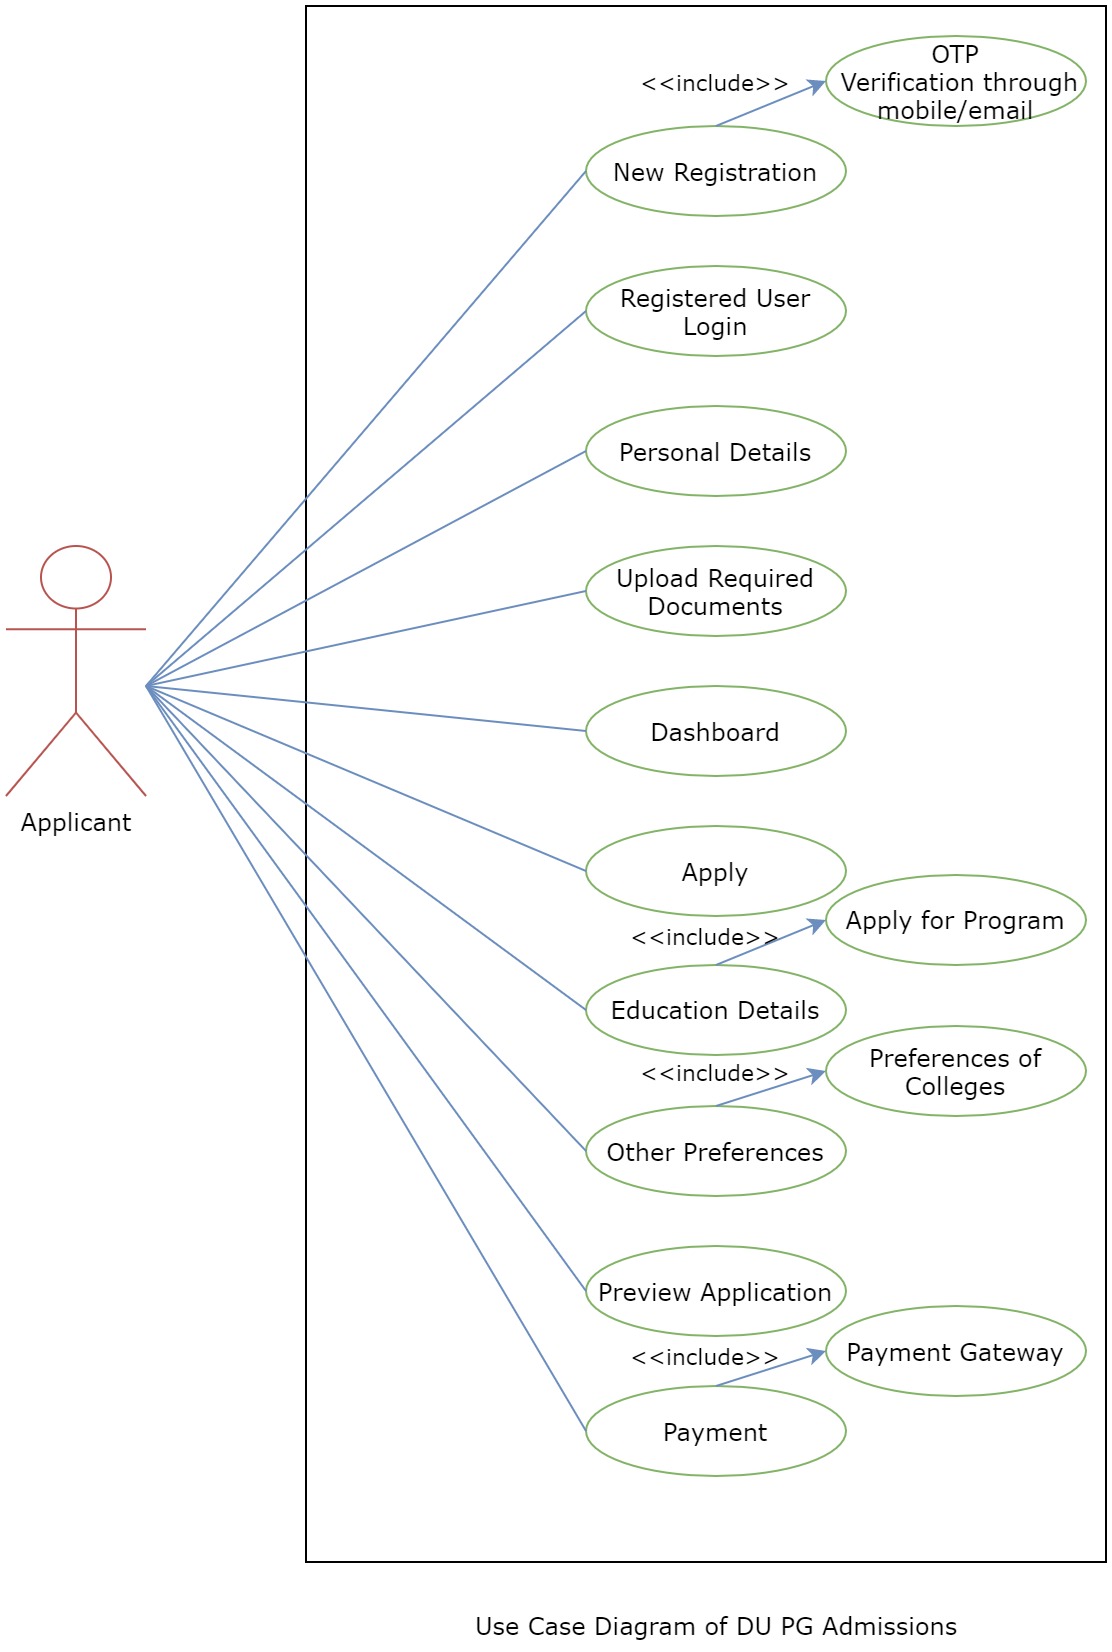
Use Case Diagram
Use Case Diagram for DU Admissions - PG