Payroll Management System
Introduction
Payroll: Payroll is the sum of all financial records of salaries for an employee, including bonus and deductions. In accounting terms, payroll refers to the amount paid to employees for the services provided by them during a certain period of time.
The Payroll Management System facilitates an organization in managing the payroll of its employees (allowances and deductions), generating monthly salary and all payroll related reports.
Self-service portals can streamline communication and approval processes, saving HR professionals' time and reducing the likelihood of errors or communication gaps. It allows employees to access and have some degree of control over their personal information.
This module deals with all the financial and fiscal needs of the University. It basically handles the system from budget allocation to budget disbursement. It facilitates the employee salary according to the updated pay commission and also helps in generating through an automated system.
It has various functionalities, which are:
Master Data (Settings)
Pay Rule Configuration
Employee Management
Salary Processing System
Reports
Income Taxes
Increment process
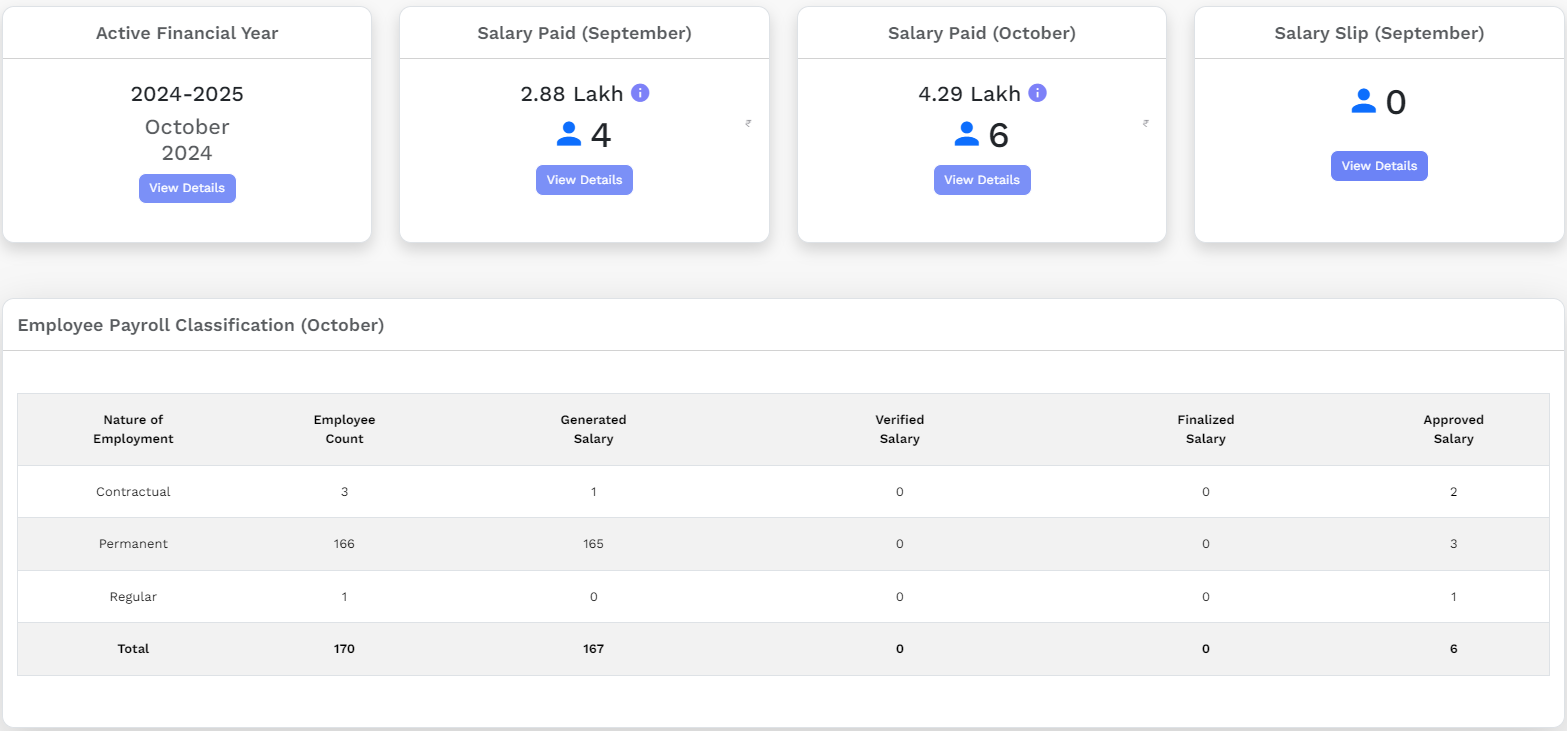
Dashboard
The dashboard gives an overview of the Payroll Management for all the employees working in the University/Organisation Unit.
Settings
Setting up first time
It deals with the budget allocation of the University through Maintenance Grant from the government. It has different functionalities and operations.
For the functioning of the payroll process, admin first needs to set up the Bank details, Budget Head, Pay Commissions Financial Year Financial Plan and configure the salary rule for the employee under the Settings menu. This can only be done by the admin.
Settings consists of the following sections:
Bank List
University Bank Details
Budget Heads
Pay Commissions
Financial Cycle
Financial Plan
Pay band Categories
Grade Pay Scale
Levels
Payroll Entry Types
Payroll Entry Group
Payroll Entries
Salary Rules Configuration
Group Management
Bank Lists
This displays the detailed list of Banks which will be mapped with the Employees.
View: Admin can view the details by clicking on View icon available in front of every entry.
Adding Bank: Admin can add new bank details by clicking on Add Bank present on the top right side of the portal and fill in the required details:
Bank Short Code
Bank Name
Status
Edit: Admin can edit/update the details by clicking on the Edit icon available
University Bank Details
This displays the University’s Bank Account details which will be used to disburse salary to the employee.
- View: Admin can view the details by clicking on View icon
University has different budget heads for different financial services:
View: Admin can view the details by clicking on View icon
Edit: Admin can update/edit the details by clicking on Edit icon
Add Budget Head: Admin can add Budget Head by clicking on Add Budget head. After clicking on it, fill the required details
Type of budget head
Major
Minor
Recurring
Non-Recurring
Accrual
Other
Nature of Budget
Temporary
Permanent
Status
Active
Inactive.
Admin can also make unused budget heads inactive.
Pay Commission
The university has a different salary structure of its employees depending upon the pay commission.
- View: Admin can only view the Pay Commission by clicking on View icon.
Financial Cycle
A financial cycle is used by the university in order to calculate their budgets for a period of 12 months.
View: Admin can view the details by clicking on View icon.
Edit: Admin can update/edit the details by clicking on Edit icon.
Financial Plan
The Financial Plan is designed by the university in order to calculate their budgets for a particular financial year.
Edit: Admin can update/edit the details by clicking on Edit icon.
Add Financial Plan: Admin can add Financial Plan by clicking on Add Financial Plan. After clicking on it, fill the required details.
View: Admin can view the details by clicking on View icon.
Add Heads: While viewing the financial plan admin can add Budget Heads for every financial plan individually by clicking on Add Budget Head. After clicking on it, fill the required details.
Pay band Categories
University has pay band categories for its employees. It lists all the available categories of pay band along with its description.
Some pay band category already exists in the system by default, namely:
15600-39100
37400-67000
5200-20200
9300-34800
View: Admin can view the details by clicking on View icon.
Edit: Admin can update/edit the details by clicking on Edit icon.
Add Pay band Categories: Admin also has an option to add Pay band Categories by clicking on Add Pay Band Categories. After clicking on it, fill the required details:
Pay band Name: Name of the pay band
Description: Description of the given pay band category
Status: Active or Inactive
Grade Pay Scale
Grade Pay scale depends upon Pay band categories. It is a term used in the 6th pay Commission which defines the pay structure. Higher the rank, more will be the grade pay.
View: Admin can view the details by clicking on View icon
Edit: Admin can update/edit the details by clicking on Edit icon.
Add Grade Pay Scale: Admin can add Grade Pay Scale by clicking on the Add Grade Pay Scale. After clicking on it, fill the required details.
Levels
In the 7th Pay Commission, Pay band and Pay Scale are merged into level.
There are different levels ranging from 1 to 18.
View: Admin can view the details by clicking on View icon.
Edit: Admin can update/edit the details by clicking on Edit icon.
Add Levels: Admin can add Levels by clicking on Add Levels. After clicking on it, fill the required details:
Level Name
Pay-Band(Select from drop down)
Description
Status(Active/Inactive)
Note: If you select pay commission to be 6th pay commission then you will see two options of Pay band and Grade Pay which are used to make salary on 6th pay commission.If you select the 7th pay commission then you see the only matric required i.e. LEVEL.
Payroll Entry Types
Payroll entry type was designed to capture the types of payroll entries which are usually either Earnings or Deduction.
- View: Admin can view the details by clicking on View icon.
Payroll Entry Groups
This subsection captures the salary category.
View: Admin can view the details by clicking on View icon.
Edit: Admin can update/edit the details by clicking on Edit icon.
Add Entry group: Admin can add Entry group by clicking on Add Entry Group. After clicking on it, fill the required details:
Entry Type (Select from drop down)
Name
Short Code
Description
Status (Active/Inactive)
Payroll Entry
It captures the payroll entries for each type of payroll head.
View: Admin can view the details by clicking on View icon.
Edit: Admin can update/edit the details by clicking on Edit icon.
Add Payroll Entry: Admin can add Payroll Entry by clicking on Add Payroll Entry. After clicking on it, fill the required details:
Entry Type (Select from drop down)
Entry Group (Select from drop down)
Tax Group (Select from drop down)
Report Group (Select from drop down)
Entry Name
Description
Applicable On (Select from drop down)
Status (Active/Inactive)
Salary Structure Template
It captures the salary structure where salary rules are defined under Payroll Entry type: Earning and Deduction.
View: Admin can view the details by clicking on View icon.
Edit: Admin can update/edit the details by clicking on Edit icon.
Add Salary structure templates: Admin can add Salary Structure Templates by clicking on Add salary Structure Templates. After clicking on it, fill in the required details.
Admin can update the details by clicking on the Update button.
To create salary rules for Earnings or deduction, click on the Add Earnings Rules/Add Deduction Rules button. A pop up will appear asking for following details:
Entry As: It is used to define the value you need to enter. To apply a formulae click on formulae, to keep the actual value click on Actual.
Salary Head: Select from drop down.
Formulae Bar: Create a formula required as per the use case.
Description
Status: Active/Inactive
a.) For Earning
Rules for Earning Salary heads:
Basic pay: It is a standard rate of pay before additional payments such as allowances and bonus.
Dearness Allowance: Dearness Allowance is paid by the government to its employees as well as a pensioner to offset the impact of inflation. The effective salary of government employees requires constant enhancement to help them cope up with the increasing prices. Formulae used: BASIC * 12%(subject to change)
House Rent Allowance: HRA, as an exemption is provided, only if the employee is living in rented accommodation. However, also in case the employee lives in his or her own house and does not pay any rent, he or she cannot claim HRA to save on taxes.\ Formulae used: Basic * 24%(minimum Rs.5400)
Transport Allowance: Allowance granted to an employee to meet his expenditure for the purpose of commuting between his place of residence and office/place of duty. Formulae used:
| Employees drawing | Rate | Pay Level | >month |
|---|---|---|---|
| > 9 and above | 7200 | > 3-8 | > Rs 3600 |
| > 1 and 2 | >1350 | (upto Basic 24199) and Rs | > 3600(Basic 24200 and above) |
| > Handicapped | > Double TA | ||
| DA and TA Traveling and Daily Allowance are payable to Government Employees who are on the official tours subject to certain conditions. |
Formulae used: TA*12%
Non-practicing Allowance(NPA):
Non-Practicing Allowance is a special kind of allowance payable to Doctors occupying the posts of Medical and Veterinary Services.
Formulae used: Basic * 20% (for doctors only).
b.) For Deduction
Rules for deduction Salary heads:
- GPF (General Provident Fund): It is a provident fund account available for the government employees. In this fund, the government employees contribute a certain percentage of their salary to the account. The accumulated amount is paid to the employee at the time of superannuation or retirement.
Formulae used: Subscription => Actual\Employer Contribution => Nil
- CPF (Contributory Provident Fund): A provident fund account is opened and the fund deducted from your salary is deposited into the account along with an equal contribution from the employer, every month. This number is required to be mentioned everywhere for linking your all claims etc. to the computerized system.
Formulae used: Subscription => Actual\Employer Contribution => Basic * 10%
- NPS(National Pension Scheme): The scheme encourages people to invest in a pension account at regular intervals during the course of their employment. After retirement, the subscribers can take out a certain percentage of the corpus. As an NPS account holder, you will receive the remaining amount as a monthly pension post your retirement.
Formulae Used: Subscription => (Basic + DA) * 10%\ Employer Contribution => (Basic + DA) * 14%
- NPS for Doctors:
Formulae Used: Subscription => (Basic + DA + NPA) * 10%\Actual => (Basic + DA + NPA) * 14%
- Other Deductions:
Formulae Used: Actual Note: You can create your own rule depending on the factors.
System Wide Changes
If the admin wants to do some changes in the payroll entry he/she can do so from this section and these changes will be reflected in the whole system.
View: Admin can view the details by clicking on View icon.
Edit: Admin can update/edit the details by clicking on Edit icon.
Override changes to system: Admin can override the changes in the whole payroll module by clicking on Gear icon.
View Old changes: Admin can view all the old changes done so far by clicking on View icon.
Group Management
This is the Employee group management section where you can create and edit payroll groups. You can also add/remove employees to the group.
Here admin can create some groups based on designation, nature of employment, Cadre, etc. as per the requirement.
Edit: Admin can edit the group details by clicking on Edit Group Button.
Add: Admin can Create Group by clicking on the Create a group button.
Overview: Admin can have an overview of all the groups, its members counts and list of members by clicking on the Overview button.
View: Admin can view all the member lists with names by clicking on the View icon.
Add/Remove Member: Admin can add/remove members from the groups as per the requirement by clicking on the Add/Remove Members button.
Add Group: Admin can add a new payroll management group by clicking on the Add Manage payroll management group button.
Note: In our module, we have one Payroll Dealing Assistant (PDA - who will generate salary) and one Payroll Change Manager (PCM - who will change the attributes related to payroll) for Payroll Group (Single) which contains multiple Employee groups. These employee groups may contain single or multiple employees.
Admin can assign group assistant, group manager (group-wise) in the managed payroll management group section.
Configuring employee payroll and related information
The salary processing module manages the calculation of salaries of the employees based on their level or pays grade criteria.
There are 7 options in Salary Processing Module :
Configure Salary
Generate Salary
Process Salary
Approve Salary
Other Payment
Income Tax Management
Tax Deposition
Employee
All employees are fetched from the employee management module. Here payroll is configured for all these employees. This section shows 3 payroll filters/status with counts:
Payroll Active (contains a list of all employees whose payroll are configured)
Flagged/Debarred (contains a list of employees who are marked debarred or their payroll-related profile has been changed)
Payroll Not Configured (contains a list of all those employees whose payroll is not configured yet)
Payroll Not configured
By clicking this option the user is directed to the Employee Detail Records interface where information of all the employees is displayed.
The information on this page changes with every employee taking a promotion, or changing their active pay commission.
Upload Bulk Data
University can upload bulk salary data of employees by clicking on Upload Bulk Employee Data. There is an option of Download Excel Format to understand the format in which bulk details to be uploaded.
Admin can download the format, fill in the details and upload the file in the required format only.
Changed Value
By clicking on i icon once can view all the details if changed.
Salary not structured
This column specifies that the particular employee salary structure is defined or not. When the salary structure is not defined then cross icon appears, else check icon appears.
View
View icon helps to view the details of the employee. Admin can add LIC policies for each employee by clicking on Add Policies.
Configure
The Settings icon configure payroll for each employee.
Define Salary Structure
To define Salary structure click on the salary icon
Here Admin can assign salary rules to employees as per the requirement.
Note: Additional employee-specific payroll entries can also be added to the employee in the Employee Salary Structure Section.
Payroll Active
When Admin defines salary structure for the employee and configures payroll for the employee, it automatically appears in the Payroll Active section as their status is changed from Not Configured" to “Active.
Flagged/Debarred
If Payroll is active for a particular employee but some changes have been done which can affect the salary processing and generating mechanism, then entry for particular employee automatically appears in the Flagged/Debarred section.
To transfer that entry from flagged to payroll active section, admin needs to activate that entry by changing the status to Active again. Also, Employee Payroll status can be explicitly marked as debarred by the organization due to certain cases.
Employee Salary Structure
Here the employee is mapped with Payroll entries like which type of salary heads will be included for that employee. In this section admin can view/add/edit payroll entry for each employee individually. Admin can even add one time payroll entry.
Add Payroll Entry: Payroll entry can be added by clicking on either Add payroll Entry button(Manually) or Add payroll Entry from Rules Set button (select from already defined rules set).
Add Payroll one time Entries: Admin can even add one time payroll entry.
Note: The Grade Pay field is dependent on the Active Pay Commission field. If the Active pay commission field shows the 7th pay commission, then this field should be hidden.
If the selected employee is Handicapped then the Transport Allowance is doubled. (T.A).
Separate NPA from the deduction.
Generating Salaries
Generating Salary
Before processing and approving salary, we need to generate it first.
By clicking this option the user is directed to the Employee Detail Records interface where information of all the employees of payroll active section is displayed.
Generate Individual Salary
If the Admin/PD (Payroll Dealing Assistant) wants to generate a salary for each employee one by one he/she can click on Rupee icon.
Generate Bulk Salary
If the Admin/PDA(Payroll Dealing Assistant) wants to generate a salary for all employees in a single go then it can be done by selecting all the employees whose salary needs to be generated together and click on Generate Bulk Salary button.
Bulk Salary Update
If the Admin/PD (Payroll Dealing Assistant) wants to add/deduct some amount to/from the employees, then it can be done in bulk under that salary heads. For example: to provide bonuses we can select multiple employees together and update that bonus amount.
Note: Payroll entry must be mapped to Employee Salary Structure for the bulk updates.
Verify Bulk Salary
By clicking this option the SO (Section Officer)/Admin is directed to Salary Processing Interface of all the employees whose salary has been generated.
The information displayed on this page is only of those employees whose salary has been generated. The SO(Section Officer)/Admin will verify the salary details and mark it verified by clicking on the Verify Bulk Salary button.
Un-Verify Bulk Salary
If Admin/SO (Section Officer) wants to un-verify the salary which has been verified but not finalized yet due to some changes then he/she needs to click on the un-verify Bulk Salary button. It cannot be unprocessed/unverified once finalized.Un-verification can be done for multiple employees in bulk.
Finalize Bulk Salary
After verification the SO (Section Officer)/Admin can finalize the salary for approval. No changes can be incorporated after the finalization process.
View Previous salary
To view the previous salary slip of an employee click on View icon. It can also be printed from here as per the requirement.
Approve Bulk Salary
By clicking this option the AR(Assistant Registrar)/Admin is directed to Salary Processing Interface of all the employees whose salary has been processed.
The information displayed on this page is only of those employees whose salary has been verified and finalized.
View Generated Salary
Generated salary slip can be viewed after approval, by clicking on View icon.
Generating Reports
Salary Slip Generation
It contains all the list for the total earnings and deductions of an employee for that particular month.
Admin has an option to generate bulk salary slip for all employees and print it in pdf format by clicking on the Print PDF button.
Employee Single Sheet
It shows the list of all the employees with their pay level, department, budget head, and basic pay along with all the deductions and savings.
Department Summary
It shows the overall earnings and deductions of the complete department.
Provident Fund Reporting
GPF: It is categorized by different employee categories and shows the amount of GPF subscription added for the particular month.
CPF: It is a Contributory Provident Fund(CPF). Earlier, the Government was giving the option to CPF subscribers to switch over from CPF Scheme to GPF Scheme (Pension Scheme).
NPS: The National Pension System(NPS) is calculated and computed based on the employee’s basic pay with the salary head Dearness Allowance(DA)'
Note: The amount of NPS calculated for Doctors also includes NPA.
Contingent
Contingent bills are generated on the basis of extra expenses in the managing of an office.
Remittance Letter
A remittance letter is issued to employees as payment towards some expenses made in the office or is sent as a gift to the employee.
Salary Head Report
Monthly Bank Statement
The monthly Bank statement can be viewed in Hindi or English format by clicking View Icon.
Monthly Bank Statement in English: This button allows the user to generate the approved Salary slips for each employee in English.
Monthly Bank Statement in Hindi: This button allows the user to generate the approved Salary slips for each employee in Hindi.
Monthly Pay-Bill Report
Earning-Deduction Report
It will generate Earning and Deduction Report of an employee monthly.
LIC Report
The LIC report generated here gives information about the employees who have opted for LIC policy. Following fields will be displayed under it:
Employee’s name
Code
Department
Policy number and
The amount that person has applied for
Income tax Deduction Statement
Last Pay Certificate
LPC is given to the employee who is going to transfer from the existing organization or on superannuation. It is very important for any employee because of its defined pay of employees or pension in the case of superannuation.
Pre-Processing Report
Pre-Processing Report generates reports of those employees who have some missing details which can affect the salary generation process.
Those details need to be completed before processing salaries so that they can be verified and get finalized accordingly.
Employee Wise Monthly Pay Report
This Report is generated monthyl for each employee.
OU Wise Monthly Pay Report
This Report is generated monthly for each Organisational Unit.
Income Tax Deposition and Generation
Income Tax
When the user clicks on this option, they are redirected to the Income Tax Management Interface. This interface allows the user to manage/deposit and generate slips for payments of income tax returns for each employee.
Income tax Depositions
When the user clicks on the tax deposition, the control is redirected to the tax deposition entries. This interface allows the user to add new tax depositions.
Add Tax Deposit: Admin can add Tax Deposit by clicking on Add Tax Deposit. After clicking on it, fill the required details.
Income Tax Generation
To generate Income tax declaration click on Rupee icon. After clicking on it, select the year and click on submit.
After calculating all the Gross Earning, Gross Deduction, Net Pay admin can declare tax by saving the changes.
Form 16
Form 16 is a certificate issued by an employer and it contains the information you need to prepare and file your income tax return. Employees can click on the Form 16 button.
Activity Logs
Here logs of any updates/changes made in the payroll module are recorded.
Procedures
Steps to Process, generate and approve salary
1: The first step of processing salaries will be accomplished by DA(Dealing Assistant)who will be responsible to generate salaries for all employee group wise.
2: After he generates the salaries for his/her group, the list will be transferred to SO(Section officer) for the verification process.
3: The SO (Section officer) will verify the generated salary list. If the SO finds any irrelevant details while the verification process he/she can mark it as not verified and ask for changes to be made.
After desired changes/updates are made, the salary are verified again.
4: After verification SO finalizes the salary. At this step, changes cannot be entertained/incorporated.
5: Now to approve the finalized salaries AR(Assistant Registrar)has to click on Approve Salary button to finally freeze the salaries and transfer it to the Finance department for further processing at their end.
Note: Payroll admin also has the right to generate, verify, finalize and approve salaries and for all the employees not restricted to a group.
Procedures to be followed by DA(PDA)
1: Login as PDA with Login ID and Password to generate salary.
2: Click on the Employee section to have a view of the salary status of his/her group.
Click on Generate Salaries where DA will get the list of all payroll configured salaries.
3: Here DA can generate salaries for each employee one by one or in bulk.
Procedure to be followed by SO
1: Login as SO with the Login ID and Password to verify the salary.
2: If the SO finds any issue in salary details he/she can un-verify it.
3: If no changes need to be done then he/she can verify it and finalize it for further processing.
Procedures to be followed by AR
1: Login as AR with the Login ID and Password to approve salary.
2: Click on the Approve salary button to approve the verified and finalized salary.
Procedures to be followed by Payroll Admin
1: Login as Payroll Admin with the administrative login id and password to view the Payroll Module Dashboard.
2: Click on the setting section to first configure the payroll related details.
3: To add new Bank Details Click on the Add Bank button to add Bank details, fill all the relevant information and click on submit.
4: To edit any details click on the Edit button and save the changes once the details are updated.
5: To view the details of academic distinction, click on the View icon.
6: Similarly to add/ edit/ view University Bank Details, Budget Heads, Pay Commissions, Financial Cycle, Financial Plan, Pay band Categories, Grade Pay Scale, Levels, Payroll Entry Types, Payroll Entry Group, Payroll Entries, Salary Structure Template and Group Management follow the same step from step 3 to step 5.
7: Payroll admin also has the right to generate,verify, finalize and approve salaries and for all the employees.
Roles
| Role Name | Description |
|---|---|
| payroll_admin | Can configure all the settings of the payroll module, can generate salary, can change the salary heads |
| payroll_pvo | Can verify and finalize the salary. |
| payroll_pda | Can generate the salary. |
| payroll_pfo | Payroll Finalization Officer |
| payroll_pcm | Can bulk update the salary heads of the employees. |
| Payroll_ar_salary | Can approve the generated salary. |
| Payroll_employee | Can view the approved salary of his own. |
Workflow Diagrams
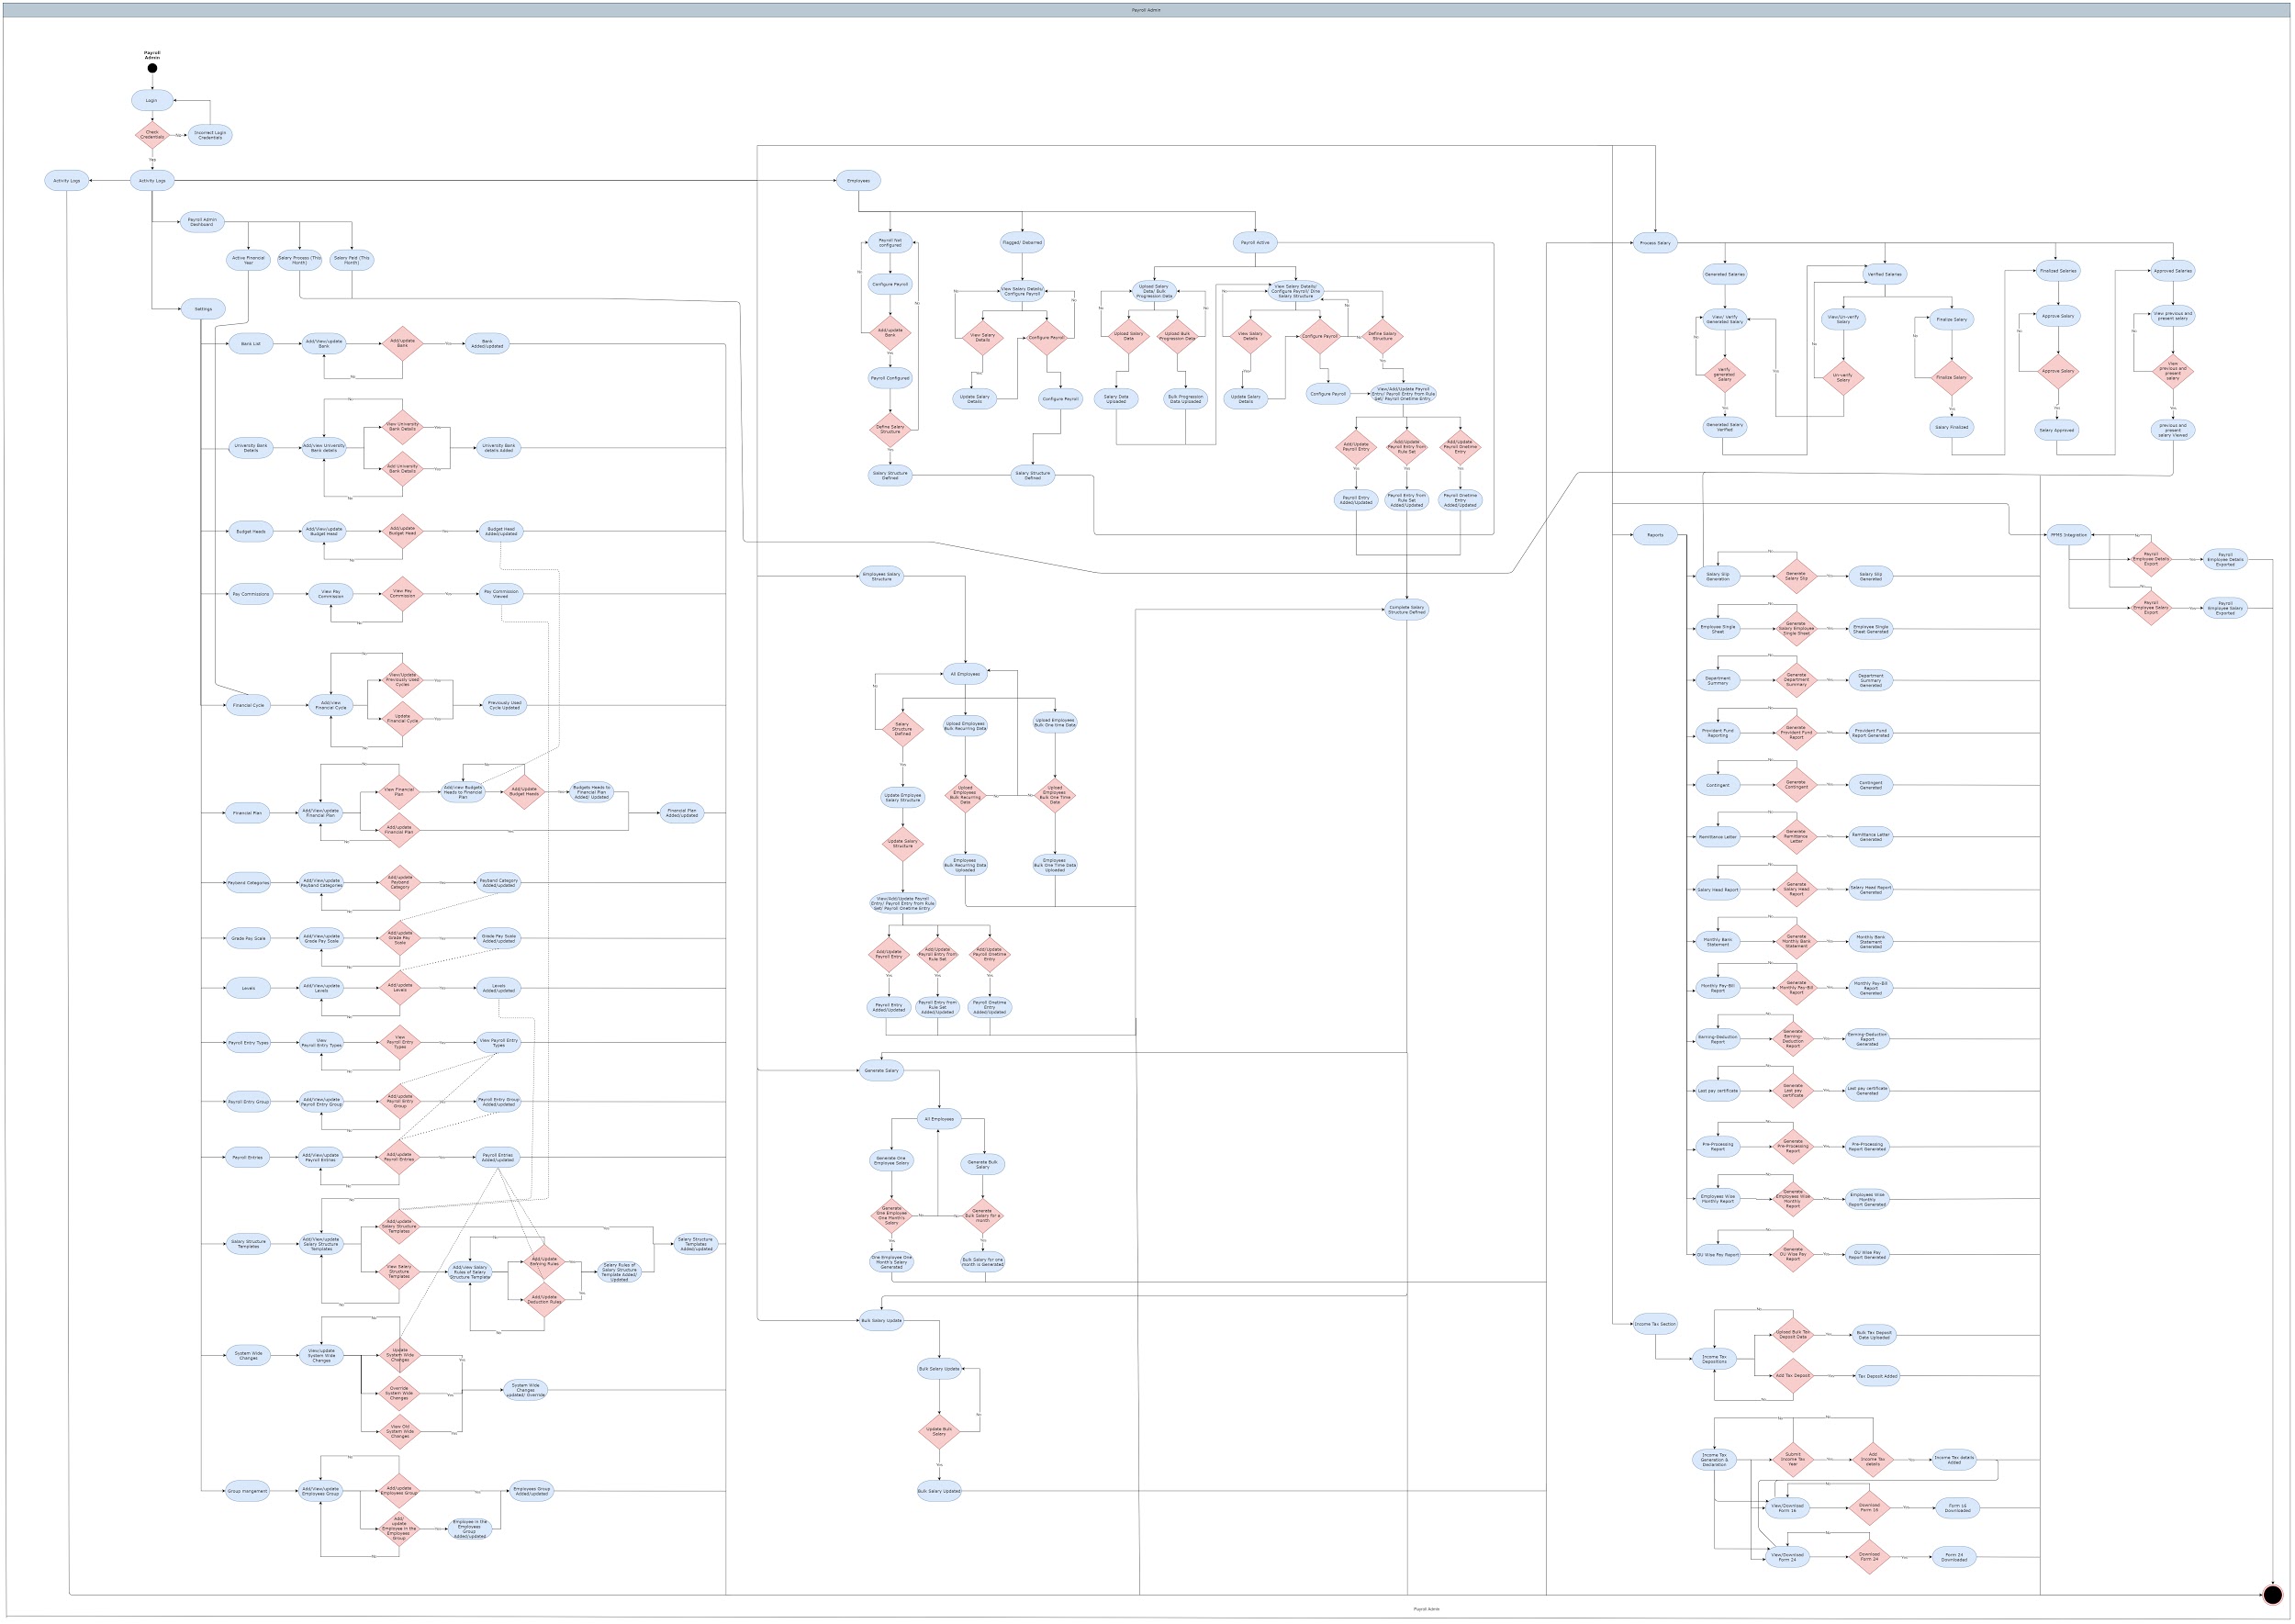
Activity Diagram
- Activity diagram is basically a flowchart to represent the flow from one activity to another activity.
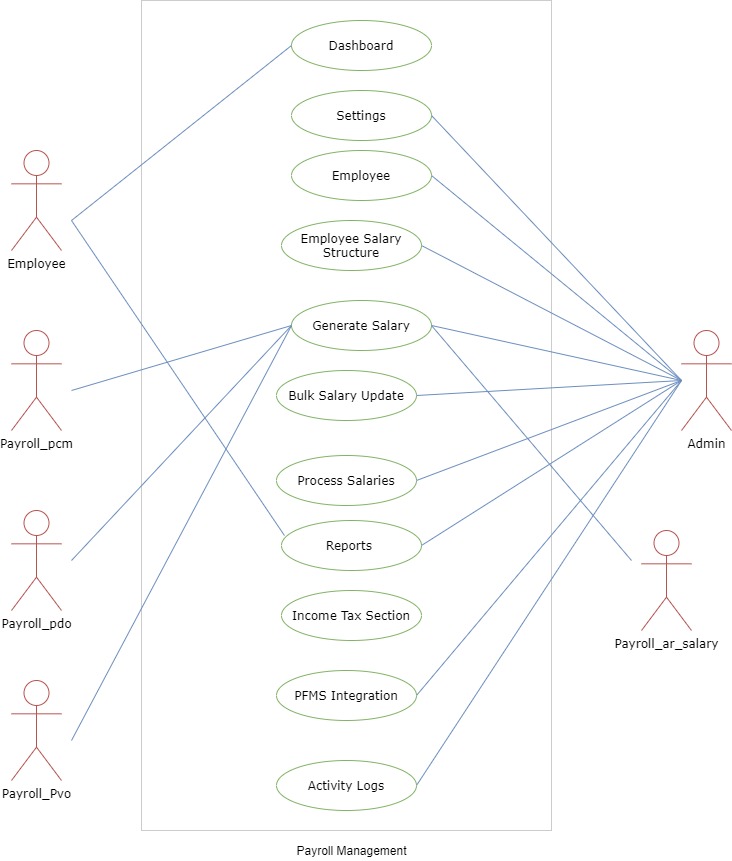
Use Case Diagram
- A use case diagram is a way to summarize details of a system and the users within the system