Training and Placement
Introduction
This module provides placement and internship to students.
This system will handle the information of students, companies, TPO(Training and placement officer).
For companies, it will do the following:
It will collect information from companies who want to recruit students for internship or placement,
Make their hiring schedules.
Record of students placed in each session or season.
Companies can also post their job/internship on the portal inactive season and can see how many applications have arrived for that job/internship.
TPO can monitor all the drive activities(From job posting to recruitment) from a single window.
For Student, it will do the following:
Quicker placements.
Better remuneration packages.
Large choice of job opportunities.
Build a career in the area of prominent skills, interests.
Job alerts.
For TPO it helps in:
Manage the student's profiles.
Monitor company's profile
Monitor placement opportunity.
Placement Directory.
Work as a silent placement officer.
Reduced cost of placement initiatives.
Greater student satisfaction.
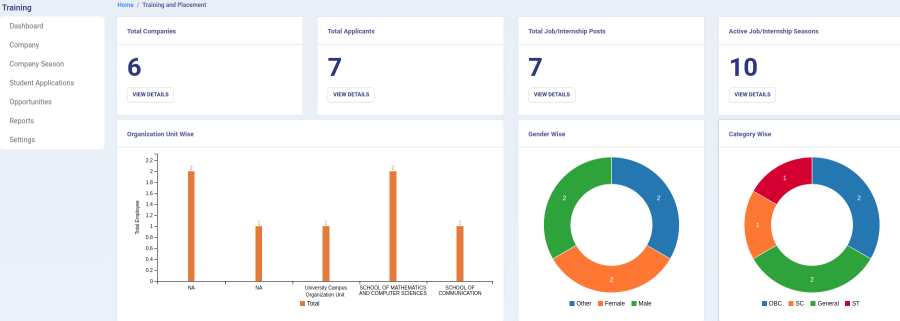
Dashboard
In Admin Dashbaord, admin has the accessibilities to Total Companies, Total Applicants, Total Job/Internship Posts and Active Job Internship Seasons, along with their graphical representation. While in Company Dashboard, company has the accessibilities to Applicants, Job/ Internship Posts and Active Job/ Internship Seasons. It can only show the count of these functions with only viewing rights.
Admin dashboard
Department dashboard
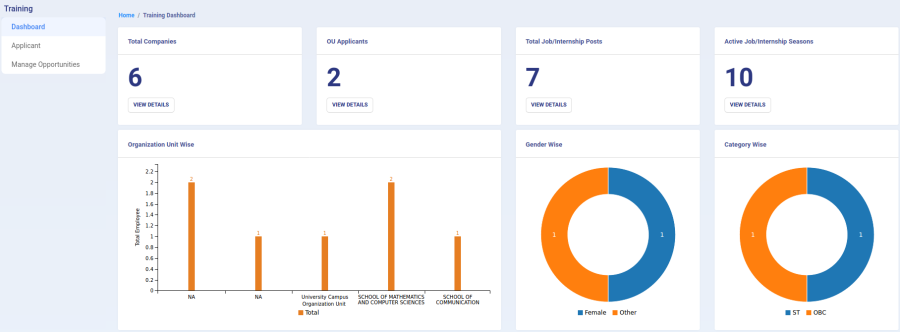
Company dashboard

Settings
This section contains the configuration detail related to the Training and placement module.
Only the admin with the rights of Training_Admin can view and access it.

OU Mapping
In this field, we can define and map different OU's i.e. who is parent OU and what is/are its child units. This is done to club/group different small departments(No. of students)into one main big department(No. of students).
Admin can view the details by clicking on “view” icon available in front of every entry.
Admin can edit/update the details by clicking on the “edit” icon available.
Admin can map OU by clicking on "Add Organization Mapping" button present on the top right side of the portal and fill in the required details:-
a) Parent Unit(Choose from the dropdown)
b) Child Unit(Choose from the dropdown)
In this field, we can define and configure the season for placement. Fore example- June-July season, Nov-Dec season, etc.
Admin can view the details by clicking on “view” icon available in front of every entry.
Admin can edit/update the details by clicking on the “Update” icon available.
Admin can add a new season by clicking on the "Add Placement Season" button present on the top right side of the portal and fill in the required details:-
a) Code(Code of the season)
b) Name(Name of the season)
c) Fee Applicable for Company(mark yes if fee needs to be taken for that season driveby the company).
d) Fee Applicable for Student(mark yes if fee needs to be taken for that season driveby the student. For example, internship).
e) Status(Active/Inactive)
Company
Admin can monitor company profile i.e. edit and view the existing profile added by the company itself through Training_company login.
Create a Company Profile
When Company HR logins with Training_company role he/she can create his/her company profile by clicking on "Create Your Company Profile" button present on the top right side of the portal and fill in the required details:-
a) Company Name(Name of the company)
b) Company Details(Details related to the company like what this company is about, its culture, it's working environment, when it was established, timings, or any other details.)
c) Company Head Office(Head office of the company - name & address)
d) Company Website
e) Company HR Name(name of the contact person who will conduct the recruitment)
f) Company HR Contact
g) Company HR Email
View
Admin/Company HR can view the details by clicking on “view” icon available in front of every entry.
Edit
Admin/Company HR can update/edit the details by clicking on “edit” icon.
Company Season
This section consists of information like:
Company
Session
Fee Amount
Payment Status
Status
Action
Apply for Training Season
Companies can apply in the active season by clicking on the "Apply" button present on the top right side of the screen and choose the season from the dropdown.
View
Admin/Company HR can view the details by clicking on “view” icon available in front of every entry.
Pay
Company HR can pay the fee by clicking on “dollar” icon to post the advertisement and conduct a recruitment drive on the campus. It totally depends on the Campus(TPO) if they want to charge a fee for the recruitment drive.
Note: The company cannot post the Job in opportunities section without selecting/opting for any season.
Student Application
This section has information about the applicants who have applied in the available options for the active and published opportunity. The "Hiring Status" can be checked and updated from the same page itself.\
Update Hiring Status
Admin(TPO)/ Department_Admin can update the hiring status for the students either individually or in the bulk process by clicking on the "update hiring status" button present on the top right side of the screen.
View
Admin(TPO)/ Department_Admin can view the details by clicking on the “view” icon available in front of every entry.
Opportunities
This section specifies all the opportunities(Placement/internship) for the students. Companies can post their job in this section and students can apply for the job from this section. It is a Job pool for students where they are given opportunities to register for any job according to their eligibility.
Add Opportunities
Companies can add job post by clicking on "Add Internship Placement Openings" button present on the top right side of the screen and fill in the following details:-
Title
Opportunity(Internship/Placement)
Description
Essential Qualification(Discipline/level/course)
Qualification Name
Desired Qualification
Eligibility
Skill Set
Designation
CTC and breakup
Experience(Choose From Dropdown)
Season(Choose From Dropdown)
Opportunity type(Full time/Part-Time)
Process(On-Campus/Off-Campus)
Selection criteria
Opening and Closing Date
Written Test(Yes/No)
Interview(Yes/No)
Group Discussion(Yes/No)
Category
Venue
Vacancies
Location
Search Keywords(will be used to search the job titles by the name mentioned in this field and also the jobs that have those keywords in them)
Terms and condition
Additional documents
Show Post(Yes/No)
Status(Active/Inactive) module_docs.
View Internship/Placement
Admin/Student/Company can view the details of the job posted by company HR by clicking on “view” icon available in front of every entry.
View Applicants
Admin/Company view the details of the applicants who have applied for the job by clicking on “view” icon available in front of every entry.
Update
Company HR can update/edit the details before publishing by clicking on the update button.
Publish
Company HR can finally publish the job openings added by him/her after updating(If any) by clicking on the Publish button.
Reports
This section helps to generate and view all data at a glance at any time, get instant reports & can be able to take an authentic decision.\
Season Report
It helps to generate the season-wise report. The report consists of :
- Season Code
- Number of Companies
- Number of Applicants
Company Report
It helps to generate a Company-wise report. This report consists of:
- Company Name
- Number of Posts
- Number of Applicants
Job Report
It helps to generate Job wise report. This report consists of :
- Company Name
- Job Posted
- Number of applicants for the job
Organizational Unit Report
It helps to generate OU wise report. This report consists of :
- Organizational Unit
- Number of applicants
Gender Report
It helps to generate the gender-wise report. This report consists of :
- Gender
- Number of applicants
Category Report
It helps to generate a Category-wise report. This rpeort consists of :
Category
Number of applicants
Logins
There will be 5 types of logins:
Training_Admin
Training admin can configure the setting, monitor student profile & company profile, monitor Opportunities, map OU's, and generate reports.
Steps to be followed
1: Login as Training admin to view the Training and placement dashboard.
2: Click on the setting section to first configure the placement related details.
3: Click on the Settings icon to configure the Placement Season and map OU’s.
4: To monitor the profiles of all the company, go to the company section. Click on “view” icon to view the profile and “edit” icon to edit the details in the profile.
5: To monitor and update student hiring status, go to the student application section and click on the update hiring status button. Click on view icon to view the status.
6: To monitor the job openings admin needs to click on the "opportunities" section. Click on “view” icon to view the jobs and icon to view the applicants.
7: To have a view and track of all the placement drive conducted in the university, Admin needs to click on reports section and he/she will be able to generate multiple reports on the basis of season, companies, students, gender, etc.
Training_Admin_view
The same role as Training_Admin but with viewing rights only.
Training_Company
Can post the job(Placement/Internship) for the recruitment drive.
Steps to be followed
1: Login as Company HR to view the Training and placement dashboard.
2: To add a company profile in the portal click on the company profile section and add the required details. Click on view icon to view the profile and edit icon to edit the details in the profile.
3: To select/opt season for placement drive go to the Company season section and click on the apply button. Click on “view” icon to view the season details and icon to pay the requested fee.
4: To add/post job go to manage opportunities section and click on add internship/placement openings button. Click on view icon to view the jobs, icon to view the applicants, and click on the publish button to finally post it on the portal.
Training_Dept
The OU who can monitor the opportunities posted by the company and can keep track of how many students have been recruited by the companies.
Students
Who will apply for the job.
Steps to be followed
1: Login as a student to view the Training and placement dashboard.
2: Click on Available Season to apply for all the jobs in the particular season.
3: Click on view icon to proceed further.
4: To apply for the job in the selected season click on the Apply button present at the bottom right side of the screen. A pop-up box will appear. Click ok to proceed further.
5: Select the season the student wants to apply for and click on the submit button.
6: The season to which a student has paid for/applied for comes under the Applied season section.
7: Click on the Pay application fees button to pay the requested fee for participating in the drive.
8: If the student wants to apply for any job irrespective of the season then, he /she can click on the "Apply for Job/internship" section.
9: Click on view icon to proceed further.
10: Click on the Apply button present on the top right side of the screen.
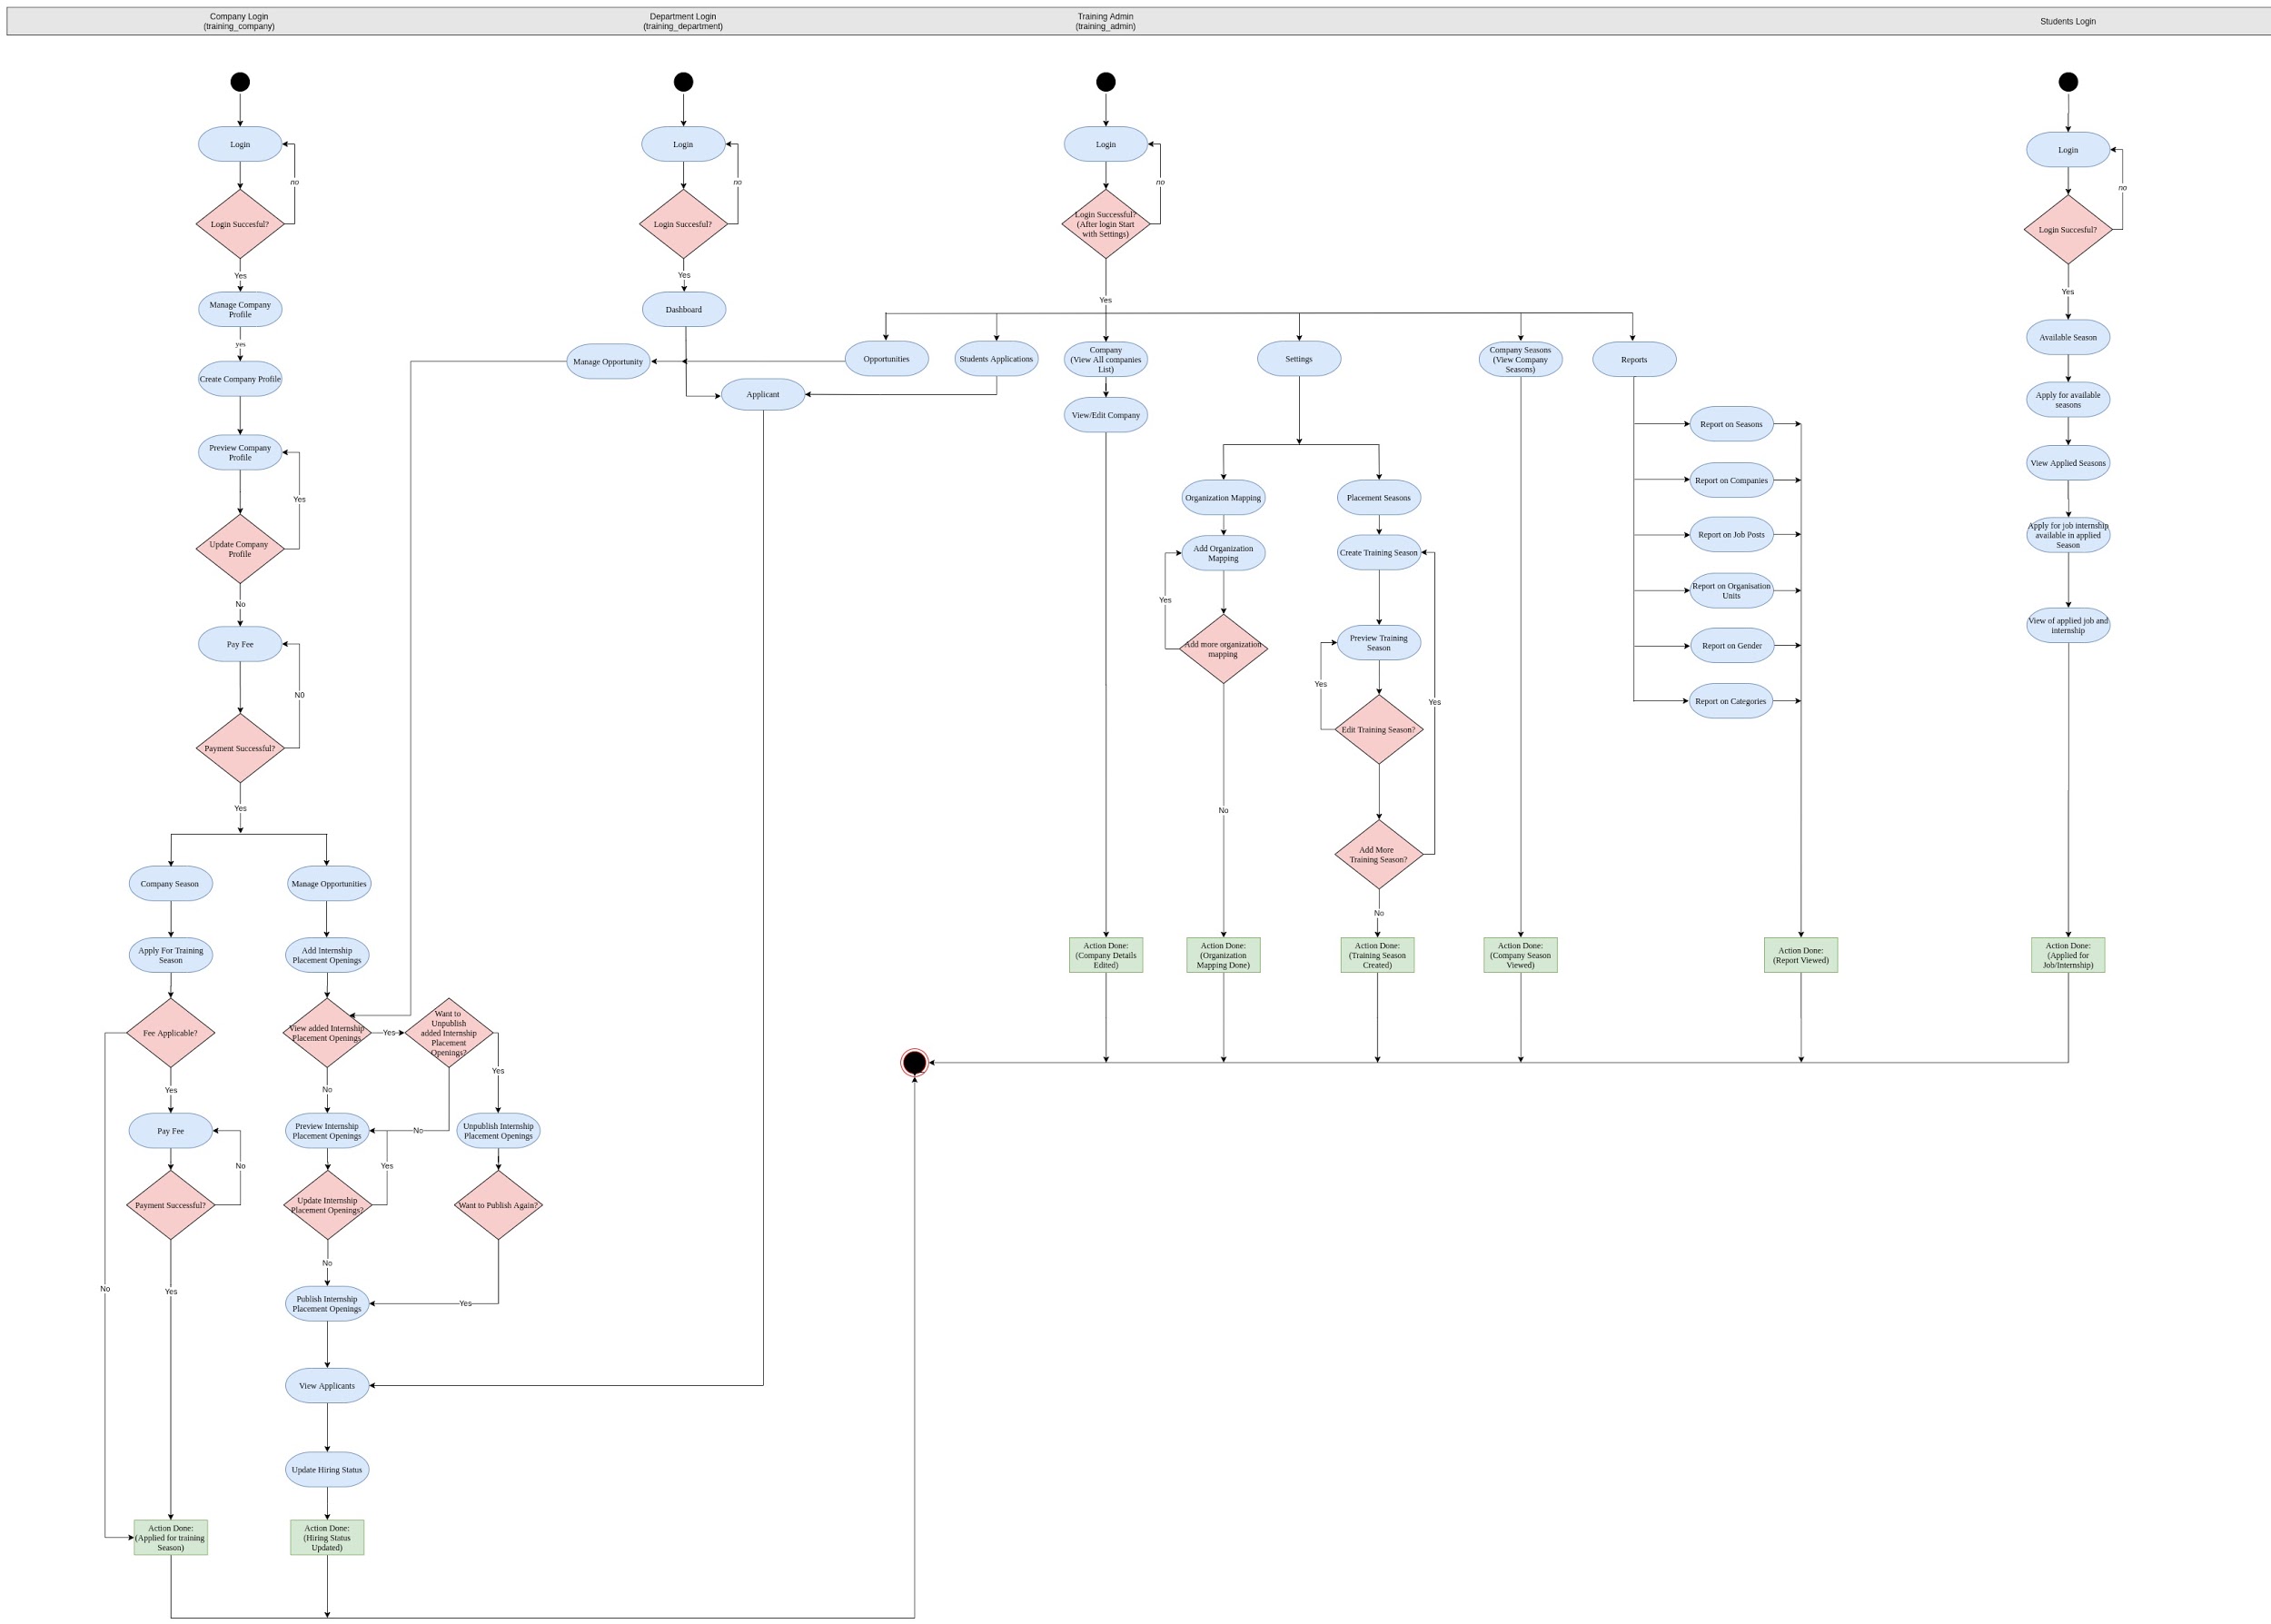
Diagram:-
Activity Diagram:-
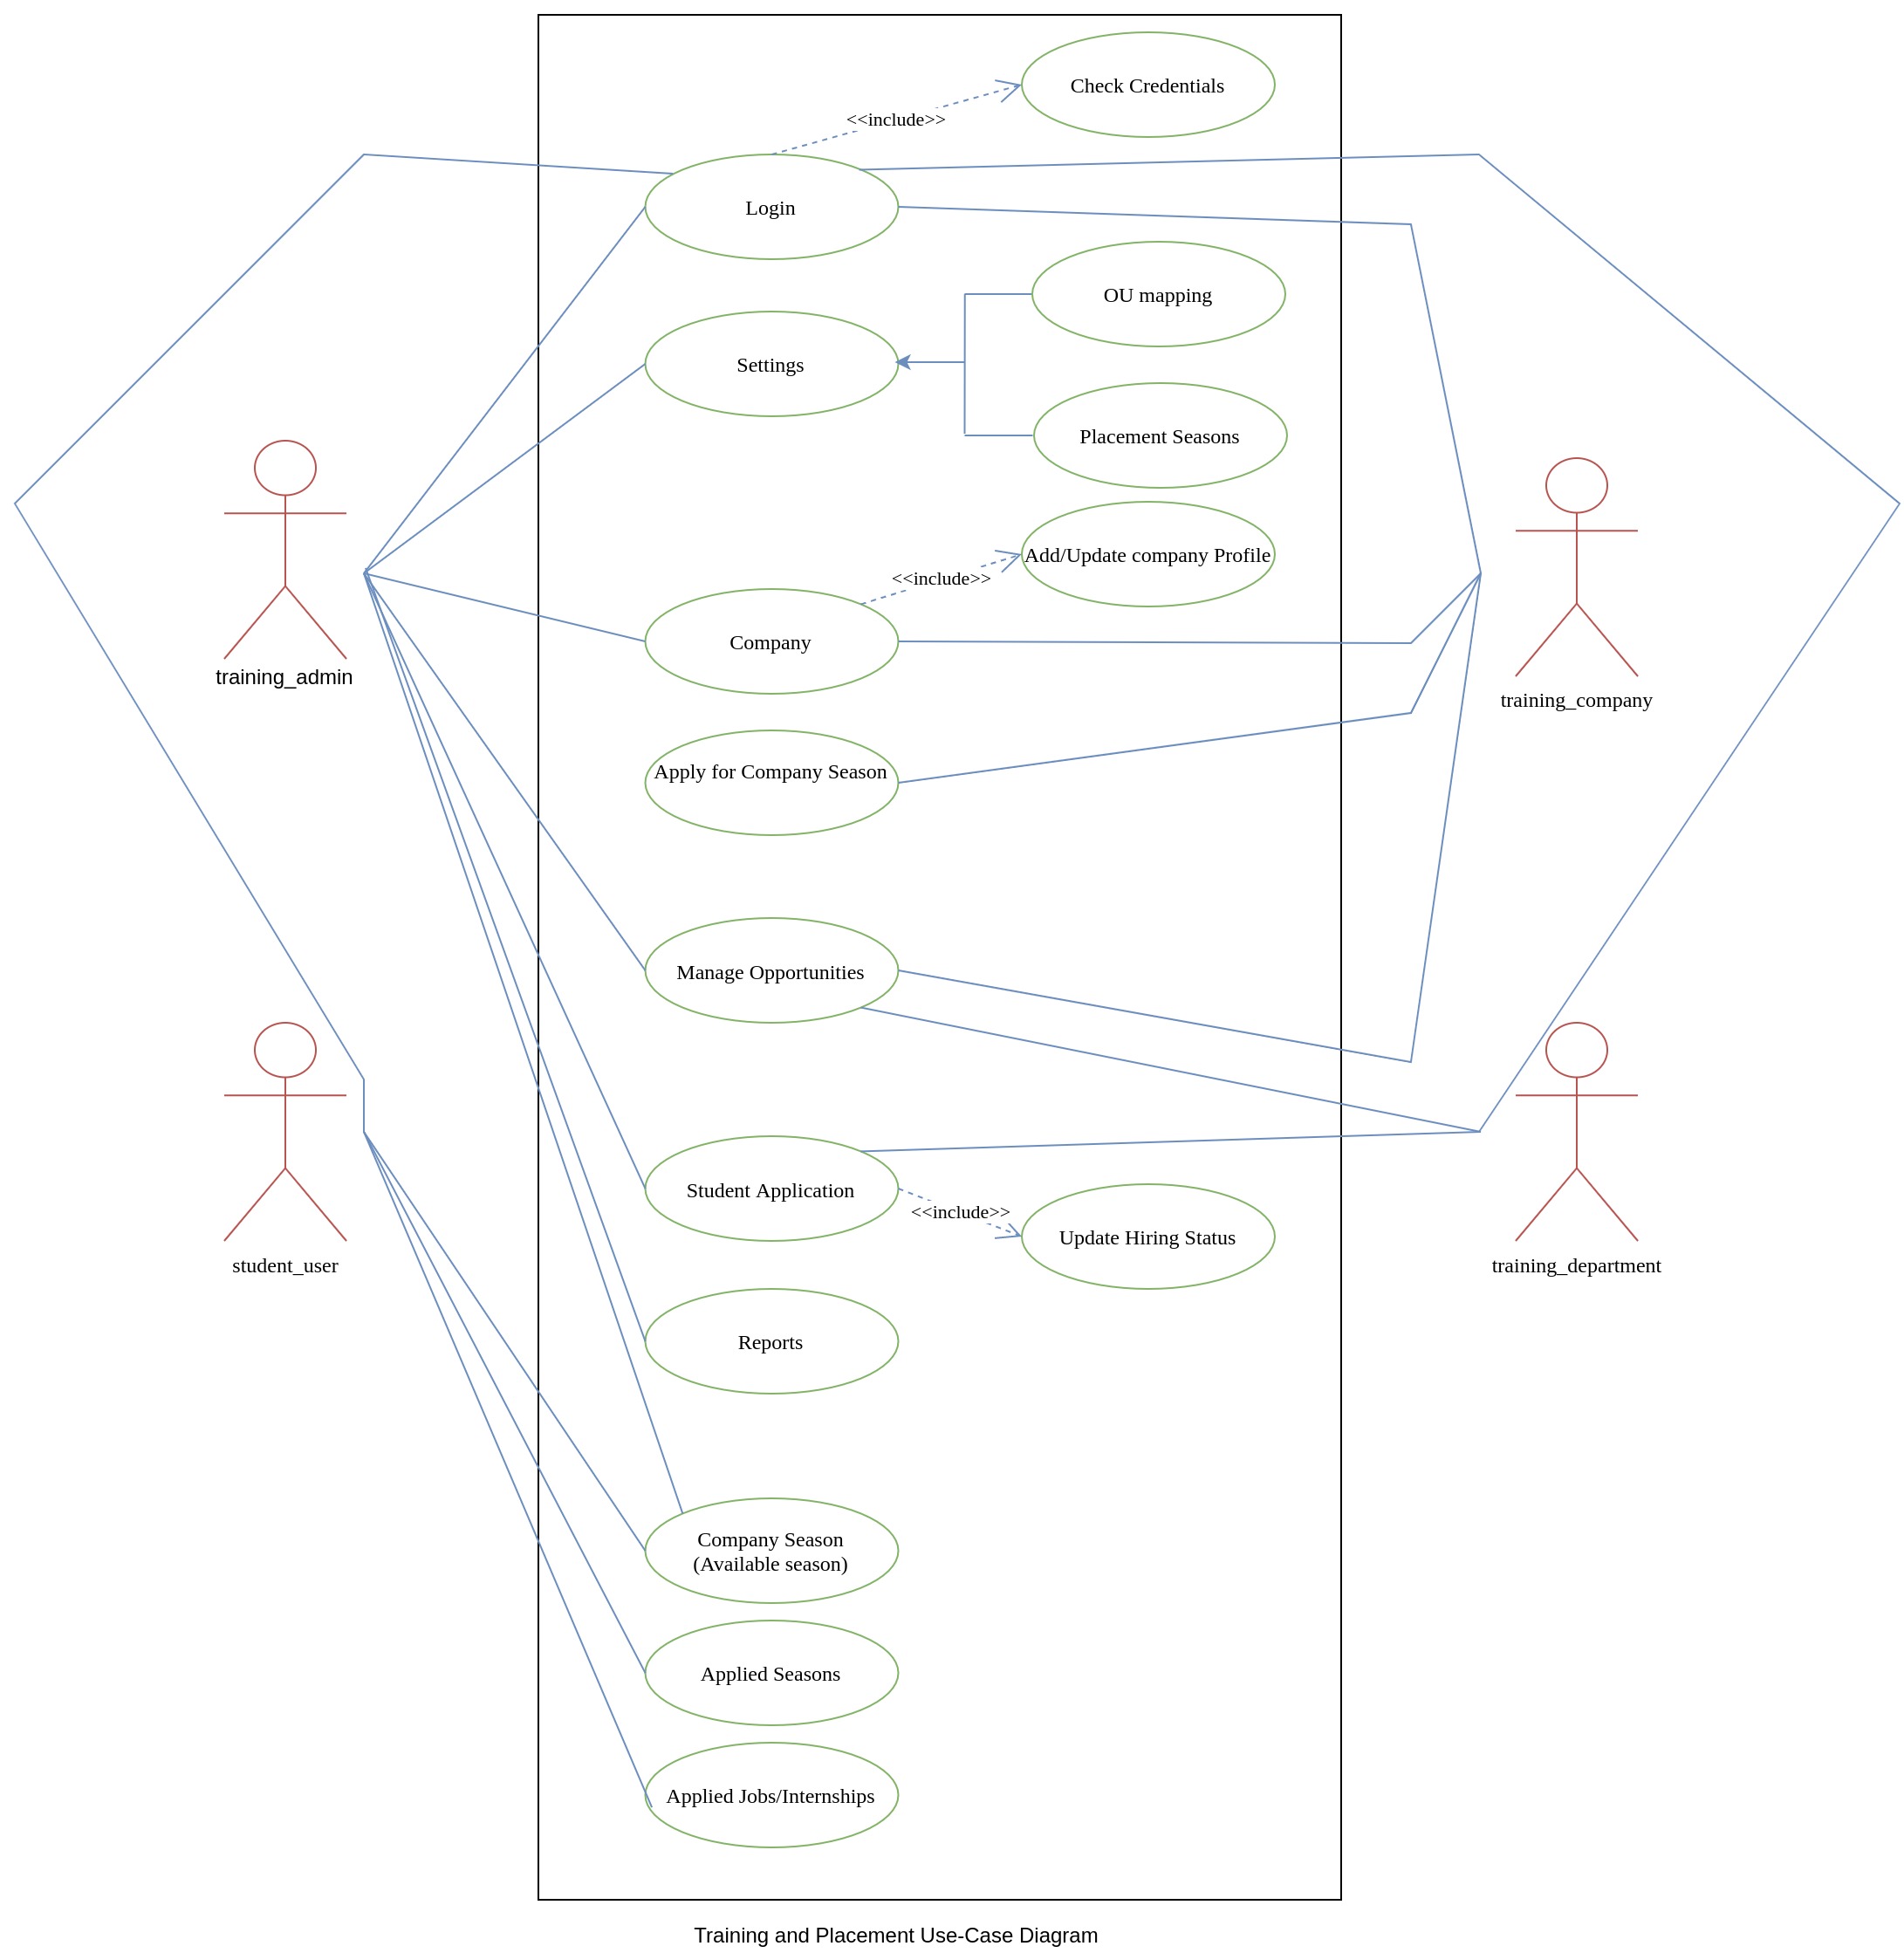
Use Case Diagram:-
FAQs
Question 1: Is there any prerequisite for using the training and placement module?
Answer: Yes, Departments/OU’s and Programmes must be configured in the Academic module. Also, student data must be available and the student portal must be active. The students should be added to their particular Batches and Sections.
Question 2: How do we configure OU mapping?
Answer: Go to the ‘Settings’ option, under it you will find OU mapping settings along with other options.
Question 3: What is the difference between ‘Administering Organisation’ and ‘Administered Organisation’ under OU Mapping?
Answer: Administering organisation is the main department or cell under which various other departments operate for the purpose of training and placement. For example, a university can have a placement cell or training and placement department under which other departments (Administered Organisation) send in their training or placement requests.
Question 4: Can we select multiple departments under Administering Organisation and Administered Organisation under OU mapping?
Answer: Under, Administering Organisation only one main unit can be selected. Under, Administered Organisation multiple departments can be selected.
Question 5: Under OU Coordinator mapping can we add multiple OU Coordinators?
Answer: The OU Placement coordinator is responsible for looking over the module’s workflow, restricted to their associated OU. Therefore, ideally one coordinator should be mapped with an OU but we do not restrict the admin to add multiple coordinators for a single OU.
Question 6: What do the ‘Name’ and ‘Code’ fields mean under the Add Placement Season?
Answer: The organisation can assign any name as per requirement for the placement drive and accordingly assign a required code.
Question 7: How do we add company details?
Answer: Go to ‘Companies’ option and select ‘Add Company’ to add company details.
Question 8: Do we have to add each company individually?
Answer: You can either add companies individually or you can bulk import data also.
Question 9: How do we import company data in bulk?
Answer: Under ‘Companies’ section click on ‘Import Company’ tab. Download excel format and make entries in the predefined format, and upload the file.
Question 10: Can we make additional entries in the Excel sheet?
Answer: No. It is strongly suggested not to edit/remove/add the headers of the bulk excel sheet while preparing the import data.
Question 11: Can companies add their details on their own?
Answer: Yes. When ‘Company registration URL’ under the ‘Settings’ option is provided to them, they can upload the details themselves.
Question 12: Once companies add their details through the registration URL, is it automatically approved on the portal?
Answer: No. The Admin can either approve or reject the company request by going to the ‘Company Verification Request’ under the ‘Company’ section.
Question 13: How can we approve multiple verification requests by different companies?
Answer: The bulk approve option is available under the admin dashboard. The admin can select multiple companies by clicking on the checkboxes and approve all such companies at once.
Question 14: Why is a registration link sent again to the companies after verifying the requests?
Answer: The registration link enables the company to create their own login credentials. After this step, the companies can login as an existing user.
Question 15: How do we add the companies to the placement season?
Answer: Click on ‘Company Season’ section and go to ‘Add Company to Season’.
Question 16: Under ‘Add company’ the Status field has two drop down options, ‘Saved’ and ‘Applied’. What is the difference between them?
Answer: The ‘Saved’ option is used to keep the application on hold. However, to actively participate in a placement season, the companies are required to ‘Apply’.
Question 17: Can companies also apply for the placement season on their own?
Answer: Yes. After the companies login as an existing user, they have the information of all the active placement seasons on their dashboard and they may apply for these seasons as per their requirement.
Question 18: Which placement seasons can the companies apply for in the ‘Season’ field under the ‘Apply for Placement Season’?
Answer: The companies can apply for all placement seasons which are ‘Active’ as per the configuration done by the Admin.
Question 19: How can companies share placement opportunities on the portal?
Answer: The companies can post opportunities from their logins as per their requirements.
Question 20: What do we mean by ‘Title’, ‘Season’ and ‘Placement’ in the ‘Add Opportunity’ tab under ‘Manage Opportunities’ section?
Answer: By ‘Title’, we mean the name of the opportunity/training being offered. ‘Season’ field reflects the placement season which was created. The ‘Placement’ field has two default dropdown options of ‘Internship’ and ‘Placement’ opportunities being offered.
Question 21: Is there a provision to add ‘Desirable Qualification’ in the opportunity section?
Answer: Yes, desirable qualifications can be mentioned.
Question 22: What is to be filled in the ‘Selection Criteria’ field?
Answer: This field describes the selection factors like Skills, Experience etc.
Question 23: What does ‘Opening Date’ and ‘Closing Date’ imply?
Answer: It is the duration between which the opportunity will appear for students to apply.
Question 24: Can we restrict the opportunity offered to a limited section of candidates?
Answer: Yes. The ‘Programme’ field in the ‘Add Opportunities’ section allows us to restrict the opportunity to a particular section of students. For example, allow only students enrolled in the Economics and Statistics department.
Question 25: What does ‘Gender’ field under add opportunity imply?
Answer: In case the opportunity is gender specific, a particular gender can be selected. If the opportunity is open to all then all three options, Male/Female/Transgender is to be selected.
Question 26: What type of file is to be uploaded in the ‘Add Opportunity’ section?
Answer: Files related placement and opportunities like Job Description, Terms of Reference etc can be uploaded.
Question 27: What does the ‘Show Post’ field imply?
Answer: Whether the job title is to reflect on the candidate’s portal or not, is configured using this particular setting.
Question 28: How do we make the opportunity details live/visible?
Answer: After adding all details in the add opportunity section click the ‘Publish’ tab to make the opportunity live.
Question 29: Can we edit or delete any opportunity once it is published?
Answer: Yes. In case there is no student data linked with such an opportunity, then the said opportunity can be deleted. Edit option is available at all times.
Question 30: How can students apply for a particular opportunity?
Answer: The students must first register themselves by filling in basic details under the training and placement section on the student portal. Once registered they will get an option to view the placement seasons and apply for the same.
Question 31: How can students track their job application for a particular season?
Answer: Once the student applies for an opportunity, they can track their application in the ‘Applied Season’ section on the portal.
Question 32: How can the Admin gather a consolidated view of the various placement seasons, participating companies, students etc.
Answer: The Admin can access consolidated reports on various aspects under the ‘Reports’ section in the settings.