Evaluation & Grading
Introduction
Evaluation & Grading module provides the structured interpretation and outcome of evaluations for students of the University, along with the planned schedule programme-wise, course-wise, exporting the relevant reports etc.
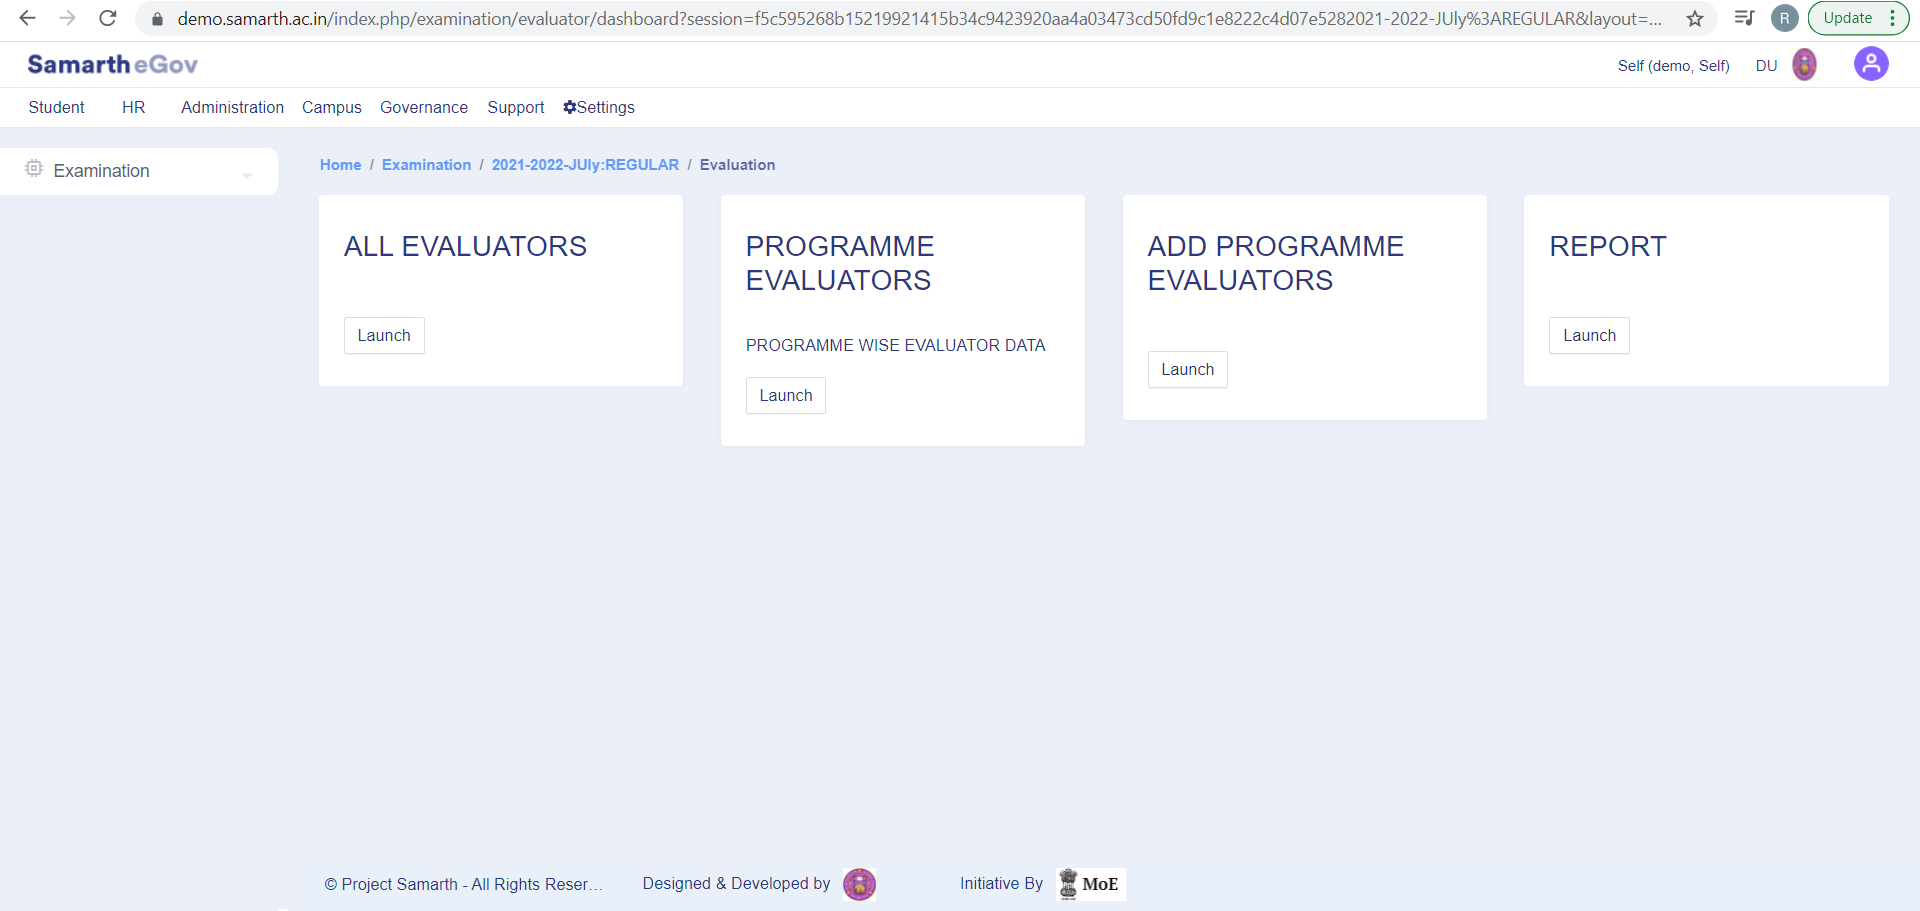
Dashboard
The dashboard of Evaluation & Grading captures the following details:-
All Evaluators
Programme Evaluators
Add Programme Evaluators
Report
Prerequisites of Evaluation & Grading
Configuration of following have to be completed:-
Programme Management
Academic Settings
Student-Course mapping
Examination (Evaluation) Settings Configuration
Configuration of Evaluation & Grading
Admin can configure the Evaluation & Grading Module by below-mentioned steps:-
Launch Academic Module
Launch Examination
Select the Examination Settings
Add Evaluation Assessment Types
The Evaluation Assessment types can be used for defining type and property of the Course Component. The Course Components will therefore be reflected in the Marksheet.
Steps for Configuration:
Click on the Add Evaluation Assessment Type button on the Examination Setting page.
Admin can View and Add a new Evaluation Assessment Type page.
Following details have to be filled by Admin:-
Fill Assessment ID
Fill Assessment Code
Fill Assessment Name
Select whether Assessment is Aggregate or not
Select the Assessment status
Add a description
Click on Save button to update the assessment.
Evaluation Division Group
The Evaluation Division Group is the function by which the Division system of Admin can be assigned. For example: The Range for First, Second and Third Division (For Credit/Percentage)
Steps of Configuration of Evaluation Division Group
Click on the cog/gear button of Evaluation Division Group on the Examination Settings page.
The admin can add the evaluation division group by clicking on the Add Eval Division Group button present on the top left-hand side.
Fill in the following details:
Select group Name
Add lower Boundary (lowest marks for the Division)
Add Grade letters (like O, A+, A, B, etc.)
Add Name
Hit the save button
Admin can Update the Evaluation Division by clicking on the pencil icon present.
Evaluation Grade Letters
By this function, admin will be assigned with the role to generate Grading System (Grade A,B,C etc.) for Evaluation.
Steps for configuration of Evaluation Grade Letters:
Click on the cog/settings button of the Evaluation Grade letter on the Examination Settings page.
The admin can add the evaluation grade letter by clicking on the Add Evaluation Grade Letters button present on the top left-hand side.
Then admin needs to fill in the following details:
Select Group Name
Add Lower Boundary (lowest marks for the Division)
Add Letter (like A, B, etc.)
Add Point
Add Name
Click on Save button to get the updates
Admin can Update the Evaluation Grade Letter by clicking on the pencil icon present.
Programme Division Group
The Programme Division Group is the function by which the admin can map the division group to Programme.
Steps for configuration
Click on the cog button of Programme Division Group on the Examination Settings page.
The admin can add the Programme Division Group by clicking on the Add Programme Division Group button present on the top left-hand side.
Then select the following details:
Programme
Division Group
Click on Save button to get the updates
Admin can update the Programme Division Group by clicking on the pencil button present.
Programme Grading Group
The Programme Grading group is the function by which the admin can map the grading group to Programme.
Steps for configuration
Click on the cog/settings button of Programme Grading Group on the Examination Settings page.
The admin can add the Programme Grading Group by clicking on the Add Programme Grading Group button present on the top left-hand side.
Then select the following details:-
Select Programme
Select Division Group
Click on Save button to get the updates
Admin can Update the Programme Grading Group by clicking on the pencil icon present.
Add Examination Cycle
Add Examination Session
Activate/Published Programmes in the Examination Session
Select the following options:-
Examination Session for which configuration has to be done
Add Programme Evaluators
Now we will follow the detailed steps to configure above mentioned settings.
Programme Term Configuration
The Programme Term Configuration is the function by which the admin can map the term report related configuration settings.
Steps for configuration
Click on the Programme Term Configuration on the Examination Settings page and then click on Add/Modify configuration button of Programme Term Configuration page.
Then add the following details:-
i) Exam Code
ii) Alias Name of Supplementary
iii) AGGREGATE PASS %
iv) Minimum Passing SGPA
v) IS GRACE
vi) Minimum Number of Subjects Required
vii) Number of Elective
viii) GRACE MAX MARKS IN A SUBJECT
ix) MAX GRACE SUBJECTS
x) GRACE MAX. MARKS
xi) IS DIVISION
xii) FIRST DIV. %
xiii) SECOND DIV. %
xiv) THIRD DIV. %
xv) IS DIVISION GRACE
xvi) GRACE MAX. DIV. MARKS
xvii) ADDITIONAL INSTITUTE NAME
xviii) IS SEMESTER MARKS SPELL OUT REQUIRED?
xix) IS IT CBCS/NEW CBCS/PERCENTAGE
xx) SGPA/CGPA/Percentage Round Off Digit
xxi) SGPA/CGPA/Percentage Digits Required (Max 4)
xxii) Display Marks In Term Report
xxiii) Display Marks In Grade Card
xxiv) Display CGPA/CPI in Term Report
xxv) Display CGPA/CPI in Grade Card
xxvi) Display Final CGPA/CPI in Term Report
xxvii) Display Final CGPA/CPI in Grade Card
xxviii) Display Aggregate Marks in Term Report
xxix) Display Aggregate Marks in Grade Card
xxx) Display Aggregate Marks (Spellout) in Term report
xxxi) Display Aggregate Marks (Spellout) in Grade Card
xxxii) Display Distinction in Term Report
xxxiii) Display Distinction in Grade Card
xxxiv) Display Distinction in Percentage Based Term Report/Grade Card
Programme Detention Rules
The Programme Detention Rule is the function by which the admin can map various detention rules for particular terms.
Steps for configuration
Click on the Programme Detention Rules on the Examination Settings page and then click on Add Programme Detention Rules button of Programme.
Then add the following details:-
Rules applicable upto this term including the previous terms
Programme
Term
Rule Code
Rule Value
Rule Output Alias (if criteria is failed)
Add Programme Evaluators
The Admin can add the evaluators required for specific programmes from this option.
Steps for configuration
Select the Programme for which the evaluation has to be done
A pop-up window will appear as an outcome of it from where the admin can select the following details to add the user
Organizational Unit
Section Name
Name
User
After filling all the mandatory fields, click on the Submit button to save the updates.
Steps involved in mapping course evaluator roles with courses:
Open the Academic management module
Launch the following steps:-
Examination Module
Active Examination Session for which configuration has to be done
Evaluation
Add Programme Evaluators
Then Select a programme for which Evaluator/Examiner needs to be added.
Click on Add User to add Examiner.
Exporting the Students list (course-wise marks)
The Admin can export students from the portal.
Visit https://demo.samarth.ac.in/index.php/site/login then enter the evaluator information i.e, user ID and password.
Click on the Programme option available on the drop down of the Academic menu.
Admin can view assigned courses of the programmes.
By clicking on the eye button, Evaluator login functionality tabs will open for the assigned course like:-
Student List
Import Marks
Imported Marks List
Click on the Launch button present on the Student List tab to open the assigned student list.
Admin can view all the assigned students and export the assigned student list in an excel sheet format of the course.
Upload and Calculate the Grade/Marks
To upload and verify the marks of the students the first 5 steps remain as it is as stated in the previous section. The next steps are:\
6. The excel sheets which were previously exported contain filled marks obtained against each student.
7. Click on the Launch button present on the Import Marks tab.
8. After clicking on the launch button the Import Student Marks page will appear.
Admin will upload the student marks obtained from the excel sheet.
Click on upload the file option to Save the updates.
9. Verification of uploaded File
After pressing the upload button a new page will open.
Admin can see all Marks filled against the student and verify if they are correctly entered or not.
After checking the marks evaluator presses the submit button.
Calculation of Aggregate Marks
To calculate aggregate marks of the students the first 9 steps remain as it is as stated in the previous section. The next steps are:-
10. Click on the Launch button present on the Imported Marks List tab present on the Manage Course page.
11. Admin will see only already imported marks of the student from the opened tab.
12. Steps to calculate marks of students
Admin have to press the Calculate Aggregate Marks button present on the top right side of the page.
Verify and Submit the Marks button.
Admin has to press the Calculate Grade and Credit button.
All Aggregate Marks, Grade & Credit will be calculated and displayed on the screen.
13. Remove calculate marks of students.
Admin can remove all the marks in all particular sections also by clicking on the remove marks button.
14. Update marks of students
Admin can update the single student marks by clicking on the single row view button.
Click on the update marks button.
Admin can also remove single students' marks by clicking on remove marks.
Export Marks
To Export marks of the students the first 12 steps remain as it is as stated in the previous section. The next steps are:-
15. Click on the Export Customized Format
16. The Admin can export customized formats in excel format and .pdf format also
Here admin need to select:
Status: Status implies component-wise input status by the examiner.
Tag Multiple: Tags are the course components.
Admin can export these reports in the excel and PDF format.
Admin can also verify marks and calculate grade & credit for particular programmes.
Process Result & Promote Students
The admin can manage SGPA/CGPA/ Percentage from the Process Result section.
Steps for configuration:
Admin have to Launch the Process Result
Select the Programme
Click Term Result
Then all Programme statistics page will appear on the page.
4. Click on Process Term report, admin can view and download the following reports:-
Excel Format(s)
Gazette Notifications
Grade Card/ SOM
Term Report
Print This Page - print html page
Promote Students
The admin can promote students to the next term by below-mentioned steps:-
On the Programme statistics page, Admin can promote students by clicking on the Promote students button.
Admin can either promote students one by one or in bulk.
After selecting students, the admin needs to click on the Promote All/Promote button.
The final step requires selecting the Academic Session and Section of the students.
NEP Exit Policy (Admin Manual)
Mindmap
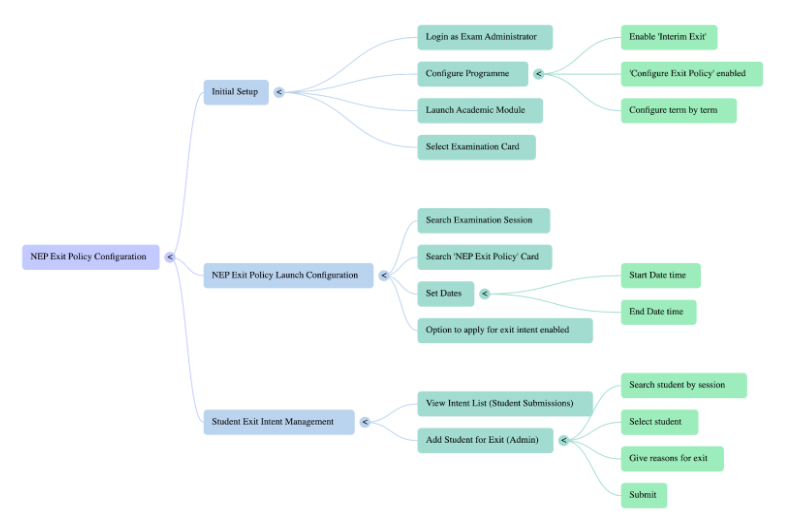
- Login to your university's SAMARTH portal. Ensure that the user has Exam Administrator role.
- Click on the Programme to Configure the NEP Exit:
- Update the Programme Settings by enabling the “Interim Exit”.
- Once set to Yes, the menu “Configure Exit Policy” will be enabled.
- Configure the programme term-by-term as per the requirement.
- Click on Academic Module to launch the academic module.
- Select the Examination Card to navigate the exam session where you want to enable the exit configuration.
- Search the Examination Session where the last result has been declared.
- Search for the NEP Exit Policy card to launch the configuration.
- Launch the NEP Exit Policy Configuration and set:
- Start Date & Time
- End Date & Time
- Once the dates are set, the exit intent option will be enabled for the time window.
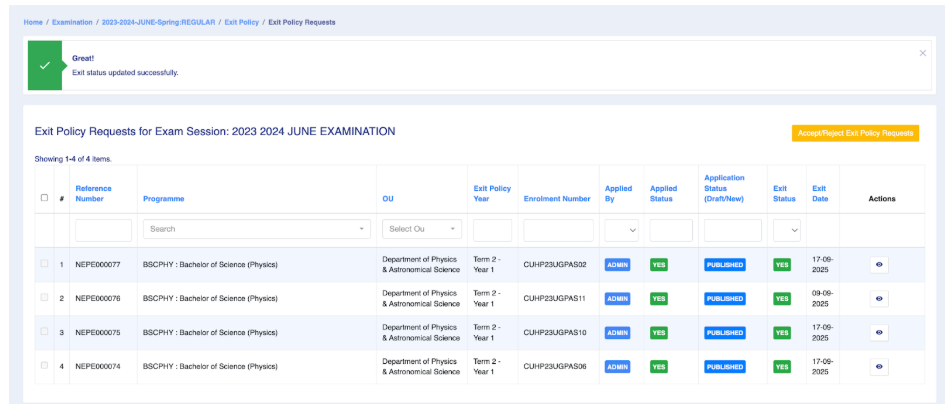
- View the list of exit intents submitted by students.
- Admin also has an option to add a student for exit:
- Search the student by session
- Select the student
- Provide the reason for exit
- Submit the exit request
Fig: 1
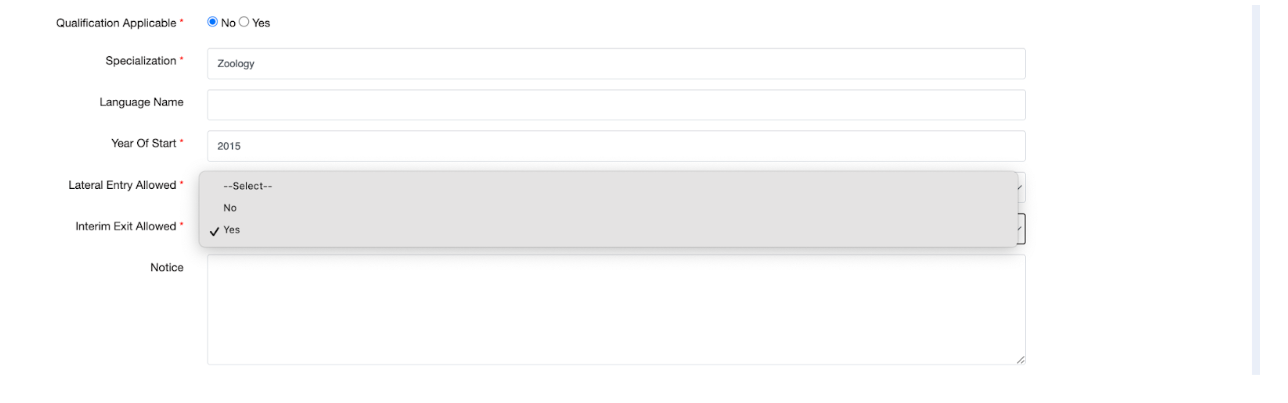
Fig: 2

Fig: 3
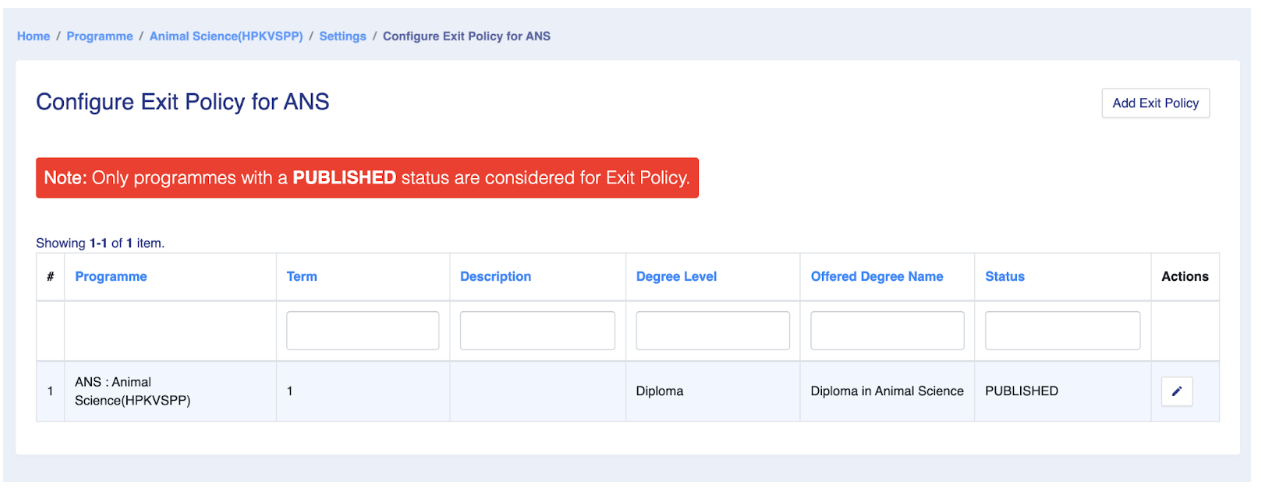
Fig: 4
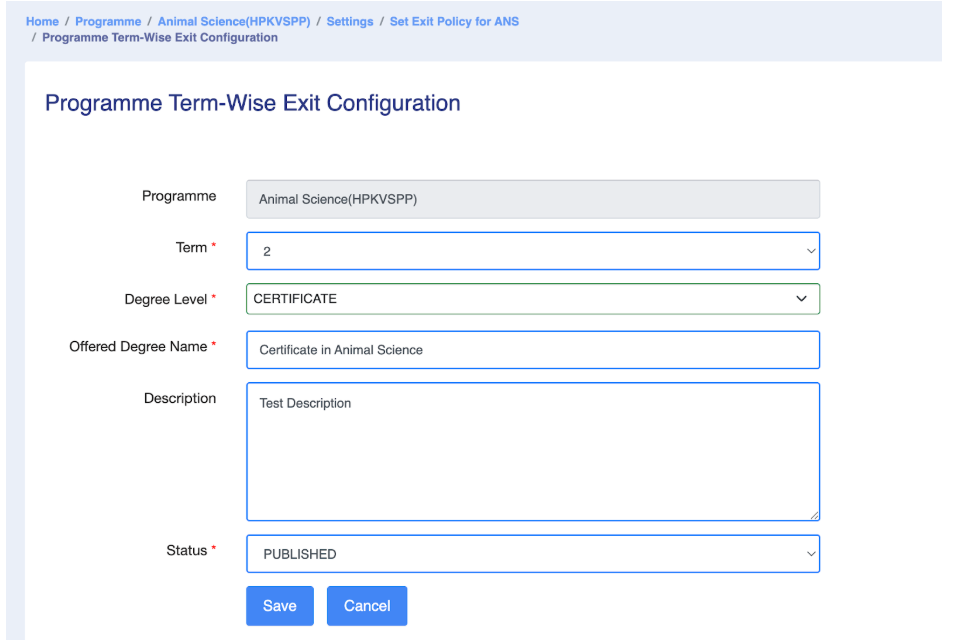
Fig: 5
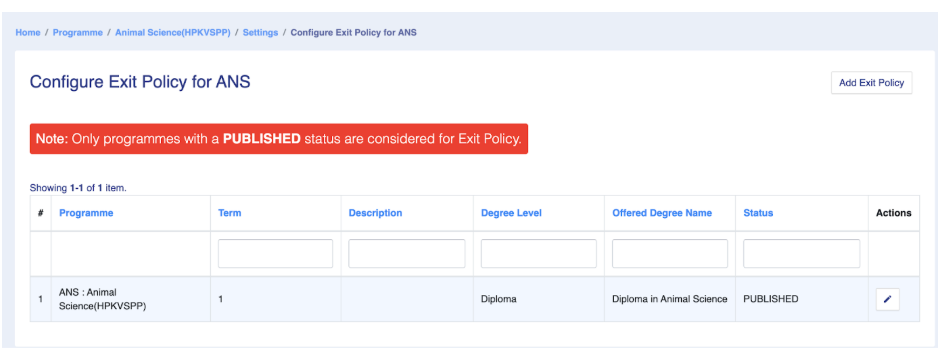
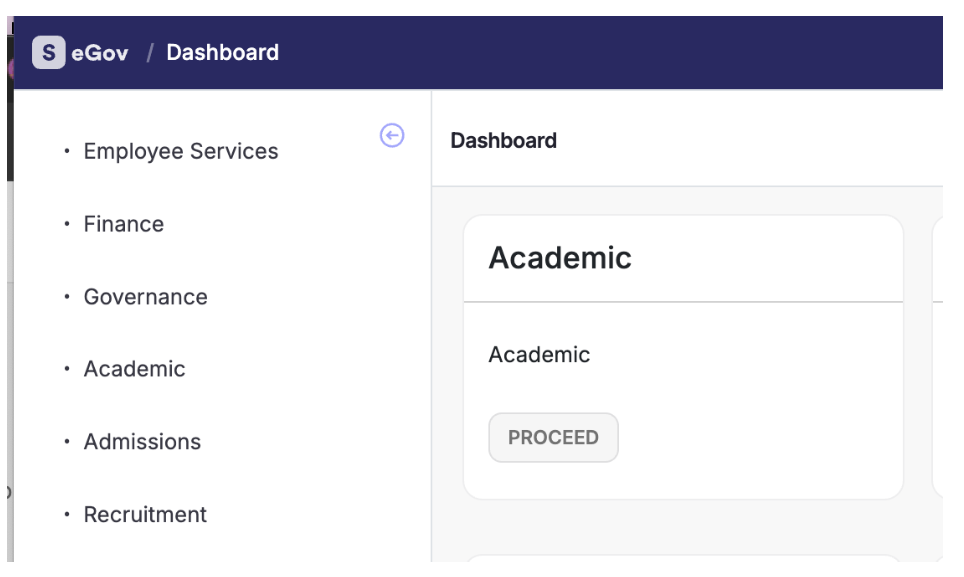
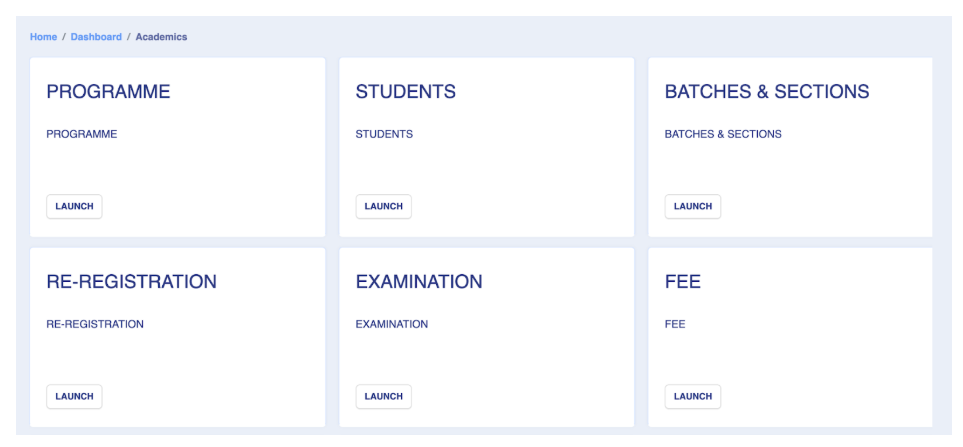
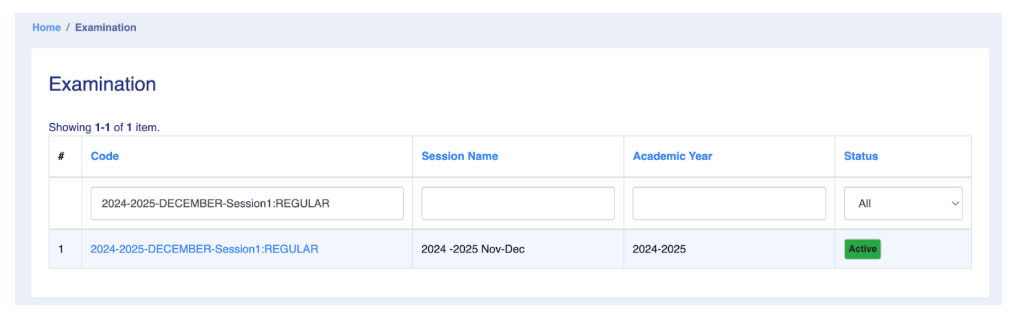

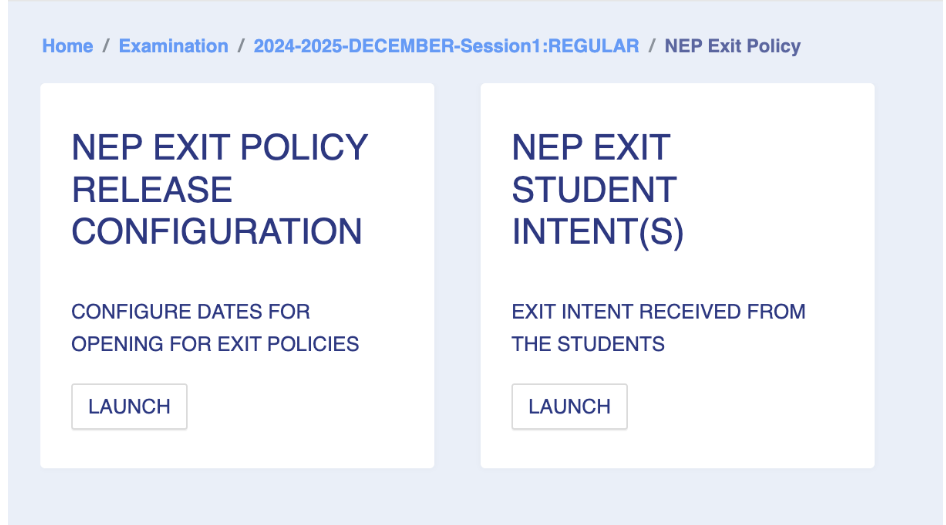
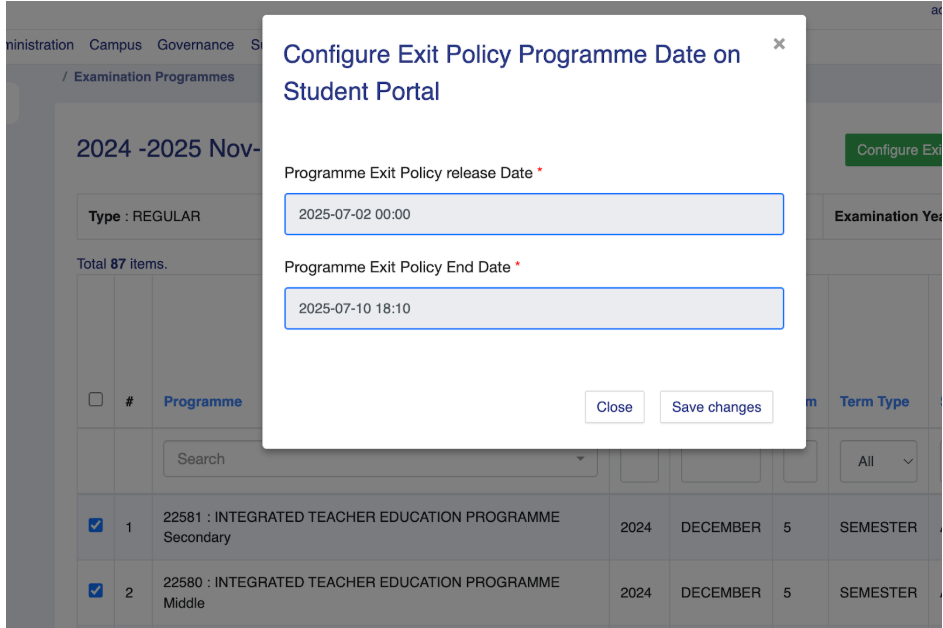
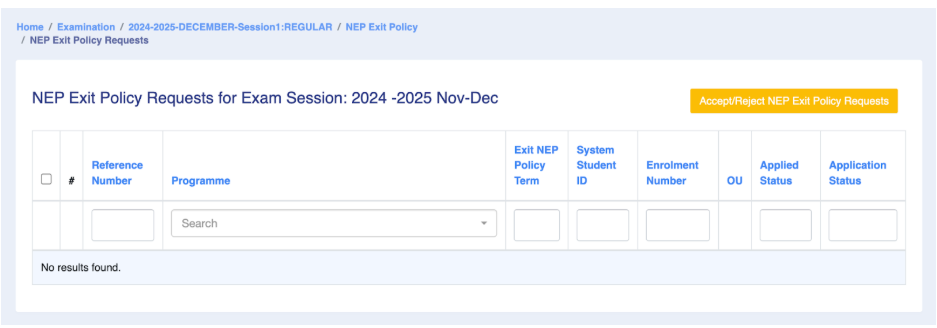
Fig: 1
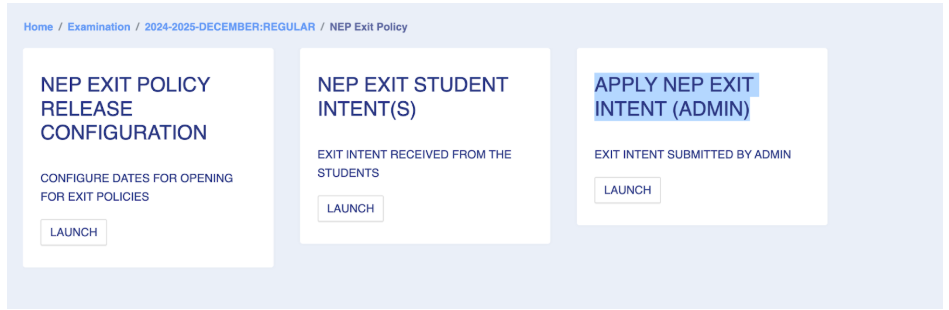
Fig: 2
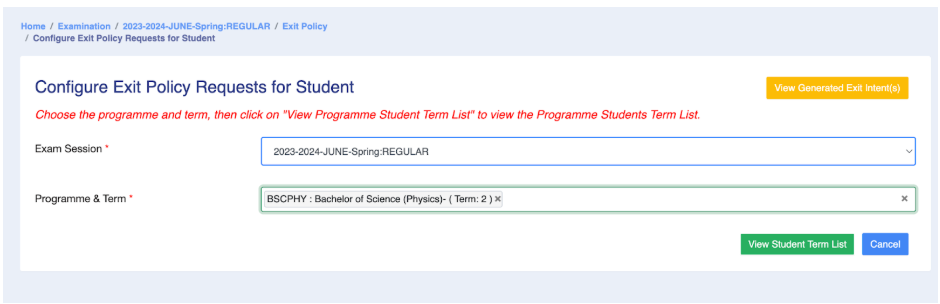
Fig: 3
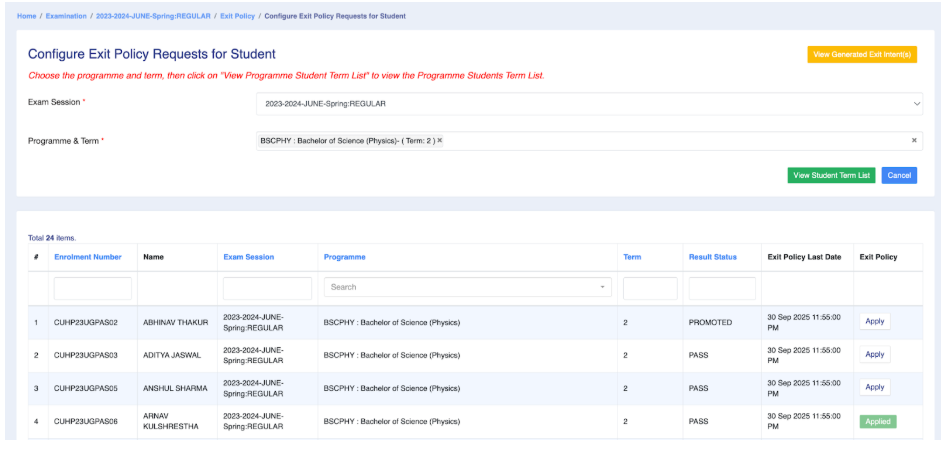
Fig: 4
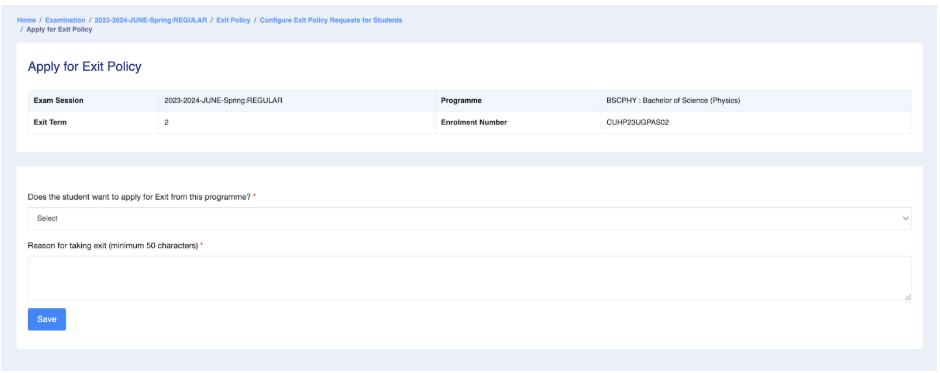
Fig: 5
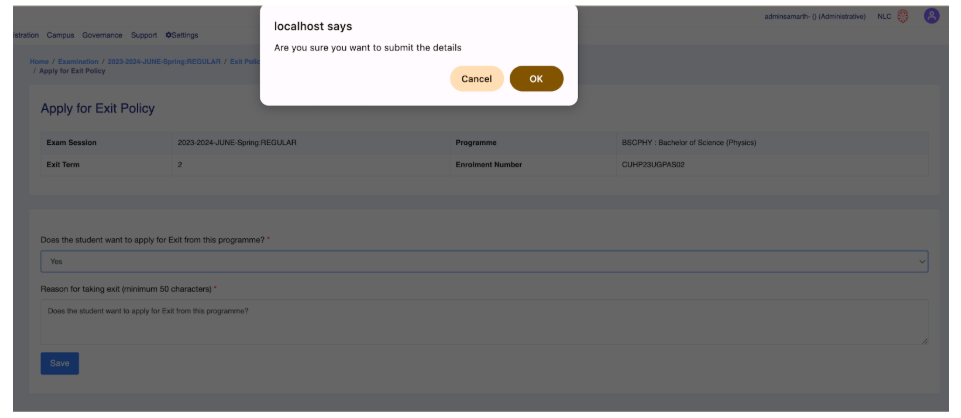
Fig: 6
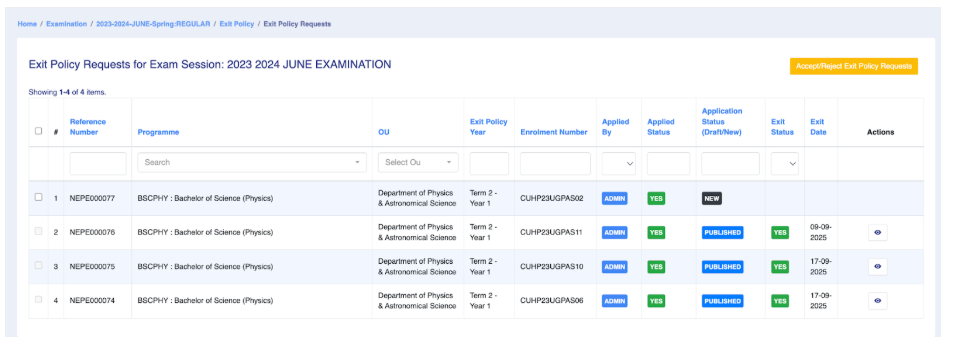
Fig: 7
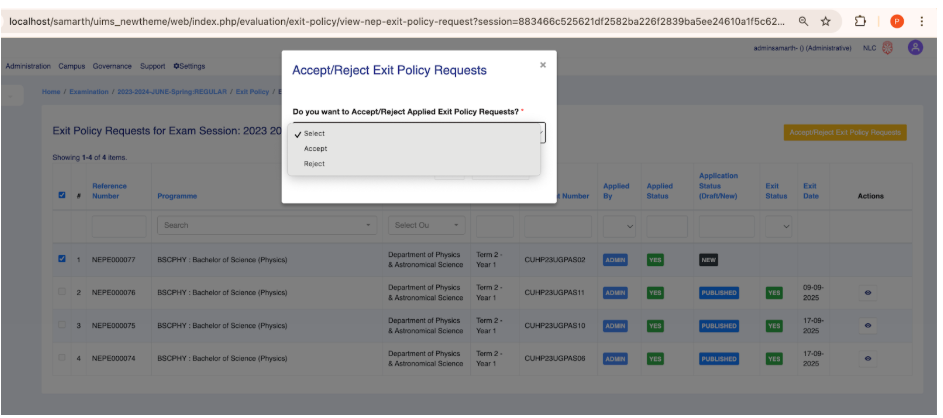
Fig: 8
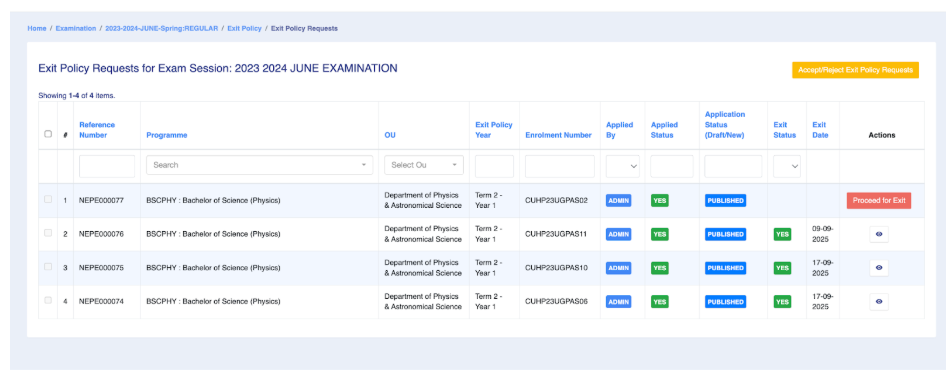
Fig: 9
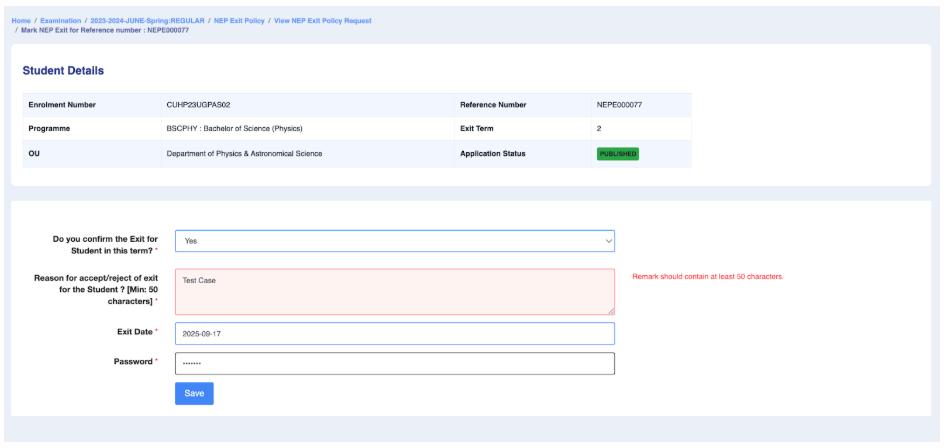
Fig: 10
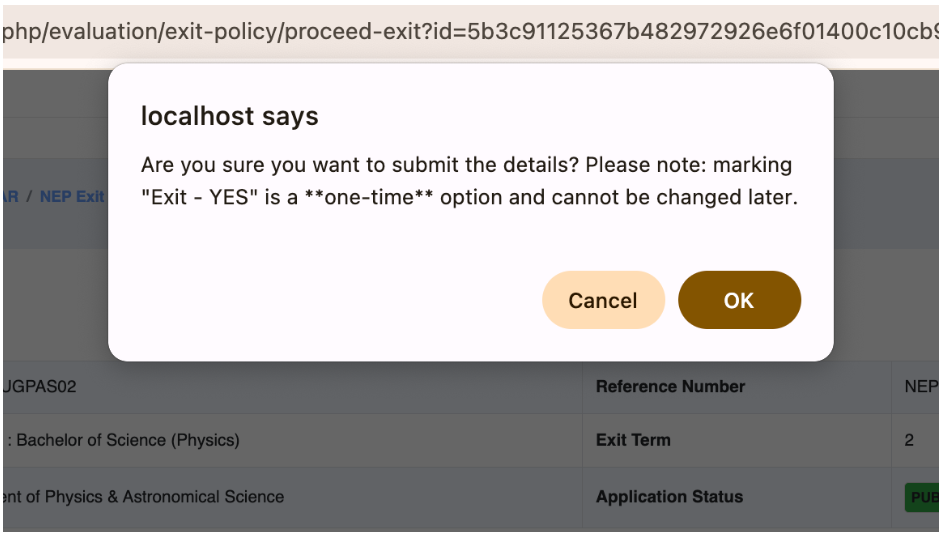
Fig: 11
Frequently Asked Questions
Question 1: Can changes be made to the Course Evaluation components for the 2024 batch after the evaluation and grading have already been processed, which were based on the criteria established for earlier batches, for example, 2023, 2022?
Once the results have been processed or marks have been imported for the courses, the administrator is not permitted to make changes to the Evaluation Components. Alterations may impact the results. If the Evaluation Components for a course are modified for newer batches, the administrator can import the updated course under a new Unique Course Code. An Alias Code may be used in this case to display the previous course codes to the students, if necessary.
Question 2: Can elective courses be changed after admission but before the Hall Ticket is published?
Yes, elective courses can be changed before the exam form is filled. Add the new course to the course structure rules, remove the old elective, and assign the new course to students.
Question 3: Can exam fees be set component-wise?
Currently, exam fees are based on course classification (theory, practical, etc.). Component-wise fee management is not available.
Question 4: Can multiple colleges be assigned to a single exam center?
Yes, multiple colleges can be assigned to the same exam center based on capacity.
Question 5: How do we divide exam centers institute-wise or school-wise?
Exam centers can be mapped by Organizational Units, which include different institutes and schools.
Question 6: Can students preview their admit cards before the official release?
No, only admins can preview admit cards before releasing them officially. Students can view them only after their status is marked as published by the Admin.
Question 7: Can we hide results until they are verified by the faculty?
Yes, results can be hidden until verified. Grade cards can be released only by the Exam Administrator.
Question 8: How do we handle remedial or backlog students?
Create a supplementary session for backlog students in which they can appear for the backlog courses, or otherwise, students can also appear for backlog with their regular exams.
Question 9: Can marks be uploaded via Excel?
Yes, marks can be uploaded using an Excel template. Faculty or admins can import marks for all course evaluation components at once, or they can import marks component-wise.
Question 10: Can we display both overall grades and component-wise grades on the grade card?
Yes, both overall and component-wise grades can be displayed.
Question 11: Can we show all semester results on one page in the student portal?
Yes, a cumulative grade report can be generated and displayed on the student portal.
Question 12: Can we show semester-wise backlogs in the grade card?
Yes, backlogs can be displayed with an “F” grade for failed courses. Students can re-appear for those courses in the supplementary or next regular sessions.
Question 13: Can we hold multiple students from filling out the exam form with a single click?
Yes, students can be marked as debarred or not eligible using the Eligibility Tag.