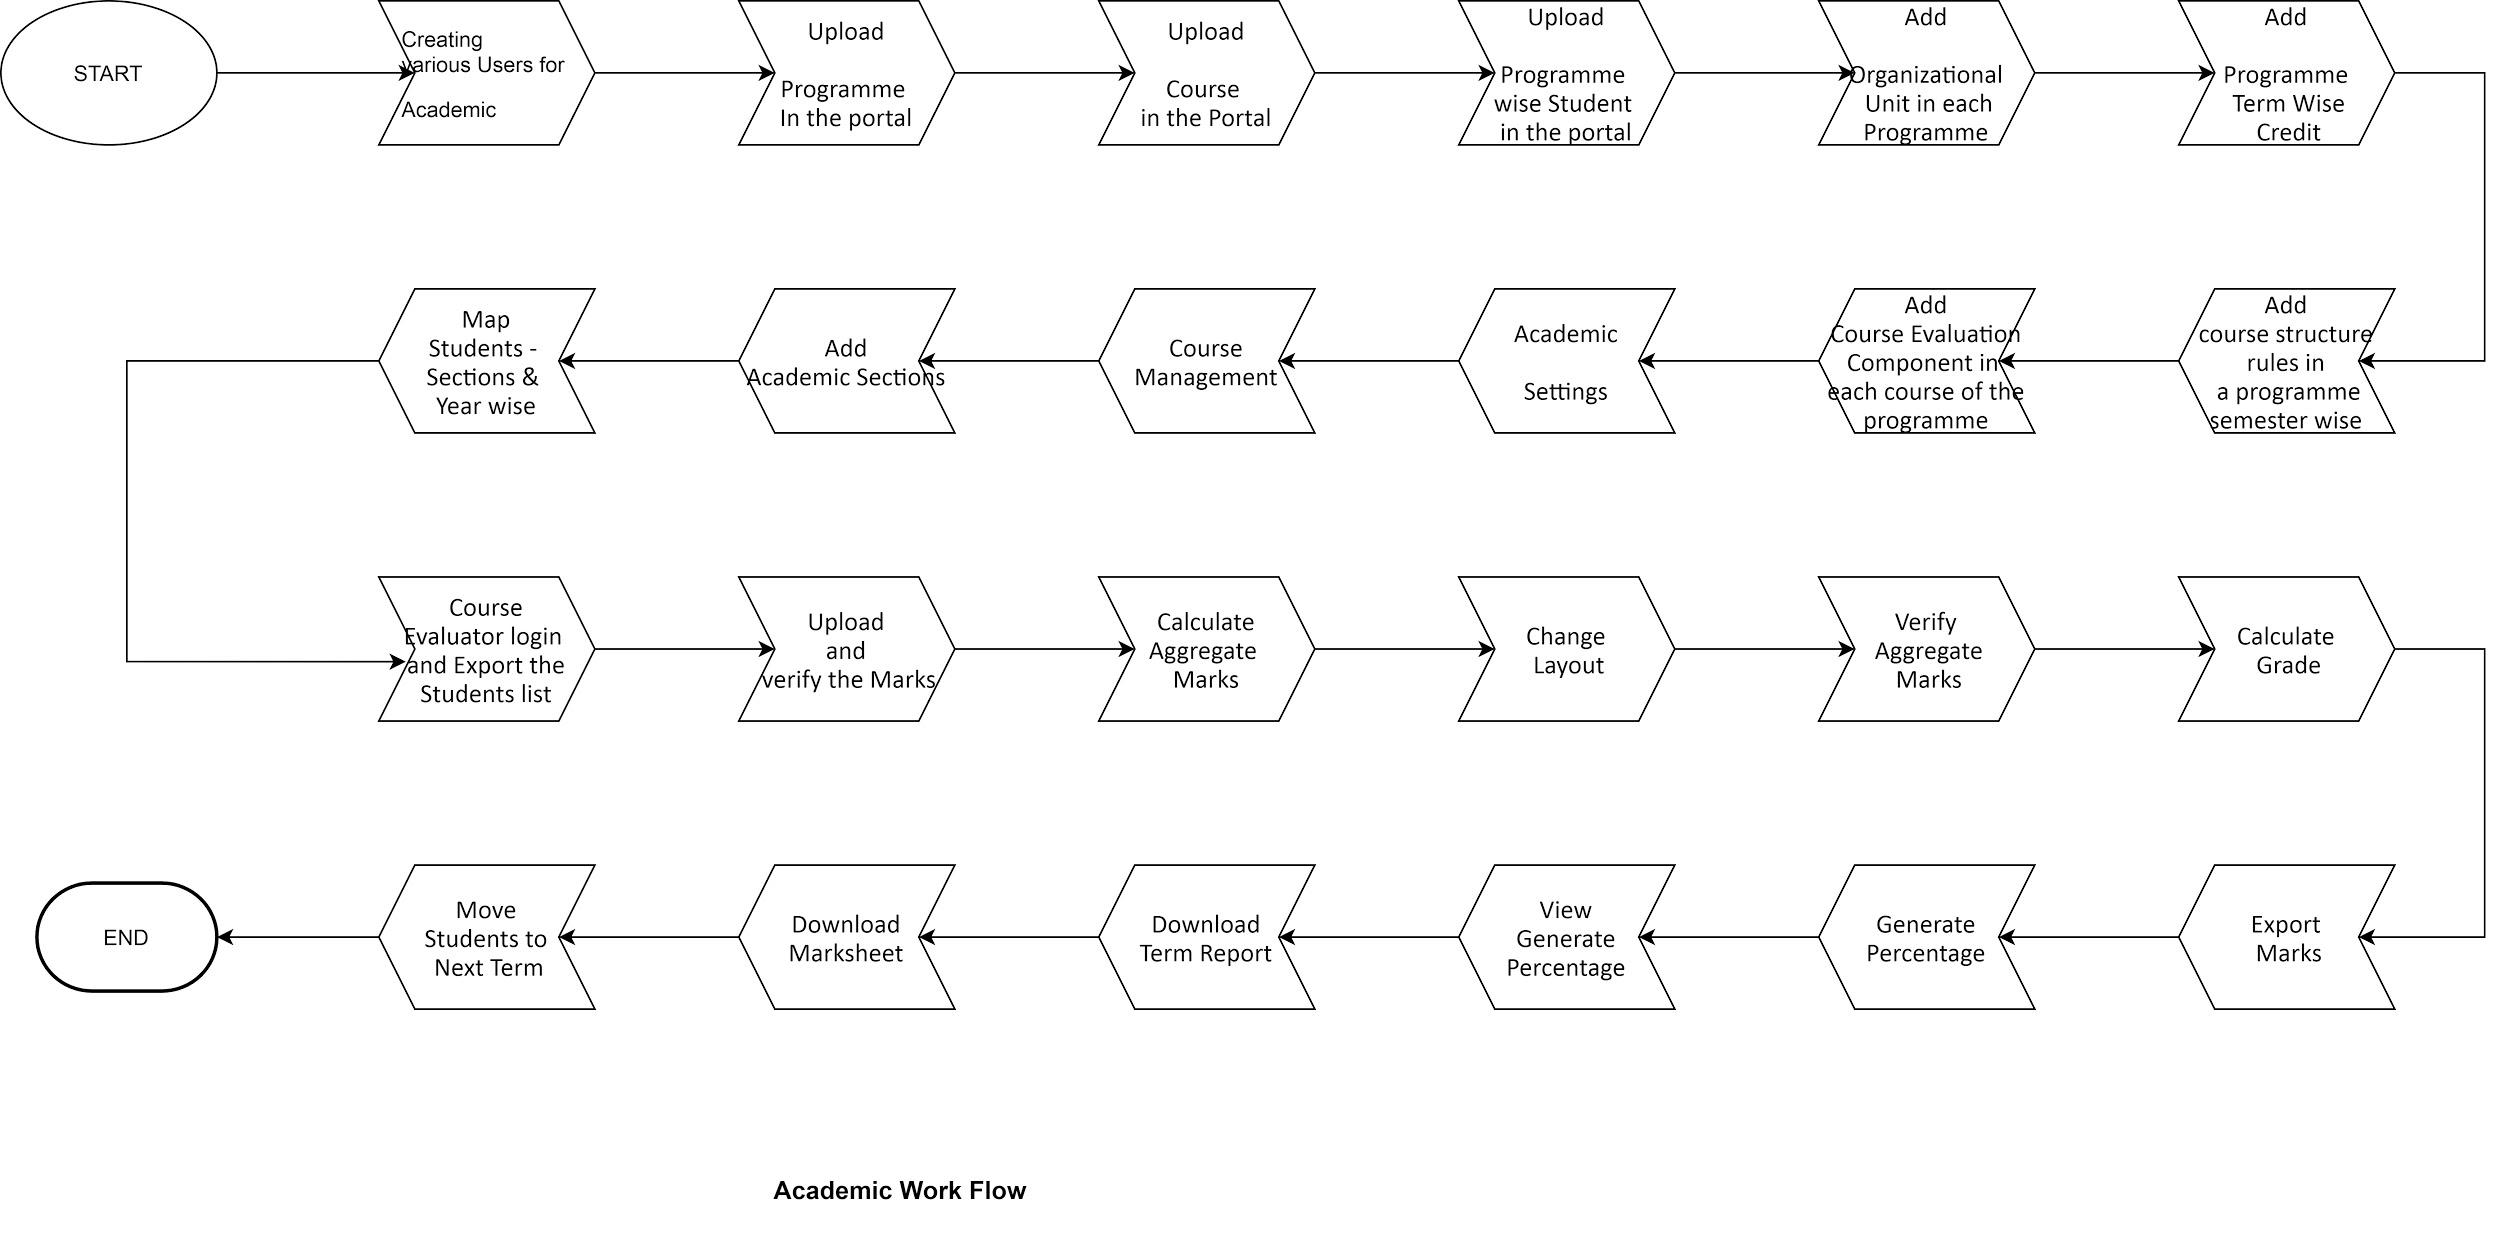
Academics
Introduction
Academic Module deals with Programmes, seats offered under various courses, duration of programmes etc. It also keeps the track of students present under different Programmes in the Institute / University.
The Academic Module depicts the following:
Roles in Academic Management
Following are the roles in Academic Module:
academic_admin: This assign to Academic Admin who view/ update /add details can act as Academic Administrator
program_management: Role to create and edit the Program of the Institute/University
programme_admin: Role to create and edit the Program of the Institute/University
programme_admin_view_only: programme admin view only rights
programme_administrator: This role defines the accessibility of the Programme and its configuration
programme_ou_specific_role: This role is for OU specific user
To upload a Programme in the portal
Follow the instructions for uploading any Programme in the system.
The new Programme can only be uploaded using programme_management and programme_admin roles.
Step1: Login to programme administrator login (programme_management-programme_admin) on the Samarth portal of your University/Institute.
NOTE: For exploring the modules, you can visit here then, enter the demouser information i.e.user ID and password.
Step 2: After login as Programme Administrator, launch Programme Management Module:
By clicking on the launch button on the Programme Management tab
By clicking on Programme Management present on the Left-hand side
By clicking on Programme Management in the drop-down list of Academic present on the top left-hand side
Step 3: To upload a programme, the admin has to select Programme Management Module
Step 4: Click on the settings button
Step 5: Then click on the settings icon add new Programme
Step 6: Fill the details asked in the form and save the details
Above steps will map the programme, the session and, the result evaluation will define the programme evaluation scheme on the basis of either credit-based scheme (CBCS) or percentage-based.
Upload Course in the Portal
Courses are the subject offered in different Programmes in the Institution/University. Course can be uploaded in the system by two ways:
Import Bulk Courses
Courses(one at a time)
Import Bulk Courses
In the Import Bulk Courses option, the Admin can add new courses in bulk by following the Steps below:
Step 1: Open the Programme Management module settings and click on the “gear icon” to open the Import Bulk Courses option. After clicking on it, import data sheet will open.
Step 2: Admin will click on the “Download Excel Format” button. It downloads a pre-formatted excel sheet.
Note: Do not change/alter the headings of Excel Sheet and only update/paste your details data accordingly.
Step 3: Fill the excel sheet and save the sheet in excel/CSV format only.
Step 4: To upload bulk courses click on the “Browser File from Computer” button and select the required sheet for upload. Then click on “Upload The File” button and verify all the courses after that click on the submit button.
Note: All the courses must be in the prescribed format and all required details must be filled in. If any course’s details are missing, then the sheet will not be uploaded.
Courses
In the courses option, the Admin can view/ search/update already existing courses. Admin can add one-by-one Programme in the system. Steps involved:
Step 1: Open the Programme Management module settings and click on the “gear icon” to open the courses option.
Step 2: Click on the “Add Course” button.
Step 3: Fill in all the required fields (required fields which has* mark) to add a Course. Type code, Title, Course Category, Maximum Credit, Credit Scheme, etc. and hit the save button. This will add a new course to the portal.
Step 4: To update already existing Programmes, click on the pencil button that is present adjacent to the Programme.
Step 5: Fill the all required field (required field which has * mark) to add a Course. Type, Code, Title, Course Category, Maximum Credit, Credit Scheme etc. and hit the save button. This will update a course in the portal.
Upload Programme wise Student in the portal
In this option Admin can Import Students in a particular Programme in bulk by following the steps below:
Step 1: Open the Programme Management module then open particular Programme settings by clicking on the “gear like icon” present adjacent to Programme.
Step 2: After clicking on the Particular Programme settings, click on the “gear like icon” to open the Import Students option. After clicking on the import students button “Students Profile” page will open. Here admin can view all the uploaded students and also upload students by the “import student” button.
Step 2: Admin can upload students by clicking on the “Import Students” button present on the right-hand side of the Student Profile page. After clicking on the button an Import student page will open.
Step 3: Admin will click on the “Download Excel Format” button. It downloads a pre-formatted excel sheet.
Note: Do not change/alter the headings of Excel Sheet and only update/paste your details data accordingly.
Step 4: To upload students, click on the “Browser File from computer” button and select the required sheet for upload. Then click on the “Upload The File” button, verify all the entries you made and click on the submit button.
Note: If any course details are missing then the sheet will not be uploaded.
Add Organizational Unit in each Programme
Theis section helps to add Organizational Unit to each Programme. It means which department/school is teaching the given programme. In other words, this section captures all the OU’s where this particular programme is running.
Step 1: Open the Programme Management module then, open particular Programme settings by clicking on the “gear like icon” present adjacent to Programme.
Step 2: After clicking on the Particular Programme settings and then open the “Organizational unit” option by clicking on the “gear like icon”. After clicking on the Organisational Unit button, Programme Organizational Units page will open. Here admin can view all the mapped Organizational Units to the Programme and also add Organizational Units by the “Add” button.
Step 3: The “Add” button will open a window, in this window admin can search any Organizational Unit, mark its status as active to add the Organizational Unit.
Step 4: The update button present will updates the active/inactive status of OU.
Add Programme Term Wise Credit (per semester)
The add Programme term wise credit is used for adding semester wise maximum or minimum credit to each Programme.
Step 1: Open the Programme Management module then open particular Programme settings by clicking on the cog button present adjacent to Programme.
Step 2: After clicking on the Particular Programme settings and then open the “Programme term wise credit” option by clicking on the cog button. After clicking on the button Programme credit setting page will open. Admin can view all the mapped term-wise credit to the Programme and also add term-wise credits by the “Add Programme Credit” button.
Step 3: The “Add Programme Credit” button will open a window, in this window admin search desired programme, then fill Programme academic cycle, termed type, term, maximum credit, and minimum credit then hit the save button to add the credits.
Step 4: The update programme term-wise credit click on the pencil button present on button present below the actions column.
Add Course Structure Rules in Programme Semester Wise
Here courses can be bifurcated on the basis of core and elective. Admin can specify what all subjects to be included in the elective part programme-wise.
Step 1: Open the Programme Management module then open particular Programme settings by clicking on the “gear like icon” present adjacent to Programme.
Step 2: After clicking on the Particular Programme settings and then open the “Course Structure” option by clicking on the “gear like icon”. After clicking on the button Programme course structure page will open. Admin can view all the mapped Courses term-wise to the Programme.
Step 3: Also to add term-wise new rules by clicking on the “Rules” button, then on the “Add New” button.
Step 4: The “Add New” button will open a window, Admin needs to add course rules and courses according to the semester. The steps involved are:
Select add course
Search course and select
Course Category is changed according to the programme : Elective or Compulsory
In compulsory course Group applicable is selected as No
Cycle Based is selected if the programme is applicable on one cycle
Applicable Year: Select the course when active for the selected programme
Sort order is selected to arrange the programme sorting in the programme
If the Programme in Elective then we Select Group applicable Yes.
Select the Group name and Group Key. Group key should be Unique for all the programmes added in one particular group.
If the course has a condition applicable in a group then
Option applicable is selected as yes
add the Data structure JSON data structure is used. System ID and Course ID is used in this data structure.
a. Required Json query:
{"type":"required","groups":["group1"],"group1":{"label":"Compulsory > selection","options":["12535"],"options_code":["ABCD7"]}}
b. Selection Json query:
{"type":"selection","groups":["group1"],"group1":{"label":"Select > from these > options","options":["12542","12543","12544","12545","12546"],"options_code":["ABCD11","ABCD12","ABCD13","ABCD14","ABCD15"]}}
c. Checkbox Json query:
{\"type\": \"checkbox\", \"groups\": \[\"group1\"\], \"group1\":
{\"min_credit\":\"32\",\"max_credit\":\"32\",\"min_max_type\":\"equal\",
\"label\": \"Choose 32 credits only\", \"options\":
\[\"12195\",\"12196\",\"12197\",\"12198\",\"12200\",\"12201\",\"15453\",\"12204\",\"12207\",\"12214\"\],
\"options_code\": \[\"MGSE1\", \"MGSE2\", \"MGSE3\",
\"MGSE4\",\"MGSE6\",\"MGSE7\",\"MGSE9\",\"MGSE10\",\"MGSE13\",\"MGSE20\"\]}
}
Select Option Type: required, selection and checkbox
Applicable from the year (yes/no)
Applicable from the cycle (select the applicable cycle)
Cycle based (yes/no)
Applicable in the cycle (select in which cycle this course is applicable)
Sort Order (sorting number)
Sort Order Sub
Status (Draft/Pending/Rejected/Published etc.)
And click on save.
Step 4: Admin can update programme course structure by clicking on the “pencil” button present on button present below the actions column.
Add Course Evaluation Component in each course of the programme
Evaluation Assessment type
The Evaluation Assessment types are used for defining type and property (like Name etc.) of the Course Component. The Course Components are reflected in the Marksheet.
Step 1: Open the Programme Management module then open Settings.
Step 2: Evaluation Assessment types are present at the bottom in the setting option. Admin could open this option on clicking on the cog button adjacent to Evaluation Assessment types.
Step 3: After opening the Evaluation Assessment Type page, Admin can add a new Evaluation Assessment Type by clicking on the “Add Evaluation Assessment Type” button.
Step 4: After clicking on the “Add Evaluation Assessment Type” button, Admin can view and add a new Evaluation Assessment Type page. Admin have to fill few details:
Fill Assessment ID
Fill Assessment Code
Fill Assessment Name
Select Assessment is Aggregate or not.
Select the Assessment status.
Add a description
Then hit save button adds the new Evaluation Assessment Type to the portal.
Step 5: Admin can also update the previously added Evaluation Assessment Type by clicking on the pencil button to present Evaluation Assessment Types and the required field which needs to be updated.
Add Course Evaluation Component
The add Course Evaluation Component is used for adding course components to each course.
Step 1: Open the Programme Management module then open particular Programme settings by clicking on the cog button present adjacent to Programme.
Step 2: After clicking on the Particular Programme settings and then open the “Course List” option by clicking on the cog button. After clicking on the button Programme credit setting page will open. Admin can view all the mapped course wise Component and also add course components by clicking the “Add/Modify Component” button.
Step 3: The “Add/Modify Component” button will open a window, in this window admin search the course component, and then fill in Process, Weightage, Maximum Marks, and Category then hit the save button to add the course component.
Step 4: The rule for adding components are:
Select the course component
Select the Process (like internal/external)
Add weightage of the Course
Maximum marks
Then select the categoey in which components belongs to like Theory, Practical or Aggregate
If the category belongs to Aggregate then, the Admin needs to add the Aggregate formula for the component
Formula can be created according to requirement by different values present and can be validated by the admin
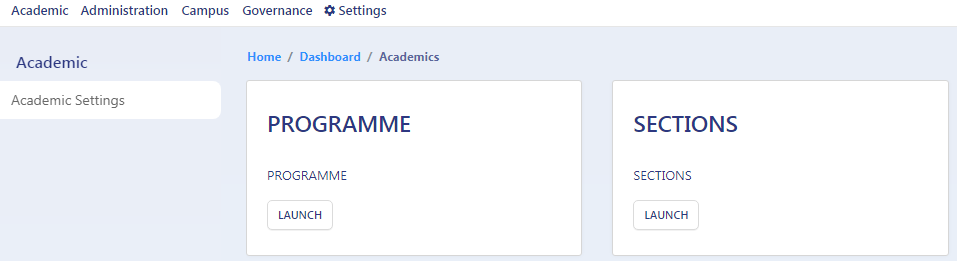
Academic Settings
Academic settings are divided in three parts:
Admission Cycle
Academic Year
Academic Session
Evaluation Division Group
Evaluation Grade Letters
Programme Division Group
Programme Grading Group
Steps involved in the opening of Academic Settings:
Step 1: Open the Academic management module by clicking on the launch button present on the Academics tab in the home page or clicking on the Academic Management present in the drop-down menu of Academic on the top left-hand side.
Step 2: Click on the Academic Settings to view the academic settings menu.
Admission Cycle
This setting shows the admission cycle and it is pre-defined. In the academic setting page click on the cog button of Admission Cycle and view Admission Cycle.
Academic Year
The Academic Year can be added or visible or not by this option.
Step 1: To open the Academic Year option click on the cog button of Academic Year on the academic setting page.
Step 2: After clicking on the Academic Year option the academic year page will open and the admin can add the academic year by clicking on the “Add Academic Year” button present on the top left-hand side. The “Mark as in-visible” option will make the academic year invisible.
Step 3: to add Academic Year Admin has to select start year and end year and hit the save button.
Academic Session
Any additions or visibility of Academic Session can be done by this option.
Step 1: To open the Academic Session option, click on the “gear like icon” of Academic Session on the academic setting page.
Step 2: After clicking on the Academic Session option, the academic session page will open and the admin can add the academic session by clicking on the “Add Academic Session” button present on the top left-hand side. The eye button will show the academic year.
Step 3: Rule to add Academic Session Admin have:-
Add Name of the session
Select Academic Year
Select type of academic session (like Year/Semester)
Select level of the academic session (like Bachelor/Master/Doctoral)
Add a description of the academic session and
Hit the save button.
Evaluation Division Group
The Evaluation Division Group is the function by which the admin can be assigned limits for the Division system like which limit of credit/percentage belongs to which division First Division, Second Division etc.
Step 1: To open the Evaluation Division Group option click on the cog button of Evaluation Division Group on the Academic Settings page.
Step 2: After clicking on the Evaluation Division Group option the Evaluation Division Group page will open and the admin can add the evaluation division group by clicking on the “Add Eval Division Group” button present on the top left-hand side.
Step 3: Rule to add Evaluation Division Group Admin have:-
Select group Name
Add lower Boundary (lowest marks for the Division)
Add letter (like A, B, etc.)
Add Name
Hit the save button
Step 4: Admin can update the Evaluation Division by clicking on the pencil button present.
Evaluation Grade Letters
The Evaluation Grade Letter is the function by which the admin can be assigned limits for the Grading system like which limit of credit/percentage belongs to grade A, B, C etc.
Step 1: To open the Evaluation Grade Letter option click on the cog button of the Evaluation Grade letter on the Academic Settings page.
Step 2: After clicking on the Evaluation Grade Letters option the evaluation grade letters page will open and the admin can add the evaluation grade letter by clicking on the “Add Evaluation Grade Letters” button present on the top left-hand side.
Step 3: Rule to add Evaluation Grade Letters Admin have:-
Select group Name
Add lower Boundary (lowest marks for the Division)
Add Letter (like A, B, etc.)
Add Point
Add Name
Hit the save button.
Step 4: Admin can update the Evaluation Grade Letter by clicking on the pencil button present.
Programme Division Group
The Programme Division group is the function by which the admin can map the division group to Programme.
Step 1: To open the Programme Division Group option click on the cog button of Programme Division Group on the Academic Settings page.
Step 2: After clicking on the Programme Division Group option the Programme Division Group page will open and the admin can add the Programme Division Group by clicking on the “Add Programme Division Group” button present on the top left-hand side.
Step 3: Rule to add Programme Division Group Admin have:
Select Programme
Select Division Group
Hit the save button.
Step 4: Admin can update the Programme Division Group by clicking on the pencil button present.
Programme Grading Group
The Programme Grading group is the function by which the admin can map the grading group to Programme.
Step 1: To open the Programme Grading Group option click on the cog button of Programme Grading Group on the Academic Settings page.
Step 2: After clicking on the Programme Grading Group option the Programme Grading Group page will open and the admin can add the Programme Grading Group by clicking on the “Add Programme Grading Group” button present on the top left-hand side.
Step 3: Rule to add Programme Grading Group Admin have:
Select Programme
Select Division Group
Hit the save button
Step 3: Admin can update the Programme Grading Group by clicking on the pencil button present.
Course Management
This option can map Compulsory and Elective courses in each semester per Programme.
Step 1: Open the Programme management module.
Step 2: Click on the eye button present beside the a Programme.
Step 3: After clicking on the eye button user can view details of the programme, total number of semesters, all students tab etc.
Step 4: After clicking on the eye button user can view details of the programme, total number of semesters, All students tab, and click on any semester like semester 1.
Step 5: After clicking on any semester of a Programme Semester page will open then click on the launch button present on the Course Management tab.
Step 6: It takes the user to the Course Management page. The user can view the added course and add new courses to a semester also by clicking on the “Add Elective Course and Add Compulsory Course”.
Add Elective Course
Click on the “Add Elective Course”
Then fill in details:
a. Select Course
b. Select Academic Year
c. Select Session Name
d. Select status (like active/inactive)
e. Select whether it needs to be visible to all or not and save it.
Add Compulsory Course
a. Click on the “Add Compulsory Course”
b. Then fill details:
i. Select Academic Year
ii. Select Session Name
iii. Select status (like active/inactive)
iv. Select whether it needs to be visible to all or not and save it.
Add Academic Sections
This option can create various sections of a Programme.
Step 1: Open the Academic management module by clicking on the launch button present on the Academic tab on the home page or clicking on the Academic Management present in the drop-down menu of Academic on the top left-hand side.
Step 2: Click on the launch button present on the Sections tab to the Academic Module page view the section menu.
Step 3: After clicking on the Sections option the section page will open and the admin can add the sections by clicking on the “Add Academic Section” button present on the top left-hand side. The user can view the academic section by clicking on the eye button.
Step 4: Rules to add Academic Sections Admin have:-
Select programme
Select term
Add Name of the section
Select Academic Year
Select type of academic session
Select Organizational unit of the section
Hit the save button.
Map Students - Sections & Year wise
This option can map/categories students of a Programme into various sections and terms.
Step 1: Open the Programme management module.
Step 2: Click on the eye button present beside the a Programme.
Step 3: After clicking on the eye button user can view details of the programme, total number of semesters, All students tab and click on any semester like semester 1.
Step 4: After clicking on any semester a semester page will open then click on the launch button present on the section tab it takes the user to the semester-wise section page. The user can add a new section to a semester also by clicking on the “Add Academic Section” but this Programme and term are fixed. Admin has fill Section Name, select Academic Year, select Academic Session and select Organization Unit.
Step 5: The eye button will take the user to the student list here user can add students to the section of the particular programme and view added students also.
Add Students to Section
Steps Involved:
Step 1: To add students to the section, users have to click on the “Add Student to section”.
Step 2: To add students to Sections, Admin/user have to:-
i. Select number of student from the list to add in the section
ii. Click on the “Add Student” button.
iii. Then click on the add button.
Map Courses with Students of the Section
Steps involved:
Step 1: To map courses with students, users have to click on the launch button present on the student list tab.
Step 2: To map course with students to Sections, Admin/user have to:-
i. Select students from the list admin can select all student also
ii. Click on “Assign Course” button
iii. Select course and press the save button.
Map Course Evaluator for each Course Section wise
This option can map Course Evaluator for each course in each section.
There are two types of course evaluator roles here:
Examiner: It can import student marks course wise
Co-ordinator: It can import, verify and evaluate student marks course wise
Steps involved in creating course evaluator roles:
Step 1: Open the Programme management module.
Step 2: Click on the eye button present beside the a Programme.
Step 3: After clicking on the eye button user can view details of the programme, total number of semesters, All students tab and click on any semester like semester 1.
Step 4: After clicking on any semester a semester page will open then click on the launch button present on the Course Evaluator tab it takes the Admin/user to the semester-wise Course Evaluator page. The admin/user can view the added course evaluator and can also add new courses evaluator to a semester by clicking on the “Add Course Evaluator”.
Step 5: Admin have to fill some details:
i. Select Academic Year
ii. Select Session Name
iii. Select Course Name
iv. Select Organization Name or Unit.
v. Selection Section Name
vi. Search & select Evaluator (Teaching Faculty) Name
vii. Assign role (Examiner or Co-ordinator)
viii. Select status
ix. Select visibility status
Course Evaluator Login & Export Students List for Marks Obtained in Assigned Course
The Course Evaluator role is assigned in the previous section by Admin/user teaching faculty. Following are the steps to explore evaluator login.
Step 1: Visit this here then enter the evaluator information i.e.user ID and password.
Step 2: After login click on the classes option available on the drop-down of the Academic menu.
Step 3: Evaluator can view assigned courses of the programmes.
Step 4: By clicking on the cog button Evaluator login functionality tabs will open for the assigned course like :
i. Student List
ii. Import Marks
iii. Imported Marks List
Step 5: Click on the launch button present on the Student List tab. This opens the assigned student list evaluator can view all the assigned students and export the assigned student list in an excel sheet format of the course.
Upload and verify the Marks
To upload and verify the marks of the students the first 5 steps remain same as given before. The next steps are:
Step 1: The excel sheets which were previously exported are filled marked obtained against each student.
Step 2: Then click on the launch button present on the Import Marks tab.
Step 3: After clicking on the launch button the “Import Student Marks” page will open and the evaluator will upload the student marks obtained excel sheet. Evaluators have to select the Year of the exam and then exam cycle and press the upload the file button.
Step 4: After pressing the upload the file button a new page will open here evaluator can see all Marks filed against the student and verify are correctly entered or not. After checking the marks evaluator press the submit button.
Calculate Aggregate Marks
Admin/Examiner/Coordinator can calculate and verify aggregate marks of the students after all marks of the courses are uploaded in the portal. The next steps are:
Step 1: Then click on the launch button present on the Imported Marks List tab present on the Manage Course page.
Step 2: After clicking on the launch button the Imported Student Marks page will open and the evaluator will see only already imported marks of the student.
Step 3: Evaluator can update the imported marks also by clicking on the update button. But to change/ update marks evaluators have submitted their passwords.
Step 4: To Calculate Marks press the “Calculate Aggregate Marks” button present on the top right side of the page and then upload the file button. Then all Aggregate Marks will be calculated and displayed on the screen.
Change Layout
Admin/Examiner/Coordinator can change imported and calculate marks of the students in the portal. The next steps are:
Step 1: Click on the Change Layout button present on the page.
Step 2: Evaluator can update the imported marks and aggregated marks also by clicking on the update button. But to change/ update marks evaluators have submitted their passwords.
Note: Current Marks is calculated using the formulae mentioned below. Once overwritten, these formulae will not be used afterward.
Verify Aggregate Marks
Admin/Examiner/Coordinator can verify calculated aggregate marks of the students in the portal. The next steps are:
Step 1: Click on the “Verify the Aggregate Marks” button present on the page.
Step 2: After Clicking on the “Verify the Aggregate Marks” button the individual update button will be removed and the tick mark will show instead of the update button.
Calculate Grade
Admin/Examiner/Coordinator can calculate grades of the aggregate marks of the students after checking and verifying all marks and aggregated marks in the portal. The next steps are:
Step 1: Click on the “Calculate Grade” button present on the page.
Step 2: After Clicking on the “Calculate Grade” button the individual grades will be updated on the page.
Export Marks
To Export marks of the students, the admin/examiner/coordinator has to first calculate the course marks then proceed to the next steps that are given below:
Step 1: Then click on the Export Marks button present on the top right side of the Marks Component page.
Step 2: After clicking on the Export Marks button Export Result page will open. Evaluator has to select export with status and then Component of the Marksheet. Marksheet with status is shown below.
Marksheet without status is shown below:
Step 3: The Evaluator can export this in excel format and .pdf format also.
Generate Percentage
To Generate the Percentage of the students the admin/examiner/coordinator have to first calculate all the Course wise marks and grades of a student or all students then proceed to the next steps are:
Step 1: After calculating all the Course wise marks and grades of a student or all students then click on the Launch Button present on the Generate Percentage tab present on the semester page.
Step 2: Select Academic year and Academic session to which percentage is to be calculated and click the “Go” button.
Step 3: After clicking on the “Go” button a list of students will be shown on the page for the selected Academic year and Academic session to which percentage is to be calculated.
Step 4: The “Save Aggregate Percentage” button will save the showing percentage for the selected Academic year and Academic session.
Note: After this step, the selected term students percentage will not be generated it will show that “The List has already been saved. Please go back and check via tab Generated SGPA”.
View Generate Percentage
To View term wise Generate Percentage of the students the admin/examiner/coordinator have to first Generate Percentage term wise of a student or all students then proceed to the next steps that are:
Step 1: After calculating all the term-wise Percentages of a student or all students then click on the “launch” Button present on the “View Generate Percentage” tab present on the semester page.
Step 2: After clicking on the “launch” button a list of students will be shown on the page.
Download Term Report
To download the term report of the students the admin/examiner/coordinator has to first Generate Percentage term wise of a student or all students then proceed to the next steps that are:
Step 1: After calculating all the term-wise Percentages of a student or all students then click on the “launch” Button present on the “Download Term Report” tab present on the semester page.
Step 2: Select Academic year and Academic session to which term report is to be downloaded and click the “Go” button.
Step 3: After clicking on the “Go” button a pdf format of the term report of students will be shown on the page for the selected Academic year and Academic session.
Download Marksheet
To download Marksheet of the students the admin/examiner/coordinator have to first Generate Percentage term wise of a student or all students then proceed to the next steps are:
Step 1: After calculating all the term wise Percentage of a student or all students then click on the “launch” Button present on the “Download Marksheet” tab present on the semester page.
Step 2: Select Academic year and Academic session to which Marksheet is to be downloaded and click the “Go” button.
Step 3: After clicking on the “Go” button a pdf format of Marksheet students will be shown on the page for the selected Academic year and Academic session.
Move Students to Next Term
To move students to next term the admin/examiner/coordinator have to first Generate Percentage term wise and Marksheets of the students then proceed to the next steps that are:
Step 1: After calculating all the term wise Percentage and Marksheets of the students then click on the “launch” Button present on the “Move Students to Next Term” tab present on the semester page.
Step 2: Select Academic year and Academic session to which students need to be moved to the next term and click the “Go” button.
Step 3: After clicking on the “Go” button a list of students will be shown on the page for the selected Academic year and Academic session that can be selected and move to next term and then click on the “Move Selected”.
Step 4: After clicking on the “Move Selected” button and dialogue box will open and then select Academic Year, Select Academic Session, and Section. After selection click on the save button.